Free Pattern
Step-by-Step
Crochet
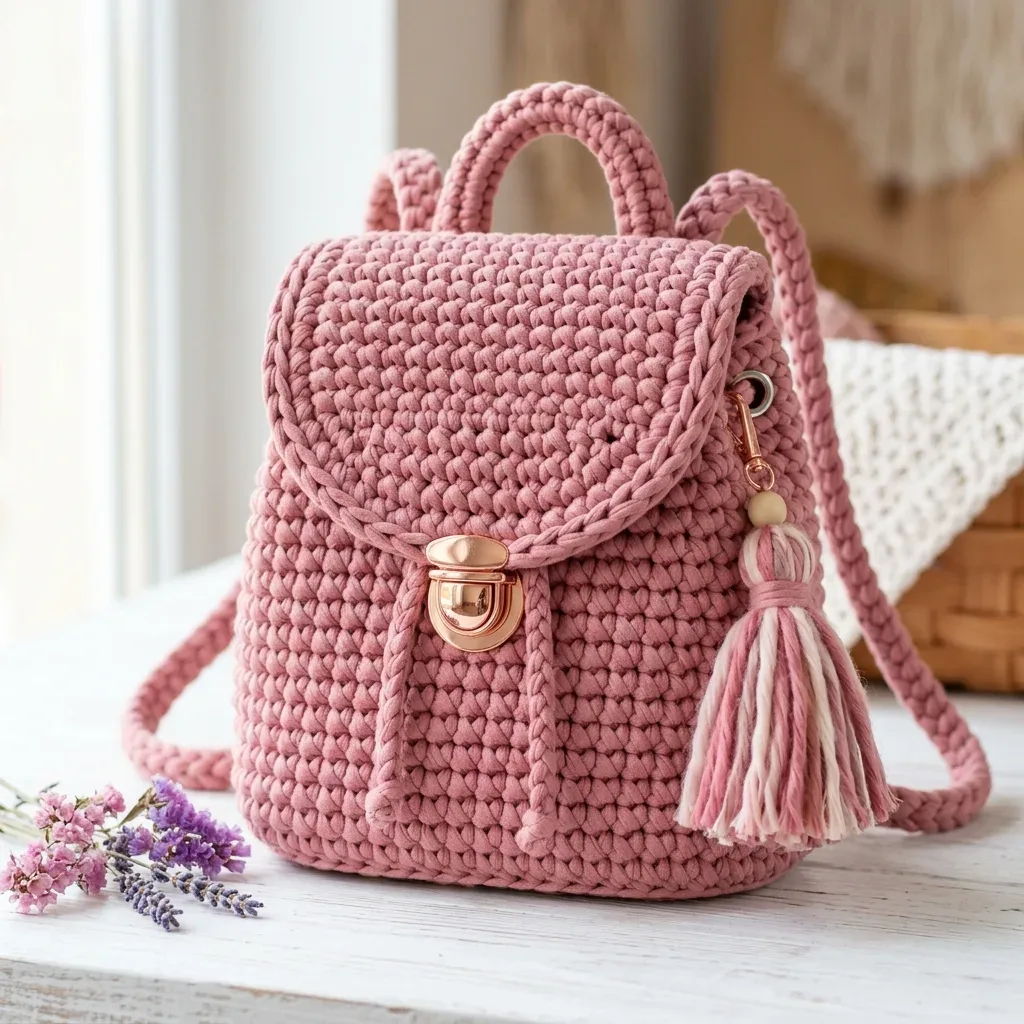
BagsDusty rose mini backpack with corded flap and braided straps
A structured crochet mini backpack built on center single crochet, with a corded flap and braided straps.
- Level
- Intermediate
- Time
- 7-10 hours
- Hook
- 6.5 mm
- Yarn
- Bulky
Pattern highlights
- Crochet the oval base flat, increasing at the ends to build width before turning upward.
- Work the body in continuous rounds of center single crochet to form the dense upright walls.
- Crochet the rounded flap separately in rows, shaping it with decreases at the sides.
- Install the hardware, including the D-rings, side rings, and swivel clasp, into the body.
- Sew the flap to the back top edge, then braid or cord the straps and attach them.
- Make the Romanian cords for the drawstring accents and the curved handle, then sew them in place.
- Close the flap, mark and install the lock, and reinforce it from the inside.
About This Pattern
I keep a small shelf for bag patterns that behave more like carpentry than crochet. This mini backpack earns a spot there. It is not a floppy tote. It has a base, a spine, a closure that actually closes. That is rarer than it should be in this category.
The technique doing the heavy lifting is center single crochet, worked in a continuous spiral from an oval base up through the body. There is also Romanian cording for the drawstring accents and the curved handle, plus hardware set into the sides. Each piece has a job.
What comes off the hook is a 7.5 by 8 by 3.5 inch backpack with a rounded flap, rose gold style hardware, and a soft tassel charm. It sits upright on its own. That alone made me want to make it twice.
Common mistakes
- Skipping the gauge swatch This bag depends on a firm fabric to stand upright, so check both stitch and round gauge before starting. If your swatch feels floppy, go down a hook size.
- Joining rounds that should spiral The base and body are worked in a continuous spiral, not joined rounds. Place a stitch marker and move it up each round so you do not lose track.
- Working the wrong loop on the ridge round The round after the base calls for back loops only to create the defined ridge. Working into both loops there will blur that line between base and body.
- Uneven Romanian cords The drawstring accents and the handle all use Romanian cord at specific lengths. Keep tension consistent across each cord so the pair reads as a matched set.
- Misplacing the lock The lock sits at the front center, measured down from the top edge after the flap is closed. Mark that spot before you install any hardware, not after.
Intermediate
Progress Tracker
0 of 0 rounds
Tap a round to tick it off — your place is saved on this device.
The kit
Yarn
- 130 to 150 yards (119 to 137 meters) of dusty rose bulky cotton tube yarn or smooth chenille cord
- 10 to 15 yards (9 to 14 meters) of cream accent yarn for the tassel
Hook
- US K/10.5 (6.5 mm) crochet hook, or size needed to match gauge
Notions
- Stitch marker
- Tapestry needle
- Sharp scissors
- 2 lower D-rings or grommets
- 2 upper grommets or side rings
- 1 swivel clasp
Yarn Suggestions
- Hoooked Zpagetti Mini or Ribbon XL for a firm cotton tube look
- Bernat Maker Home Dec for a soft but structured cord
- Premier Parfait Chunky for a plush chenille version (line the bag for extra strength)
- When substituting yarn, choose a bulky or super bulky weight that creates a dense fabric at gauge. If your fabric collapses or feels floppy, go down a hook size or plan to add a lining.
Main Pattern
Round 1Single crochet in 2nd chain from hook, single crochet in next 10 chains, 3 single crochet in last chain. Working along the opposite side of the foundation chain, single crochet in next 10 chains, 2 single crochet in first chain. (26 sc)
Round 2Increase in first stitch, single crochet 10, increase in next 3 stitches, single crochet 10, increase in last 2 stitches. (32 sc)
Round 3[Single crochet 1, increase] once, single crochet 10, [single crochet 1, increase] 3 times, single crochet 10, [single crochet 1, increase] 2 times. (38 sc)
Round 4[Single crochet 2, increase] once, single crochet 10, [single crochet 2, increase] 3 times, single crochet 10, [single crochet 2, increase] 2 times. (44 sc)
Main Pattern
Round 1Single crochet in 2nd chain from hook and in each chain across. Chain 1, turn. (20 sc)
Round 2through 5: Single crochet in each stitch across. Chain 1, turn. (20 sc)
Round 6Decrease, single crochet 16, decrease. Chain 1, turn. (18 sc)
Round 7Decrease, single crochet 14, decrease. Chain 1, turn. (16 sc)
Round 8Decrease, single crochet 12, decrease. Chain 1, turn. (14 sc)
Round 9Decrease, single crochet 10, decrease. Chain 1, turn. (12 sc)
Round 10Decrease, single crochet 8, decrease. Do not turn. (10 sc)
Main Pattern
Round 5Working through back loops only, center single crochet in each stitch around. (44 csc)Working in the back loops only creates that nice defined ridge between the base and the body walls.
Round 6through 21: Center single crochet in each stitch around. (44 csc each round)
Round 22Single crochet in each stitch around to firm the top edge. (44 sc)
Round 23Slip stitch loosely in each stitch around. Fasten off, leaving an 18 inch (46 cm) tail for tidying the edge. (44 slip stitches)
Base Checkpoint
Your base should measure about 7.25 by 3.25 inches (18.5 x 8 cm). A slight cup shape is fine and actually helps the bag stand up. However, if you see a strong ruffle, your stitches are too loose. Go down a hook size and try again.
Body Checkpoint
After Round 21, your body should measure approximately 7.5 inches (19 cm) wide at the front and 7.5 to 8 inches (19 to 20 cm) tall from base to top edge.
Flap Edging
Single crochet around the entire flap as follows: 2 single crochet in lower corner, single crochet 8 across lower edge, 2 single crochet in lower corner, single crochet 10 up side, single crochet 20 across top, single crochet 10 down side. Join with slip stitch. (52 sc)
Corded Border
Make a 24 inch (61 cm) Romanian cord and sew it around the outer flap edge, easing it smoothly around the curved portion.
Assembly
Step 1Final Checkpoint: Before calling your backpack complete, check these things: The flap should close without pulling The base should stand flat on a surface The straps should sit evenly from the back lower rings to the upper side rings
Finishing
- Weave in all tails, including the 18 inch tail left after the final slip stitch round, along the inside seams.
- Block the body and flap with gentle steam to firm up the gauge before assembly.
- Sew the flap to the back edge, attach the hardware and straps, then install the lock last.
Why it works
The base starts with increases concentrated at both short ends of the oval, which is what gives the finished shape its length without rounding it into a circle.
The flap is worked flat in rows rather than in the round, since it needs two straight edges and a curved decrease at the tip rather than a continuous surface.
What it becomes
- A day bag for short errands, sized to hold a phone, keys, and a small wallet.
- A going-out bag that pairs well with a plain jacket, since the texture and hardware already do the talking.
- A gift for someone who collects structured bags rather than soft amigurumi.
FAQ
Can I use a different yarn than the bulky cotton tube?
Yes, as long as it is bulky or super bulky and creates a dense fabric at gauge. The notes suggest Bernat Maker Home Dec or Premier Parfait Chunky as alternatives, with lining recommended for the chenille version.
Why does my bag feel floppy even though I followed the stitch counts?
Gauge matters more here than in most patterns, since the structure relies on a firm fabric. If your swatch is loose, drop a hook size or plan to line the bag.
Do I need to join each round?
No. The base and body are worked in a continuous spiral unless the pattern specifically tells you to join. Use a stitch marker to track your round starts.
Can I adjust the strap length?
Yes, the pattern is designed so you set the strap length before your final stitching. Measure against your own fit preference before sewing the straps down.