
Free Pattern
Step-by-Step
Crochet
AmigurumiEasy Crochet Bear Amigurumi Pattern for Beginners
Learn to crochet an adorable bear amigurumi with this beginner-friendly pattern covering legs, body, head, ears, and arms in simple rounds.
Level IntermediateTime 4-6 HoursHook 3.5 mmYarn Worsted
Pattern highlights
- Crochet two identical legs separately, working in rounds and stuffing each one as you go.
- Join both finished legs together in one continuous round to form the base of the body.
- Continue shaping the joined body upward with additional rounds, stuffing firmly as the piece grows.
- Set the body aside and crochet the head separately, working through its shaping rounds.
- Stuff the head fully and close the top securely with a tapestry needle before attaching it to the body.
- Crochet the ears and arms as small separate pieces to prepare them for attaching.
- Sew or glue the ears and arms onto the body and head in balanced, symmetrical positions.
- Finish by embroidering the nose and eyebrows with black yarn to give your bear its expression.
About This Pattern
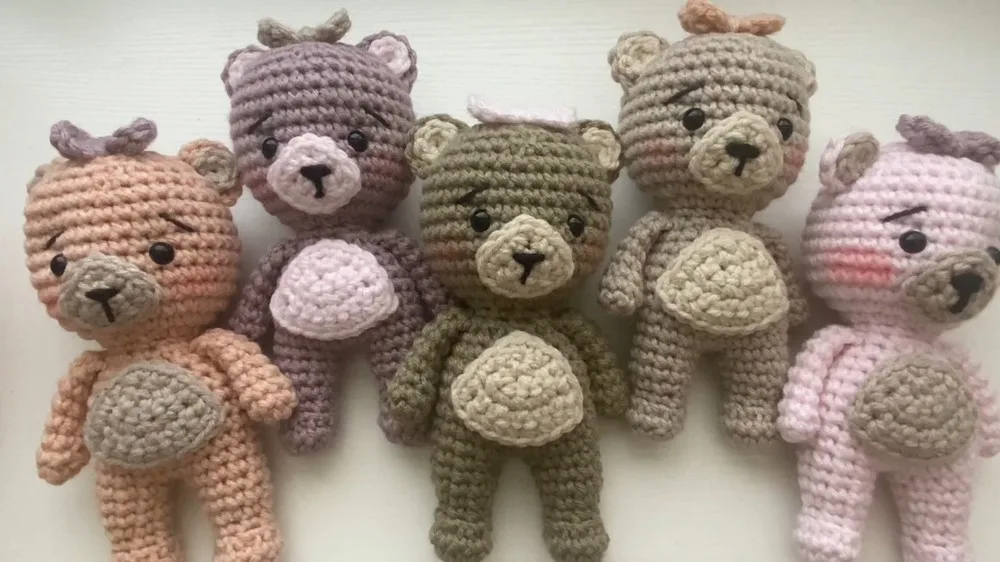
This crochet bear amigurumi is the kind of project that makes you fall in love with the craft all over again. Working from the ground up, you'll build two sturdy legs, join them seamlessly into a rounded body, then top it off with a perfectly proportioned head. It's an ideal pattern for anyone who wants a classic, huggable teddy shape without fussing over complicated shaping or dozens of tiny pieces. Gift-givers, nursery decorators, and yarn stash users alike will find this bear irresistibly satisfying to make.
You'll spend most of your time working single crochet in continuous rounds, with increases and decreases shaping the legs, body, and head into their rounded forms. The Join Legs and Body section is where the magic really happens, transforming two separate leg tubes into one cohesive lower body. Expect a comfortable beginner-to-intermediate skill level here — if you're new to amigurumi, this pattern is a gentle but rewarding introduction, and it typically comes together in a focused afternoon or over a cozy weekend.
When you tie off that last stitch, you'll have a plush, rounded bear with a solid stance thanks to those two-piece legs, a snug little head, and room to personalize with ears, arms, and adorable black-yarn facial details. The finished size depends on your yarn and hook choice, but expect a classic tabletop amigurumi scale — sturdy enough to sit proudly on a shelf, soft enough to snuggle. It makes a heartfelt handmade gift for baby showers, birthdays, or simply because someone you love deserves a little yarn bear of their own.
Variations
There's something so satisfying about watching this bear take shape round by round — starting with two little legs worked separately, then joining them into one solid body in a single continuous piece. I love that the Join Legs and Body section eliminates extra seaming; it's such a clever construction trick that makes the whole project feel more professional. The head comes together quickly in just four rounds, so you get that thrilling moment of seeing 'a bear' emerge pretty fast, which keeps momentum high. Adding the ears, arms, and those sweet black yarn eyebrow and nose details at the end is my favorite part — it's where the bear actually gets its personality and expression. This pattern strikes a lovely balance: enough shaping and technique to keep you engaged, but nothing so fiddly that beginners will feel overwhelmed. Plus, using accessible yarns like Karen One Pound or Hobby Lobby brands means you can start this project today without a special yarn order. It's the kind of make you can pick up during a quiet evening and have real, tangible progress to show for it.
Common mistakes
- Losing track of stitch counts
- Place a stitch marker at the start of every round and count your stitches before moving on — this catches errors early before they compound through multiple rounds.
- Not stuffing the legs firmly enough
- Stuff each leg fully and evenly, pushing stuffing into the toe area first, so the finished bear can stand and the joined body doesn't look lumpy or hollow.
- Leaving gaps or holes where the legs
- Work your stitches slowly through both leg openings, making sure to catch both loops evenly, and consider a quick whip stitch pass afterward to close any small gaps.
- Skipping proper closure at the top
- Cinch the remaining stitches closed tightly using a tapestry needle and weave the tail through several stitches in a circular pattern before trimming for an invisible finish.
- Attaching ears and arms
- Pin or hold the ears and arms in place with stitch markers, then step back and view the bear from multiple angles before sewing them permanently in place.
- Using yarn that's too thin or thick
- Match your yarn weight to your hook size carefully — worsted weight pairs well with a 4mm-5mm hook — and always work a small test round to check your tension before starting the full piece.


Intermediate
Progress Tracker
0 of 0 rounds
Tap a round to tick it off — your place is saved on this device.
Materials
- Karen One Pound yarn or Hobby Lobby yarn in desired colors
- Crochet hook size not specified in the text (common hook sizes for amigurumi include 3.5mm - 5mm depending on yarn weight)
- Stuffing material
- Safety eyes (9mm or similar, though size can vary based on preference)
- Tapestry needle
- Scissors
- Black yarn for nose and eyebrow details
- Glue gun (optional for securing parts)
Legs (Make 2)
- Round 1Start with six single crochets (sc) into a magic circle.(6)
- Round 2Work 2 sc in each stitch around (total 12 sc).
- Round 31 sc in each stitch around (12 sc).(12)
- Round 4Decrease round - single crochet into the first stitch, then work five single crochet decreases (sc2tog), end with 1 sc (7 stitches).(7)
- Round 51 sc in each stitch around (7 sc).(7)
- Round 6Increase round to form the foot - pattern (1 sc, 2 sc in next) around to total 10 stitches.
- Round 7-81 sc in each stitch around (10 sc). Finish one leg and sever the yarn. For the second leg, do not cut the yarn after round 8.
Join Legs and Body
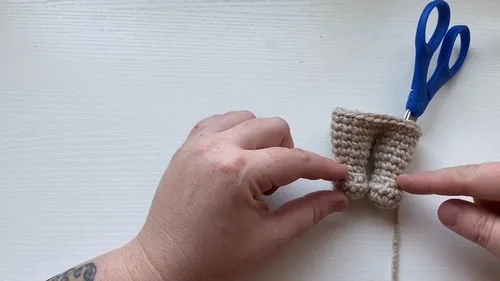
After completing the second leg, perform slip stitches to center the yarn, then chain 2.
Join legs by arranging them correctly and start single crocheting around both legs, which should total 24 stitches.
- Round 10-141 sc in each stitch around (24 stitches). Pause to partially stuff the legs for shaping.
- Round 15(2 sc, sc2tog) repeat pattern around for a total of 18 stitches.
- Round 161 sc in each stitch around (18 stitches).(18)
- Round 17(1 sc, sc2tog) repeat around for 12 stitches.
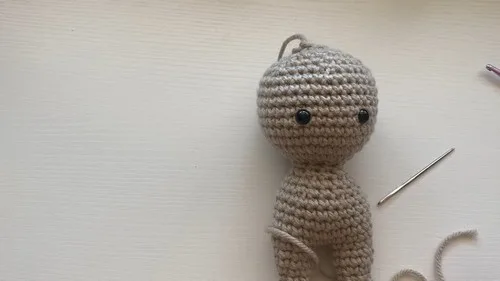
- Round 18(4 sc, sc2tog) repeat to reduce to 10 stitches. Stuff the body firmly.
Head
- Round 19Increase for head by working 2 sc in each stitch around (20 stitches).(20)
- Round 20(1 sc, 2 sc in next stitch) repeat around for 30 stitches.
- Round 21(4 sc, 2 sc in next stitch) repeat around for 36 stitches.
- Round 22-281 sc in each stitch around (36 stitches). Place safety eyes between rounds 6 and 7 of the head, spaced 6 stitches apart. Continue to stuff the head firmly as you go.Rounds 29-30 Rounds 29-30: Begin decreases for the head Continue decreasing as you finish the head, reducing the stitches to close the top. Use a tapestry needle to weave the tail through the last round's stitches and pull tight to close.
Ears, Arms, and Details
Ears and Arms : The method involves creating a curved shape through increases and decreases, then sewing them onto the body. The ears have a two-color design, requiring you to make an inner and outer ear and then attach them together before sewing onto the head.
Nose : Crafted with a few rows, starting with 3 sc into a magic circle, forming a small triangle, and then sewing it onto the face. Stitch over with the black yarn to add detail.
Tummy Patch, Bow/Bow Tie : Construct these separately, then sew or glue onto the bear as desired. The tummy patch is oval-shaped, and the bow is created with chained loops and treble crochets into a magic ring.
Finishing Touches : Add blush to the cheeks, sew or glue on the tummy patch, nose, and bow. Optionally, wrap the yarn around the safety eyes and add a drop of glue for extra security.
Important notes
💡 Since the hook size isn't specified in the original pattern, start with a 4mm hook for worsted weight yarn like Hobby Lobby's I Love This Yarn, then size down to 3.5mm if your stitches look loose or gappy.
💡 Use a stitch marker (a scrap of contrasting yarn works fine) to mark the beginning of each round on the legs, body, and head so you never lose your place during the increase and decrease sections.
💡 Stuff firmly but not overly tight — you want the bear to hold its shape and stand upright without the stuffing showing through the stitches or distorting the rounded silhouette.
💡 When joining the legs and body, leave a long yarn tail so you have plenty of length to close any small gaps at the seam with a few extra whip stitches.
💡 Save your black yarn for last and work the nose and eyebrow details after the head is fully stuffed and closed — it's much easier to gauge placement on a finished, rounded head.
💡 If using a glue gun to attach ears or arms, let each piece cool completely and hold it in place for a few extra seconds to ensure a secure bond that won't pop loose with handling.
More photos
Original pattern: https://crocheteverything.com/easy-to-make-crochet-bear-amigurumi-tutorial-for-beginners/
FAQ
What size hook should I use for this bear pattern since it's not specified?
worsted weight yarn like Karen One Pound or Hobby Lobby yarn, a 4mm hook is a solid starting point. If your amigurumi fabric looks too loose or gaps appear, size down to 3.5mm for tighter stitches that keep stuffing from peeking through.
How much yarn do I need to make one bear?
The exact amount depends on your chosen bear size and yarn weight, but one skein of worsted weight yarn is typically enough for the body, legs, and head, with a small amount of a contrasting or black yarn for the details. It's always smart to have a little extra on hand for the ears and arms.
Can I make this bear without a glue gun?
Absolutely — the glue gun is optional and only suggested for securing smaller parts like ears. You can sew all pieces on securely with a tapestry needle and matching yarn for a fully glue-free, washable finished bear.
Is this pattern suitable for a first-time amigurumi maker?
Yes, this bear is a great choice for beginners since it relies mainly on basic single crochet, simple increases, and decreases across just a few pattern parts. The Join Legs and Body technique is the trickiest step, but it's very manageable with a bit of patience.
How do I make sure my bear can stand up on its own?
Firm, even stuffing in the legs is key — pack the stuffing down into the feet area so there's a solid, weighted base. Making sure both legs are stuffed to the same firmness also helps the bear balance evenly without tipping.