Free Pattern
Step-by-Step
Crochet
Home & KitchenEasy crochet towel holder pattern with wooden ring
A simple single crochet strip that loops through a wooden ring to hold a kitchen towel.
- Level
- Beginner
- Time
- 2-3 hours
- Hook
- 4 mm
- Yarn
- Worsted
Pattern highlights
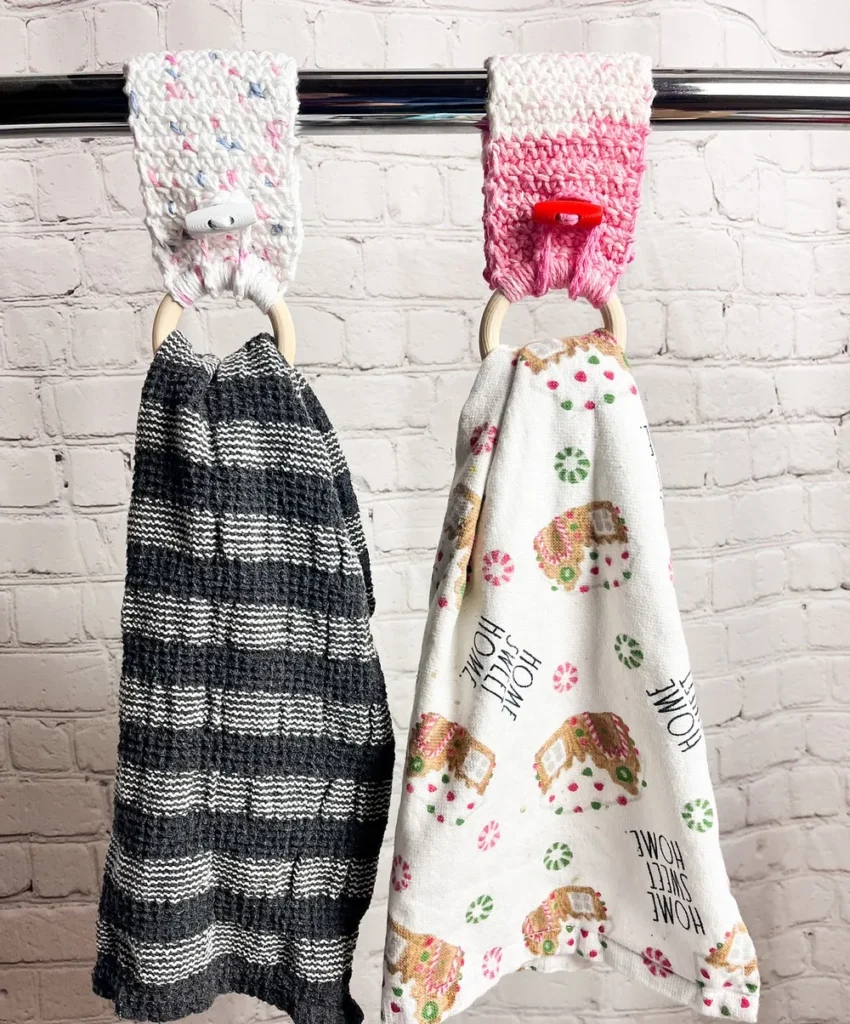
- Chain a foundation and work single crochet around the wooden ring to set the strip's width.
- Work single crochet rows straight up, turning with a chain-1 each time, to build length.
- the last row, stitch partway across, then chain a long loop to form a buttonhole.
- Skip a stitch after the chain, then finish the remaining stitches to complete the row.
- Fasten off cleanly and weave in every loose end so the strip lies flat and neat.
- Sew the button in place a few rows up from the starting edge.
- Slip the wooden ring onto the strip, then loop the buttonhole around the button to close.
About This Pattern
This towel holder sits in the small, useful corner of my collection. It keeps company with dish cloths and pot holders. Nothing flashy, just a strip of cotton crochet with real work to do. I like having quick makes on hand for last-minute gifts. This one takes an evening, not a weekend, and that suits me fine. It fits neatly between bigger projects too.
The whole piece is worked flat, row by row, in single crochet. A chain-1 turn starts each row, and that chain counts as the first stitch. Twenty-seven rows build the length before anything changes shape. The last row does the real trick: a long chain forms a buttonhole loop. It is simple stitching, but the shaping at the end asks for attention.
When it's done, the strip loops through a small wooden ring. A button closes the loop, and the towel hangs neatly through the ring. It's the kind of finished piece that looks tidier than the effort it took. I like that it does one job well: keeping a towel off the counter. It suits a stove handle or a drawer pull just as easily.
This pattern is designed to be simple enough that even beginners can get the hang of it, making crafting this practical item both enjoyable and rewarding. Skill level: Beginner.
Worth knowing
There's something satisfying about straight single crochet rows that don't waver. Twenty-seven rows of the same 11 stitches teach a steady rhythm. I like that the chain-1 turn does double duty as the first stitch. That means I never fuss over an extra one. The real payoff comes on the last row. Four stitches, a chain-18 loop, and five more stitches turn a flat strip into a working buttonhole. Sewing the button in place afterward feels like closing a small loop of logic. It's a short make, but it has a genuine mechanism: ring, loop, button, done. That combination of plain stitching and one clever detail is why I'd make this again.
Common mistakes
- Losing count over 27 rows Count your stitches every few rows. It's easy to drift by one over that many repeats.
- Forgetting chain-1 counts as sc Treat the turning chain as your first stitch, not an extra one. Skipping this throws off the whole count.
- Wrong gauge from hook size Check your swatch against the gauge note before starting. If you get too many stitches in 5cm (2"), change to a larger hook; if you get too few, change to a smaller hook.
- Button placed in wrong spot Measure up from the starting row before sewing the button. It should land between rows 6 and 7.
- Crooked chain-18 buttonhole Count the 4 stitches before the chain and skip only 1 stitch after it. A miscount skews the whole loop.

Beginner
Progress Tracker
0 of 0 rounds
Tap a round to tick it off — your place is saved on this device.
The kit
Yarn
- #4 cotton, 22m - 24yds
- Suggested yarn: Bernat Handicrafter
Hook
- 4 mm crochet hook
Other
- tapestry needle, 2.75” wooden ring, button, scissors
Gauge
- 8 sc and 7 rows = 5cm x 5cm (2" x 2”) 4mm hook
- If you get too many stitches in 5cm (2”), change to a larger hook. If you get too few stitches, change to a smaller hook size.
- For best result, use the same yarn throughout.
Main Pattern
FoundationMake a slip knot and then make 11 sc around the wooden ring. Ch1, turn(11)
Round 11 sc across, turn (11sc)
Rounds 2–27ch1, 1 sc across, turn. (11sc)
Round 28ch1, 1 sc in next 4sc, ch18, skip 1sc, 1sc in next 5 sc (10sc) Finish off, weave in ends.(10)
Assembly
Step 1Sew the button between row 6 and row 7.
Finishing
- Weave in the end left from fastening off after row 28.
- Sew the button between row 6 and row 7, checking it sits centered on the strip.
- Slip the wooden ring onto the strip, then loop the chain-18 buttonhole around the button to close it.
Why it works
The foundation sets 11 single crochet stitches around the wooden ring, then row 1 confirms that count across the row.
Rows 2 through 27 hold that count steady with plain chain-1 turns.
Row 28 skips one stitch to open the chain-18 loop, which drops the count from 11 to 10.
Working every row flat keeps the piece a straight strip. That shape is what lets it wrap around the ring.
What it becomes
- Hang it by the stove to keep a dish towel within reach.
- Loop it onto an oven door handle for quick drying between uses.
- Attach it to a drawer pull or cabinet knob in a laundry room.
Original pattern: https://crocheteverything.com/crochet-kitchen-towel-holder/
FAQ
Can I use a different yarn?
Stick with a #4 cotton like the pattern calls for. Cotton holds up to kitchen use and washes easily.
What size wooden ring do I need?
The pattern uses a 2.75 inch wooden ring. Any craft or hardware store should carry that size.
How long is the finished strip?
Length comes from working all 27 rows before the buttonhole row shapes the end. I didn't measure mine, so go by row count instead.
Can I swap the button for something else?
Any button that fits through the chain-18 loop will work. I'd pick one sturdy enough for daily tugging.