
Free Pattern
Step-by-Step
Crochet
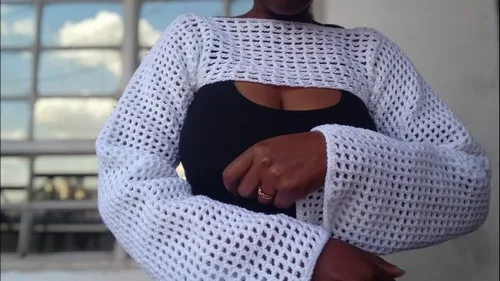
GarmentsFishnet mesh bolero shrug crochet pattern for easy layering
An easy fishnet mesh bolero shrug worked in double crochet spaces with simple set-in sleeves.
- Level
- Beginner
- Time
- 6-10 hours
- Hook
- 4.0 mm
- Yarn
- 4-ply / Fingering
Pattern highlights
- Chain a long foundation row, then build the first mesh row with double crochet stitches spaced by skipped chains.
- Work the offset mesh pattern across several rows until each back panel reaches about six inches.
- Make two matching panels since the shrug is built from a mirrored pair joined later.
- Seam the two panels together at the top edge, skipping spaces to leave the neckline open.
- Join yarn at each armhole and crochet the sleeves in the round using the same mesh spacing.
- Continue the sleeve mesh until it reaches the desired length, about twenty-four inches in the sample.
- Finish each cuff with single crochet around the edge, then repeat the whole sleeve process on the other side.
About This Pattern
A fishnet bolero sits in the open-weave corner of my collection, next to the summer wraps and lace vests. It's not a piece for warmth. It's a piece for texture, the quick layer you throw over a tank top when the evening cools but you still want bare arms. I keep coming back to mesh shrugs like this one because they use so little yarn and still read as a finished garment.
Finished, it's two mesh panels seamed at the shoulders with a gap left open for the neck, sleeves added afterward and finished with a plain single crochet cuff. The whole thing drapes rather than clings, which is the point of an open weave. It reads as effortless, though every offset chain space took a little counting to keep straight.
Worth knowing
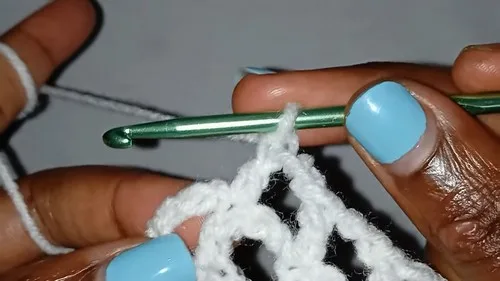
What I like about this bolero is how the mesh does all the visual work. Alternating double crochet and chain-2 spaces across the back panel rows builds a diamond lattice without any fancy stitch names. The sleeves are worked in the round straight from the armhole, so there's no separate sleeve cap to set in, one less seam to fuss over. Making two identical back panels forces a kind of discipline; row counts have to match or the drape goes lopsided. And the size-based underarm join, direct for small, chained for medium through extra-large, is a small detail that shows someone thought about ease before writing the pattern. It's a fast make with a big payoff: an airy layer for barely any yarn.
Common mistakes
- Losing track of chain-2 offsets Count spaces before starting each new row. The diamond pattern only holds if the offset stays consistent.
- Treating sleeves like flat rows Remember sleeves join with a slip stitch in the round, not turn like the back panels, or the mesh will spiral.
- Skipping the size-specific underarm join Check whether you're making a small or a medium-through-XL before joining underarm, since the join differs by size.
- Uneven panel lengths Measure both back panels against each other, not just against the target length, so the shrug hangs even.
- Neck opening cut too tight Skip the full three spaces at the top when seaming, or the neckline will sit too close to the throat.


Beginner
Progress Tracker
0 of 0 rounds
Tap a round to tick it off — your place is saved on this device.
The kit
- 4-ply acrylic yarn
- 4.0 mm crochet hook
- Foundation chain of 64 stitches measuring about 14 inches
Main Back Panel (Make Two)
Row 1Double crochet in the 7th chain, chain 2, skip 2, DC in 3rd chain, repeat across
Row 2Chain 4, DC in first DC, chain 2, DC in next DC, repeat across, finish with DC in turning chain
Row 3Chain 4, DC in first DC, chain 2, DC in next DC, repeat, finish with DC in turning chainRepeat Row 3 until panel measures 6 inches (around 13 rows total)
Top Part Extension
Attach yarn at top edge, chain 4
Row 1DC in base stitch, chain 2, DC in next DC, repeat acrossRepeat for 4 rows of extensionRepeat on opposite side
Creating the Armholes
Size Small For size small, join underarm directly
Size Medium-XL For medium to XL, chain 3 and slip stitch to create space
Fasten off and repeat on other side
Sleeves
Row 1Attach yarn to armhole, chain 3, DC in next DC, chain 1, DC in next DC, repeat aroundJoin with slip stitch to starting chain Continue repeating for desired length (about 55 rows = 24 inches)Cuff: Work SC around sleeve edge, SC in each DC and chain space, join with slip stitch, fasten off and weave ends
Assembly
Step 1Place panels together, skip 3 spaces at top for neck opening
Step 2Single crochet seam along edge through both layers
Step 3Make 2 SCs in last chain space, chain 1, fasten off
Step 4Repeat for other side
From the collection

Finishing
- Seam the two back panels together with single crochet, skipping three spaces at the top for the neckline.
- Work a single crochet edge around each sleeve cuff, join with a slip stitch, then fasten off.
- Weave in every loose end from panels, sleeves and cuffs, then steam the mesh gently to even the spaces.
Why it works
The mesh spacing offsets by one stitch each row, so double crochets land over the chain-2 gap below and build a diagonal grid.
Underarm construction changes by size: small sizes join directly, medium through extra-large add a chain-3 space for extra room.
What it becomes
- Layer it over a fitted tank for a casual look with jeans or a midi skirt.
- Throw it over a sundress for an evening out when the mesh adds texture without heat.
- Wear it over a simple cami for the office, paired with tailored trousers.
Original pattern: https://crocheteverything.com/crochet-fishnet-bolero-easy-shrug-pattern-for-stylish-ladies/
FAQ
How long should I make the sleeves?
The sample sleeve runs about fifty-five rows to reach twenty-four inches, but the pattern lets you stop whenever the length suits you. Try it on as you go, since mesh stretches once worn.
Why does the underarm join differ by size?
Smaller sizes join directly because there's less ease needed under the arm. Medium through extra-large chain three stitches and slip stitch to add a little room for movement.
Do the two back panels really need to match exactly?
Yes, since they're seamed together at the shoulder and mirror each other across the neckline. Keep an eye on row count on both panels so the finished bolero hangs evenly.