
Free Pattern
Step-by-Step
Crochet
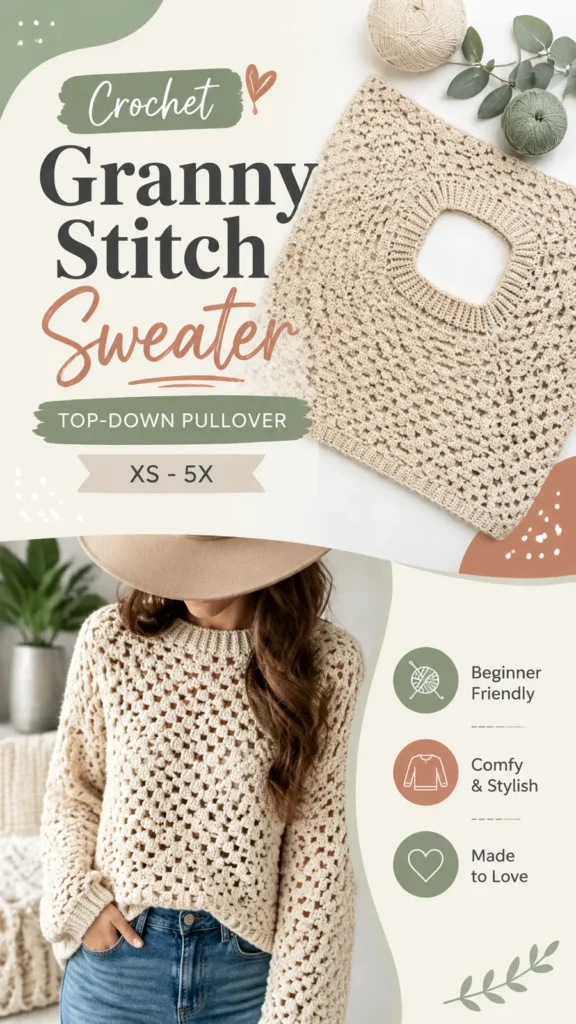
GarmentsGranny cluster raglan pullover sweater pattern
A top-down granny cluster sweater worked in joined rounds, no square assembly required.
- Level
- Intermediate
- Time
- 4-6 hours
- Hook
- 5 mm
- Yarn
- Worsted
Pattern highlights
- Chain and join a ring, then work the first round of double crochet to set the stitch count.
- Place markers at four points and increase at each one every other round to shape the raglan yoke.
- Keep working increase rounds until the yoke reaches the depth called for in the pattern.
- Separate the sleeve stitches onto holders and join the body with underarm chains.
- Work granny cluster rounds around the body until it reaches the length called for.
- Return each sleeve's stitches to the hook and work granny clusters down to the cuff length.
- Finish the hem and both cuffs with rounds of alternating front and back post double crochet ribbing.
About This Pattern
I keep a shelf for garments that borrow a motif's look without its assembly headache. This sweater belongs there. It takes the granny square's familiar open texture and spreads it across a panel instead of dozens of joined pieces. For anyone tired of weaving in square after square, it is a relief.
The build is a top-down raglan, which means no separate pieces to sew together later. Increases land at four marked points, the yoke grows in joined rounds, and then body and sleeves split off to be finished on their own. The granny clusters themselves are just groups of double crochet worked into chain spaces.
What comes off the hook is a lightweight pullover with dropped sleeves and ribbed cuffs. It reads as handmade without looking fussy. The open clusters keep it breathable, and the ribbing gives it a tidy, wearable finish at the wrists and hem.
This pattern is written for confident beginners and sized from XS through 5X, with a finished bust of approximately 42 inches (106 cm) for a medium. Gauge is 14 double crochet stitches and 8 rows = 4 inches (10 cm), using approximately 1,800 yards (1,646 meters) of worsted weight yarn for a medium. Always check your gauge before beginning a crochet garment, since small changes in stitch size can significantly affect the final fit, especially around the neckline, shoulders, and sleeves. This pattern is written using US crochet terms.
Common mistakes
- Uneven yoke shaping Check that all four raglan increase points are placed evenly.
- Loose or tight fabric Adjust your hook size if your gauge does not match.
- Wavy neckline Use fewer increase stitches around the collar edge.
- Sleeves feel narrow Add additional rounds before beginning the cuff.


Intermediate
Progress Tracker
0 of 0 rounds
Tap a round to tick it off — your place is saved on this device.
The kit
- Worsted weight yarn in one main color or multiple coordinating colors, approximately 1,800 yards (1,646 meters) for size medium
- 5 mm crochet hook (US H-8)
- Scissors
- Tapestry needle
- Stitch markers
- Measuring tape
Main Pattern
The sweater is constructed from the neckline downward in joined rows. The yoke begins with increases placed at four raglan points, creating the shoulder shaping. Once the yoke reaches the correct depth, stitches are divided into the body and sleeves. The body continues in rounds, while the sleeves are worked separately before adding ribbed edges.
The main texture is created with granny clusters made from groups of double crochet stitches separated by chain spaces. This creates small openings throughout the fabric while keeping the garment soft and flexible. The ribbed edging uses front post and back post double crochet stitches to create stretch around the hem, cuffs, and neckline.
The sweater is worked from the neckline down. Turning chains do not count as stitches. Join each round with a slip stitch unless instructed otherwise.
FoundationChain 72. Join with a slip stitch to form a ring, making sure the chain is not twisted.
Round 1Ch 2, dc in each chain around. Place markers after every 18 stitches to mark four raglan points. Join. (72 dc)
Round 2Ch 2, work dc until 1 stitch before marker, increase by working 2 dc in next stitch, dc in marked stitch, work 2 dc in next stitch. Repeat at all four markers. Join. (80 dc)
Round 3Ch 2, dc across each section, increasing at each raglan corner as established. Join. (88 dc)Repeat Round 3 until yoke measures approximately 9 inches (23 cm) from neckline.
Body Section
Separate sleeve stitches and place them on stitch holders or scrap yarn.
Join front and back sections with a chain of 6 under each arm.
Round 1Work granny clusters around the body, placing 3 dc clusters into chain spaces and maintaining the stitch pattern. Join.Repeat the granny stitch round until the body measures approximately 18 inches (46 cm) from shoulder.Finish with 6 rounds of ribbing using alternating front post dc and back post dc stitches.
Sleeve Instructions
Return sleeve stitches to the hook.
Round 1Attach yarn under arm and work granny clusters evenly around.Continue working granny stitch rounds until sleeve measures 16 inches (41 cm).Work 6 rounds of ribbing with alternating front post dc and back post dc stitches.Fasten off and repeat for the second sleeve.
Neckline Finishing
Round 1Join yarn at the neckline edge and work one round of single crochet evenly around.Add one additional round if a thicker neckline finish is desired.Fasten off and weave in all ends.
Special Stitch
Granny Cluster: Work 3 dc into the indicated chain space.
Granny Repeat: Skip the next 3 stitches, work 3 dc into the next space. Repeat as instructed.
Assembly
Step 1After completing the sweater, gently block the finished garment to help the granny stitch pattern relax and create an even appearance. Lay the sweater flat, shape the neckline and sleeves, and allow it to dry completely.
Step 2Pro Tip: Wash a small yarn sample before beginning your sweater. Some fibers relax or grow after washing, and knowing this beforehand helps you create a better-fitting handmade garment.
Step 3Store the sweater folded rather than hanging to help maintain its shape. Follow the yarn label recommendations for washing and drying.
Finishing
- Weave in every yarn end from color changes and the underarm joins with a tapestry needle.
- Block the finished sweater flat, shaping the neckline and sleeves before it dries.
- Fold the sweater for storage rather than hanging it, so the granny texture keeps its shape.
Why it works
Increases happen only at the four marked raglan points, which is what forms the diagonal shoulder lines.
The underarm chain of six bridges the gap left when sleeve stitches are set aside, joining front and back into one body round.
Sleeves are worked separately from the body after the split, which lets each piece be sized without affecting the other.
Contrasting yarn colors can be used to highlight the granny stitch texture, since the clusters and chain spaces show color changes clearly.
What it becomes
- An everyday pullover layered over a tank top or thin long-sleeve tee.
- A lightweight spring layer in a cotton blend, worn open over a dress.
- A warmer autumn sweater in washable wool blend, paired with jeans and boots.
Original pattern: https://duniarecipe.com/easy-crochet-granny-square-sweater-pattern-cozy-handmade-pullover-tutorial/
FAQ
Can I use multiple colors for this sweater?
Yes, the materials list allows one main color or several coordinating colors. The granny clusters make color changes at round joins fairly unobtrusive.
Why is the yoke worked in joined rounds instead of turned rows?
Joined rounds keep the raglan increases symmetrical at all four marker points at once. Turning would break the continuous spiral the raglan shaping depends on.
What happens to the sleeve stitches after the yoke?
They get set aside on stitch holders or scrap yarn when the body and sleeves separate. Each sleeve is then returned to the hook and worked on its own.
Do I need to block this sweater before wearing it?
Yes, blocking helps the granny clusters relax into an even, open pattern. Lay it flat, shape the neckline and sleeves, and let it dry fully.