Free Pattern
Step-by-Step
Crochet
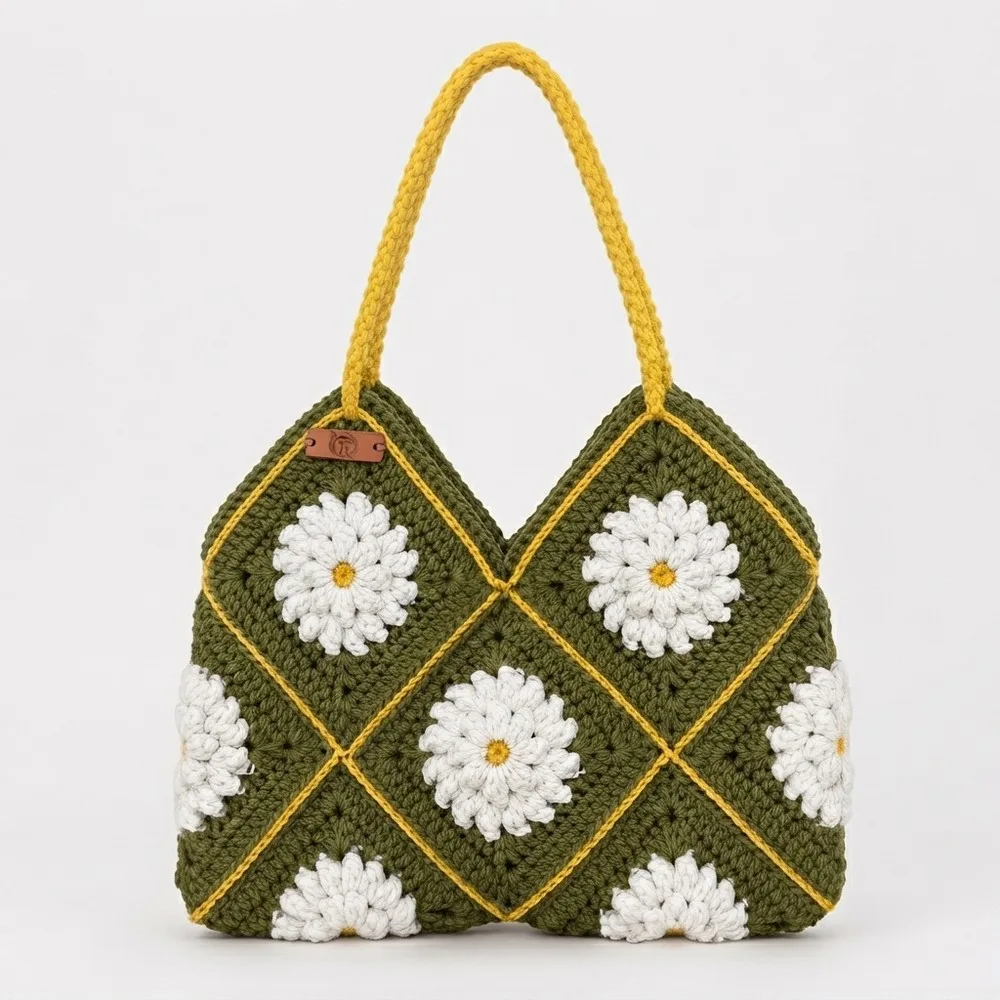
BagsGranny square crochet bag with popcorn stitch detail
A ten-square granny bag pattern joined flat, with popcorn stitch rounds and a Romanian cord handle.
- Level
- Intermediate
- Time
- 4-6 hours
- Hook
- 3.5 mm
- Yarn
- Worsted
Pattern highlights
- Work ten identical granny squares, each starting from a magic ring and building popcorn rounds outward.
- Keep corner increases consistent across all ten squares so the panel edges match when joined.
- Join the finished squares edge to edge using the flat slip stitch method for a smooth seam.
- Fold the joined panel along its seams to form the bag's peaks and valleys.
- Work a single crochet border around the top opening, decreasing at the edges as you go.
- Finish the border with a decorative slip stitch round for a clean edge.
- Attach the Romanian cord handle to the top corners to complete the bag.
About This Pattern
This one lives in the motif drawer of my notebook, the section for pieces built from repeated squares rather than one continuous spiral. Ten granny squares, joined flat, folded into shape. I like patterns that ask a stitch to do double duty — here it is both surface texture and structural unit.
The technique list is short but not casual: magic ring starts, a popcorn stitch worked as five double crochets clustered per stitch, chain-2 spacing, and corner increases that keep each square flat. The join is flat slip stitch, chosen for a seam that lies smooth rather than ridged.
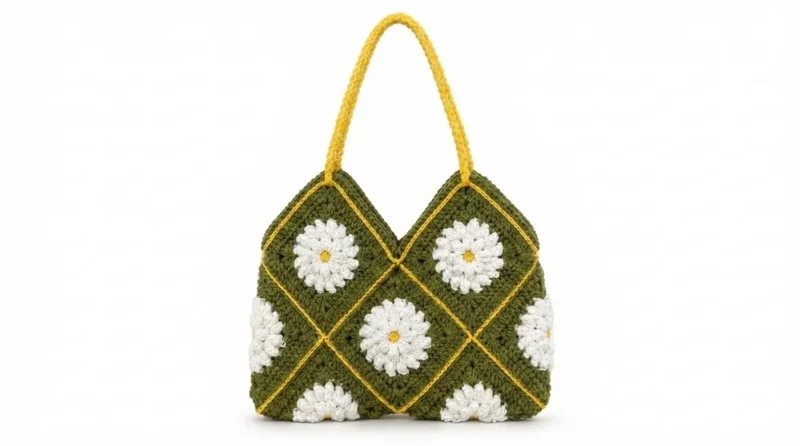
The finished object is a bag, 25 to 30 cm wide and 20 to 25 cm tall before the handle. Yellow and white popcorn rounds sit against a green base, edged in single crochet with decreases and topped by a 25 cm Romanian cord handle.
Worth knowing
The satisfaction here is in the popcorn stitch — five double crochets clustered into one bump, repeated across every square until the surface reads as texture rather than individual stitches. It's slow work but rhythmic once the sequence sets in. The flat slip stitch join rewards patience too: ten squares laid edge to edge, seamed so the join disappears rather than ridges. I like that the folding isn't an afterthought — the pattern plans for peaks and valleys from the start, so the bag shape emerges from the panel rather than being sewn onto it after. The Romanian cord handle is a nice change from a plain chain strap. Small detail, but it changes how the whole thing feels in hand.
Common mistakes
- Uneven popcorn stitches Keep all five double crochets in each cluster the same height before closing it off. A loose one flattens the texture.
- Chain-2 spaces stretched too wide Check spacing against an earlier round before moving on. Wide gaps throw off the corner shaping.
- Inconsistent square sizes Block all ten squares to the same dimensions before joining. Even a small mismatch shows in the seams.
- Sloppy flat slip stitch join Work the join loosely enough to lie flat, not so tight it puckers the seam. Test on two squares first.
- Handle attached off-center Measure both top corners before securing the Romanian cord. An uneven handle throws the whole bag off balance.
Intermediate
Progress Tracker
0 of 0 rounds
Tap a round to tick it off — your place is saved on this device.
The kit
Yarn in three colors
- Yellow, White, and Green; cotton or cotton blend recommended for stitch definition and durability.
- Crochet hook suitable for yarn weight (suggested size 3.5 mm to 4.5 mm).
- Yarn needle for finishing and joining ends.
Blocking tools
- pins and flat surface.
- Scissors.
- Measuring tape or ruler.
Granny Square Pattern
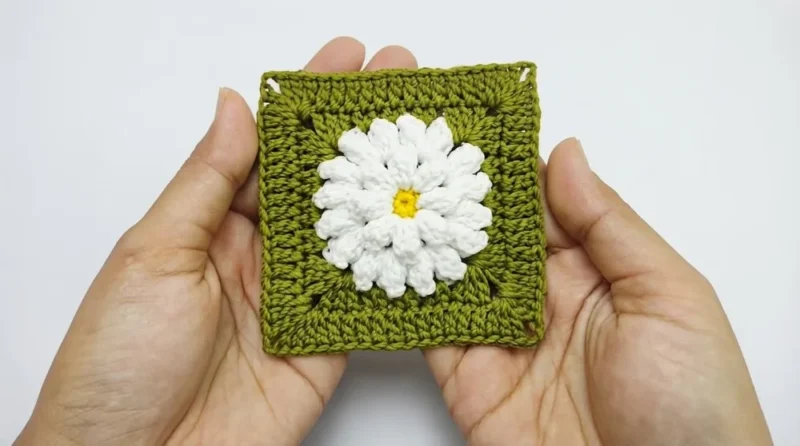
Round 1Yellow Begin with a magic ring (MR) . Work 8 single crochets (sc) into the ring.Join with slip stitch (sl st) to the first sc to close the round, forming a tight, neat center.
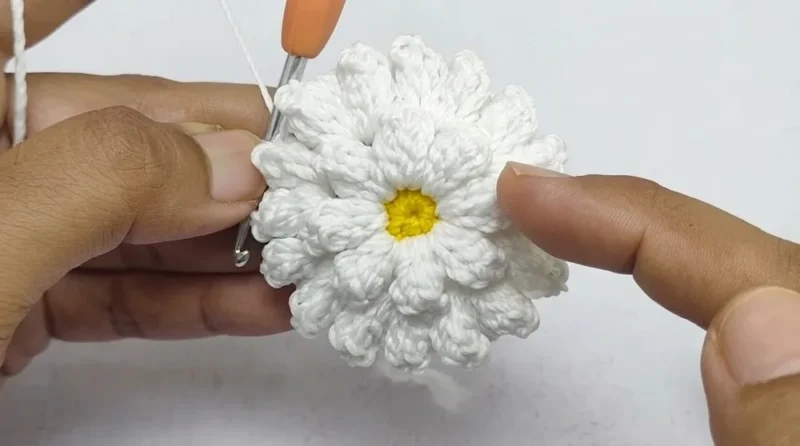
Round 2White Work around each sc of Round 1: In each sc stitch, create a popcorn stitch (5 double crochets clustered).Follow each popcorn with a chain 2 space.Repeat this sequence 8 times total around.Popcorn stitch: work 5 double crochets (dc) into the same stitch or space. Remove the hook from the last loop, insert it into the first dc of this cluster, yarn over, and pull the loop through to close the cluster, creating a raised popcorn effect.
This builds a textured floral petal effect.
Round 3White Work in the 2-chain spaces from Round 2 . In each 2-chain space, work two popcorn stitches separated by 2 chains .This results in 16 popcorn stitches in total, doubling the texture and petal count.
Round 4Green Begin in one of the 2-chain spaces from the previous round. Work 3 double crochets (dc) in the starting 2-chain space to form the corner’s beginning.For the next three 2-chain spaces on each side, work 2 half double crochets (hdc) in each space.Continue this corner pattern all around: 3 dc, chain 1, 3 dc to form the four square corners.
This creates the geometric edge necessary for bag assembly.
Round 5Green Chain 3 to start (counts as first dc). Work 1 dc in each stitch across the side edges.In the corner chain spaces, work 3 dc, 2 chains, 3 dc for corner shaping.Finish the round with a slip stitch to join.This round finishes the square with even edges and defined corners necessary for joining.
Step 2: Assembly Blocking Block all 10 granny squares to ensure they are flat and uniformly sized.
Pin the squares and lightly mist or steam according to your fiber’s care instructions to straighten edges.
Allow fully to dry before joining.
Layout Arrange your 10 blocked squares in the following layout: 2 squares in the first row , 3 squares in the second row ,
2 squares in the third row , 1 square in the fourth (center) row , and 2 squares in the fifth row .
This layout yields an aesthetically pleasing, floral-inspired bag shape.
Joining (Yellow)
Using yellow yarn, join the squares with the flat slip stitch technique:
Work slip stitches through one strand of the corresponding edge stitches from each adjoining square pair.
This method produces flat, durable seams with minimal added thickness, perfect for bags.
Continue joining until all squares are connected in the arranged configuration.
Step 3: Finishing the Bag Structure
Fold the assembled piece to create the bag’s body shape, aligning the peak points of the assembled squares thoughtfully to form structural triangles and valleys.
Ensure the shape is balanced and the corners meet neatly.
Top Border (Green)
Work 1 round of single crochet (sc) evenly around the top edge of the bag to create a solid border.
At the peaks and valleys (corners where the squares join), use a 3-single crochet decrease to shape the border smoothly, avoiding bunching and maintaining pleasing curvature.
Decoration (Yellow)
Add a final decorative round by working slip stitches around the top edge, slipping through the double crochet spaces from the previous rounds.
This detail adds visual interest and a polished finish.
Handle (Romanian Cord)
Create a Romanian cord handle approximately 25 cm long: crochet a narrow, sturdy cord using a combination of chains and slip stitches or single crochets for solidity and flexibility.
Sew the handle securely to the top peaks of the bag to support weight and maintain aesthetic balance.
Assembly
Step 1The complete bag stands approximately 25 to 30 cm wide and 20 to 25 cm tall excluding the handle.
Step 2Handle length provides a comfortable hand or shoulder carry option depending on personal preference.
Step 3The textured granny squares create a robust yet lightweight construction that maintains form thanks to neat joins and solid edging.
From the collection
Finishing
- Weave in every yarn end from the color changes between squares before joining.
- Block the joined panel on a flat surface with pins so the folds sit evenly.
- Attach the Romanian cord handle to the top corners once the border and edging are complete.
Why it works
Each square starts with 8 single crochets into a magic ring, giving every motif the same center before the popcorn rounds build outward.
Popcorn stitches are separated by chain-2 spaces, which is what lets each round expand into the flat, corner-shaped square rather than curling.
The flat slip stitch join keeps the seam between squares low-profile, which matters once the panel is folded into a bag shape.
Each granny square measures about 9 cm by 9 cm after blocking, and gauge runs roughly 9 cm per completed square with the suggested hook and yarn — swatch first, since tension changes the final bag size.
Corner stitch patterns in Rounds 4 and 5 need close attention — that's where each square's geometry locks in before joining, so uneven corners there throw off the whole panel.
The Romanian cord handle gives the bag its firm support and distinctive look, though it can be substituted for another handle style if preferred.
What it becomes
- An everyday market bag, sturdy enough for grocery shopping and light enough to carry all day.
- A casual accessory for meeting friends, paired with simple cotton separates so the texture stands out.
- A handmade gift, given as a practical bag or bundled with a small yarn stash for the receiver.
Original pattern: https://redagapeblog.com/how-to-crochet-stylish-granny-bag-free-pattern/
FAQ
Can I use a different yarn weight than what's listed?
The pattern calls for cotton or a cotton blend for stitch definition. A different weight will change the finished bag's size, so check your gauge against the suggested hook range of 3.5 mm to 4.5 mm.
Why does the join have to be flat slip stitch specifically?
That join keeps the seam low and smooth, which matters once the panel folds into the bag's peaks and valleys. A bulkier join would show under the fold.
Do all ten squares need to be identical?
Yes — consistent size and shaping across all ten squares is what lets the panel fold cleanly into the bag form. Blocking each one to match helps.
Is the popcorn stitch difficult for a newer crocheter?
It's listed as an intermediate skill for a reason — five double crochets clustered takes a bit of practice. Once the rhythm sets in across the first square, it goes faster.