
Free Pattern
Step-by-Step
Crochet
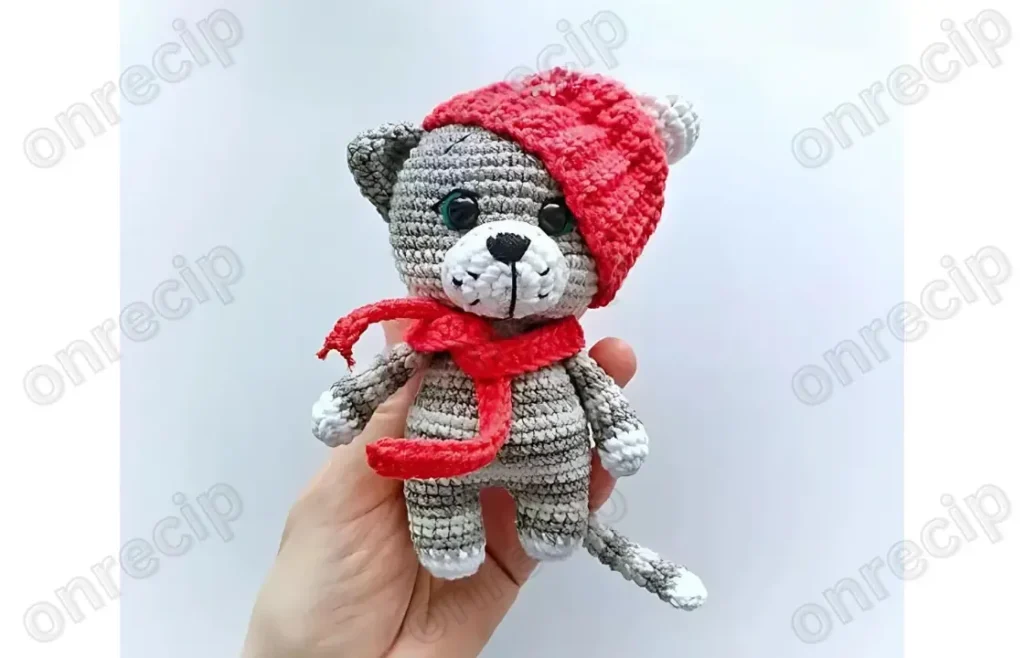
AmigurumiA gray and white cat amigurumi with striped arms
A small crocheted cat with striped arms, a two-tone head, and a muzzle sewn on after.
- Level
- Intermediate
- Time
- 5-7 hours
- Hook
- 2.5 mm
- Yarn
- Sport
Pattern highlights
- Begin the head with a magic ring, then increase steadily until the sides reach their fullest point.
- Crochet both legs separately, then keep the yarn live on the second leg to continue straight into the body.
- Work the tail as a flat panel instead of in rounds, then sew its long edges together.
- Finish with a white muzzle, dark gray ears, and embroidered brows, nose, and spots for the face.
About This Pattern
A cat like this earns a place on the amigurumi shelf, beside the bears and lopsided owls. It's a single build, not a kit, so it asks for an afternoon rather than a weekend. The gray and white palette keeps it quiet beside louder toys. I like that the ears are a separate color, dark gray against a lighter head.
Every main piece starts the same way, with a magic ring pulled tight before the increases begin. The head grows through steady single crochet increases, holds its width for many rounds, then decreases back down. The arms pick up a second color partway up, and the tail is worked flat, not in rounds. Legs are made separately, then the yarn carries straight into the body without a break.
What comes off the hook is a small stuffed cat, built from separate pieces joined after. The head carries two colors, the arms show a stripe, and the legs flow into the body. A seamed tail, a white muzzle, and dark ears finish the face and the back. Eight-millimeter eyes give it the look it's going for, somewhere between a cat and a plush toy.
Worth knowing
The satisfaction here is in the shaping, not the finishing. Watching sc increases turn a flat ring into a round head feels like a small trick every time. The arms add a second thrill, a clean color change mid-round with no visible jog. Decreasing the head after the long plain stretch is where the shape finally reads as a face. I like that the tail skips rounds entirely, worked flat, then seamed into a tube. It's a different kind of problem to solve than the rest of the pieces. By the time the muzzle and ears go on, the cat already looks finished. So the face details feel like a reward, not a chore.
Common mistakes
- Losing count through the increases Check your stitch count against the written total at the end of each round. A single missed increase throws off every round after it.
- Fastening off the second leg too soon Leave the yarn attached after the second leg since the body continues straight from it. Cutting it just means rejoining yarn you didn't need to break.
- Tail panel curling before seaming The tail is worked flat, not in rounds, so it wants to curl until it's seamed. Sew the long edges together as soon as you finish the panel.
- Overstuffing the arms The arms only need stuffing halfway, per the pattern. Packing them too full stiffens the bend where the color change sits.


Intermediate
Progress Tracker
0 of 0 rounds
Tap a round to tick it off — your place is saved on this device.
The kit
- Hook 2-2.5 mm
- Eyes for toys 8 mm
- Toy stuffing
- Sewing needle
- Scissors
Head
Round 17 KA 2nd row. increases 14 sc 3rd row. (1 sc, inc) x 7 = 21 sc 4th row. (2 sc, inc) x 7 = 28 sc
Round 5(3 sc, inc) x 7 = 35 sc 6th row. (4 sc, inc) x 7 = 42 sc 7th row. (5 sc, inc) x 7 = 49 sc8th-18th row. no changes (49)Switch to light gray yarn.
Round 19(5 sc, dec) x 7 = 42 sc 20th row. (4 sc, dec) x 7 = 35 sc 21st row. (3 sc, dec) x 7 = 28 sc
Round 22(2 sc, dec) x 7 = 21 sc 23rd row. Randomly make 3 decreases per row. 18 sc Eyes between rows 12-13. Distance 5 full sc between them.
Arms (2 pieces, crochet in two-row color stripes)
Make 2Round 16 KA 2nd row. increases 12 sc 3rd row. 12 sc, color change on the last sc to dark gray
Round 4no changes 5th row. 2 dec, 8 sc, 10 sc 6th-14th row. no changes Stuff the arm halfway. Leave a tail for sewing or crochet it in.
Legs + body Crochet the leg:
Round 16 KA 2nd row. increases 12 sc 3rd row. (sc, inc) x 3, 6 sc = 15 sc 4th-7th row. no changes (15)Fasten the yarn, cut it. Crochet the second leg the same way. Don’t cut the yarn after the second leg. Continue:
Round 1Crochet 4 ch, join with the second leg using sc. You should have (37 sc) around.
Round 24 sc, inc, 2 sc, inc, 16 sc, inc, 2 sc, inc, 10 sc = 42 sc 3rd-8th row. no changes
Round 9(5 sc, dec) x 6 = 36 sc 10th row. no changes (36)
Round 11(4 sc, dec) x 6 = 30 sc 12th-13th row. no changes (30)
Round 14(3 sc, dec) x 6 = 24 sc 15th row. no changes 16th row. (2 sc, dec) x 6 = 18 sc 17th row. no changes. Attach arms at the sides.
Round 18no changes (18)Leave a tail for sewing the head.
Tail
Round 18 KA 2nd-20th row. (8 sc) Sew the edges, leave a tail for sewing. Or crochet it in at row 5. I sewed mine slanted.
Face details I sewed the ears randomly, one ear slightly to the side, the other straight.
Embroider the brows. I made the eyes green (highlight).
Embroider the nose and spots.
Sew the muzzle under the eyes.
Did a small classic eye indent (if you don’t know how, you can look it up online).
Hat and scarf The hat is the simplest, a classic crochet style. Crochet through the back loop only.
Chain 16 ch.
Round 1start in the 2nd chain: 10 sc, sl st (5 chains remain), ch, turn. 2nd row. sl st, 10 sc, ch, turn.
Round 311 sc, 2 sl st, ch, turn. (2 sc remain) 4th row. sl st, 12 sc, ch, turn. 5th row. 13 sc, 2 sl st, ch, turn.
Round 6sl st, 14 sc, ch, turn. (15 sc) This was the first wedge; if you crocheted through the back loop, you should have 3 raised rows. Repeat the pattern until the hat fits the cat’s head.
Your crocheted cat is ready!
Please tag the author on social media @keti_amigurumi.
Author: Ekaterina Krikun / translated by onrecip Enjoy!
Muzzle (white yarn)
7 KA 14 sc, increases (1 sc, inc) x 7 = 21 sc 4-5. no changes (21)
Leave a tail for sewing.
Ears (2 pieces, dark gray yarn)
Make 26 KA (sc, inc) x 3 = 9 sc (2 sc, inc) x 3 = 12 sc (sc, inc) x 6 = 18 sc 5-6. no changes (18)
Leave a tail for sewing (sew the ears on both sides).
Finishing
- Stuff the head firmly before closing the last decrease rounds, so the shape holds once seamed.
- Sew the muzzle on first, under where the eyes will sit, before adding other face details.
- Attach the ears at slightly different angles, and sew the tail on with a slant.
Why it works
The head's increases stop well before the color change, so light gray only covers the decrease rounds.
The arm's color change happens on one stitch, right before the hand decreases begin.
Both legs are crocheted first, then the yarn stays live for the body to follow.
What it becomes
- A shelf piece next to other amigurumi animals, where its gray and white palette won't clash.
- A handmade gift for someone who likes cats more than they like wrapping paper.
- A desk companion that sits well beside a small crocheted mug or plant, if you've made those too.
Original pattern: https://onrecip.com/free-crochet-cat-amigurumi-pattern/
FAQ
Why does the head change color partway through?
The light gray only appears on the decrease rounds, once the back of the head starts shaping. It's a quick way to suggest shading without extra embroidery.
Do the legs and body use the same yarn?
Both legs are crocheted first, then the body continues straight from the second leg's yarn. That join is what starts the body.
Why is the tail worked flat instead of in rounds?
It's crocheted as a flat strip, eight single crochets per row, then the edges get sewn together. That makes a tube without any decreases at the tip.
How noticeable is the stripe on the arms?
The color change happens on one stitch partway up the arm, giving a clean stripe line. It lines up with where the hand decreases begin.