
Free Pattern
Step-by-Step
Crochet
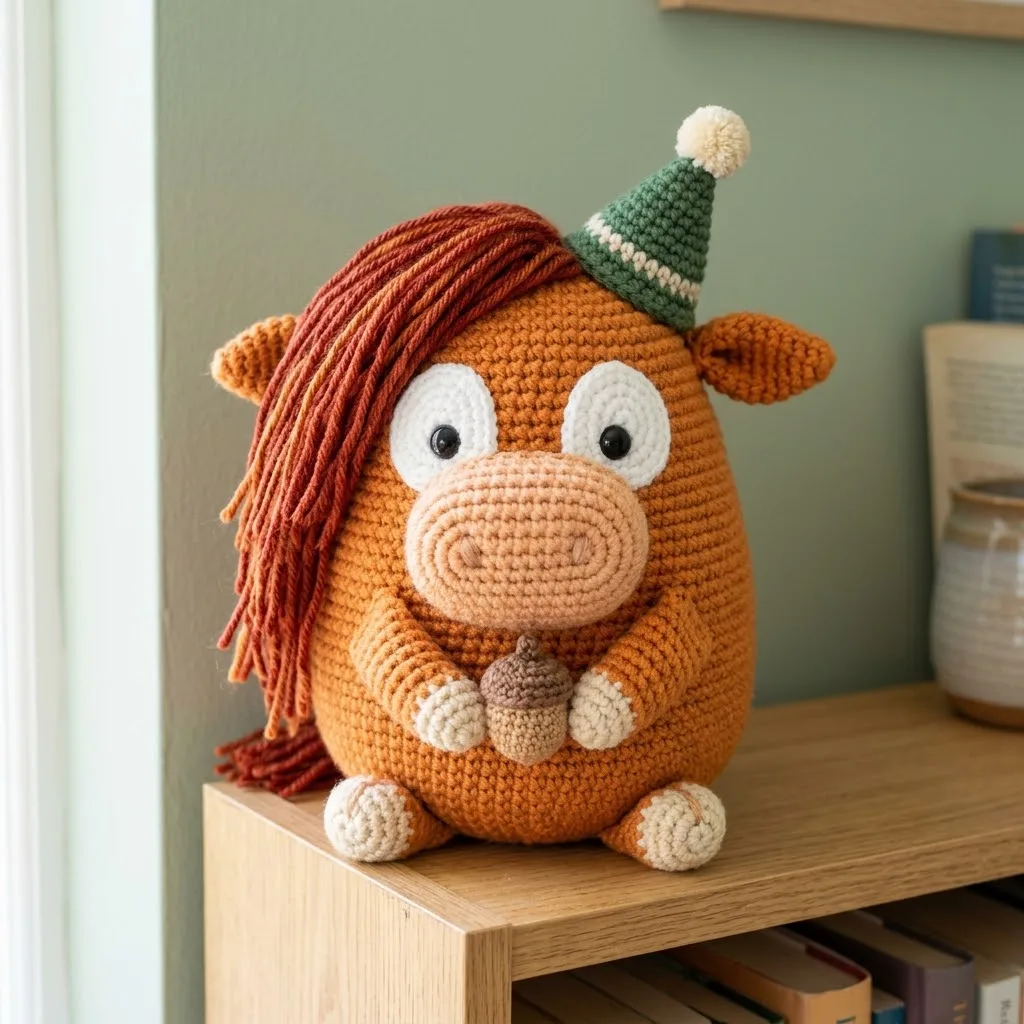
AmigurumiHighland cow amigurumi with a shaggy ginger mane
A rustic highland cow amigurumi in burnt orange, cream, and ginger yarn with safety eyes.
- Level
- Intermediate
- Time
- 4-6 hours
- Hook
- 3.5 mm
- Yarn
- Worsted
Pattern highlights
- Start the body at the bottom and work upward in one continuous piece in burnt orange.
- Build the smaller parts separately, each beginning from its own magic ring in rounds.
- Shape the taller small part with rounds of increase followed by rounds of decrease to form a dome.
- Stuff each piece before closing it, keeping stitches tight enough that fiberfill doesn't show through.
- Insert the safety eyes before the head is fully stuffed, then assemble all the pieces together.
- Finish with the optional nostril embroidery in pink for the last bit of expression.
About This Pattern
I keep a shelf for farm animals in my amigurumi notes, and a highland cow is a rare entry there. Most cow patterns go generic black-and-white. This one commits to a specific breed, with its shaggy mane and that long-nosed, mild expression highland cattle are known for. It earns its spot by being particular rather than general.
The body is worked bottom-up in one continuous piece, which keeps the silhouette unbroken. Smaller parts are built separately in rounds from magic rings, then shaped and set aside for assembly later. Color changes mark out the muzzle and eye patches without seams. A smaller-than-usual hook is specified on purpose, to keep the fabric dense enough that stuffing stays hidden.
What comes off the hook is a sturdy little cow, burnt orange body, cream muzzle and feet details, rust mane, with 12mm safety eyes doing the expression's heavy lifting. Pink embroidery for the nostrils is optional, and I'd argue it's worth the five minutes. The finished piece sits rather than stands, built for a shelf, not a game of catch.
Worth knowing
The satisfaction here is in the particulars. The body's 21 rounds let the shape build gradually instead of ballooning, so the proportions stay cow-like rather than blob-like. Smaller parts worked from 4- and 6-stitch magic rings keep the increase math simple, and the brief increase-then-decrease shaping in the taller pieces produces a neat domed cap, closed and ready to stuff without extra seaming. Color changes for the muzzle and eye patches are worked right into the rounds, no appliqué required. Dropping to a 3.5mm hook forces tight stitches, which matters more here than in most amigurumi, since burnt orange and cream next to each other show every gap. It is fussy in a good way.
Common mistakes
- Stuffing peeks through loose stitches Drop to a smaller hook than you'd normally use, as the materials list suggests. Check for white fiberfill between stitches as you go, not after stuffing.
- Losing track of the round Use a stitch marker from round one and move it up every round without exception. It's easy to lose count on long, repetitive rounds like the body's.
- Eyes placed after stuffing is finished Insert the 12mm safety eyes while the head piece is still easy to manipulate, before it's fully packed with fiberfill. Backing them on a stuffed, firm shape is much harder.
- Magic ring left loose at the center Pull the tail tight after the first round on every small part, including Part 11 and Part 17. A loose center leaves a visible hole once the piece is stuffed.


Intermediate
Progress Tracker
0 of 0 rounds
Tap a round to tick it off — your place is saved on this device.
The kit
- Burnt orange/pumpkin (approximately 150 yards) for the body
- Light tan/cream (approximately 40 yards) for the muzzle, eye patches, and feet details
- Rust/ginger (approximately 30 yards) for the mane
- 3.5mm (E/4) crochet hook
- A smaller hook helps achieve tight stitches that prevent stuffing from showing through
- 12mm black safety eyes (2)
- Polyester fiberfill stuffing
- Yarn needle for sewing
- Stitch marker
- Scissors
- Small amount of pink yarn or embroidery floss for nostril details (optional)
- Gauge is not critical for amigurumi, but your stitches should be tight enough that stuffing doesn’t peek through. If you see white fiberfill between stitches, go down a hook size.
Body
The body is worked from the bottom up in one piece using burnt orange yarn.
Round 16 sc in MR (6 sts)
Round 2Inc in each st around (12 sts)Step by step: Sc in each st around (12 sts) Sl st, FO leaving a tail. Acorn Body (Tan):.Step by step: *Sc 1, inc* repeat around (18 sts) Sl st to next st, FO leaving a long tail for sewing; These should lay flat like little circles.
Round 3*Sc 1, inc* repeat around (18 sts)Step by step: Sc in each st around (18 sts).*Sc 1, dec* repeat around (8 sts) Sl st to next st, FO leaving a long tail. Do not stuff. Flatten the ear and sew the opening closed.
Round 4*Sc 2, inc* repeat around (24 sts)Step by step: Working in back loops only, sc in each st around (24 sts); Sc in each st around (24 sts) Sl st to next st, FO leaving a long tail for sewing.Stuff the muzzle lightly. The back loop round in Rnd 5 creates a nice ridge that defines the nose area.Using a small amount of tan or pink yarn, embroider two small nostril indentations with straight stitches on the front of the muzzle.
Step by step: Eye Patches (Make 2); These white ovals frame the safety eyes and give Angus his sweet expression; Using cream/white yarn:.
Round 5*Sc 3, inc* repeat around (30 sts)
Round 6*Sc 4, inc* repeat around (36 sts)
Round 7*Sc 5, inc* repeat around (42 sts)
Round 8*Sc 6, inc* repeat around (48 sts)
Rounds 9–12Sc in each st around (48 sts)
Round 13*Sc 7, inc* repeat around (54 sts)
Rounds 14–22Sc in each st around (54 sts)
Round 23*Sc 7, dec* repeat around (48 sts)
Round 24Sc in each st around (48 sts)
Round 25*Sc 6, dec* repeat around (42 sts)
Round 26Sc in each st around (42 sts)
Round 27*Sc 5, dec* repeat around (36 sts) Begin stuffing the body firmly. Continue adding stuffing as the opening narrows.
Round 28*Sc 4, dec* repeat around (30 sts)
Round 29*Sc 3, dec* repeat around (24 sts)
Round 30*Sc 2, dec* repeat around (18 sts)
Round 31*Sc 1, dec* repeat around (12 sts)
Round 32Dec around (6 sts) FO, leaving a tail. Thread through remaining stitches and pull tight to close. Weave in end.
Part 11
Round 14 sc in MR (4 sts)
Round 2*Sc 1, inc* repeat around (6 sts)
Round 3Sc in each st around (6 sts)
Part 17
Round 16 sc in MR (6 sts)
Round 2Inc in each st around (12 sts)
Rounds 3–5Sc in each st around (12 sts)
Round 6*Sc 1, dec* repeat around (8 sts)
Round 7Dec around (4 sts) FO, stuff lightly, close opening. Sew cap to top of acorn body.
Change to cream
Round 4*Sc 2, inc* repeat around (8 sts)
Change to burnt orange
Rounds 5–10Sc in each st around (12 sts) Sl st to next st, FO leaving a long tail. Stuff lightly.
Change to green
Round 5Sc in each st around (8 sts)
Round 6*Sc 3, inc* repeat around (10 sts)
Change to burnt orange
Rounds 7–8Sc in each st around (18 sts) Sl st to next st, FO leaving a long tail. Stuff firmly.
Party Hat (Optional)
This adorable striped cone hat takes this Highland cow amigurumi to the next level.
Using green yarn:
Change to cream
Round 7Sc in each st around (10 sts)
Change to green
Round 8*Sc 4, inc* repeat around (12 sts)
Round 9Sc in each st around (12 sts) Sl st to next st, FO leaving a long tail. Pom Pom: Wind cream yarn around two fingers about 20 times. Tie tightly in the center, cut loops, and trim into a small ball. Attach to the top of the hat.
Acorn (Optional)
This tiny acorn gives Angus something to hold.
Acorn Cap (Brown):
Notions
Step by step: Using light tan yarn:.
Step by step: Using light tan yarn:.
Step by step: Using burnt orange yarn:.
Step by step: The muzzle is worked in light tan yarn and creates that distinctive Highland cow snout.
12mm black safety eyes (2)
Polyester fiberfill stuffing Yarn needle for sewing Stitch marker Scissors Small amount of pink yarn or embroidery floss for nostril details (optional)
Gauge: Gauge is not critical for amigurumi, but your stitches should be tight enough that stuffing doesn’t peek through. If you see white fiberfill between stitches, go down a hook size.
Abbreviations and Stitch Definitions Before we dive in, let’s make sure we’re speaking the same language.
Round 1Ch = Chain. Wrap yarn over hook, pull through loop on hook. This creates your foundation.
Round 2Sc = Single crochet. Insert hook into stitch, yarn over and pull up a loop (2 loops on hook), yarn over and pull through both loops.
Round 3Inc = Increase. Work 2 single crochets into the same stitch. This makes your piece grow wider.(2)
Round 4Dec = Invisible decrease. Insert hook through front loops only of the next 2 stitches, yarn over and pull through both front loops, yarn over and pull through both loops on hook. This creates a cleaner decrease than the standard method.
Round 5Sl st = Slip stitch. Insert hook, yarn over, pull through stitch and loop on hook in one motion.
Round 6MR = Magic ring. An adjustable loop that closes completely, leaving no hole at the center of your work.FO = Fasten off. Cut yarn and pull through final loop to secure.
Pattern Notes
Round 7This Highland cow amigurumi is worked in continuous rounds unless otherwise noted. Do not join rounds with a slip stitch. Use a stitch marker to track the beginning of each round and move it up as you work.Stuff pieces firmly as you go. It’s much easier to add stuffing before the opening gets too small.
All pieces are made separately and sewn together during assembly. Take your time with placement. Pin everything before sewing to make sure you’re happy with the look.
Finishing
- Weave in every yarn tail as each piece is completed, rather than leaving them for the end.
- Stuff the body and smaller parts firmly but evenly before closing the final rounds.
- Attach the safety eyes, then sew the shaped pieces and mane in place to finish the face.
Why it works
The body is built in one piece from the base up, so there's no side seam running down the torso.
Part 11 starts from a 4-stitch magic ring and grows by one round of increases, forming a small, simple cone shape suited to horns.
Part 17 increases for two rounds then decreases back down before the final fasten-off, which closes the piece into a domed cap after stuffing.
What it becomes
- A shelf piece for anyone collecting farm-animal amigurumi, standing alongside other barnyard figures.
- A tactile desk companion, small enough to sit next to books or a mug.
- A handmade gift for someone who keeps highland cattle or just likes their shaggy look.
Original pattern: https://crochetwithmia.com/rustic-ginger-highland-cow-amigurumi-free-crochet-pattern/
FAQ
Why use a smaller hook than usual?
The pattern specifies a 3.5mm hook partly to keep stitches tight. Loose stitches let the white fiberfill show through the burnt orange and cream yarn, which is more noticeable on a pale-colored piece than a dark one.
Is the embroidered nostril detail necessary?
No, it's listed as optional in the materials. The safety eyes do most of the expression work, but a bit of pink yarn or floss for the nostrils adds a finishing touch.
What is Part 17 likely used for?
Based on its shape, rounds of increase followed by decrease into a dome, it reads as one of the smaller shaped pieces, like an ear or similar detail, stuffed lightly and sewn onto the head.
Do I need to match the exact yarn amounts listed?
The amounts given are approximate guides for burnt orange, cream, and rust yarn. As long as you have comparable worsted-weight yarn in those three colors, small variations in exact yardage won't affect the construction.