Free Pattern
Step-by-Step
Crochet
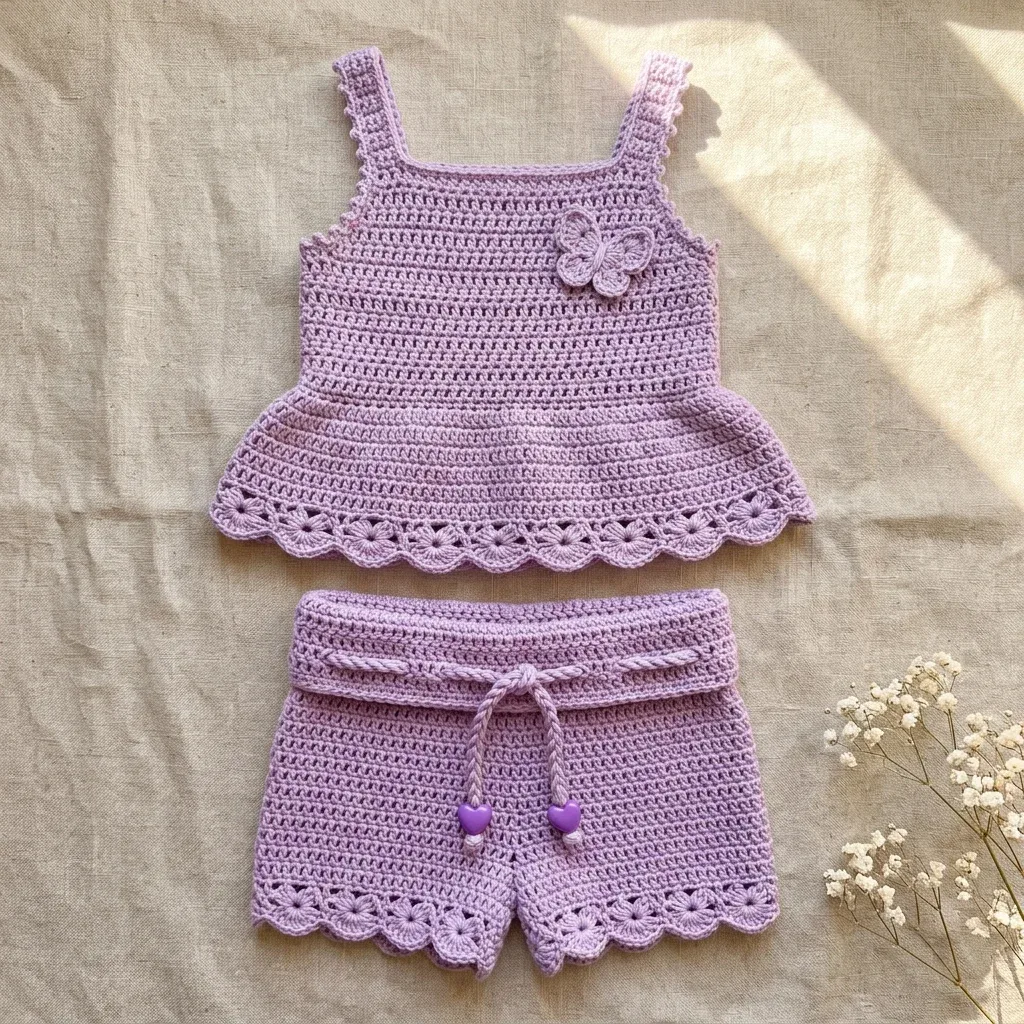
Baby GarmentsA crocheted lavender baby tank top with a butterfly applique
A crocheted lavender tank top with a beaded butterfly applique and twisted cord tie.
- Level
- Intermediate
- Time
- 6-8 hours
- Hook
- 3.5 mm
- Yarn
- DK
Pattern highlights
- Start with the front panel, working flat rows of half double crochet from a foundation chain.
- Shape the straps and neck opening at the top by working fewer stitches across the row.
- Repeat the same shaping for the back panel so the two mirror each other.
- Seam the side edges together with right sides facing, leaving the upper edges open for armholes.
- Join the shoulder straps with a seam, then turn the whole body right side out.
- Make the butterfly separately, working each wing as its own small ring, then stitch it to the front.
- Twist a cord or thread elastic through the waist to finish the fit.
About This Pattern
Baby sets take up a small corner of my notebook. This one earns its page. A tank top, built from two flat panels, seamed at the sides. Straps are just extensions of the shoulder edge, not a separate piece. I like how it reads as a study in half double crochet, rows of it. Then a butterfly applique turns up to prove the stitch has range. It sits next to my simpler baby patterns as the one with a little more plot.
The body is rows of hdc worked flat. No shaping happens until the straps split off. The wings are the real technique note. Tiny rings of chain, built up with dc or hdc, two pairs at different scales. A twisted cord takes three strands of yarn and torques them into a drawstring, no hook required. Between plain rows and fussy wings, this pattern covers more ground than most.
What comes off the hook is a lavender tank top with straps and a seamed peplum. A small butterfly perches on the front. Two beads sit in for antennae or eyes. I never worked out which they're meant to be. The drawstring threads through for fit, or elastic does the same job without a knot to hide. It is small enough to finish in a weekend and sturdy enough to survive a few washes.
Worth knowing
This piece rewards someone who likes variety in one project. The body is straightforward hdc, row after row, almost meditative. Then the butterfly applique shows up with four tiny rounds, each one a different wing size and shape. Working two pairs of wings in different stitches is a neat lesson in proportion. The dc upper pair sits taller than the hdc lower pair. The twisted cord is the fastest satisfaction in the whole project. Just twist strands until they snap back on themselves. Threading elastic or cord through the finished waist changes everything. A flat seamed tube suddenly fits a baby. It is a small set with a surprising range of skills packed in.
Common mistakes
- Counting the ch-2 as a stitch Ch 2 never counts as a stitch at the start of hdc rows. Skip it when counting across.
- Losing track of the right side Mark the right side with a stitch marker right away. The hdc bump faces back only on the RS.
- Working all armhole rows the same Row 15 shapes the armhole with slip stitches and unworked stitches, not another full hdc row.
- Making both wing pairs identical Use dc for the upper wings and hdc for the lower pair so the proportions actually differ.
- Untwisting the cord before it sets Hold both ends firmly until you fold the cord in half. Otherwise it unwinds instead of twisting back on itself.
Intermediate
Progress Tracker
0 of 0 rounds
Tap a round to tick it off — your place is saved on this device.
The kit
- Lion Brand Yarn Pound of Love in Pastel Purple is machine washable and holds its shape beautifully for baby garments.
- Paintbox Yarns Simply DK in Lilac Wine shows stitch definition clearly, which is perfect for the shell border details.
- Drops Safran in color 13 Lavender offers a cotton blend option with slightly more structure, ideal for summer wear.
- Choose any DK weight yarn that achieves gauge. For baby clothes, stick with machine washable fibers. Avoid fuzzy or loosely plied yarns since you want the shell border and butterfly to show up crisp and clear.
Yarn
- Approximately 200 yards of DK weight yarn (CYCA 3 Light) in lavender
Hook
- US size E-4 / 3.5 mm crochet hook
Notions
- Yarn needle for seaming and weaving in ends
- Scissors
- 4 to 6 stitch markers
- 2 small heart or round beads in purple or coordinating color with holes large enough to thread yarn through
- Small amount of fiberfill if making the butterfly applique puffy (optional)
- Safety pin or bodkin for threading elastic or cord
Tank Top
You now have 14 rows of solid hdc. The piece should measure approximately 4.25 inches tall. This completes the lower body section.
After Row 22, front panel should measure approximately 6.75 inches from foundation with 28 stitches across.
Divide the 28 sts into three sections: 8 sts for left strap, 12 sts for neck opening, 8 sts for right strap.
Fasten off right strap, leaving a 12 inch tail for seaming.
Fasten off left strap, leaving a 12 inch tail for seaming.
The peplum attaches directly to the lower edge of the joined body.
This count gives 14 complete shell repeats plus a final sc for the border.
Foundation: Ch 42.
Round 1(WS): Starting in 3rd ch from hook (skipped ch-2 does not count as st), hdc across. (40 hdc)
Round 2(RS): Ch 2, turn, hdc in each st across. (40 hdc)
Round 3through 14: Ch 2, turn, hdc in each st across. (40 hdc per row)(40)
Round 15(RS): Ch 2, turn, sl st across first 4 sts, ch 2, hdc in next 32 sts, leave last 4 sts unworked. (32 hdc)
Round 16Ch 2, turn, hdc2tog, hdc across to last 2 sts, hdc2tog. (30 hdc)
Round 17Ch 2, turn, hdc2tog, hdc across to last 2 sts, hdc2tog. (28 hdc)
Round 18through 22: Ch 2, turn, hdc in each st across. (28 hdc per row)(28)
Round 23Right strap Ch 2, turn, hdc in first 8 sts only, leave rem sts unworked. (8 hdc)
Round 24through 28 (Right strap): Ch 2, turn, hdc in each st across. (8 hdc per row)(8)
Round 23Left strap With RS facing, skip center 12 sts for neck opening, attach yarn in 21st st of Row 22; ch 2, hdc in same st as join and in next 7 sts. (8 hdc)
Round 24through 28 (Left strap): Ch 2, turn, hdc in each st across. (8 hdc per row)Back Panel: Work exactly as Front Panel from foundation through Row 28, including all armhole and strap shaping. The back is identical to the front.(8)
Round 1Peplum, increase round With RS facing, attach yarn at one side seam at the lower edge; ch 2, hdc in same st, work 1 hdc in each st around entire lower edge, placing 2 hdc into each corner stitch at side seams, also work 2 hdc into 1 additional stitch at center front and center back to bring count to 85 hdc total; join with sl st to top of first hdc. (85 hdc)
Round 2Peplum Ch 2, hdc in each st around. Join. (85 hdc)
Butterfly Applique
Upper wings (make 1 pair): Ch 4, sl st to first ch to form a ring; ch 3 (counts as first dc), work 4 dc into ring, ch 2, sl st into ring (first upper wing complete).
Upper wings: Ch 2, work 5 dc into ring, ch 2, sl st into ring (second upper wing complete).
Lower wings (make 1 pair, slightly smaller): Ch 4, sl st to first ch to form a ring; ch 2 (counts as first hdc), work 3 hdc into ring, ch 1, sl st into ring (first lower wing complete).
Lower wings: Ch 1, work 4 hdc into ring, ch 1, sl st into ring (second lower wing complete).
Twisted Cord (Drawstring)
Cut 3 strands of yarn, each 36 inches long. Hold together and fold in half. Anchor the folded end. Twist all strands clockwise until tightly twisted. Fold twisted length in half and allow to twist back on itself. Knot both ends. Finished cord measures approximately 8 inches.
Assembly
Step 1Place Front and Back panels with right sides together.
Step 2Side seams: Using mattress stitch or slip stitch seam, join side edges from Row 1 through Row 14. Leave Rows 15 through 22 open as armhole openings.
Step 3Shoulder seams: Match left strap of Front to left strap of Back with right sides together. Seam the 8 sts of each strap using whip stitch or slip stitch. Repeat for right strap.
Step 4Turn the joined body right side out. Joined body should measure 18 inches around chest and approximately 6.75 inches from lower edge to shoulder.
Step 5Butterfly applique: Hold upper and lower wing pairs together with right sides facing up. Using yarn and needle, wrap yarn tightly around the center junction 3 to 4 times to cinch wings together, forming the butterfly body. Tie off securely. Optional: make 2 small chains of 3 stitches each from the center to form antennae.
Finishing
- Weave in every yarn tail from the panels, straps, and butterfly wings before assembly.
- Stuff the butterfly body lightly with fiberfill, if using. Sew the wings together with the beads at the center.
- Thread the elastic or twisted cord through the waist casing, then knot it to finish the fit.
Why it works
Front and back panels start as flat rows of hdc, with straps simply continuing the shoulder stitches upward.
Row 15 narrows the panel by slip-stitching over a few stitches and leaving others unworked, shaping the armhole.
The four wing rounds are worked as separate rings. The dc upper pair stands taller than the hdc lower pair.
What it becomes
- A baby shower gift, something different from the usual blanket or hat.
- A warm-weather outfit for outdoor photos, paired with soft leggings or bare legs.
- A layering piece under a cardigan on cooler days, with the butterfly peeking out.
FAQ
Can I substitute elastic for the drawstring cord, or the other way around?
Yes, the pattern offers both options. Use elastic cut to the baby's waist measurement, or make the twisted cord instead.
Why does Row 15 leave stitches unworked?
That's where the armhole shaping starts, leaving the lower body section behind. The last few stitches on each side are skipped to open the arm.
Do the upper and lower wings use the same stitch?
No. The upper wings use dc and the lower wings use hdc. That's why one pair sits taller than the other.
How do I keep the right side consistent across pieces?
Mark it the moment you identify it, since the hdc bump faces back only on the RS. Do this before working several rows, or it's easy to lose track.