Free Pattern
Step-by-Step
Crochet
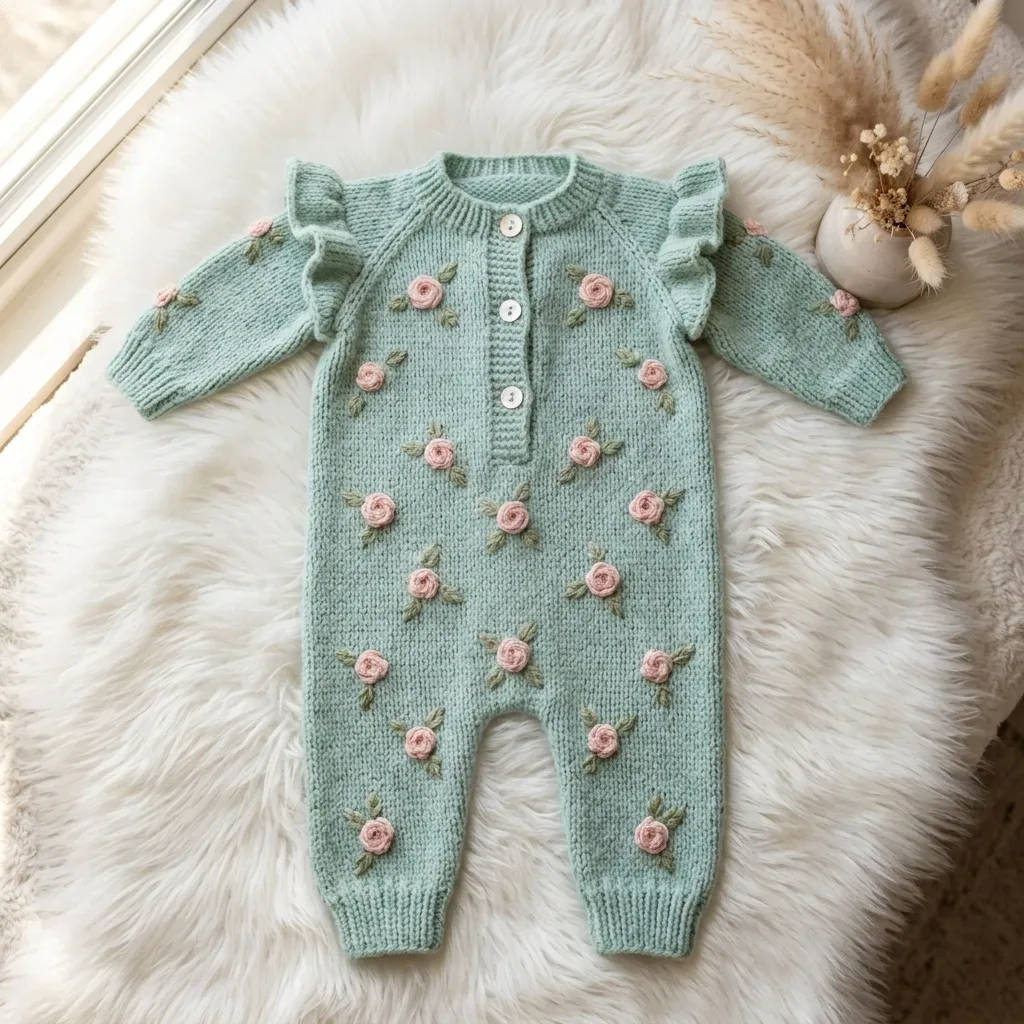
Baby GarmentsMint green rose baby romper with raglan yoke
A BLO single crochet baby romper with raglan shoulders and dimensional roses.
- Level
- Intermediate
- Time
- 12-18 hours, plus 2-4 hours for roses and leaves
- Hook
- 4.00 mm
- Yarn
- Worsted
Pattern highlights
- Start at the neckline and work the yoke flat, placing raglan markers to divide back, sleeves, and front.
- Increase at each marked raglan point every row to shape the shoulders as the yoke grows.
- Divide the piece at the underarms, setting the sleeves aside from the body.
- Shape the crotch and work the two legs separately down to the ankles.
- Finish each sleeve down to the wrist, then add ribbed cuffs to both sleeve ends.
- Work the button placket up the center front and a edging around the neckline.
- Seam everything together, block the piece flat, then sew on the roses, leaves, and buttons.
About This Pattern
I keep a mental shelf for garments that try to do more than one thing at once. This romper earns its spot there. It is a baby sweater, a pair of fitted legs, and a flower bed, all stitched into one piece. Not every pattern in my notebook attempts that much. This one does, and mostly earns it.
The technique doing the heavy lifting is single crochet through the back loop only, row after row. That one small choice turns ordinary sc into something that reads like knit stockinette from across the room. Add raglan shaping worked flat, a button placket up the front, and ribbed cuffs at wrist and ankle, and you have a surprising amount of construction packed into a baby size.
What comes off the hook is a long-sleeved romper, soft and horizontally ridged, with a scattering of rolled roses and small two-leaf clusters sewn on after the fact. It is the kind of piece that photographs well folded on a shelf. It is also meant to be worn, buttons and all.
Worth knowing
The appeal here is the BLO texture doing double duty: it looks knit, works up in sc, and gives the raglan increases a clean line to sit against. I like that the shaping happens honestly, through visible increase points at each marker, not hidden in short rows. The rolled rose motif is satisfying in a small, mechanical way, chaining a strip, then rolling it like a cinnamon bun. Add a button placket and real ribbed cuffs, and this stops feeling like a swatch exercise and starts feeling like a garment with proper finishing. For a crocheter ready to seam and pick up stitches, that combination of knit-look fabric and true construction is the actual draw.
Common mistakes
- Forgetting the back loop only Check your first few stitches of every row against the ridge pattern already established. One normal sc breaks the horizontal line and it will show.
- Losing track of raglan markers Move each stitch marker up as you work past it, every single row. Eight markers minimum exist for a reason, do not skip replacing them.
- Rolling the rose too loosely Keep the strip taut as you roll it from one end, or the rose will sit flat instead of dimensional. Stitch through the base several times to lock it.
- Skipping the gauge swatch This is a fitted garment built from a chain of exact numbers. Swatch in BLO sc with your actual hook before casting on the yoke.
- Seaming before blocking Block each flat piece, or at minimum the assembled romper, before final seaming. BLO ridges and ribbing both settle differently once wet.
Intermediate
Progress Tracker
0 of 0 rounds
Tap a round to tick it off — your place is saved on this device.
The kit
- Yarn A (main color): Soft mint green, worsted weight, approximately 650 (750) [850] yards / 595 (685) [777] meters
- Yarn B (rose color): Blush pink, worsted weight, approximately 50 (60) [70] yards / 46 (55) [64] meters
- Yarn C (leaf color): Sage green, worsted weight, approximately 30 (35) [40] yards / 27 (32) [37] meters
- Lion Brand Pound of Love in Mint works beautifully for this project. This 100% acrylic yarn is machine washable, soft against baby skin, and has excellent stitch definition.
- Paintbox Yarns Simply DK in Soft Fern is another great option when used at worsted gauge. Adjust your hook size as needed to match the gauge swatch.
- Paintbox Yarns Baby DK in Spearmint held double creates an extra soft fabric perfect for newborns.
- Any smooth worsted weight yarn (category 4) that achieves gauge and is machine washable will work. Avoid fuzzy yarns like mohair blends because they will obscure the stitch texture and make seaming difficult.
Hook
- US size G-6 / 4.00 mm for main body
Hook
- US size F-5 / 3.75 mm for ribbing and cuffs
- Row counter (recommended)
Tools
- Tapestry needle for seaming and attaching motifs
- Three to four white or pearl buttons, approximately 5/8 in / 16 mm diameter
- At least 8 stitch markers
- Scissors
Small Rose Motif
These adorable dimensional roses are worked separately and sewn on after the garment is complete. Here is how to make them:
With YB and G-6 hook, ch 16.
Round 1Sc in second ch from hook, sc in each ch across. (15 sc)
Round 2Ch 3, turn. Working in front loops only, (2 dc in next st) across all 15 sts. (30 dc)Fasten off, leaving a long tail. Roll the strip tightly from one end to the other, keeping the flat bottom edge as the base. Use the tail to stitch through the base several times to secure the rose shape.Make 20 (24) [28] roses total.
Leaf Cluster
Each rose gets a pair of leaves worked in sage green.
With YC, ch 6.
Round 1Sl st in second ch from hook, sc in next ch, hdc in next ch, sc in next ch, sl st in last ch. (5 sts, one leaf made)Ch 6 again from the base.
Round 2Sl st in second ch from hook, sc in next ch, hdc in next ch, sc in next ch, sl st in last ch. (5 sts, second leaf made)Fasten off, leaving a tail for sewing. Each cluster produces two small leaves at slight angles.Make 20 (24) [28] leaf clusters total.
Yoke
With YA and G-6 hook, ch 43 (47) [51].
Foundation row (WS): Sc in second ch from hook, sc in each ch across, turn. 42 (46) [50] sc.
Set up raglan markers. The stitches divide as follows: Right back: 6 (7) [8] sts Right sleeve cap: 6 (6) [6] sts Front: 18 (20) [22] sts
Left sleeve cap: 6 (6) [6] sts Left back: 6 (7) [8] sts Place markers at each division point.
Round 1(RS): Ch 1, turn. Work BLO sc to 1 st before first marker, Raglan Increase in marked st, sm, BLO sc across sleeve to 1 st before next marker, Raglan Increase in marked st, sm, BLO sc across front to 1 st before next marker, Raglan Increase in marked st, sm, BLO sc across sleeve to 1 st before next marker, Raglan Increase in marked st, sm, BLO sc to end. Turn. 50 (54) [58] sts.
Round 2(WS): Ch 1, turn. BLO sc across all sts, moving markers as you pass them. Turn. 50 (54) [58] sts.Repeat Rows 1 and 2, working increases on RS rows only, until yoke measures 3.5 (4) [4.5] in / 9 (10) [11.5] cm from foundation, ending with a WS row.After 14 (16) [18] RS increase rows, your stitch counts per section should be: Right back: 20 (23) [26] sts Right sleeve cap: 34 (38) [42] stsFront: 46 (52) [58] sts Left sleeve cap: 34 (38) [42] sts Left back: 20 (23) [26] sts Total: 154 (174) [194] sts
Shape Crotch and Work Legs
The body now divides into front and back, then into individual legs.
Front Body Division:
Identify the center of your 92 (104) [116] sts. The front half consists of the first 46 (52) [58] sts.
Round 1(RS): Ch 1, turn. BLO sc across 22 (25) [28] sts for right front leg. Leave remaining sts unworked. Turn. 22 (25) [28] sc.
Right Front Leg:
Continue in BLO sc on these 22 (25) [28] sts until leg measures 5 (5.5) [6] in / 12.5 (14) [15] cm from division row, ending with a WS row.
Ankle Ribbing: Switch to F-5 hook.
Round 1Ch 8. Sc in second ch from hook, sc in each ch across. (7 sc) Sl st into first 2 sts of leg edge to anchor. Turn.
Round 2Working in BLO, sc across 7 sts. Turn.
Round 3BLO sc across 7 sts, sl st into next 2 sts of leg edge. Turn. Repeat Rows 2 and 3 until ribbing spans entire ankle width. Fasten off. Seam ribbing ends together.
Left Front Leg: Rejoin YA at center front with RS facing.
Round 1(RS): Ch 1. BLO sc across remaining 24 (27) [30] sts. Turn. 24 (27) [30] sc. Continue in BLO sc until leg measures 5 (5.5) [6] in / 12.5 (14) [15] cm from division, ending with a WS row.Work ankle ribbing same as right front leg. Fasten off.
Back Body:
Work back body exactly as front body, dividing at center and working right back leg and left back leg identically.
Sleeves
Transfer held right sleeve sts onto G-6 hook. Rejoin YA at underarm center with RS facing.
Set up: Work 2 sc into the underarm bridge sts to join cleanly. 36 (40) [44] sts total.
Round 1(RS): Ch 1, turn. BLO sc across all sts. Turn. 36 (40) [44] sc.
Round 2(WS): Ch 1, turn. BLO sc across. Turn. 36 (40) [44] sc. Work straight in BLO sc until sleeve measures 3 (3.5) [4] in / 7.5 (9) [10] cm from underarm, ending with a WS row.Sleeve taper (dec row): Ch 1, turn. Sc2tog over first 2 sts, BLO sc to last 2 sts, sc2tog. Turn. 34 (38) [42] sc.Work 5 rows straight.Repeat dec row. 32 (36) [40] sc.Work 4 rows straight.Repeat dec row one final time. 30 (34) [38] sc.Continue straight until sleeve measures 6 (6.5) [7] in / 15 (16.5) [18] cm from underarm, ending with a WS row.Wrist Ribbing: Switch to F-5 hook and work ribbing same as ankle ribbing.Work second sleeve same as first.
Button Placket
The button placket is worked along the center front opening from neckline down 3 (3.25) [3.5] in / 7.5 (8) [9] cm.
With RS facing and G-6 hook, join YA at top right of center front opening.
Placket band (right side, buttonholes): Ch 1. Work sc evenly down the right edge, approximately 1 sc per row end. You should have approximately 15 (17) [18] sc. Turn.
Round 2Ch 1. BLO sc across. Turn.
Round 3Buttonhole row Ch 1. Sc 2, (ch 1, sk 1 st, sc 3) repeat 3 times, sc to end. Turn.
Round 4Ch 1. Sc across, working 1 sc into each ch-1 sp. Turn.
Round 5Ch 1. BLO sc across. Fasten off. Left placket band: With RS facing, join YA at bottom left of opening. Work sc evenly up left edge. Work 2 rows of BLO sc. Fasten off.
Divide Sleeves from Body
Next row (RS): Ch 1, turn. BLO sc across 20 (23) [26] right back sts. Ch 3 (for underarm bridge), skip the 34 (38) [42] right sleeve sts (place on stitch holder or scrap yarn). BLO sc across 46 (52) [58] front sts. Ch 3, skip the 34 (38) [42] left sleeve sts (place on holder). BLO sc across 20 (23) [26] left back sts. Turn.
Next row (WS): Ch 1, turn. BLO sc across all sts including 3 sc worked into each ch-3 bridge. Turn. 92 (104) [116] sc.
Body
Continue working flat in BLO sc without increases or decreases until body measures 5 (5.5) [6] in / 12.5 (14) [15] cm from underarm divide, ending with a WS row.
Neckline Edging
With RS facing and G-6 hook, join YA at top right of neckline. Work 1 round of sc evenly around entire neckline, including tops of placket bands. Sl st to first sc to join. Fasten off.
Ruffles
Ruffles are worked along the raglan seam lines on the RS after seaming.
With RS facing and G-6 hook, join YA at the base of one raglan seam where sleeve meets body.
Ruffle row: Ch 3 (counts as first dc). Work 2 dc into same st. (Work 3 dc into next st) across entire raglan seam line. Fasten off.
Repeat on all four raglan seam lines.
Seaming
1. Seam the left side seam of front body to left side seam of back body using whipstitch, RS facing outward.
2. Seam the right side seam the same way.
3. Seam the inseam of each leg: with RS together, align front and back leg edges and whipstitch from ankle cuff upward to crotch.
4. Seam the crotch: with RS together, whipstitch center crotch seam closed.
5. Seam sleeve underarms if any gap exists at underarm bridge.
Blocking
Wet block the finished garment by soaking in cool water for 15 minutes. Gently press out excess water in a towel. Lay flat on a blocking mat, pinning to finished measurements. Allow to dry completely before attaching rose motifs.
Attaching Rose Motifs and Leaves
Once the garment is fully dry and blocked, arrange the roses across the body, sleeves, and yoke in a scattered pattern. Space roses roughly 2 to 2.5 inches apart in a diagonal grid arrangement.
To attach each rose, thread the tail onto a tapestry needle. Insert needle from back through the garment at the chosen placement, securing the flat base with 6 to 8 stitches. Knot securely on the WS.
Position each leaf cluster behind and slightly beside its paired rose so the two leaves frame the rose at the lower left and lower right. Stitch through the base several times to secure. Knot on WS.
Button Attachment
Mark button placement on the left placket band to align with buttonholes on the right band. Sew each button securely using a double strand of YA, passing through the button shank 6 to 8 times and knotting tightly on the WS.
Finishing
- Weave in every end from the yoke, sleeves, body, and each individual rose and leaf before assembly.
- Block the finished, seamed romper flat so the BLO ridges lie even and the ribbing relaxes into shape.
- Attach the rose motifs and leaf clusters where you want them, then sew on the buttons last.
Why it works
The raglan increases land at four marked points every row, which is what pushes the yoke outward into back, two sleeves, and front sections at once.
The rose and leaf motifs are worked flat as separate small pieces first, then attached afterward, so they never interrupt the BLO rhythm of the main fabric.
Legs are shaped directly off the body after a dedicated crotch shaping section, which is why that part alone runs five rounds instead of two.
What it becomes
- A gift for a new baby's first cool-weather wardrobe, paired with simple knit booties.
- A keepsake piece for photos, since the roses and ridged texture read well up close.
- A layering piece under a plain cardigan, letting the placket and cuffs show at the edges.
Original pattern: https://crochr.com/mint-green-rose-baby-romper-free-crochet-pattern/
FAQ
Can I skip the roses and leaves?
Yes, the romper is complete without them structurally. You would just lose the dimensional detail the pattern is built around.
Why work flat instead of in the round?
Flat construction lets you divide cleanly for raglan shaping, then separate sleeves from body at the underarms. It also makes the button placket and seaming straightforward.
Does the BLO technique make this slower?
It adds a small amount of attention per stitch, not real time. Once the ridge rhythm clicks, it moves at a normal sc pace.
What yarn weight does this actually need?
Worsted weight, category 4, is the target, though the pattern notes DK held double or adjusted gauge as options. Match the gauge swatch over the yarn, not just the label.