
Free Pattern
Step-by-Step
Crochet
GarmentsLavender Cottage Babydoll Dress Crochet Pattern
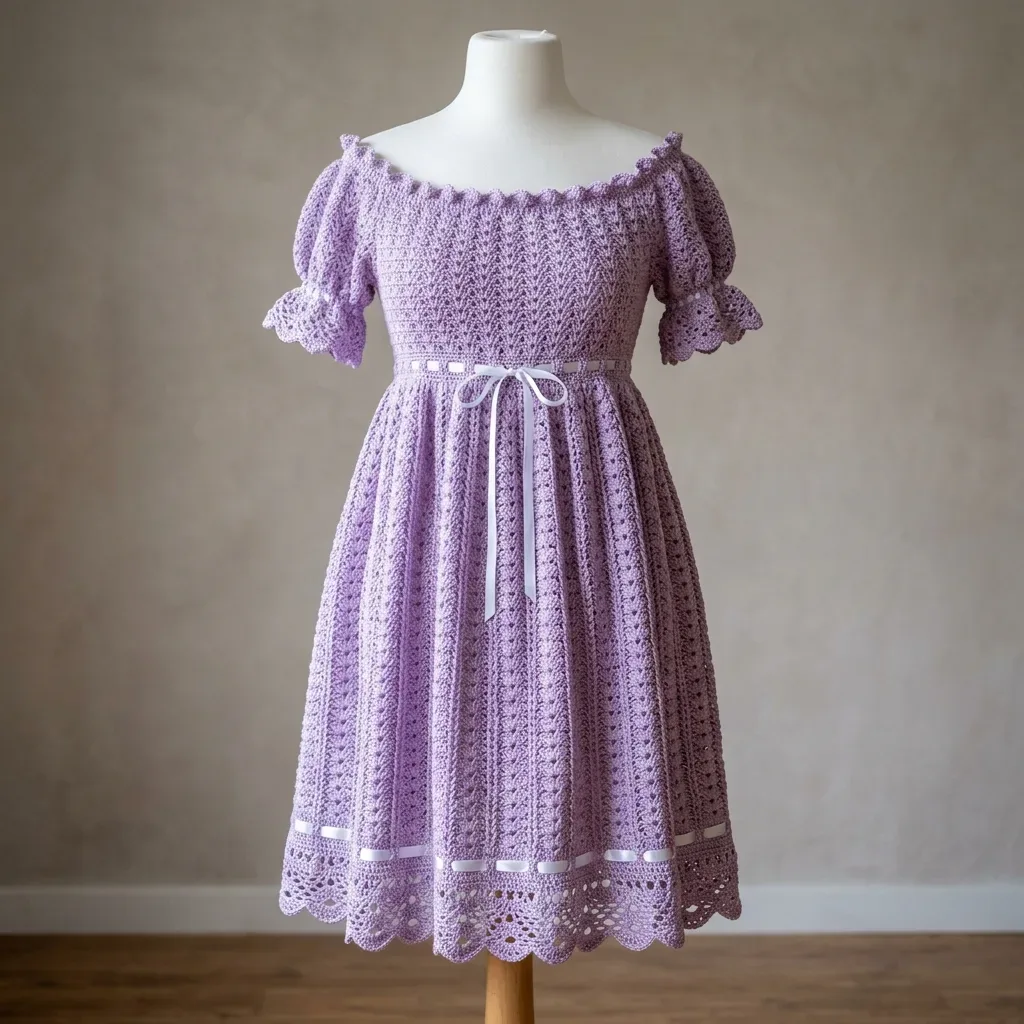
A lace babydoll dress with chevron bodice, puff sleeves, and a fan-border hem.
- Level
- Intermediate
- Time
- 4-6 hours
- Hook
- 3.5 mm
- Yarn
- DK
Pattern highlights
- Start at the neckline foundation, then build the bodice as two flat panels worked in chevron lace.
- Join the front and back bodice panels at the sides before adding the shoulder openings.
- Work the puff sleeves separately with their ruffle cuffs, then join each one at an armhole opening.
- Finish the hem with the fan border stitch for the open, scalloped lace edge.
- Thread one ribbon through the waist eyelet row and tie it at center front.
- Weave the second ribbon through the hem eyelets for the horizontal finishing detail.
About This Pattern
I keep a shelf for garments that ask more of me than a hat does, and this dress earns its spot there. It's the kind of project I pull out when I want lace that actually does structural work, not just decoration. A babydoll silhouette with a fitted bodice is a nice change from the usual boxy crochet sweater.
The techniques stack up fast here. There's a chevron lace worked flat for the bodice, a vertical lace column worked in the round for the skirt, and a fan border closing out the hem. Add puff sleeves joined at the armhole and an eyelet row threaded with ribbon, and you've got a proper sampler of garment skills in one piece.
What comes off the hook is a midi-length dress with an off-the-shoulder neckline and a scalloped picot edge. The A-line skirt opens into vertical channels of lace, and the hem finishes in roughly four inches of open fanwork. Ribbon at the waist and hem ties the whole thing together, literally.
Common mistakes
- Losing the chevron repeat mid-row Count in multiples of 6 plus 2 at the start of each bodice row. A stitch marker at the first repeat helps you catch a dropped ch-1 space early.
- Fan border shells collapsing Make sure all seven dc land in the same ch-5 space in Round 3. A loose ch-5 earlier in the round makes the shells uneven.
- Sleeve join puckering at the armhole Ease the sleeve cap evenly around the armhole opening before seaming, rather than forcing it flat on one side first.
- Ribbon threading the wrong eyelet round The waist ribbon goes through Round 22, not a nearby row. Double-check the round number before you thread, since unpicking ribbon from lace is tedious.


Intermediate
Progress Tracker
0 of 0 rounds
Tap a round to tick it off — your place is saved on this device.
The kit
- Main Color (MC): Soft lavender DK weight yarn, approximately 1,400 yards (1,280 meters)
- Contrast Color (CC): White satin ribbon, 3 yards (2.75 meters), 3/8-inch (1 cm) wide. This is for the waist tie and hem accent, not crocheted.
- Option 1: Lion Brand Yarn Pound of Love in Pastel Purple. This acrylic DK weight yarn provides excellent stitch definition for the lace patterns, is machine washable, and gives the dress a soft drape suitable for warm weather wear.
- Option 2: Paintbox Yarns Simply DK in Misty Purple. A 100 percent acrylic DK yarn with a smooth plied construction that works up cleanly in lace patterns and holds its shape after blocking.
- Option 3: We Are Knitters The Petite Wool in Lilac. A soft merino-blend DK yarn that adds a slight halo, enhancing the romantic cottage aesthetic of the dress. Requires hand washing.
Substitution Note
- Choose any DK weight yarn, approximately 200 to 220 yards per 100 gram skein, that achieves gauge. A smooth, tightly plied yarn will show the lace texture most clearly. Avoid fluffy or bouclé yarns, as they obscure stitch definition. If substituting a cotton-blend, purchase an additional 10 percent yardage as cotton has less elasticity and the bodice may require more rows to reach the correct length.
- Size US E-4 (3.5 mm) crochet hook for bodice and sleeves
- Size US F-5 (3.75 mm) crochet hook for skirt and borders
- Stitch markers (6)
- Tapestry needle
- Scissors
- Rust-proof blocking pins
- Blocking mats or towels
- 3 yards (2.75 meters) white satin ribbon, 3/8-inch (1 cm) wide
- Safety pin or bodkin for threading ribbon
- Dress form or mannequin (optional, for blocking)
Chevron Lace Stitch (worked flat, multiple of 6 plus 2)
Round 1(RS): Chain 3 (counts as dc here and throughout). Dc in 4th chain from hook. (Ch 1, skip 2 chains, dc in next chain, dc in next chain) across, ending dc in last chain. Turn.
Round 2(WS): Chain 1. Sc in first dc. (Ch 3, skip 2 sts, sc in next dc, sc in next dc) across. Turn.
Round 3(RS): Chain 3. Dc in first sc. (Ch 1, skip ch-3 sp, dc in next sc, dc in next sc) across. Turn.Repeat Rows 2 and 3 for pattern.
Vertical Lace Column Stitch (worked in the round, multiple of 8)
Round 1(Dc in next 3 sts, ch 2, skip 2 sts, dc in next 3 sts) around.
Round 2(Dc in next 3 sts, 2 dc in ch-2 sp, dc in next 3 sts) around.
Round 3(Dc in next 2 sts, ch 2, skip 1 st, dc in ch-sp, ch 2, skip 1 st, dc in next 2 sts) around.
Round 4(Dc in next 2 sts, dc in ch-sp, dc, dc in ch-sp, dc in next 2 sts) around. Repeat Rounds 1 through 4 for pattern. The column of open chain spaces creates the vertical lace effect visible in the finished dress.
Fan Border Stitch (worked in the round, multiple of 10)
Round 1(Sc in next st, ch 5, skip 4 sts) around.
Round 2(Sc in ch-5 sp, ch 5) around.
Round 3(7 dc in ch-5 sp, sc in next ch-5 sp) around.
Round 4Sl st across first 3 dc of each fan. (Ch 5, sc between 2 fans) around.
Round 5(7 dc in ch-5 sp, sc between fans) around.
Section 1: Neckline Foundation
The neckline foundation chain establishes the off-the-shoulder width. This section is worked flat, then joined.
Using E-4 hook and MC, chain 164.
Round 1Foundation, RS Dc in 4th chain from hook (first 3 ch count as dc). Dc in each chain across. (162 dc)
Round 2Neckline picot edging, applied immediately before joining Do not turn. Working along the top edge of Row 1 (the initial chain edge), join yarn with sl st to the first chain. Ch 1. Work 1 sc in same st. (Ch 3, sl st in first ch of ch-3 to form picot, skip 1 chain, sc in next chain) across the foundation chain edge. Fasten off. This creates the picot scallop neckline visible in the finished dress. (Approximately 54 picots)Return to working end of Row 1. Do not fasten off.
Section 4: Sleeves (Make Two)
Each sleeve is worked in the round from the armhole opening outward toward the cuff.
Using E-4 hook and MC, join yarn with sl st to the armhole opening at the underarm point.
Round 1Armhole pickup Ch 3. Work 2 dc in each of the 20 armhole sts around, plus pick up approximately 10 sts along each side of the armhole opening from the bodice rows (approximately 10 sts per side), for a total of approximately 60 dc. Join with sl st to top of ch-3. (60 dc)
Note: Adjust pickup count to the nearest multiple of 6 so that 60 is confirmed. 60 divided by 6 = 10 repeats. Confirmed.
Round 2Ch 3. Dc in each st around. Join. (60 dc)
Round 3Ch 3. (Dc in next 4 sts, dc2tog) around. Join. (50 dc)
Round 4Ch 3. Dc in each st around. Join. (50 dc)
Round 5Ch 3. (Dc in next 3 sts, dc2tog) around. Join. (40 dc)
Round 6Ch 3. Dc in each st around. Join. (40 dc)
Round 7Ch 3. Dc2tog 5 times evenly spaced around. Dc in remaining sts. (35 dc)
Round 8Ch 3. Dc in each st around. Join. (35 dc)
Round 9Cuff puff ruffle setup Ch 3. (Puff st in next st, ch 1, skip 1 st) around. Join. Work (puff st, ch 1, skip 1) 17 times. Dc in last st. (17 puff sts, 17 skipped sts, 1 final dc = 35 sts confirmed)
Round 10Cuff scallop Ch 1. (Sc in ch-1 sp, 4 dc in top of puff st, sc in next ch-1 sp) across. For the odd stitch at end: sc in last dc. Join. Approximately 17 mini scallops.
Round 11Cuff picot edging Sl st to first sc. (Ch 3, sl st into first ch to form picot, sl st to next sc) around. Fasten off.Weave in ends on both sleeves.Checkpoint: Each sleeve should measure approximately 5 inches (12.5 cm) from the armhole pickup row to the bottom of the cuff ruffle. The puff stitch rounds should create a gentle gathered effect near the cuff.
Section 5: Skirt (Worked in the Round From Waist Down)
Switch to F-5 hook.
Join MC with sl st to Round 23 (waist) at center back.
Round 1Waist increase round Ch 3. Work 2 dc in each of the 126 sts around, and additionally work a 3rd dc (extra increase) into the sts at positions 1, 32, 64, and 96 (4 evenly spaced positions). Total dc: 252 plus 4 = 256. Join. (256 dc)
Round 2Ch 3. Work Vertical Lace Column Stitch Round 1 around all 256 sts. (256 dc, with ch-2 sps)
Round 3Work Vertical Lace Column Stitch Round 2 around. (256 dc)Round 4: Work Vertical Lace Column Stitch Round 3 around. (256 sts, structured with ch-sps)
Round 5Work Vertical Lace Column Stitch Round 4 around. (256 dc)
Round 6through 9: Repeat Vertical Lace Column Stitch Rounds 1 through 4. (256 dc each round)(256)
Round 10First skirt increase round Ch 3. Work the Vertical Lace Column Stitch Round 1, but work an extra dc at every 8th repeat position. This adds 32 dc. Total: 256 plus 32 = 288 dc. (288 dc)
Round 11through 13: Work Vertical Lace Column Stitch Rounds 2, 3, and 4 over the 288 sts. (288 dc each round)(288)
Round 14Work Vertical Lace Column Stitch Round 1. (288 dc)
Round 15through 17: Work Vertical Lace Column Stitch Rounds 2, 3, and 4. (288 dc)
Round 18Second skirt increase round Ch 3. Work Vertical Lace Column Stitch Round 1 with extra dc at every 9th repeat position (32 increases). Total: 288 plus 32 = 320 dc. (320 dc)
Round 19through 21: Work Vertical Lace Column Stitch Rounds 2, 3, and 4. (320 dc)
Round 22Work Vertical Lace Column Stitch Round 1. (320 dc)
Round 23through 25: Work Vertical Lace Column Stitch Rounds 2, 3, and 4. (320 dc)
Round 26Third skirt increase round Work with extra increases to reach 360 dc. Work: Ch 3. Work Vertical Lace Column Stitch Round 1, adding 1 extra dc at every 8th repeat for 40 evenly spaced increases. 320 plus 40 = 360 dc. (360 dc)
Round 27through 29: Work Vertical Lace Column Stitch Rounds 2, 3, and 4. (360 dc)
Round 30Work Vertical Lace Column Stitch Round 1. (360 dc)
Round 31through 33: Work Vertical Lace Column Stitch Rounds 2, 3, and 4. (360 dc)
Round 34Hem ribbon eyelet round Ch 3. (Dc in next 2 sts, ch 1, skip 1 st) around. Join. (360 sts: 240 dc plus 120 ch-1 sps)
Round 35Stabilizer before border Ch 3. Dc in each st and ch-sp around. Join. (360 dc)Checkpoint: After Round 35, the skirt should measure approximately 22 inches (56 cm) from the waist join. The circumference at the hem should be approximately 90 inches (228.5 cm), confirming the full gathered A-line silhouette. The eyelet round at Round 34 should be clearly visible for the decorative ribbon accent.
Left Front Panel (30 sts)
Row 3: Ch 1, turn. Work Row 2 of Chevron Lace Stitch across 30 sts. (30 sts)
Row 4: Ch 3, turn. Work Row 3 of Chevron Lace Stitch across. (30 sts)
Rows 5 through 18: Continue in Chevron Lace Stitch, alternating Rows 2 and 3 of the pattern. (30 sts each row)
Round 19Eyelet row for left front waist Ch 3, turn. (Dc in next 2 sts, ch 1, skip 1 st) across. (30 sts with 10 eyelets)
Round 20Ch 3, turn. Dc in each st and ch-1 sp across. (30 sts) Fasten off.
Back Panel (62 sts)
Row 3: Ch 1, turn. Work Row 2 of Chevron Lace Stitch across 62 sts. (62 sts)
Row 4: Ch 3, turn. Work Row 3 of Chevron Lace Stitch across. (62 sts)
Rows 5 through 18: Continue in Chevron Lace Stitch, alternating Rows 2 and 3 of the pattern. (62 sts each row)
Round 19Eyelet row for back waist Ch 3, turn. (Dc in next 2 sts, ch 1, skip 1 st) across, ending dc in last 2 sts. (62 sts with 20 eyelets)
Round 20Ch 3, turn. Dc in each st and ch-1 sp across. (62 sts) Fasten off.
Section 6: Hem Fan Border
The Fan Border is worked over a multiple of 10 stitches. Round 35 ends with 360 dc. 360 divided by 10 = 36 repeats. Confirmed.
Round 36(Fan Border Round 1): Ch 1. (Sc in next st, ch 5, skip 4 sts) around. Join to first sc. (72 sc plus 36 ch-5 sps)
Round 37(Fan Border Round 2): Sl st into first ch-5 sp. Ch 1. (Sc in ch-5 sp, ch 5) around. Join. (36 sc plus 36 ch-5 sps)
Round 38(Fan Border Round 3): Sl st into first ch-5 sp. Ch 3. Work 6 more dc into same ch-5 sp (7 dc total in sp). Sc in next ch-5 sp. (7 dc in ch-5 sp, sc in next ch-5 sp) around. Join. (36 fans of 7 dc each plus 36 sc)
Round 39(Fan Border Round 4): Sl st across to center (4th) dc of first fan. Ch 1. Sc in center dc. (Ch 5, sc in center dc of next fan) around. Join. (36 sc plus 36 ch-5 sps)
Round 40(Fan Border Round 5): Sl st into first ch-5 sp. Ch 3. 6 more dc in same sp (7 dc total). Sc in next sc between fans. (7 dc in ch-5 sp, sc in sc) around. Join. (36 fans of 7 dc each plus 36 sc)
Round 41(Scallop picot edging, final row): Sl st to 4th dc of first fan. Ch 1. Sc in 4th dc. (Picot: ch 3, sl st in first ch, sc in 4th dc of next fan, ch 2, sc in sc between fans) around. Join. Fasten off.
Checkpoint: The fan border should add approximately 4 inches (10 cm) to the skirt length. The final scallop-picot edge should align visually with the picot edging at the neckline, giving the dress a cohesive look.
Section 2: Bodice (Worked Flat in Two Panels Then Joined)
The bodice consists of a Back Panel and a Front Panel worked simultaneously as one flat piece, using markers to denote the four sections: left front, left armhole space, back, right armhole space, right front.
After completing Row 1 of the neckline (162 dc), work as follows.
Stitch distribution: Place stitch markers after stitch 30 (left front/left armhole divide), after stitch 50 (left armhole/back divide), after stitch 112 (back/right armhole divide), after stitch 132 (right armhole/right front divide). This leaves 30 stitches for left front, 20 for left armhole gap, 62 for back, 20 for right armhole gap, and 30 for right front.
The armhole gap stitches (20 sts each side) will be skipped when the bodice is joined in the round, and sleeve stitches will be picked up around them.
Right Front Panel (30 sts)
Work identically to Left Front Panel. (30 sts)
Fasten off.
Checkpoint: After completing all three bodice panels through Row 20, each panel should measure approximately 6 inches (15 cm) in height, not including the neckline row. The total flat width across the neckline should still be 36 inches (91.5 cm).
Assembly
Step 1Weave in all ends using a tapestry needle. Ensure all yarn tails are secured on the wrong side.
Step 2Seam check: If any side seam gaps are visible at the bodice armhole join areas, close them with a few whipstitches using the tapestry needle and yarn tail.
Step 3Ribbon threading (waist): Cut one piece of white satin ribbon measuring approximately 50 inches (127 cm). Thread the ribbon through the eyelet round at the waist (Round 22) using a safety pin or bodkin. Begin and end at center front. Ensure the ribbon is not twisted inside the eyelets. Pull ends through evenly so both tails are equal length. Tie in a bow at center front.
Step 4Ribbon threading (hem accent): Cut one piece of white satin ribbon measuring approximately 60 inches (152 cm). Thread this ribbon through the eyelet round near the hem (Round 34) beginning at one side seam. Weave the ribbon over and under the dc columns around the entire hem circumference. Join both ends at the starting point with a small hand stitch or simple knot hidden at the side seam. This creates the horizontal white ribbon accent visible near the hemline.
Finishing
- Weave in every yarn tail on the wrong side with a tapestry needle before blocking.
- Check the armhole seams where the sleeves join the bodice, and whipstitch any gaps closed.
- Block the dress flat or on a dress form, then thread the waist and hem ribbons through their eyelet rounds.
Why it works
The bodice is worked flat in two panels, left and right front plus back, which lets the chevron lace lie straight before any side seaming pulls it into shape.
The puff sleeves are made separately from the bodice and joined afterward at the armhole openings, which keeps the sleeve shaping independent of the bodice's chevron repeat.
What it becomes
- A warm-weather occasion dress, worn with simple sandals so the fan-border hem stays visible.
- A statement piece for a garden party or outdoor gathering, paired with a light cardigan if the shoulders need covering.
- A photoshoot or portfolio piece for a crocheter who wants to show off lace garment construction, not just amigurumi.
FAQ
Can I make this dress in a different size?
Yes, the pattern includes size customization instructions at the end, since the main instructions fit a US women's Medium, dress sizes 8 to 10. I'd still make a gauge swatch first regardless of which size you're adjusting to.
Do I need two different crochet hooks?
Yes, an E-4 (3.5 mm) for the bodice and sleeves, and an F-5 (3.75 mm) for the skirt and borders. The size change helps the denser chevron lace fit snugly while the skirt drapes more loosely.
What happens if I substitute a cotton-blend yarn?
Cotton has less elasticity than the acrylic or wool-blend options listed, so the bodice may need extra rows to reach length. The pattern also recommends buying about 10 percent more yardage if you go this route.
Is this a beginner-friendly pattern?
No, it's rated intermediate to advanced, and I'd want at least two finished garments under my belt first. Working in the round, joining sleeves to a bodice, and constructing an eyelet waist all come up here.