
Free Pattern
Step-by-Step
Crochet
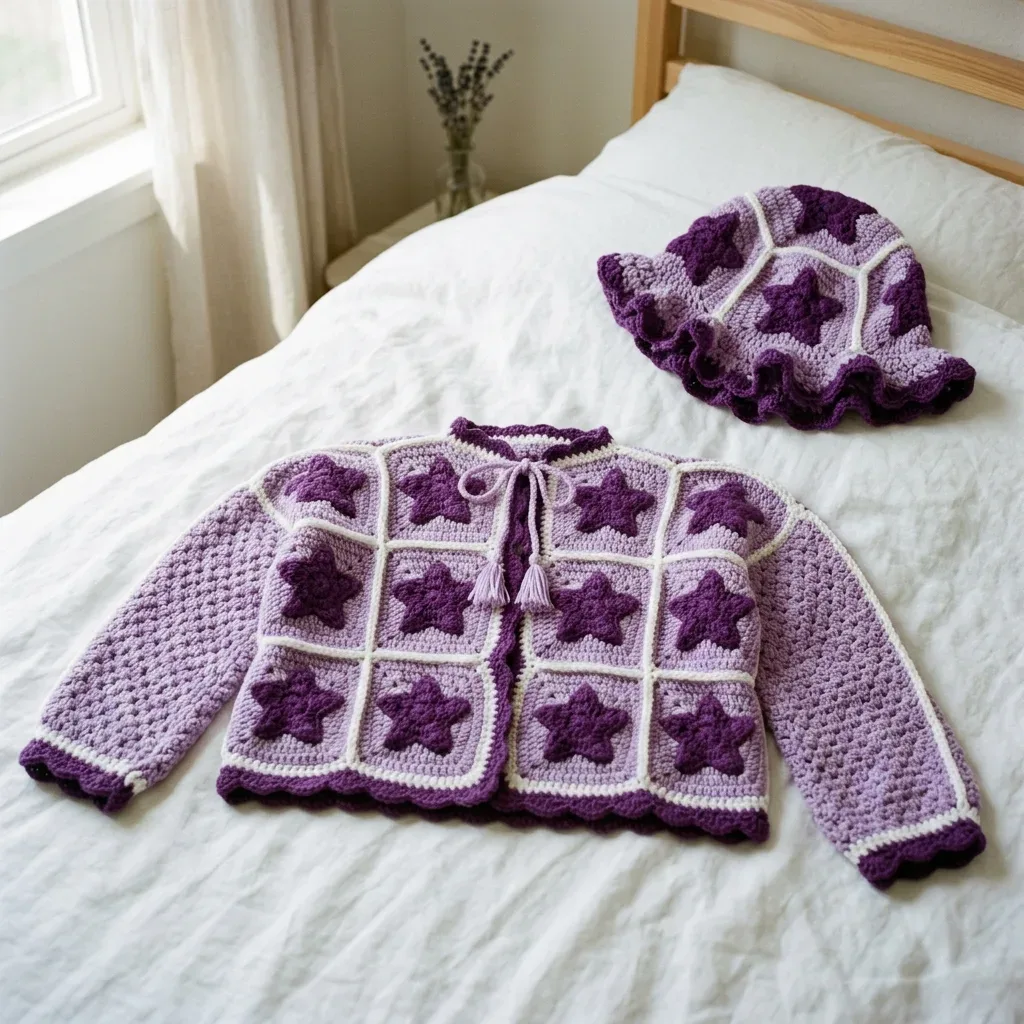
GarmentsA lavender star granny square cardigan and hat set
A granny square cardigan and hat with raised star clusters and a scalloped edge.
- Level
- Intermediate
- Time
- 10-14 hours
- Hook
- 6.0 mm
- Yarn
- Worsted
Pattern highlights
- Work each granny square from center out, building corner ch-2 spaces and star clusters as you go.
- Block every square to a consistent size before you even think about joining them together.
- Seam or join the blocked squares into the cardigan panels and sleeves, matching corners as you go.
- Join yarn around the hem, cuffs, and neckline to work the shell-and-slip-stitch scallop edging.
- Build the matching hat from the brim upward, repeating the same corner increases at a smaller scale.
- Weave in every end, mist the finished piece, and let it dry flat before wearing.
- Finish by attaching the two lavender tassels to the hat for a matching, playful touch.
About This Pattern
A granny square cardigan does not show up often in my notebook. Most stars I collect live flat, on afghans or pillows. This set puts a raised star cluster to work on wearable panels instead. Twenty-five identical squares carry the motif from hem to shoulder, then a hat repeats it at a smaller scale. I like when a favorite block gets reassigned like this. It is still a granny square. It has simply learned to hang differently.
The technique list reads like a sampler. Front post treble crochets, worked around the post instead of through the top of a stitch, build the raised star points. A five-double-crochet shell stitch, skipped and slip-stitched between, makes the scalloped edge on hem, cuffs, and neckline. Granny squares increase at their corners through ch-2 spaces, doubled each round. Three colors — lavender, deep purple, and white — trade off between motif and background. Stacked together, it is a proper technique sampler disguised as a cardigan.
What comes off the hook is a cardigan and matching hat, built from squares rather than rows. The squares get sewn together, then the whole edge gets one pass of that scalloped trim. Two lavender tassels finish the hat. It reads as a set, not a solo piece — same star, same shell edge, same three colors on both pieces. I would block every square before joining. Guessing at flat has never once worked out for me.
This set is sized for children around 4 to 6 years old. The construction is modular: you work individual squares first, then join them together, so if you've made a granny square blanket before, you already have most of the skills you need.
Worth knowing
The satisfaction here is in the raised star cluster. Front post treble crochets pull the motif off the flat granny square background into real relief — you can run a finger over it. The shell-and-slip-stitch scallop edge is another small pleasure: five double crochets fanning out of one stitch, skipped stitches on either side, repeated until the hem waves. Corner increases on each square are pure granny square logic, ch-2 spaces doubling out at four corners every round, so the geometry never surprises you. Twenty-five squares sounds like a lot until you time one at under 35 minutes. The hat brim recycles every trick from the squares at a smaller scale, so by the time you reach it, none of it is new.
Common mistakes
- Wrong stitch count for the scallop The scallop needs a stitch count divisible by 6 before you start. Recount your edge stitches first.
- Front post treble worked into the top Insert the hook around the post, front to back to front, not through the stitch's top. Working into the top flattens the star.
- Joining squares before blocking Seam squares while they're still uneven and the whole cardigan warps. Wet block every square to size first.
- Missing the corner ch-2 space Skip a corner's ch-2 space and the square stops lying flat. Check all four corners each round before moving on.
- Choosing a fuzzy yarn Brushed or fuzzy fibers hide the raised star detail completely. Stick with a smooth worsted like the ones listed for definition.


Intermediate
Progress Tracker
0 of 0 rounds
Tap a round to tick it off — your place is saved on this device.
The kit
Yarn (Worsted Weight, Category 4)
- Color A (Lavender): approximately 350 yards / 320 meters
- Color B (Deep Purple): approximately 250 yards / 229 meters
- Color C (White or Off-White): approximately 100 yards / 91 meters
Hook
- US size J / 6.0 mm
Notions
- Stitch markers (at least 6)
- Yarn needle for seaming and weaving ends
- Scissors
- Blocking mat and pins
- 2 lavender tassels (instructions included below)
Yarn Suggestions
- Lion Brand Pound of Love works beautifully here with excellent stitch definition and machine washability. Paintbox Yarns Simply Aran in Wisteria Purple and Pansy Purple gives gorgeous color fidelity. Caron Simply Soft is widely available and wonderfully soft against children’s skin.
- Avoid brushed or fuzzy yarns for this project. They will obscure the 3D star detail that makes this pattern special.
The Granny Square Pattern
You will need 18 squares for the cardigan and 7 for the hat. All squares are identical.
Round 1 is worked in Color B (Deep Purple).
Round 1Magic ring (or ch 4, sl st to join into ring). Ch 3 (counts as first dc), work 2 dc into ring, ch 2, (3 dc into ring, ch 2) 3 times. Sl st to top of beg ch-3 to join. (12 dc, 4 ch-2 corner spaces)(12)
Round 2Ch 3 (counts as dc). Work 1 dc into each of next 2 dc, (2 dc, ch 2, 2 dc) into corner ch-2 sp, 1 dc into each of next 3 dc, (2 dc, ch 2, 2 dc) into corner ch-2 sp. Repeat from beginning of round for remaining 2 corners, ending with sl st to top of beg ch-3. (28 dc, 4 ch-2 corner spaces)(28)
After this round, you have 7 dc across each side. The 5 center dc of each side will form one star point in the next round.
Round 3 is worked in Color A (Lavender) and is the Star and Background Round.
Round 3Join Color A with sl st into any corner ch-2 sp. Ch 3 (counts as dc), dc into same sp, ch 1. Now work the star point: skip the first dc of the side, work 1 fptr around each of the 5 center dc posts from Round 2 as a cluster (5-fptr cluster as described above), ch 1. Skip the last dc of the side before the corner. Work (2 dc, ch 2, 2 dc) into corner ch-2 sp. Repeat the star point sequence for each of the remaining 3 sides, ending with 2 dc into the starting corner sp, ch 2, sl st to top of beg ch-3. (4 star points made, 4 corner clusters made)
Step by step for the 3D star point cluster: work the first fptr around the first designated dc post but stop with 2 loops remaining on hook; work another fptr around the next dc post, stopping with 3 loops on hook; repeat for the next 3 dc posts until you have 6 loops on hook; yarn over and draw through all 6 loops; chain 1 to close and lock the point. This creates one raised, three-dimensional star point projecting from the fabric surface — each square has 4 star points, one on each side.
Round 4 is worked in Color C (White or Off-White).
Round 4Join Color C with sl st into any corner ch-2 sp. Ch 3 (counts as dc). Work (dc, ch 2, 2 dc) into same corner sp. Work 1 dc into each of next 2 dc, 1 dc into ch-1 sp, 1 dc over the top of the star point cluster (into the closing ch-1 of that point), 1 dc into next ch-1 sp, 1 dc into each of next 2 dc. Work (2 dc, ch 2, 2 dc) into corner ch-2 sp. Repeat across remaining 3 sides. Sl st to join. Fasten off. (9 dc across each side between corner clusters, 4 corners each with ch-2 sp)
Block all 25 squares to exactly 4.5 inches / 11.4 cm square before joining.
Use Color C (white) for all joins — a flat slip stitch join worked through the back loop of the corresponding stitch on both squares held with wrong sides together — to create the visible white grid line.
Hat Brim
Join Color B to the brim edge with sl st.
Round 1Ch 1, sc in each st around. Work 1 extra sc into each of the 6 join points between squares. (60 sc)
Round 2Ch 1, (sc in next 4 sc, 2 sc in next sc) 12 times. Sl st to join. (72 sc)
Round 3Ch 1, (sc in next 5 sc, 2 sc in next sc) 12 times. Sl st to join. (84 sc)
Round 4Ch 1, (sc in next 6 sc, 2 sc in next sc) 12 times. Sl st to join. (96 sc)
Rounds 5–6Ch 1, sc in each sc around. Sl st to join. (96 sc)
Assembly
Step 1Weave in all ends securely, weaving at least 1 inch in two directions to prevent unraveling.
Step 2Blocking: Wet block all squares before joining. Soak in cool water for 10 minutes, press out excess water in a towel, pin to exactly 4.5 inches square, and allow to dry completely. After assembly, mist the whole piece and let it dry flat.
Step 3Care: Hand wash in cool water with gentle detergent. Press out water gently, never wring or twist. Lay flat to dry. Do not tumble dry or iron directly on the 3D star points. Store folded, not hung.
Finishing
- Weave in every end from both squares and edging, running each tail at least an inch in two directions.
- Block each square flat before assembly, then mist the joined piece once seaming is done.
- Tassel instructions (make 2): wrap Color A around a 3-inch wide piece of cardboard 20 times. Cut a 10-inch length, slide it under all the wraps at the top, and tie it tightly with a double knot to form the hanging loop. Slide the wraps off the cardboard. Cut another 10-inch length and wrap it tightly around all the strands about 0.5 inch below the top tie, then knot securely. Cut through all the loops at the bottom and trim the ends even.
- Attach the two lavender tassels to the hat as the very last step.
Why it works
Each square's corners grow through ch-2 spaces, worked as 2 dc, ch 2, 2 dc every round.
The hat brim joins in rounds, adding an extra sc at each square seam to keep stitch counts even.
Front post trebles wrap around a stitch's post, not its top, which raises the star off the surface.
Gauge: one completed granny square (after Round 4) measures 4.5 inches / 11.4 cm square, blocked. In half double crochet flat rows with a J hook, gauge is 14 hdc x 10 rows = 4 inches / 10 cm square. Gauge is critical here — if your squares are too small, go up a hook size; too large, go down a size — since every finished measurement depends on each square measuring exactly 4.5 inches after blocking.
Finished measurements — Cardigan: chest approximately 26 inches / 66 cm closed (with 1 inch / 2.5 cm of ease), length shoulder to hem approximately 14 inches / 35.5 cm, sleeve length underarm to cuff approximately 11 inches / 28 cm. Hat: circumference approximately 20 inches / 51 cm, height crown to brim base approximately 6 inches / 15 cm plus a 2-inch / 5 cm ruffle brim.
What it becomes
- A cardigan and hat set for stroller walks, paired with plain leggings so the squares stand out.
- A photo-session outfit, layered over a solid onesie to keep the star motif the focus.
- A baby shower gift set, paired with a matching granny square blanket if you have one on hand.
Original pattern: https://crochetwithmia.com/lavender-star-granny-square-cardigan-set-free-crochet-pattern/
FAQ
Can I substitute a different yarn?
Yes, as long as it's smooth worsted weight. Avoid brushed or fuzzy fibers — they hide the raised star detail this pattern is built around.
How many squares does the cardigan use?
Twenty-five identical squares make up the whole garment. Each one takes roughly 25 to 35 minutes once you're in the rhythm.
What size hook do I need?
A US size J / 6.0 mm hook is used throughout, for both the squares and the hat.
How do I care for the finished set?
Hand wash in cool water with a gentle detergent and lay flat to dry. Skip the tumble dryer and don't iron directly on the stitches.