Free Pattern
Step-by-Step
Crochet
Flowers & AppliquésLayered 3D crochet rose with three petal sizes
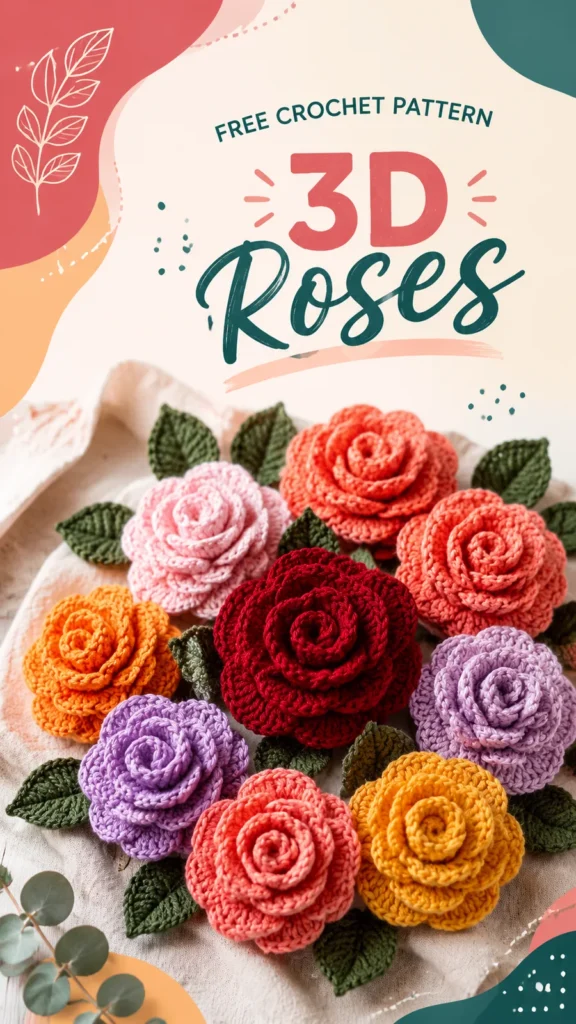
A layered crochet rose built from a center and three petal sizes, worked in sc and dc.
- Level
- Intermediate
- Time
- 4-6 hours
- Hook
- 4.0 mm
- Yarn
- Worsted
Pattern highlights
- Start with a magic ring and build the small crocheted center through its three joined rounds.
- Work six small petals individually in rows, shaping each with increases and a curved top.
- Make eight medium petals the same way, slightly wider and taller than the small ones.
- Crochet ten large petals for the outer layer, following the same row structure.
- Stitch the small petals around the finished center to form the inner rose.
- Layer the medium petals around that, then the large petals around the outside.
- Shape the whole flower by hand, cupping the medium petals and flaring the large ones.
About This Pattern
Every notebook needs one flower that isn't flat. Most crochet roses I've logged are single spirals worked in one piece. This one takes the slower route: a center plus three separate petal sizes, assembled after the fact. It belongs in the section I keep for pieces built like real sewing projects, not single continuous rounds.
The technique here is layering, not a fancy stitch. The center is three joined rounds of single crochet, doubling and then increasing every other stitch. The petals are flat pieces worked in rows, hdc for the sides and dc for height, shaped with increases at the start and a curved top. Nothing exotic. Just patience, repeated six, eight, and ten times.
What comes out is a rose with real depth, not a motif pretending to be one. Small petals hug the center, medium petals fill the middle, and large petals flare the outer edge. Shaped by hand once joined, it reads as sculptural rather than appliquéd. A fourth outer layer, if you add it, pushes it toward a full, blown-open bloom.
Skill Level: confident beginner to intermediate. Finished Size: approximately 4 in (10 cm) wide and 2.25 in (5.5 cm) deep. Gauge: approximately 18 sc x 20 rows = 4 in (10 cm), worked firmly; exact measurements will vary with yarn, hook, and tension. The pattern is written in US crochet terminology; in UK terms, single crochet is double crochet, half double crochet is half treble, and double crochet is treble crochet.
You can make each petal layer in the same color for a classic rose, or combine pink, coral, red, lavender, orange, yellow, and cream across the layers for a cheerful mixed bouquet.
Worth knowing
The satisfaction is in the repetition paying off. Six small petals, eight medium, ten large — each one quick on its own, each one shaped the same way with increases at the base and a curved hdc-dc top. By the time you're attaching the third layer, your hands know the rhythm without looking at the pattern. The payoff is a flower that actually has volume, with petals you can cup and flare instead of a flat spiral pretending at dimension. I like that the center is just three rounds of single crochet worked fast, so the real effort goes where it shows. It's a good project for using up small amounts of worsted yarn, and flexible enough to leave off the optional fourth layer if you want a half-opened bud instead.
Common mistakes
- Losing the round count on the center Use a stitch marker on round 1 since the center has no written stitch markers and the joins are easy to miscount. Recheck the stitch total at the end of each round before moving on.
- Making petals too uniform Shape each petal slightly differently by hand before attaching it. Uniform petals flatten the 3D effect the layering is meant to create.
- Skipping the curved top shaping Don't rush the hdc-to-dc transition at the petal tip. That shift is what rounds the petal edge instead of leaving it square.
- Attaching layers too tightly Leave a little give when stitching petals to the center and to each other. Petals sewn flush against the base can't flare outward later.
- Blocking the rose flat Dampen and shape by hand instead of pressing. Pressing flat undoes the cupped and flared shaping that gives the rose its depth.
- Working stitches too loosely Crochet slightly firmly for more dimensional petals. If your stitches are very loose, try a smaller hook rather than pulling the yarn tightly, and keep tension consistent so all three petal layers sit evenly around the center.
Intermediate
Progress Tracker
0 of 0 rounds
Tap a round to tick it off — your place is saved on this device.
The kit
- Worsted-weight yarn in one main rose color, approximately 25 to 35 yd (23 to 32 m)
- Optional green worsted-weight yarn for leaves, approximately 5 yd (4.5 m)
- 4.0 mm (US G/6) crochet hook
- Yarn needle with a blunt tip
- Scissors
- Stitch marker, optional but helpful
- Small amount of stuffing or scrap yarn for the center, optional
Part 1: Crocheted Rose Center
Make a magic ring.
Round 1Ch 1, work 8 sc into the ring. Sl st to the first sc to join. Do not count the ch 1 as a stitch. 8 sc.
Round 2Ch 1, work 2 sc in each stitch around. Sl st to the first sc. 16 sc.
Round 3Ch 1, [sc in the next st, 2 sc in the next st] 8 times. Sl st to the first sc. 24 sc.
FO, leaving a yarn tail approximately 10 in (25 cm) long for assembly.
Pull the magic ring closed firmly. Do not over-tighten the center because the petals need a small amount of room to curve upward.
Part 2: Small Inner Petals
Make 6 small petals . Each petal is worked separately.
Ch 4.
Row 1Hdc in the 2nd ch from the hook, hdc in the next ch, dc in the final ch. 3 sts.
Row 2Ch 1, turn. Work 2 hdc in the first st, hdc in the next st, 2 hdc in the final st. 5 sts.
Row 3Ch 1, turn. Hdc in the first st, dc in the next 3 sts, hdc in the final st. 5 sts.
Row 4Ch 1, turn. Sl st in the first st, hdc in the next st, 3 dc in the next st, hdc in the next st, sl st in the final st. 5 sts.
FO, leaving a 7 in (18 cm) sewing tail.
After making all 6 petals, gently curve each petal by pinching the lower edge slightly and rolling the top edge toward the center. Do not flatten the petals completely.
Part 3: Medium Petals
Make 8 medium petals . These should be slightly wider and taller than the inner petals.
Ch 5.
Row 1Hdc in the 2nd ch from the hook, hdc in the next 2 ch, dc in the final ch. 4 sts.
Row 2Ch 1, turn. Work 2 hdc in the first st, hdc in the next 2 sts, 2 hdc in the final st. 6 sts.
Row 3Ch 1, turn. Hdc in the first st, dc in the next 4 sts, hdc in the final st. 6 sts.
Row 4Ch 1, turn. Sl st in the first st, hdc in the next st, 2 dc in the next 2 sts, hdc in the next st, sl st in the final st. 6 sts.
FO, leaving a 7 in (18 cm) sewing tail.
Shape each medium petal with your fingers while the yarn is still flexible. Curve the two upper corners slightly inward. This helps the petals overlap rather than spreading completely flat.
Part 4: Large Outer Petals
Make 10 large petals . These create the broad, open edge of the rose.
Ch 6.
Row 1Hdc in the 2nd ch from the hook, hdc in the next 3 ch, dc in the final ch. 5 sts.
Row 2Ch 1, turn. Work 2 hdc in the first st, hdc in the next 3 sts, 2 hdc in the final st. 7 sts.
Row 3Ch 1, turn. Hdc in the first st, dc in the next 5 sts, hdc in the final st. 7 sts.
Row 4Ch 1, turn. Sl st in the first st, hdc in the next st, dc in the next 3 sts, hdc in the next st, sl st in the final st. 7 sts.
FO, leaving an 8 in (20 cm) sewing tail.
For a more ruffled outer edge, gently stretch the center portion of each large petal while leaving the lower edge compact. The result should be a curved petal that naturally bends away from the center.
Crochet Insight: The layered appearance comes from changing the petal scale rather than using increasingly complicated stitches. Keep the inner petals upright, angle the medium petals outward, and allow the large petals to curl away from the center. This simple change in positioning gives the flower its 3D character.
Special Stitch: Petal Cluster
Petal cluster: Work 3 dc into the indicated stitch, ch 1, then work 3 dc into the same stitch. This creates a broad, rounded petal section. Do not count the chain-1 space as a stitch unless the instructions specifically say otherwise.
Petal shell: Work 2 hdc, 2 dc, ch 1, 2 dc, 2 hdc into the indicated stitch. This forms a taller, curved petal with a defined center point.
Part 5: Assemble the Inner Rose
Place the center with the right side facing upward.
Take one small petal and position its lower edge along the center’s outer round.
Using the petal’s yarn tail, sew through the bottom two or three stitches of the petal and then through the center between stitches.
Pull the thread firmly enough to hold the petal upright, but do not gather the center tightly.
Position the second small petal so it overlaps approximately one-third of the first petal.
Continue adding all 6 small petals around the center.
For the final petal, tuck its right edge underneath the first petal. Sew the two overlapping edges together with a few small stitches.
Gently curl the tops of the petals inward to form the central spiral effect.
At this stage, the center should resemble a small closed rosebud. If it looks too flat, use the yarn tail to make one or two additional stitches through the lower portions of opposite petals, drawing them slightly toward the center.
Part 6: Add the Medium Petal Layer
Arrange the 8 medium petals around the outside of the small-petal layer.
Place the first medium petal so its bottom edge sits slightly lower than the bottom edges of the inner petals.
Sew the lower two or three stitches of the petal to the center foundation.
Place the next petal so it overlaps the previous petal by approximately one-quarter to one-third of its width.
Repeat this placement around the flower until all 8 medium petals are attached.
As you work, angle each petal outward slightly more than the preceding inner layer.
When the eighth petal is positioned, tuck its edge beneath the first medium petal and secure the overlap.
Check the shape before weaving in the tails. From above, you should see a continuous ring of medium petals. From the side, the petals should rise toward the center and then bend gently outward.
Part 7: Add the Large Outer Petal Layer
Arrange all 10 large petals around the base of the flower.
Position the first large petal so its lower edge extends slightly below the medium layer.
Sew the bottom two or three stitches of the petal securely to the center foundation or to the lower edge of the medium layer.
Place the second petal beside the first, overlapping the first by approximately one-quarter of its width.
Continue adding the remaining 8 petals, maintaining an even overlap around the circumference.
Curve the upper portions outward to create a gently open outer edge.
After all 10 petals are attached, inspect the flower from several angles and reposition any petals that are lying completely flat.
Secure the final petal beneath the first outer petal with several small stitches.
The completed flower should have a compact center, a rounded middle section, and a wider outer edge. The exact diameter will vary according to yarn and tension, but the suggested materials should produce a flower close to 4 inches (10 cm) across.
Optional Part 8: Crochet Leaves
Leaves are optional, but they are especially effective when several roses are arranged together. Make as many leaves as needed for your project.
With green yarn, ch 10.
Working along one side of the chain, sl st in the 2nd ch from the hook, sc in the next ch, hdc in the next 2 ch, dc in the next 3 ch, hdc in the next ch, sc in the next ch, and 3 sc in the final ch. 13 stitches around the first side and tip.
Continue along the opposite side of the foundation chain: sc in the next ch, hdc in the next ch, dc in the next 3 ch, hdc in the next 2 ch, sc in the next ch, sl st in the final ch. 13 stitches along the second side.
FO, leaving a 6 in (15 cm) tail.
Use the tail to sew the leaf to the underside of the rose.
For a stronger leaf shape, pinch the leaf lengthwise and make two or three small stitches through the center line. This creates a raised central vein and helps the leaf hold its position.
Fastening Off and Weaving In
Once all petals are attached, check the underside of the rose for loose sewing tails. Knot or secure each tail discreetly through several nearby stitches, then weave the ends through the back of the flower. Trim excess yarn only after the ends are securely woven.
For a decorative bouquet, leave one long tail at the base or attach the rose to floral wire, a crocheted stem, or another suitable support according to the intended use.
Assembly
Step 1Shaping the Finished Flower: Before finalizing the flower, spend a few minutes shaping each layer. Use your fingers to cup the medium petals slightly and flare the large petals outward. The center should remain compact and slightly raised. For cotton yarn, light blocking can help smooth uneven stitches. Rather than pressing the flower flat, lightly dampen it and shape the petals by hand. Allow it to dry completely while maintaining the desired curves.
Step 2Attaching the Rose to Other Projects: The finished rose can be sewn to a crochet bag, hat, scarf, headband, basket, cushion cover, blanket corner, wreath, or decorative textile. For frequently handled items, sew through the lower foundation of several petals rather than attaching only to the center. This spreads the tension and helps prevent the flower from loosening. For a bouquet, arrange flowers at different heights and angles. Combining large and small roses creates a more natural arrangement. Crocheted leaves can be attached beneath individual flowers or grouped between several roses.
Step 3Care Instructions: Care depends on the yarn fiber used. For washable cotton, hand washing or a gentle machine cycle may be appropriate according to the yarn manufacturer’s care instructions. Avoid high heat, which can distort the layered petals. Reshape the flower while damp and allow it to air dry. For decorative flowers that are not intended to be washed, dust them gently with a soft brush or use low airflow from a hair dryer held at a distance. Store finished roses loosely rather than crushing them under heavy objects.
Finishing
- Weave in the yarn tail left from fastening off the center before attaching any petals.
- Stitch each petal to the previous layer individually, leaving its own tail free until positioned.
- Once all layers are attached, weave in remaining ends and lightly dampen the flower to set the shaped curves.
Why it works
The center's three rounds each double the increase pace, going from 8 to 16 to 24 stitches, which keeps it flat and tight rather than domed.
Each petal is worked flat in rows rather than in the round, since a single shaped panel is easier to curve and fasten to the center individually.
The join at the end of each center round (sl st to the first sc) keeps the rounds flat and aligned so the petals have an even base to attach to.
Petal counts rise from six to eight to ten across the three sizes, which is what lets the outer layer spread wider without gapping.
What it becomes
- A brooch or hair clip base, paired with a small felt backing or pin finding.
- An accent flower on a bag or basket, grouped with the optional crocheted leaves.
- A statement piece for a bouquet alongside other crochet flowers in mixed scales.
Original pattern: https://duniarecipe.com/free-crochet-rose-pattern-easy-3d-crochet-flower-tutorial/
FAQ
Can I make the rose smaller without changing the pattern?
Yes, just leave off the optional fourth outer layer and stop at three petal layers. The rose will look more like a partially opened bud.
Do I need stuffing for the center?
No, the center is optional to stuff. A small amount of scrap yarn or stuffing just adds a slightly raised, firmer base for the petals to sit against.
Why are the petals worked flat instead of in the round?
Each petal is a single shaped panel worked in rows, which makes it easier to curve the top and attach it at an angle. Working in the round wouldn't give the same flat, layerable shape.
What yarn weight works best for this rose?
The pattern is written for worsted-weight yarn with a 4.0 mm hook. Sticking close to that weight keeps the three petal sizes proportioned correctly to each other.