Free Pattern
Step-by-Step
Crochet
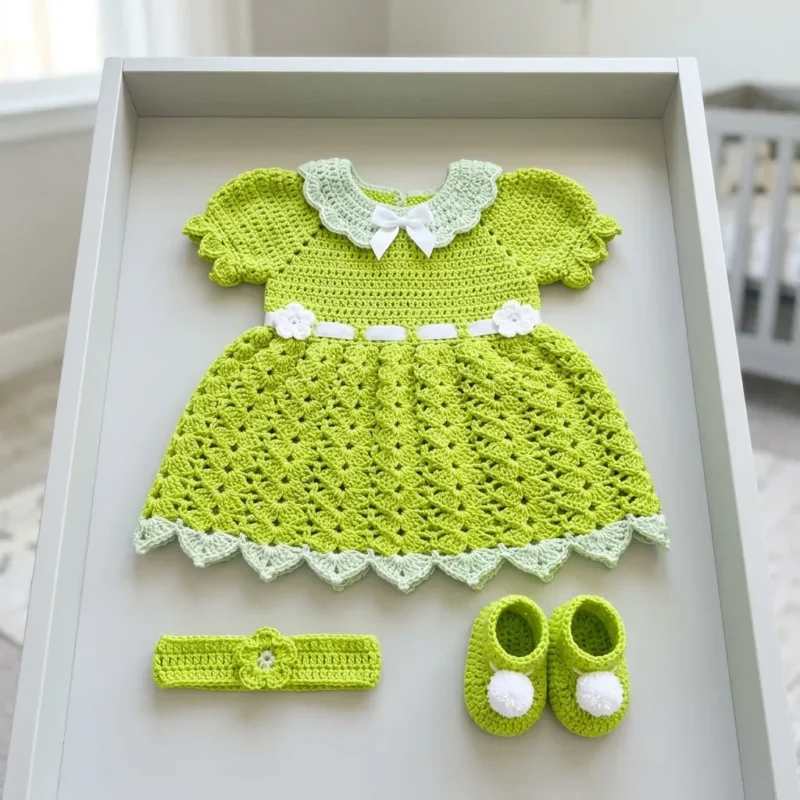
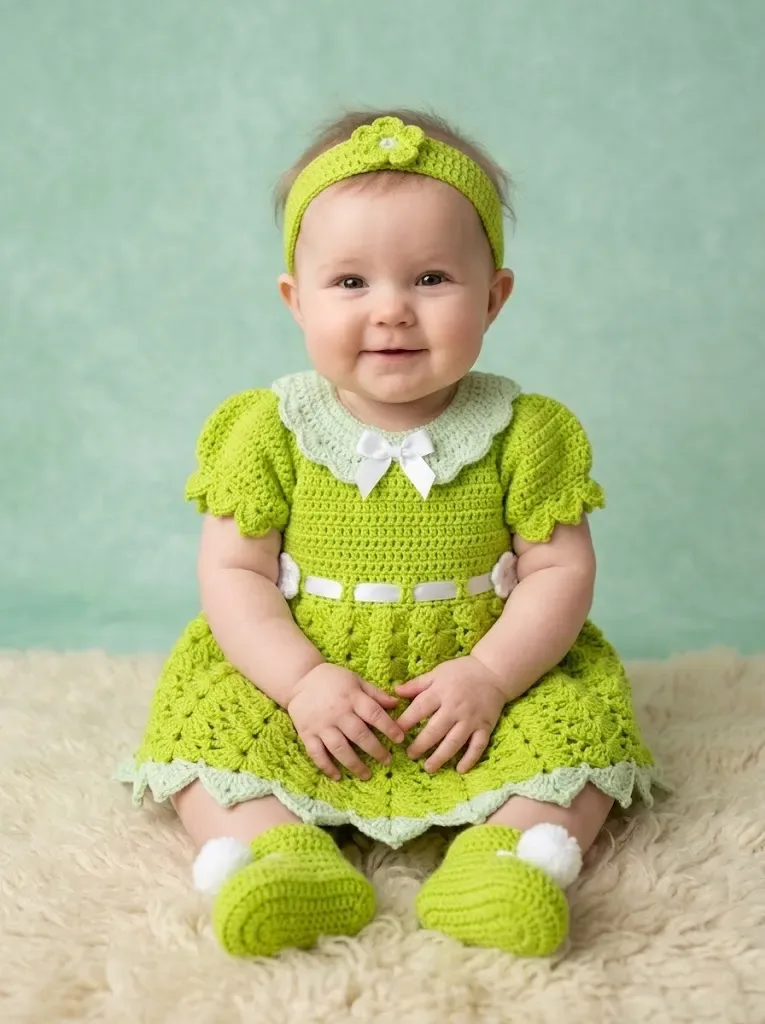
Baby ClothingA lime green fairy dress for baby, crocheted in shells
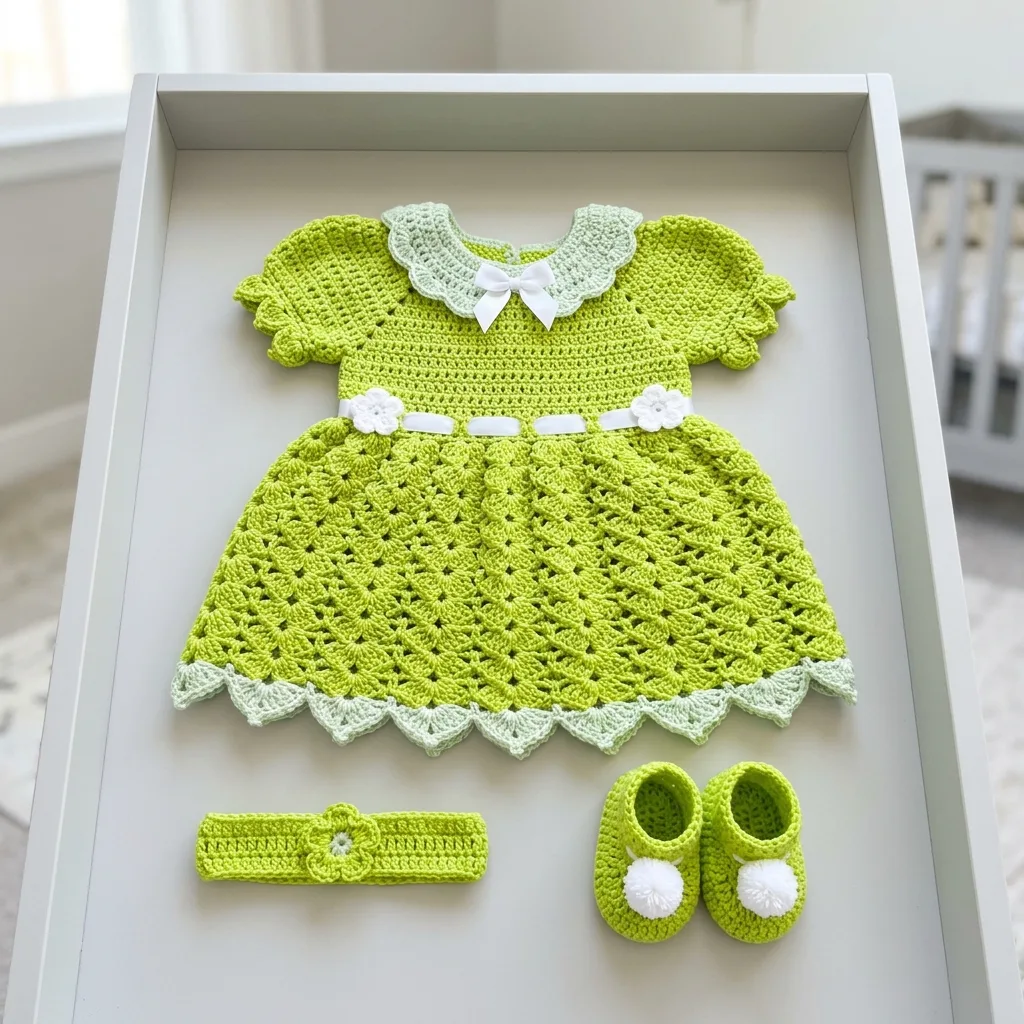
A lime green fairy dress for baby, worked in shell stitch with matching booties.
- Level
- Intermediate
- Time
- 6-8 hours
- Hook
- 4.0 mm
- Yarn
- DK
Pattern highlights
- Set up your materials and markers first, since this dress uses two hook sizes and several colors.
- Work the skirt in joined rounds, building shells on top of shells until the flare reaches its length.
- Pick up stitches around each armhole, work a few plain rounds, then finish the sleeve edge in contrast mint shells.
- Crochet each bootie separately, starting with the sole, building up the sides, then finishing with a cuff.
- Thread ribbon through the waist and collar for ties, then add a bow at the neckline.
- Attach the white flower accents, buttons or beads, and pom poms to the booties as a final touch.
About This Pattern
A piece like this lands in an odd corner of my notebook, somewhere between plush toys and drawstring bags. This dress is not a novelty or a prop. It is a wearable baby garment, built in two colors of DK yarn with a shell stitch skirt. I keep a few of these in my files because they show what joined rounds can do beyond amigurumi heads and bag bodies. A fairy theme just happens to suit lime and mint green.
The skirt works in joined rounds, shell stitch built on shell stitch, each row starting at the center dc of the shell below. The sleeves pick up stitches around the armhole, work a few plain sc rounds, then finish with their own shell edge in a contrast color. The booties follow the usual sole, sides, cuff order. None of this is unusual crochet. What is nice is seeing a shell pattern carried from skirt to cuff, tying the whole dress together without much fuss.
Finished, this is a small lime green dress with a shelled, flared skirt and short sleeves trimmed in mint. White flower accents sit somewhere on the bodice, ribbon ties close the waist, and a small bow finishes the collar. There are matching booties too, with pom poms on the cuffs. It reads more like a costume piece than daily wear, the kind of dress you'd put on for one photograph and then fold away carefully for later.
Common mistakes
- Losing the shell alignment Each shell round joins at the center dc of the shell below, not at a stitch count. Mark that center stitch as you go so the stack doesn't drift.
- Uneven armhole pickup Space the sc stitches evenly around the armhole opening before starting the first sleeve round, or the later shell edge won't sit symmetrically.
- Loose pom pom attachment Tack pom poms to the bootie cuffs with several passes of thread so they survive a baby's grip and the washing machine.
- Skipping two stitches incorrectly Count carefully when the skirt pattern says to skip 2 sts between shells. One stitch off and the shell count won't come out even around the round.
Intermediate
Progress Tracker
0 of 0 rounds
Tap a round to tick it off — your place is saved on this device.
The kit
Yarn
- Main Color (MC): Approximately 200 yards of DK weight yarn in lime green
- Contrast Color (CC): Approximately 50 yards of DK weight yarn in mint green
- Accent Color (AC): Small amount of white yarn for flower embellishments
Hook
- 4.0mm (G/6) crochet hook
- 3.5mm (E/4) crochet hook for edging details
Notions
- Yarn needle for weaving ends
- Scissors
- Stitch markers
- Two small white pom poms for booties
Optional
- small white buttons or flower beads for embellishment
- Stitch Abbreviations and Definitions
- Gauge
- With 4.0mm hook in half double crochet:
- 16 stitches and 12 rows = 4 inches
- Take time to check your gauge! A dress that is too small or too big will not fit properly. Make a small swatch, measure it, and adjust your hook size if needed. Go up a hook size if your swatch is too small, down if it is too large.
Notions
Yarn needle for weaving ends Scissors Stitch markers 1/4 inch white satin ribbon, approximately 24 inches for waist 1/4 inch white satin ribbon, approximately 6 inches for collar bow
Two small white pom poms for booties Optional: small white buttons or flower beads for embellishment Stitch Abbreviations and Definitions
Let me walk you through every stitch you will need. Read through these before starting so nothing catches you off guard.
Ch = Chain. Wrap yarn over hook, pull through loop. This creates your foundation.
Sl st = Slip stitch. Insert hook, yarn over, pull through stitch AND loop on hook in one motion. Used for joining rounds.
Sc = Single crochet. Insert hook, yarn over, pull up a loop (2 loops on hook), yarn over, pull through both loops. The shortest basic stitch.
Hdc = Half double crochet. Yarn over, insert hook, yarn over, pull up a loop (3 loops on hook), yarn over, pull through all 3 loops. Slightly taller than single crochet.
Dc = Double crochet. Yarn over, insert hook, yarn over, pull up a loop (3 loops on hook), yarn over, pull through 2 loops, yarn over, pull through remaining 2 loops. Creates a taller, more open fabric.
Shell = Work 5 dc into the same stitch. This creates the fan shape that makes the skirt so pretty.
Inc = Increase. Work 2 stitches into the same stitch.
Sk = Skip. Miss the indicated stitch and work into the next one.
Gauge With 4.0mm hook in half double crochet: 16 stitches and 12 rows = 4 inches
Take time to check your gauge! A dress that is too small or too big will not fit properly. Make a small swatch, measure it, and adjust your hook size if needed. Go up a hook size if your swatch is too small, down if it is too large.
Pattern Notes The bodice is worked flat in rows, then joined to work the sleeves and skirt.
The skirt is worked in joined rounds from the waist down.
The peter pan collar is worked separately and attached.
Stitch counts are provided at the end of each row or round in parentheses.
Mark the beginning of each round with a stitch marker.
Tinkerbell Green Fairy Baby Dress Pattern Instructions Bodice Back Using MC and 4.0mm hook:
Round 1Ch 27. Hdc in 3rd ch from hook and in each ch across. Turn. (25 hdc)
Round 2Ch 2 (does not count as a stitch here and throughout), hdc in each st across. Turn. (25 hdc)
Round 3through 10: Repeat Row 2. (25 hdc) Fasten off. Set aside. Bodice Front Work exactly as Bodice Back through Row 10. Do not fasten off.
Joining Bodice and Creating Armholes
Round 11Ch 2, hdc in first 6 sts (right front shoulder), ch 5 for underarm, skip to back piece, hdc across 25 sts of back, ch 5 for second underarm, hdc in last 6 sts of front (left front shoulder). Turn. (37 hdc, 10 ch)
Round 12Ch 2, hdc in each st and ch across. Turn. (47 hdc)
Round 13Ch 2, hdc in each st across. Turn. (47 hdc) This creates your waist edge. Now we will add the shell stitch skirt.
Skirt
Change to working in joined rounds. Join with a sl st to form a tube.
Round 1Ch 1, sc in each st around, sl st to first sc to join. (47 sc)
Round 2Ch 3 (counts as first dc), dc in same st, sk 2 sts, *shell in next st, sk 2 sts*, repeat from * around, 3 dc in same st as beginning ch 3, sl st to top of ch 3 to join. (15 shells plus 2 half shells at join)
Round 3Sl st to center dc of first shell, ch 3, 4 dc in same st (first shell made), *shell in center dc of next shell*, repeat from * around, sl st to top of ch 3 to join.Rounds 4 through 12: Repeat Round 3.
Round 13Border Round Change to CC. Sl st to center dc of first shell, ch 1, *sc in center dc of shell, ch 3, sc in same st*, repeat from * around, sl st to first sc to join.Fasten off and weave in ends.
Sleeves (Make 2)
Join MC at underarm with a sl st.
Part 7
Round 1Ch 1, work 24 sc evenly around armhole opening, sl st to first sc to join. (24 sc)
Round 2through 4: Ch 1, sc in each st around, sl st to first sc to join. (24 sc)
Round 5Shell Edge Ch 3, 2 dc in same st, sk 2 sts, *shell in next st, sk 2 sts*, repeat from * around, 2 dc in same st as beginning, sl st to top of ch 3 to join. (8 shells)(8)
Round 6Change to CC. Sl st to center dc of first shell, ch 1, *sc in center dc of shell, ch 2*, repeat from * around, sl st to first sc to join.Fasten off. Repeat for second sleeve.Peter Pan Collar Using CC and 4.0mm hook:
Part 8
Round 1Ch 50. Sc in 2nd ch from hook and in each ch across. Turn. (49 sc)
Round 2Ch 1, sc in first st, *sk 1 st, shell in next st, sk 1 st, sc in next st*, repeat from * across. Turn. (12 shells)(12)
Round 3Ch 3, 2 dc in first sc, *sc in center dc of shell, shell in next sc*, repeat from * across, ending with 3 dc in last sc. Turn.
Round 4Ch 1, sc in first dc, *shell in sc, sc in center dc of shell*, repeat from * across, sc in top of turning ch.Fasten off. The collar will naturally curve due to the shell construction.Collar Edging Using white yarn and 3.5mm hook, join at one corner of collar.Edging Round: Ch 1, sc evenly around entire collar edge, working 3 sc in each corner. Sl st to first sc. Fasten off.Matching Headband Pattern Using MC and 4.0mm hook:
Part 9
Round 1Ch 8. Sc in 2nd ch from hook and in each ch across. Turn. (7 sc)
Round 2through 45: Ch 1, sc in each st across. Turn. (7 sc) The band should measure approximately 14 inches. Adjust length as needed.Fasten off, leaving a long tail. Sew short ends together to form a loop.Flower Embellishment Using white yarn and 3.5mm hook: Magic Ring: Ch 1, work 5 sc into ring, sl st to first sc. Pull ring tight.Petal Round: *Ch 3, sl st in same st*, repeat from * in each sc around. (5 petals)Fasten off. Sew flower to center of headband. Add a small bead or button to flower center if desired.
Matching Booties Pattern (Make 2)
Using MC and 4.0mm hook:
Sole
Round 1Ch 10. Sc in 2nd ch from hook and in next 7 ch, 3 sc in last ch (this turns the corner). Working along opposite side of foundation ch, sc in next 7 sts, 2 sc in last st, sl st to first sc. (20 sc)
Round 2Ch 1, 2 sc in first st, sc in next 7 sts, 2 sc in each of next 3 sts, sc in next 7 sts, 2 sc in each of next 2 sts, sl st to first sc. (26 sc)
Round 3Ch 1, sc in first st, 2 sc in next st, sc in next 7 sts, *sc in next st, 2 sc in next st* 3 times, sc in next 7 sts, *sc in next st, 2 sc in next st* twice, sl st to first sc. (32 sc)
Sides
Round 4through 6: Ch 1, working in back loops only for Round 4 then both loops for Rounds 5 and 6, sc in each st around, sl st to first sc. (32 sc)
Toe Shaping
Round 7Ch 1, sc in first 10 sts, *sc2tog* 6 times, sc in remaining 10 sts, sl st to first sc. (26 sc)Sc2tog = Single crochet decrease. Insert hook in first st, pull up a loop, insert hook in next st, pull up a loop, yarn over, pull through all 3 loops on hook.
Round 8Ch 1, sc in first 10 sts, *sc2tog* 3 times, sc in remaining 10 sts, sl st to first sc. (23 sc)
Cuff
Round 9through 11: Ch 1, sc in each st around, sl st to first sc. (23 sc)
Round 12Edging Ch 1, *sc in next st, ch 1, sk 1 st*, repeat around, sl st to first sc.Fasten off. Sew white pom pom to top center of each bootie.
Assembly and Finishing
Weaving in Ends
Use your yarn needle to weave all remaining yarn tails into the wrong side of the fabric. Weave through several stitches, then back through in the opposite direction for security. Trim close to fabric.
Care Instructions
Hand wash in cool water with mild detergent or machine wash on delicate cycle in a mesh laundry bag. Lay flat to dry and reshape while damp. Do not hang dry as this can stretch the garment. Store folded rather than hanging.
Tips for Success with This Crochet Baby Dress Pattern
Round 1Counting stitches: The shell stitch rounds can get tricky to count. Remember that each shell has 5 double crochets with the center one being your landmark for the next round. Place stitch markers if needed.Tension consistency: Try to keep your tension even throughout the project. The bodice needs to be slightly firmer than the skirt for structure.(5)
Round 2Sizing adjustments: To make this dress larger, add more chains to your starting chain (in multiples of 4 for the shell pattern to work) and add more rows to the bodice before joining.
Color variations: This pattern works beautifully in any color combination. Try soft pink with white, lavender with mint, or classic white with pale yellow accents.
I really hope you enjoy making this sweet little dress set! It makes such a thoughtful handmade gift, and I just know the lucky baby who receives it will look absolutely precious. If you make this pattern, I would absolutely love to see your finished project. Tag me on Instagram or share it in my Facebook group so I can cheer you on!
Be sure to save this Tinkerbell Green Fairy Baby Dress crochet pattern to your Pinterest boards so you can find it whenever you are ready to start stitching. And please drop a comment below if you make it. I read every single one and your photos make my whole day!
From the collection
Finishing
- Weave in every color change end from the skirt, sleeve, and bootie color swaps before adding any trim.
- Thread the ribbon through the waist and collar, tying a bow at the front and at the collar.
- Sew on the white flower accents and buttons or beads, then stitch a pom pom to each bootie cuff.
Why it works
Skirt Round 2 sets the shell pattern by skipping two stitches between each shell; every later round joins at the center dc of the shell below, stacking shells rather than counting stitches.
Each sleeve starts by picking up stitches directly around the armhole opening, so the sleeve is worked in the round from the body outward rather than seamed on afterward.
The shell-edge trim on the sleeve changes to the contrast color only at the final round, keeping the main sleeve body in the main color and the chain-2 detail isolated to the edge.
What it becomes
- A dress for a single photo session, paired with plain white socks or tights.
- A keepsake piece for a baby's first year, stored alongside the matching booties.
- A costume-style outfit for dress-up play once baby is a toddler, paired with soft slippers.
FAQ
Can I use cotton yarn instead of acrylic?
Yes, a cotton or cotton-blend DK yarn works fine for this dress. Just expect less stretch than acrylic, so check the fit around the armholes as you go.
Do I need to make the flowers and booties, or can I skip them?
They're embellishments, so the dress holds together without them. I'd still add at least the ribbon ties, since they're how the waist and collar close.
What if my shell count doesn't match after Round 2 of the skirt?
Recount your skip-2 repeats before moving to Round 3, since every later round joins at the center dc of each shell. A miscount here carries through the rest of the skirt.