Free Pattern
Step-by-Step
Crochet
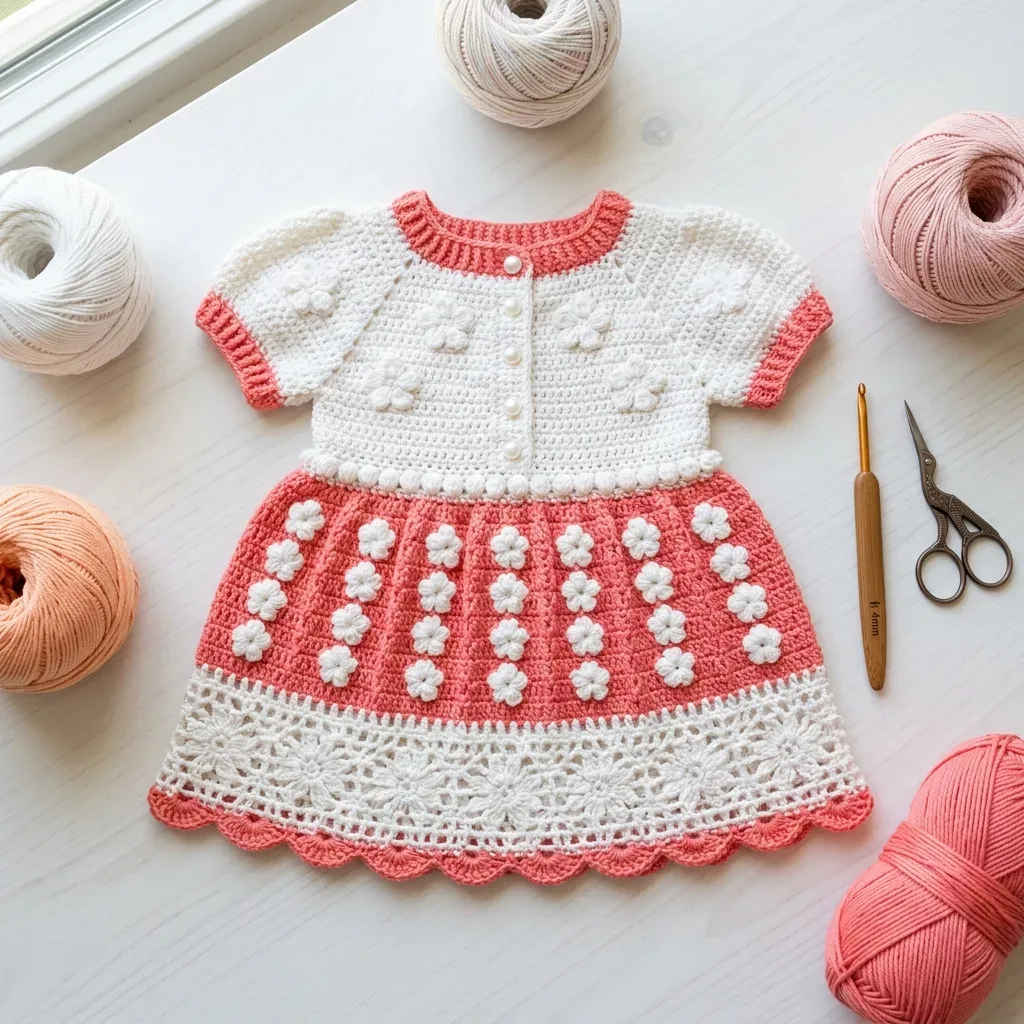
Baby ClothingCoral bloom baby dress with daisies and lace trim
A top-down crochet baby dress with a raglan yoke, popcorn stitches, lace border, and daisies.
- Level
- Advanced
- Time
- 18-25 hours
- Hook
- 3.25 mm
- Yarn
- DK
Pattern highlights
- Crochet the coral neckline ribbing as a flat strip, then seam the short ends into a ring.
- Pick up stitches around the ring and work the yoke flat, increasing at each raglan marker while popcorn stitches bloom across the front.
- Divide at the markers to set aside sleeve stitches, then join the body stitches to work the skirt in the round.
- Work the waist bobble divider, then continue the skirt body down to hem length.
- Make the sleeves separately with coral cuffs, then crochet the daisy appliques from magic rings in spare moments.
- Finish with the button band, sew the daisies onto the skirt in columns, and block the whole dress flat.
About This Pattern
I keep a shelf of baby garments, and most are quick colorwork stripes stitched up in an afternoon. This one is different. The Coral Bloom Baby Dress sits at the fussier end of my collection, with a button-back yoke and a two-hook system. It is the kind of pattern I pull out when I actually want to use my stitch markers for once, not just carry them around.
The yoke carries raised popcorn stitches made from five double crochets closed by pulling a dropped loop through the first stitch of the group. The skirt shells and the lace border scallops lean on the same five-stitch cluster logic, just left open instead of popped. Thirty daisy appliques are worked separately from magic rings, with simple petals chained around each flower center.
What comes off the hook is a fitted little dress with short coral cuffs, a lace-edged hem, and a scattering of cream daisies down the skirt. It is sized for an 18-month chest, built top-down with a button opening at the back. The lace border alone, pinned open for blocking, is worth the hours it takes to get there.
Worth knowing
What I like here is the popcorn stitch doing actual structural work, not just texture for texture's sake. Each popped cluster on the yoke reads as a tiny raised flower, and watching it pop toward the right side on cue is satisfying every single time. The shell-and-scallop lace border is the payoff section: after rounds of plain single crochet, it finally lets the hook show off. And the daisy appliques, worked from magic rings with six petals each, are small enough to carry in a project bag for evening rounds in front of the television. Thirty of them is a commitment, but sewing them into columns down the coral skirt turns a plain dress into something with a story.
Common mistakes
- Popcorn stitch popping the wrong way Insert the hook from front to back into the first dc of the group, not back to front. That's what sends the popcorn toward the right side.
- Ribbing worked into both loops Work Rows 2 and 3 of the neckline strip into the back loop only. Ribbing worked into both loops loses the stretch the collar needs.
- Losing track of raglan markers Keep a stitch marker at each raglan point through every increase row. Move them up as you work, or the increases drift off line.
- No sewing tail on daisies Leave the full fastening-off tail on each daisy applique. You will need it to tack all thirty flowers onto the skirt later.
- Skipping the gauge swatch Swatch both the sc yoke gauge and the hdc skirt gauge before casting on. This dress is fitted, and a stitch off per inch changes the fit.
Advanced
Progress Tracker
0 of 0 rounds
Tap a round to tick it off — your place is saved on this device.
The kit
Yarn
- Yarn A (Cream/White): DK weight, 100% cotton or cotton blend, approximately 350 yards or 320 meters
- Yarn B (Coral): DK weight, 100% cotton or cotton blend, approximately 280 yards or 256 meters
Recommended yarn options
- Paintbox Yarns Cotton DK in Coral and Paper White
- Drops Safran DK
- Lion Brand 24/7 Cotton in Ecru and Coral
Hooks
- US size D/3 (3.25 mm) for yoke and main body
- US size C/2 (2.75 mm) for lace border and daisy appliques
Notions
- 3 small pearl or white buttons, approximately 10 mm diameter
- At least 6 stitch markers
- Yarn needle for seaming and weaving ends
- Scissors
- Blocking board and rust-proof pins
- Spray bottle or basin for wet blocking
Three-Dimensional Daisy Applique
You will make 30 of these little flowers. Each one measures about 0.75 inches across.
With US C/2 hook and Yarn A, make a magic ring.
Round 1Ch 1, work 6 sc into ring, join with sl st to first sc. (6 sc)
Round 2Petals (Ch 4, sl st into 2nd ch from hook, sc in next ch, hdc in next ch, sl st into next sc of Round 1) 6 times. (6 petals formed)Fasten off leaving a 10-inch tail for sewing.(6)
Section 1: Neckline Ribbing
The neckline starts as a horizontal strip worked in Yarn B (coral), then seamed into a ring.
With Yarn B and D/3 hook, ch 9.
Round 1(RS): Sc in 2nd ch from hook and in each ch across. Turn. (8 sc)
Round 2(WS): Ch 1, sc in BLO of each st across. Turn. (8 sc)
Round 3(RS): Ch 1, sc in BLO of each st across. Turn. (8 sc) Repeat Rows 2 and 3 until piece measures 13 inches long, approximately 54 rows total.Do not fasten off. Fold the strip with short ends together and sl st the two short edges together to form a ring. You now have a ribbing ring with 54 ridges around.
Section 3: Yoke (Worked Flat)
The yoke is worked flat to allow for the button opening at center back. Turn your work so the WS faces you.
Round 1(WS): Ch 1, sc across all 108 sts. Turn. (108 sc)
Round 2RS, increase row Ch 1, sc to 1 st before first raglan marker, 2 sc in next st, 2 sc in next st, sc across sleeve to 1 st before next marker, 2 sc in next st, 2 sc in next st, sc across back to 1 st before next marker, 2 sc in next st, 2 sc in next st, sc across sleeve to 1 st before last marker, 2 sc in next st, 2 sc in next st, sc to end. Turn. (116 sc)
Round 3(WS): Ch 1, sc across. Turn. (116 sc) Continue this pattern: increase on every RS row, plain sc on every WS row. Work a total of 14 raglan increase rows.
After Row 28, you will have 220 sts total.
Popcorn Placement Rows:
Round 14RS, increase + popcorn row Work the increase row as established. On the right front section, work: sc 4, pc, sc 4, pc, sc to end of section. On the back section: sc 12, pc, sc 12, pc, sc 12, pc, sc to end. Mirror on left front. Complete sleeves with plain sc and increases. Turn. (164 sc)
Round 15(WS): Ch 1, sc across all sts, working sc into top of each popcorn. Turn. (164 sc)Continue through Row 29, placing popcorns on Rows 18 and 22 in offset and aligned positions as specified in the full pattern.
Round 30(RS): Switch to Yarn B. Ch 1, sc across all 220 sts. Turn. (220 sc)
Round 31(WS): Ch 1, sc across in Yarn B. Turn. (220 sc) Fasten off Yarn B. This coral stripe marks your waistline.
Section 5: Waist Bobble Divider
Round 1Yarn B Join Yarn B. Ch 3 (counts as dc), dc in each st around. Join. (152 dc)
Round 2Ch 3, dc in each st around. Join. (152 dc)
Round 3Bobble divider Ch 3, dc in next 2 sts, make a small bobble, (dc 3, bobble) around. Join. (152 sts)
Section 6: Skirt Body
The skirt uses hdc with evenly spaced increases to create that beautiful A-line flare.
Skirt Round 1 (increase): Ch 2, (hdc 10, 2 hdc in next) 13 times, hdc 9. Join. (165 hdc)
Skirt Rounds 2 and 3: Ch 2, hdc in each st around. Join. (165 hdc)
Skirt Round 4 (increase): (Hdc 10, 2 hdc in next) 15 times. Join. (180 hdc)
Skirt Rounds 5 through 7: Plain hdc. (180 hdc)
Continue the increase pattern every 4th round:
Round 8increase to 195 hdc
Round 12increase to 210 hdc
Round 16increase to 225 hdc
Round 20increase to 240 hdc Skirt Rounds 21 through 24: Plain hdc. (240 hdc) Fasten off Yarn B. Your skirt body should measure approximately 6 inches from the waist divider.
Section 2: Yoke Pickup Row
With RS facing, using Yarn A and D/3 hook, join Yarn A to any seam point on the top edge of the neckline ribbing.
Pickup Round (RS): Ch 1, work 1 sc evenly into each row end around the neckline ribbing. Pick up 108 sc total. Join with sl st to first sc. Do not turn. (108 sc)
Place markers to divide for yoke sections: Right front: sts 1 through 17 (17 sts)
Right sleeve: sts 18 through 29 (12 sts)
Back: sts 30 through 79 (50 sts)
Left sleeve: sts 80 through 91 (12 sts)
Left front: sts 92 through 108 (17 sts)
Check your math: 17 + 12 + 50 + 12 + 17 = 108. Perfect.
Section 4: Divide for Sleeves and Join Body
With RS facing, join Yarn A to the right front section.
Round 1Separation Row (RS): Ch 1, sc across 31 right front sts, skip 40 sleeve sts (place on holder), ch 6 for underarm, sc across 78 back sts, skip 40 sleeve sts onto holder, ch 6 for underarm, sc across 31 left front sts. Join with sl st to first sc to form a ring. (152 sts)
Round 2Body Setup Round Ch 2 (does not count as st), hdc in each st and each ch around. Join with sl st to first hdc. (152 hdc)
Section 7: Lace Border
Join Yarn A to any stitch.
Round 1Transition Round: Ch 1, sc in each hdc around. Join. (240 sc)
Round 2Lace Round 1: Ch 4 (counts as dc, ch 1), skip 1 st, (dc in next st, ch 1, skip 1 st) around. Join. (120 dc, 120 ch-1 sp)(120)
Round 3Lace Round 2 (fan round): Sl st into first ch-1 sp. (Sc in sp, skip 1 sp, shell of 5 dc into next sp, skip 1 sp, sc in next sp, ch 3) around. Join. (30 shells)Continue through Lace Rounds 3, 4, and 5 as specified, then finish with the scallop edging in Yarn B.(5)
Section 8: Sleeves
Work both sleeves identically.
Round 1Remove sleeve sts from holder. With Yarn A and D/3 hook, join yarn to center of underarm chain.
Round 2Sleeve Setup Round Ch 1, sc across 6 underarm chain sts, sc in each of 40 held sleeve sts. Join. PM. (46 sc)
Round 3Sleeve Rounds 1 and 2: Ch 2, hdc in each st around. Join. (46 hdc)
Round 4Sleeve Round 3 (decrease): Ch 2, hdc2tog, hdc to last 2 sts, hdc2tog. Join. (44 hdc)
Round 5Continue working the sleeve with decreases as needed, then finish with 2 rounds of BLO sc in Yarn B for the coral cuff.
Assembly
Step 1Button band: Work a row of sc along each center back opening edge, adding 3 evenly spaced button loops (ch 3, skip 1) on one side.
Step 2Daisy placement: Sew your 30 daisy appliques onto the coral skirt in vertical columns, spacing them evenly. The image shows approximately 5 to 6 daisies per column.
Step 3Blocking: Wet block the finished dress, pinning the lace border open to show off those beautiful fans and scallops.
Step 4Sew on your 3 pearl buttons opposite the button loops.
Finishing
- Weave in every yarn end left from the color changes between Yarn A and Yarn B.
- Wet block the dress, pinning the lace border open so the shells and scallops hold their shape.
- Sew the pearl buttons opposite the loops, then stitch the daisy appliques onto the skirt columns.
Why it works
The raglan increases land at the marker points on every right-side row, doubling stitches there while the rest of the row stays flat.
The yoke is worked flat, row by row, so the center back button opening can stay open until the band is added later.
Dividing at the markers separates sleeve stitches from body stitches, and rejoining the body stitches turns the flat yoke into a round skirt.
What it becomes
- An everyday outfit for an 18-month-old, paired with simple white tights and soft shoes.
- A portrait-session dress, since the lace hem and daisies photograph well against a plain backdrop.
- A handmade gift for a new baby, handed over with the buttons already sewn on.
Original pattern: https://bunnypatterns.com/coral-bloom-baby-dress-free-crochet-pattern/
FAQ
Why is the yoke worked flat instead of in the round?
The button opening sits at center back, and working flat lets me keep that opening accessible while shaping the raglan increases. Joining happens later when I divide for sleeves and move into the skirt.
Can I use a different yarn weight?
Stick with DK weight if you want the dress to hit its finished size. Changing weight means re-swatching both the sc and hdc gauges before you start.
Do all thirty daisies need to be finished before assembly?
No, I crochet them in batches during spare evenings, then sew them on in columns once the skirt is done. Spacing them evenly matters more than finishing them in one sitting.
What if my gauge doesn't match?
Swap hook sizes up or down until your swatch matches the stated stitch counts per inch. This is a fitted garment, so even a small gauge gap changes the final chest measurement.