Free Pattern
Step-by-Step
Crochet
Baby ClothingRaglan fan stitch baby dress in two colors
A top-down baby dress with fan stitch raglan yoke and ribbon waist casing.
- Level
- Intermediate
- Time
- 4-6 hours
- Hook
- 3.5 mm
- Yarn
- DK
Pattern highlights
- Chain a foundation strip and work two rows of single crochet to form the neckline band.
- Turn the strip so the chain edge sits at the top and join the second color there.
- Work the yoke in turned rows, placing four markers to mark the raglan points.
- Alternate increase rows, which add stitches at each marker, with plain rows worked even.
- Continue the yoke rows until the raglan sections reach full width for the body and sleeves.
- Join underarm stitches into rounds and edge each sleeve opening with two rounds of single crochet.
- Set the ribbon into a waist casing and thread the star charm onto the ends.
About This Pattern
Every collection needs one baby garment that isn't just a square with armholes. This is that piece. It starts as a plain neckline strip and turns, a few rounds later, into a shaped raglan yoke. I like patterns that earn their shape rather than assuming it.
The technique of note here is raglan shaping worked flat, in rows, with four stitch markers doing the real work of dividing the body into front, back, and two sleeves. Each increase row adds stitches at all four points at once, which is tidier than it sounds once you've done it twice.
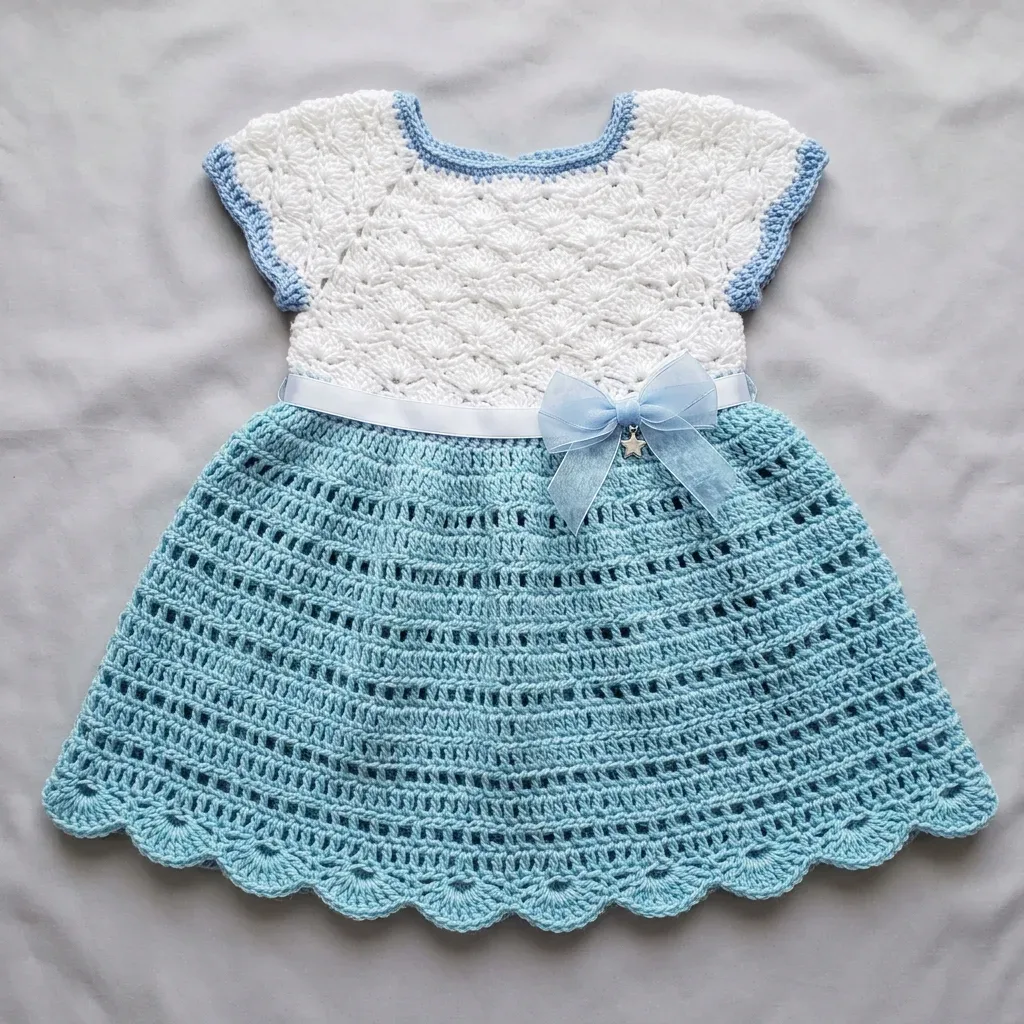
The finished object is a two-color dress, white and light blue, with a fan stitch yoke, set-in sleeve edging, and a ribbon casing at the waist. A star charm threads onto the ribbon ends. Small dress, several ideas packed in.
This pattern is rated intermediate level. You should be comfortable working in joined rounds, reading stitch repeats, and managing stitch counts. Instructions are written for the 6-month size (Chest 16 inches / 40.5 cm, Length 11.5 inches / 29 cm); sizes 0-3 months (Chest 14 in / 35.5 cm, Length 10 in / 25.5 cm) and 12 months (Chest 18 in / 45.5 cm, Length 13 in / 33 cm) are also included.
Worth knowing
The satisfaction is in the raglan math working out without a calculator. Four markers, eight stitches added per increase row, and the sections stay proportional the whole way through — left front, left sleeve, back, right sleeve, right front. I also like that the sleeve openings get their own quiet finish afterward, joined in the round with a simple sc edging, so nothing about the armhole looks like an afterthought. The ribbon casing at the waist is the kind of detail that turns a plain bodice into something a person will actually dress a baby in twice. It's a small pattern with a real technique at its center, not just repeated rows.
Common mistakes
- Losing track of the four markers Move each marker up into the new stitch every row, right after working the increase there. Skipping this makes the next increase row land in the wrong place.
- Turning the neckline strip the wrong way Check that the foundation chain edge sits at the top before joining Yarn A. The pattern depends on working into that specific edge, not the last sc row.
- Forgetting the ch-3 counts as a stitch Treat the turning ch-3 as the first dc in every yoke row. Miscounting here throws off every stitch count downstream.
- Uneven sc count around the sleeve opening Count sleeve stitches and underarm chain stitches separately before starting the edging round. The two groups need to add up to the stated total.
- Ribbon too short after threading Check the ribbon length against the waist casing before cutting the ends level. There's no adding more once it's through.
Intermediate
Progress Tracker
0 of 0 rounds
Tap a round to tick it off — your place is saved on this device.
The kit
- The techniques you will use include:
- Raglan-style yoke shaping
- Fan and shell stitches
- Color changes
- Working in back loop only for the ribbon casing
- Scalloped border construction
- Option 1: Paintbox Yarns Simply DK (100% acrylic, 137 yd per 50 g). Colors: Pure White and Sailor Blue. This gives excellent stitch definition and is easy to care for.
- Option 2: Scheepjes Cahlista (100% mercerized cotton, 85 yd per 50 g). Colors: White (106) and Cyan (397). Cotton provides beautiful drape and breathability for warmer months.
- Option 3: Lion Brand Pound of Love (100% acrylic, 1020 yd per 454 g). Colors: White and Pastel Blue. Soft, machine washable, and economical for gift projects.
- Substitution Note: Use any smooth DK weight yarn that achieves gauge. Avoid fuzzy or textured yarns because the fan and shell stitches will lose their definition. If using cotton, check your gauge carefully since cotton has less stretch than acrylic.
- Yarn A (White): DK weight yarn, approximately 120 yards (110 m)
- Yarn B (Light Blue): DK weight yarn, approximately 200 yards (183 m)
Hook
- US size E-4 / 3.5 mm crochet hook
Notions
- Yarn needle, 4 stitch markers, 24 inches (61 cm) of 3/8 inch (1 cm) satin ribbon in white, 1 small star charm, scissors
Neckline Foundation
Using Yarn B and hook E-4, ch 61.
Do not fasten off. Turn your work so the foundation chain edge is at the top and you are working into the bottom of Row 1.
Join Yarn A with a sl st at the right end of the foundation chain edge.
Row 1(RS): Sc in 2nd ch from hook and in each ch across. Turn. (60 sc)
Row 2Ch 1, sc in each sc across. Turn. (60 sc)
Yoke
The yoke is worked in rows, turning, in the fan stitch pattern with raglan shaping. Four markers divide the work into 5 sections: left front, left sleeve, back, right sleeve, right front.
Yoke Section Counts at Start: Left front 12 sts, Left sleeve 8 sts, Back 20 sts, Right sleeve 8 sts, Right front 12 sts. Total 60 sts.
Yoke Increase Method: Each increase row adds 8 sts total, 2 sts at each of the 4 raglan marker points (1 st before marker, 1 st after marker). Work 2 dc in the st before marker, sm, work 2 dc in the st after marker.
Yoke Row 1Increase, RS Ch 3, dc in each st to 1 st before first marker, 2 dc in next st, sm, 2 dc in next st, dc to 1 st before second marker, 2 dc in next st, sm, 2 dc in next st, dc to 1 st before third marker, 2 dc in next st, sm, 2 dc in next st, dc to 1 st before fourth marker, 2 dc in next st, sm, 2 dc in next st, dc to end. Turn. (68 sts)
Yoke Row 2Plain Ch 3, dc in each st across. Turn. (68 sts)
Yoke Row 3Increase Repeat increase row method. (76 sts)
Yoke Row 4Plain Ch 3, dc in each st across. Turn. (76 sts)
Yoke Row 5Increase Add 8. (84 sts)
Yoke Row 6Plain Ch 3, dc in each st across. Turn. (84 sts)
Yoke Row 7Increase Add 8. (92 sts)
Yoke Row 8Plain Ch 3, dc in each st across. Turn. (92 sts)
Yoke Row 9Increase Add 8. (100 sts)
Yoke Row 10Plain Ch 3, dc in each st across. Turn. (100 sts)
Now you will work the fan stitch rows across the bodice front and back only. Time for sleeve separation.
Set aside the 18 sleeve sts per sleeve. You will return to these.
Sleeve Sep RowCh 3, dc in each of first 17 sts (right front), ch 4, skip 18 sleeve sts (right sleeve), dc in each of next 30 sts (back), ch 4, skip 18 sleeve sts (left sleeve), dc in each of last 17 sts (left front). Turn. (72 working sts: 17 + 4 + 30 + 4 + 17)(72)
Sleeve Cap and Sleeve Edging
Make 2Join Yarn B at underarm with sl st.
Sleeve Edging 1Rnd Ch 1, sc evenly around sleeve opening: sc in each of 18 sleeve sts, sc in each of 4 ch sts at underarm. Join with sl st to first sc. (22 sc)
Sleeve Edging 2Ch 1, sc in each sc around. Join. (22 sc)Fasten off Yarn B. Weave in ends. Repeat for second sleeve.
Assembly
Step 1Weave in all ends securely, leaving at least 6 inches (15 cm) of tail for weaving.
Step 2Wet blocking is strongly recommended. Soak the dress in cool water with a small amount of wool wash or gentle soap for 15 minutes. Do not wring. Gently press water out by rolling in a clean dry towel. Lay flat on a blocking mat and pin to the finished measurements. Allow to dry completely before unpinning, at least 24 hours.
Step 3Blocking opens the fan stitches and mesh rows beautifully and evens out the scallop hem. Remove ribbon before blocking and rethread after the dress is dry.
Finishing
- Weave in every color change end from the neckline join, the yoke, and both sleeve joins.
- Thread the satin ribbon through the waist casing round and knot or tie as needed.
- Slide the star charm onto one or both ribbon ends before the final knot.
Why it works
The neckline is built first as two flat rows, then rotated so its foundation chain becomes the base for the yoke — one strip serving two edges.
Increases land only at the four marker points, which is what keeps the raglan lines straight from underarm to neckline.
The yoke stays in turned rows rather than joined rounds because raglan shaping needs a visible right side to track where each increase falls.
The sleeve caps get their own small worked rounds after the yoke splits, closing the underarm gap with chain stitches before edging.
What it becomes
- A first outfit for a new baby, paired with plain white tights and soft-soled shoes.
- A gift piece for a baby shower, wrapped with the same ribbon color as the casing.
- A photo-session dress, since the fan stitch yoke reads well in close-up shots.
Original pattern: https://crochetwithmia.com/ocean-blue-baby-dress-free-crochet-pattern/
FAQ
Why does the yoke get worked flat instead of in rounds?
Raglan shaping needs turned rows so you can see the right side and place increases accurately at each marker. Working it in joined rounds would blur where the raglan lines fall.
What is the ribbon casing actually doing?
It's a round of back-loop-only single crochet at the waist join, which leaves a channel for the ribbon to run through. That's what lets the skirt cinch at the waist.
Do I need all four stitch markers or can I estimate?
Use all four. They mark the exact raglan points, and the increase method depends on working into the stitch before and after each one.