Free Pattern
Step-by-Step
Crochet
Baby ClothingA crochet baby dress with a matching bolero cardigan
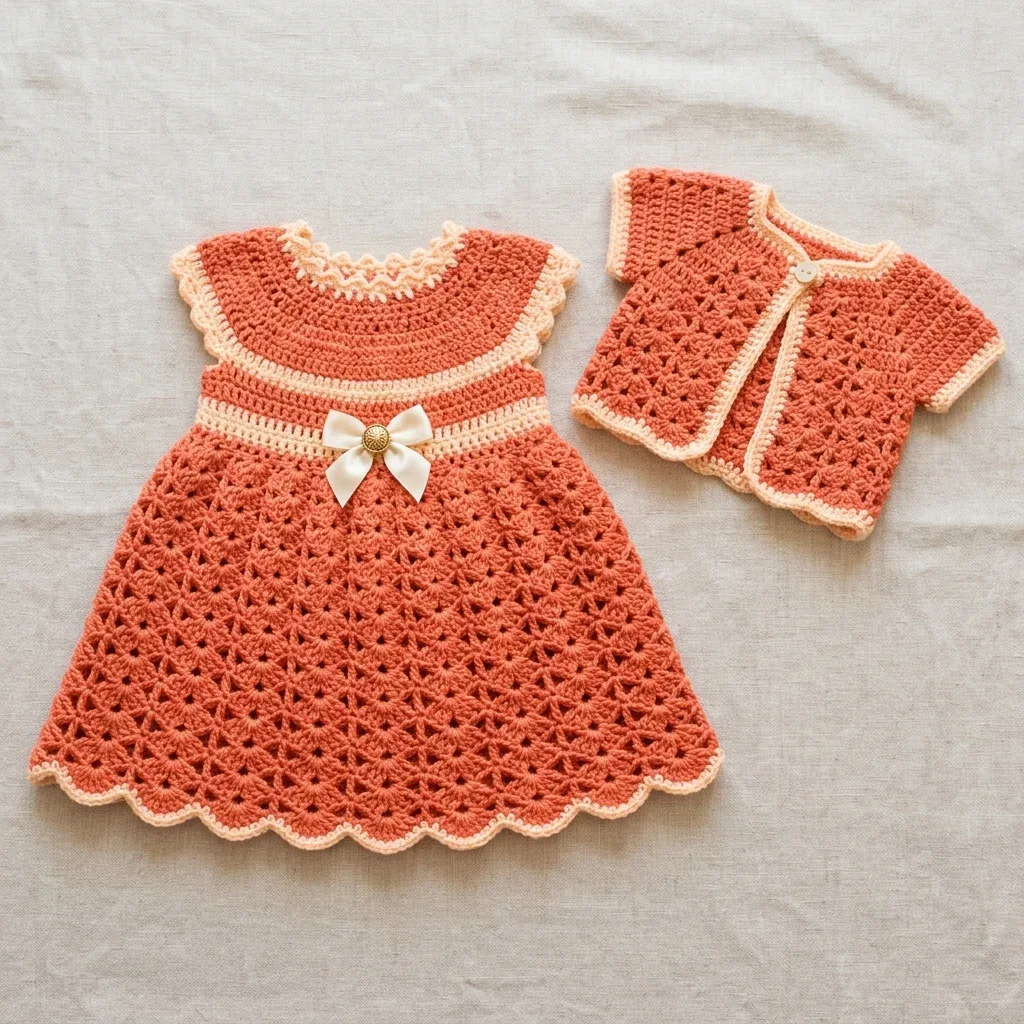
A top-down crochet dress and matching bolero for a 6 to 12 month baby.
- Level
- Confident Beginner
- Time
- 12-18 hours
- Hook
- 4.0 mm
- Yarn
- DK
Pattern highlights
- Increase steadily around the yoke until the piece reaches the empire waist and the bow placement.
- Transition into the shell lace skirt, letting the fan stitches open up as the rounds build downward.
- Finish the skirt with the scalloped hem edging, then weave in ends and block the piece flat.
- Separately, work the bolero body flat in rows until the V-stitch grid takes over the pattern.
- Pick up each sleeve directly from the armhole opening and work it in the round with a taper.
- Close the bolero at the neck with a single button, then block it alongside the dress.
About This Pattern
A dress-and-bolero set earns a spot of its own in my notebook. Baby garments ask for patience in miniature, and this one delivers two pieces for one effort. I keep a running list of top-down yoke dresses, and this one slots neatly beside the others. The shell lace skirt and matching cardigan make it feel more considered than a quick baby gift. It's the sort of set I file under worth the two colors.
Finished, the dress has an empire waist with a satin bow above a scalloped shell skirt. The bolero layers over the shoulders with short sleeves and a single button at the neck. Worn together they read as a matching set; worn apart, each piece stands fine alone. The picot neckline and scalloped hem give it a dressed-up finish without fuss. I'd call it a going-out dress with its own little jacket.
Both pieces are sized for a 6 to 12 month infant with a chest measurement of 17 to 18 inches. Finished measurements, dress: chest circumference 18 in / 46 cm (blocked, at underarm); length from shoulder to hem 14.5 in / 37 cm; yoke depth 4.5 in / 11.5 cm; skirt length from empire waist join 9 in / 23 cm. Finished measurements, bolero: chest circumference (laid flat, open) approximately 19 in / 48 cm; length from shoulder to hem 6 in / 15 cm; sleeve length 2.5 in / 6.5 cm.
Gauge: 18 stitches and 10 rows = 4 in / 10 cm in double crochet worked in the round with Color A and a US G-6 / 4.0 mm hook, after blocking. Shell lace gauge: one 6-stitch shell repeat (shell + ch-1 + sc) = approximately 1.5 in / 3.8 cm wide and 0.75 in / 1.9 cm tall per round. Gauge is critical for garment fit, so please swatch and adjust hook size as needed.
Color suggestions: Pound of Love works well with one skein in Terracotta plus a partial skein in Pastel Peach. Paintbox Yarns Simply DK works well with 3 skeins of Burnt Orange and 1 skein of Vanilla Cream. Drops Safran, a 100% cotton option good for sensitive skin, needs 3 skeins main color and 1 skein contrast; note that cotton has less elasticity, so a gauge swatch matters even more. Choose any smooth, plied DK weight yarn and avoid highly textured or thick-and-thin yarns, since the shell lace stitch needs clear stitch definition.
Time estimate: the dress takes about 8 to 12 hours, and the bolero adds another 4 to 6 hours. Plan for 12 to 18 hours total depending on your experience level.
Worth knowing
What I like here is the contrast inside one project. The yoke's picot edge is fussy in the best way, small and satisfying to count out. Then the shell lace skirt opens up into something looser, almost architectural once it's blocked and pinned flat. The bolero's V-stitch grid is the fastest fabric in the set. It's an open mesh that grows quickly under the hook. Working the sleeves straight from the armhole, with no separate seaming, keeps the finishing light. The single button closure is the kind of detail that looks harder than it is. By the end you've practiced edging, lace, flat rows, and rounds, all in one small garment. Not bad for something that fits on one small human.
Common mistakes
- Twisting the foundation ring Check the chain lies flat before joining. A twisted ring makes the yoke spiral instead of sitting flat.
- Losing count on the picot edging Mark every fifth picot with a scrap of thread so a missed repeat shows up right away.
- Cutting Color B too early The pattern asks you to carry Color B rather than cut it partway through the bolero body. Leave it hanging until instructed to use it again.
- Miscounting the V-stitch skips Each V-stitch row skips a set stitch between repeats, so recount after every few repeats to stay aligned.
- Skipping the gauge swatch with cotton Cotton stretches less than acrylic, so swatch first with Drops Safran or the fit runs tight.
Confident Beginner
Progress Tracker
0 of 0 rounds
Tap a round to tick it off — your place is saved on this device.
The kit
Yarn
- Color A (main, coral/terracotta): approximately 380 yards / 348 m of DK weight yarn (CYCA 3)
- Color B (contrast, soft peach/cream): approximately 120 yards / 110 m of DK weight yarn (CYCA 3)
Hook
- US size G-6 / 4.0 mm
Notions
- Stitch markers (6 recommended)
- Yarn needle for weaving ends
- One decorative button (approximately 5/8 in / 16 mm) for bolero closure, antique brass or pearl finish
- One small satin ribbon bow, pre-made or cut from 3/8-in satin ribbon (approximately 12 in / 30 cm of ribbon), with a small shank button or brad to secure at center
- Scissors
- Rust-proof blocking pins and a foam mat
Yoke
The yoke is worked in the round from the neckline down. Begin with Color B.
Foundation: With Color B and G-6 hook, ch 60. Being careful not to twist, sl st to first ch to form a ring. (60 ch)
Round 1Neckline edging, Color B Ch 1 (does not count as st), work picot edging as follows: sc in first ch, (ch 3, sl st in first ch of ch-3, sc in each of next 2 ch) around, ending sc in last ch, sl st to first sc to join. Fasten off Color B at end of this round. (20 picots, 60 sc)Step by step for the picot edging: sc in first stitch, ch 3, sl st into the first ch of the ch-3 just made (this forms the picot), then sc in the next 1 to 2 stitches. Repeat these steps around.
This picot edging sits at the very top neckline as the decorative ruffle you see in the photo. After completing, your neckline circumference is approximately 13 in / 33 cm, which will stretch to fit over a baby’s head comfortably.
Round 2(foundation dc round, Color B): Join Color B with sl st to any st of Rnd 1. Ch 3 (counts as dc). Dc in each st around. Sl st to top of beg ch-3. (60 dc)
Round 3(increase round 1, Color A): Join Color A with sl st to any st. Ch 3 (counts as dc). Dc in same st. (Dc in next 4 sts, 2 dc in next st) around, ending dc in last 4 sts. Sl st to top of beg ch-3. (72 dc)
Round 4Color A Ch 3, dc in each st around. Sl st to top of beg ch-3. (72 dc)
Round 5(increase round 2, Color A): Ch 3, dc in same st. (Dc in next 5 sts, 2 dc in next st) rep around. Sl st to top of beg ch-3. (84 dc)
Round 6Color A Ch 3, dc in each st around. Sl st to top of beg ch-3. (84 dc)
Round 7(increase round 3, Color A): Ch 3, dc in same st. (Dc in next 6 sts, 2 dc in next st) rep around. Sl st to top of beg ch-3. (96 dc)
Round 8Color A Ch 3, dc in each st around. Sl st to top of beg ch-3. (96 dc)
Round 9(increase round 4, Color A): Ch 3, dc in same st. (Dc in next 7 sts, 2 dc in next st) rep around. Sl st to top of beg ch-3. (108 dc)
Round 10Color A Ch 3, dc in each st around. Sl st to top of beg ch-3. (108 dc)
Round 11Yoke lower border, Color B Drop Color A to WS (do not cut). Join Color B. Ch 3, dc in each st around. Sl st to top of beg ch-3. (108 dc)
Round 12Color B Ch 3, dc in each st around. Sl st to top of beg ch-3. (108 dc)
Round 13Color A, empire waist stripe Drop Color B. Pick up Color A. Ch 3, dc in each st around. Sl st to top of beg ch-3. (108 dc)
Round 14Color A Ch 3, dc in each st around. Sl st to top of beg ch-3. (108 dc) CHECKPOINT: After Rnd 14, your yoke should measure approximately 4.5 in / 11.5 cm from neckline picot to the bottom of Rnd 14. The circumference at this point is approximately 24 in / 61 cm.
Bolero Body
Foundation Row: With Color B and G-6 hook, ch 56. Turn. (55 working ch)
Round 1WS, Color B Ch 3 (counts as dc), dc in each ch across. Turn. (55 dc)
Round 2RS, Color B Ch 3, dc in each st across. Turn. (55 dc)
Round 3Color B Ch 3, dc in each st across. Turn. (55 dc) Join Color A. Do not cut Color B.
Round 4(Color A, V-stitch body row 1): Ch 4 (counts as dc + ch 1). Sk 1 st. (V-st in next st, sk 1 st) across, ending dc in last st. Turn. (26 V-sts + 2 edge dc)V-stitch: work (dc, ch 1, dc) all into the same stitch or chain space. This creates the open grid of the bolero. Each V-stitch counts as 2 dc plus 1 ch-1 sp.
Round 5Color A Ch 4 (counts as dc + ch 1). V-st in each ch-1 sp of V-sts across, ending dc in top of t-ch. Turn. (26 V-sts + 2 edge dc)
Rows 6–10Rows 6 through 10: Rep Row 5. (26 V-sts + 2 edge dc each row) CHECKPOINT: After Row 10, the bolero body should measure approximately 4 in / 10 cm from the foundation chain top edge.
Round 11Color A Ch 3, dc in each dc and each ch-1 sp across. Turn. (55 dc)
Round 12Color A Ch 3, dc in each st across. Turn. (55 dc)
Round 13Color B, scallop hem edging Drop Color A. Pick up Color B. Work scallop edging across: Ch 1, sc in first st. (Ch 2, 2 dc) in same sc. (Sk 2 sts, sc in next st, (ch 2, 2 dc) in same sc) across. Fasten off Color B.Step by step for scallop edging (used at this hem and at the sleeve cuffs and skirt hem): sl st into first st; ch 1, sc in same st; (ch 2, 2 dc) in that same st to begin the scallop; sk 2 sts, sc in next st; (ch 2, 2 dc) in that same sc just worked; repeat the last two steps across or around.
Bolero Sleeves
Mark the side edges of the bolero approximately 2.5 in / 6.5 cm down from the shoulder edge on each side to define the armhole opening.
With Color A and RS facing, join yarn at the base of the right armhole opening. Work 24 sc evenly around the armhole opening. Sl st to first sc to join. (24 sc)
Round 1Sleeve, Color A Ch 3, dc in each st around. Sl st to top of beg ch-3. (24 dc)
Round 2Sleeve, Color A Ch 3, dc in each st around. Sl st to top of beg ch-3. (24 dc)
Round 3Sleeve decrease round, Color A Ch 3. (Dc2tog, dc in next 2 sts) around. Sl st to top of beg ch-3. (18 dc)
Round 4Sleeve border, Color B Drop Color A. Join Color B. Work scallop edging around sleeve cuff: Ch 1, sc in first st. (Ch 2, 2 dc) in same sc. (Sk 2 sts, sc in next st, (ch 2, 2 dc) in same sc) around. Sl st to first sc. Fasten off.Rep for second sleeve at left armhole.
CHECKPOINT: Each sleeve should measure approximately 2.5 in / 6.5 cm from shoulder pickup to cuff scallop.
Underarm Separation
This step separates the front and back yoke from the sleeve openings and prepares the stitch count for the skirt.
Mark the yoke as follows using stitch markers: Place marker after st 20 (right front/back divide)
Place marker after st 34 (sleeve opening, 14 sts)
Place marker after st 74 (back, 40 sts)
Place marker after st 88 (second sleeve opening, 14 sts)
Remaining 20 sts = left front
Round 15Underarm chain round, Color A Ch 3. Dc in each of next 19 sts (front, 20 sts total including ch-3). Ch 8 (bridge over right underarm). Sk 14 sts (right sleeve). Dc in each of next 40 sts (back). Ch 8 (bridge over left underarm). Sk 14 sts (left sleeve). Dc in each of next 20 sts (left front/remaining). Sl st to top of beg ch-3.Stitch count after Rnd 15: 20 (right front) + 8 (ch) + 40 (back) + 8 (ch) + 20 (left front) = 96 working sts in next round.
Round 16(work across underarm chains, Color A): Ch 3, dc in each of next 19 sts, dc in each of 8 ch, dc in each of next 40 sts, dc in each of 8 ch, dc in each of next 20 sts. Sl st to top of beg ch-3. (96 dc)This round joins the yoke into a single tube for the skirt.
Skirt Transition Round
The skirt uses a shell lace pattern with a repeat of 6 stitches. The 96-stitch count divides into 16 repeats of 6 stitches each.
Round 17Setup round, Color A Ch 1 (does not count as st). Sc in first st. (Ch 2, sk 2 sts, sc in next st) around, ending sl st to first sc. (32 sc, 32 ch-2 sps)
You now have 32 chain-2 spaces. The shells will be worked into every other chain space (16 shell positions), with single crochets in the spaces between.
Skirt
Round 18(Shell Round 1, Color A): Sl st into first ch-2 sp. Ch 3, 4 dc in same ch-2 sp (first shell made, 5 dc). Ch 1. Sc in next ch-2 sp. Ch 1. (5 dc in next ch-2 sp, ch 1, sc in next ch-2 sp, ch 1) around. Sl st to top of beg ch-3. (16 shells of 5 dc, 16 sc, 32 ch-1 sps)Shell stitch: work 5 dc all into the same stitch or chain space. This creates the fan shape that forms the lace skirt. The shells are separated by single crochets and chain spaces to create the open lace fabric.
Round 19Between-shell round, Color A Sl st into top of shell (center dc of shell below). Ch 1. Sc in same st. Ch 2. (Sc in center dc of next shell, ch 2) around. Sl st to first sc. (16 sc, 16 ch-2 sps)
Round 20(Shell Round 2, Color A): Sl st into first ch-2 sp. Ch 3, 4 dc in same sp. Ch 1. Sc in next sc. Ch 1. (5 dc in next ch-2 sp, ch 1, sc in next sc, ch 1) around. Sl st to top of beg ch-3. (16 shells, 16 sc)
Round 21Rep Rnd 19. (16 sc, 16 ch-2 sps)
Round 22(Shell Round 3, expanded, Color A): This expansion round doubles your shells. In each ch-2 sp from Rnd 21, work (5 dc, ch 1). In each sc from Rnd 21, work (sc, ch 1, 5 dc, ch 1, sc, ch 1). Sl st to top of beg ch-3. (32 shells, 32 sc)
Round 23Between-shell round, Color A Sl st to center dc of first shell. Ch 1. Sc in same st. Ch 2. (Sc in center dc of next shell, ch 2) rep around. Sl st to first sc. (32 sc, 32 ch-2 sps)
Round 24(Shell Round 4, Color A): (5 dc in ch-2 sp, ch 1, sc in next sc, ch 1) around. Sl st to top of beg ch-3. (32 shells, 32 sc)
Rounds 25–33Rnds 25, 27, 29, 31, 33: Rep Rnd 23. (32 sc, 32 ch-2 sps)
Rounds 26–32Rnds 26, 28, 30, 32: Rep Rnd 24. (32 shells, 32 sc) CHECKPOINT: After Rnd 33, the skirt should measure approximately 8.5 in / 21.5 cm from the empire waist.
Hem Scallop Edging
Round 34Color B, scallop hem edging Drop Color A. Join Color B. Work scallop edging across all shell tops and spaces: Sl st to top of beg ch-3 of first shell from Rnd 32. Ch 1. Sc in same st. (Ch 2, 2 dc) in same sc. Sk to next sc between shells. Sc in that sc. (Ch 2, 2 dc) in same sc. Continue (sk to center dc of next shell, sc in center dc, (ch 2, 2 dc) in same sc, sk to next sc, sc in that sc, (ch 2, 2 dc) in same sc) around. Sl st to first sc. Fasten off Color B.
Total scallops: 64
Waist Bow Embellishment
Cut approximately 12 in / 30 cm of 3/8-in satin ribbon in white or cream. Tie into a small bow. Using a brad, decorative shank button, or small safety pin, attach the bow to the front center of the empire waist stripe at the vertical center front.
The ribbon bow is a non-structural embellishment attached after finishing. It does not affect stitch counts.
Bolero Sides and Neckline Edging
With Color B, work a single row of sc up the right front edge, across the top of the foundation chain (neckline), and down the left front edge. At the top right corner, work a button loop as follows: sc in corner, ch 5, sc in same corner.
Attach button to left front top corner at corresponding position.
Assembly
Step 1Weave in all ends thoroughly on the WS using a yarn needle. Run the tail through at least 1 in / 2.5 cm of stitches in two directions to prevent unraveling.
Step 2Wet blocking is recommended for both pieces. Soak in cool water with a small amount of wool wash or gentle soap. Gently press out excess water in a towel. Do not wring. Pin pieces to a foam mat to finished measurements using rust-proof pins, opening the shell lace to display the fans fully. Allow to dry completely before unpinning, approximately 24 hours.
Step 3Attach the satin ribbon bow to the dress waist. Attach the bolero closure button. Steam the scallop edges lightly if needed to encourage them to lie flat.
Finishing
- Weave in every end on the wrong side. Run each tail through at least an inch of stitches in two directions.
- Wet block both pieces, pinning the skirt out so the shell lace opens fully into its fan pattern.
- Once dry, stitch the satin bow in place at the waist and sew on the single neckline button.
Why it works
The yoke begins as a chained ring joined with a slip stitch. This puts the picot edging right at the neckline before shaping starts.
The bolero body is worked flat in rows for several rows first. That keeps the center front open for the button closure before the V-stitch grid takes over.
Each sleeve is picked up directly from the armhole opening and worked in the round. A decrease round then narrows the sleeve as it goes.
A few conventions apply throughout: when changing colors, complete the last yarn-over pull-through of the final stitch with the new color for a cleaner transition. The ch-3 at the beginning of a double crochet round counts as the first dc throughout this pattern unless otherwise stated, and all rounds are worked with right side facing unless otherwise noted.
What it becomes
- A soft everyday outfit for warm-weather days, paired with simple sandals or bare feet.
- A photo-session dress, especially once the skirt is blocked and the fans sit open.
- A baby-shower gift, with the bolero doubling as a light layer for cooler rooms.
FAQ
Can I make just the dress without the bolero?
Yes, the two pieces are written to work alone or together. Skip the bolero section and the dress stands on its own.
Is the yarn amount enough if I use Drops Safran instead of acrylic?
The materials list already accounts for the main and contrast yardage needed. Just swatch first, since cotton behaves differently than acrylic at the same hook size.
Can this pattern be sized up for an older baby?
The pattern is written for the 6 to 12 month range with a specific gauge. I'd treat any resizing as an experiment rather than a guarantee.