Free Pattern
Step-by-Step
Crochet
Baby ClothingCrochet Penguin Baby Romper: Adorable Navy Bodysuit Pattern
Crochet an adorable navy penguin baby romper with this detailed written pattern featuring separate legs, a seamless body, and sweet penguin details.
Level IntermediateTime 8-10 HoursHook 4.0 mmYarn Worsted
Pattern highlights
- Crochet the right leg as a seamless tube worked in rounds, shaping gradually with a few strategic increases.
- Set the finished right leg aside and crochet the left leg to matching stitch counts and length.
- Leave the last round of the left leg open and mark the inner-leg stitch to prepare for joining.
- Chain a small bridge and join it to the marked stitch on the right leg to connect both legs.
- Work the first body round around both legs and the chain bridge to merge everything into one seamless tube.
- Continue the body upward in plain rounds, adding shaping increases at set points to widen the fit.
- Divide the stitches evenly into front and back sections so the front bib can rise higher than the back panel.
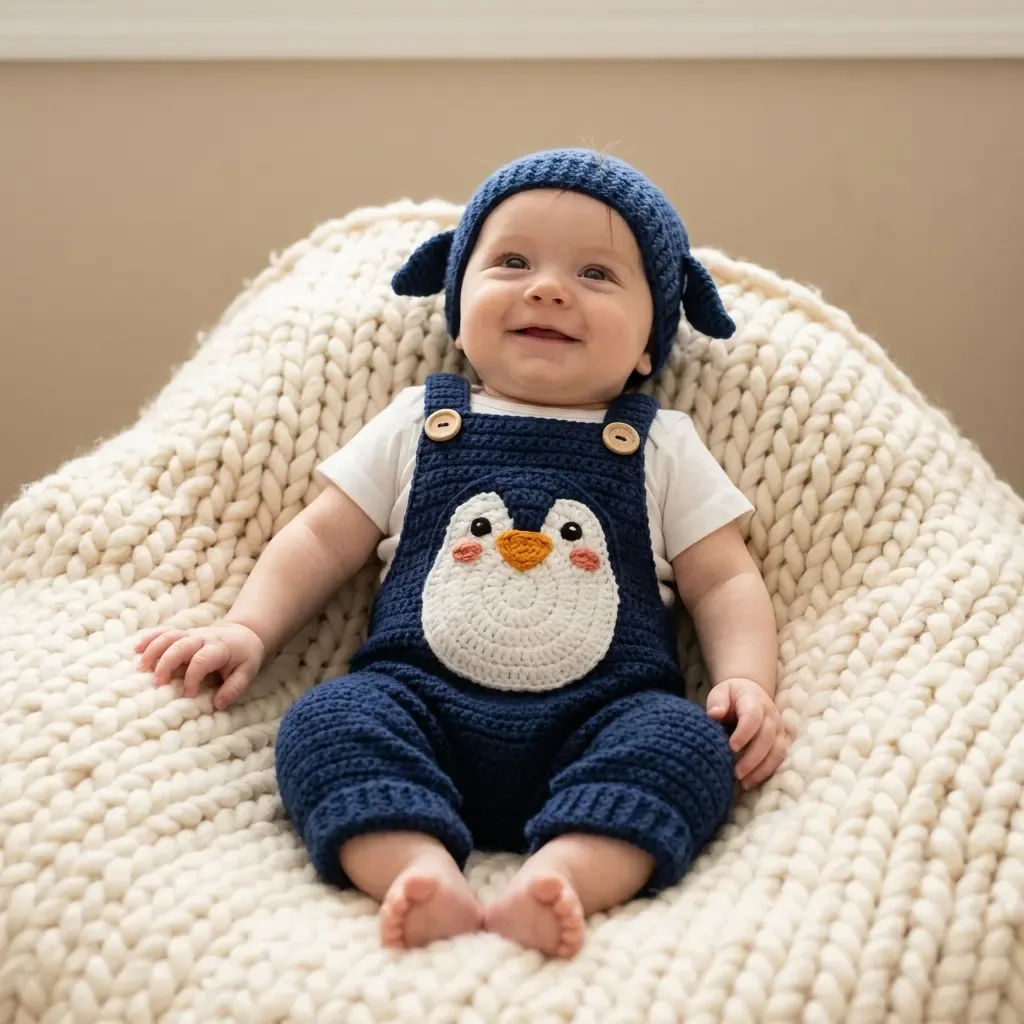
- Finish with the penguin face, belly, and feet details, then secure the button closures to complete the romper.
About This Pattern
This navy blue penguin baby romper is the kind of pattern that turns heads at baby showers and family photos alike. Worked from the legs up in a rich navy worsted yarn, it builds into a one-piece bodysuit with a distinctly playful penguin personality. It's perfect for the crocheter who wants to gift something both practical and adorable — a garment a little one can actually wear, not just admire on a shelf, and one that feels handmade in the very best way.
The construction relies on classic amigurumi-style single crochet worked in continuous rounds, with each leg made separately before being joined at the crotch using a small chain bridge — a technique that keeps the romper completely seamless through the body. You'll use stitch markers to track your rounds and increases, work back loop only sections for defined ribbing-like edges, and shape the body with strategic increases that separate the front bib from the back panel. It's a satisfying intermediate project, ideal for someone who has a few amigurumi or garment pieces under their belt already.
The finished romper is worked at a baby-appropriate scale using worsted weight yarn on a G-6 hook, giving it structure and softness at once. With its crisp navy body, cream belly panel, and tiny orange and black penguin details finished off with wood buttons, it has that irresistible 'too cute to put down' quality. Whether it's tucked into a gift box for a new parent or kept for your own little penguin, this piece is a genuine keepsake.
Variations
This romper is endlessly adaptable once you understand the basic construction. Swap the navy for classic black to make a more traditional tuxedo-style penguin look, or try a deep charcoal gray for a softer, more subtle palette that still reads unmistakably 'penguin.' For a gender-neutral gift, consider a sage green or warm mustard yellow body with the same cream belly panel — the penguin silhouette still shines through regardless of the main color. If you want a completely different animal altogether, this same leg-and-body construction works beautifully as a base for other creature rompers; just adjust the contrast panel shape and face details. Sizing up is straightforward in concept: add stitches to your foundation chains in multiples that keep your increase rounds evenly spaced, and add a few extra rounds to the leg and body lengths to accommodate a bigger baby, checking your checkpoint measurements as you go to stay proportional. If you're working with what's in your stash, any worsted weight yarn substitutes well here, though a yarn with a bit of stitch definition will make the back loop only sections pop more clearly than a fuzzy or heavily textured yarn would. For the tiny accent colors — the orange feet, black eyes, and blush cheeks — even small amounts of scrap yarn work perfectly since you need only a few yards of each. You could also swap the wood buttons for coordinating plastic snap closures if you prefer a more practical, fuss-free closure for quick diaper changes, or use contrasting buttons in a bright color to make the closure itself a playful design feature.
I adore this pattern because it's a real garment that still feels like an amigurumi project in disguise — every round is worked in the round with no seams to sew up the sides, which honestly makes the whole thing so much more enjoyable to build. Watching the two separate leg tubes come together at the crotch with that little four-chain bridge is one of my favorite moments in any romper pattern; it just clicks into place and suddenly you're holding something that looks like a real baby outfit. I love that the front bib rises higher than the back panel, giving it that classic overall-style silhouette penguins are known for. The back loop only sections add just enough texture to make the piece feel considered and professional, not just a plain tube. And once you get to the penguin face and belly details, it becomes genuinely fun rather than technical. This is the kind of project where every round brings you closer to something unmistakably charming, and I always find myself wanting to work just one more round before I set it down for the night.
Common mistakes
- Twisting the foundation chain
- Lay your chain flat on the table before joining and double-check that the row of bumps runs straight without any twist before you slip stitch to close it.
- Losing track of which round you're
- Place a stitch marker in the first stitch of every round and move it up as you go, especially through the body where increases happen at specific rounds.
- Working both increases in Body Rnd 5 in
- Count carefully to the exact stitch before each increase and use a marker to flag each increase point so you can verify your count matches before moving on.
- Forgetting to leave the left leg's last
- Re-read the final leg round closely — the left leg intentionally does not join at Rnd 25 so it can flow directly into the body setup chain.
- Mismatching the marked 17th stitch
- Count out from your marker slowly and confirm you're inserting into the correct inner-leg stitch rather than an adjacent one, since this determines the crotch alignment.
- Skipping the checkpoint measurements
- Actually measure your work against the given inch and centimeter checkpoints, since tension varies crocheter to crocheter and stitch counts alone won't catch a gauge mismatch.
Intermediate
Progress Tracker
0 of 0 rounds
Tap a round to tick it off — your place is saved on this device.
Materials
- Lion Brand Pound of Love works beautifully here. It’s worsted weight, 100% acrylic, machine washable, and budget friendly for baby items.
- Paintbox Yarns Simply DK held double gives a worsted weight equivalent with exceptional stitch clarity and a lovely matte finish.
- Cascade 220 Superwash is soft against baby skin, machine washable, and shows the stitch texture beautifully.
- Any worsted weight yarn achieving gauge will work. Prioritize machine washable fibers. Avoid fuzzy or bouclé textures since stitch definition matters for the dense fabric and applique edges.
Yarn
- Yarn A (Navy Blue): worsted weight, approximately 400 yards / 366 meters
- Yarn B (White/Cream): worsted weight, approximately 60 yards / 55 meters
- Yarn C (Orange/Amber): worsted weight, approximately 5 yards / 4.5 meters
- Yarn D (Black): approximately 3 yards / 2.7 meters
- Yarn E (Rose/Blush Pink): approximately 2 yards / 1.8 meters
Hooks
- US size G-6 / 4.0 mm (main fabric)
- US size F-5 / 3.75 mm (ribbing)
Notions
- 2 wood buttons, approximately 3/4 inch / 20 mm diameter
- Yarn needle
- Stitch markers (at least 6)
- Scissors
- Measuring tape
- Black safety eyes, 9 mm, 2 pieces (optional, or embroider eyes instead for safety)
Right Leg
Set right leg aside.
Checkpoint: The right leg tube should measure approximately 5 inches / 12.7 cm in length. The circumference at the top should be approximately 7.3 inches / 18.5 cm.
Foundation: With MC and G-6 hook, ch 29. Sl st in first ch to form a ring. Be careful not to twist.
- Round 1Ch 1, sc in each ch around. Join with sl st to first sc. (29 sc)
- Rounds 2-5through 5: Ch 1, sc in each sc around. Join with sl st to first sc. (29 sc each round)(29)
- Round 6Ch 1, sc in next 14 sc, inc in next sc, sc in next 14 sc. Join with sl st to first sc. (30 sc)
- Rounds 7-10through 10: Ch 1, sc in each sc around. Join with sl st to first sc. (30 sc each round)(30)
- Round 11Ch 1, sc in next 14 sc, inc in next sc, sc in next 15 sc. Join with sl st to first sc. (31 sc)
- Rounds 12-15through 15: Ch 1, sc in each sc around. Join with sl st to first sc. (31 sc each round)(31)
- Round 16Ch 1, sc in next 15 sc, inc in next sc, sc in next 15 sc. Join with sl st to first sc. (32 sc)
- Rounds 17-20through 20: Ch 1, sc in each sc around. Join with sl st to first sc. (32 sc each round)(32)
- Round 21Ch 1, sc in next 15 sc, inc in next sc, sc in next 16 sc. Join with sl st to first sc. (33 sc)
- Rounds 22-24through 24: Ch 1, sc in each sc around. Join with sl st to first sc. (33 sc each round)(33)
- Round 25(final leg round, do NOT join yet): Ch 1, sc in each sc around. Do not join. (33 sc) Fasten off. Place a stitch marker in the last stitch worked and another marker in the 17th stitch of this round. This marks the inner leg / crotch point.
Body
Place a stitch marker at the beginning of each body round. Move marker up each round.
Checkpoint: After completing Body Rnd 16, the piece from crotch join to current edge should measure approximately 4 to 4.5 inches / 10 to 11.5 cm.
The 80 stitches are now divided: 40 for the back and 40 for the front. The front bib will rise higher than the back. Mark the first 40 stitches as the FRONT and the following 40 stitches as the BACK.
Setup: With left leg still on hook and yarn attached, ch 4. With RS facing, insert hook into the marked stitch of the right leg (the 17th stitch, which is the inner leg point), sl st to join.
- Round 1of Body: Ch 1, sc in each of the 33 sc around the right leg, sc in each of the 4 ch stitches of the bridge, sc in each of the 33 sc around the left leg, sc in each of the 4 ch stitches on the opposite side of the bridge. Join with sl st to first sc. (74 sc)
- Rounds 2-4through 4 of Body: Ch 1, sc in each sc around. Join with sl st to first sc. (74 sc each round)(74)
- Round 5of Body: Ch 1, sc in next 17 sc, inc in next sc, sc in next 37 sc, inc in next sc, sc in next 18 sc. Join with sl st to first sc. (76 sc)
- Rounds 6-8through 8 of Body: Ch 1, sc in each sc around. Join with sl st to first sc. (76 sc each round)(76)
- Round 9of Body: Ch 1, sc in next 18 sc, inc in next sc, sc in next 38 sc, inc in next sc, sc in next 18 sc. Join with sl st to first sc. (78 sc)
- Rounds 10-12through 12 of Body: Ch 1, sc in each sc around. Join with sl st to first sc. (78 sc each round)(78)
- Round 13of Body: Ch 1, sc in next 18 sc, inc in next sc, sc in next 39 sc, inc in next sc, sc in next 19 sc. Join with sl st to first sc. (80 sc)
- Rounds 14-16through 16 of Body: Ch 1, sc in each sc around. Join with sl st to first sc. (80 sc each round)(80)
Back Panel
Turn the work so WS faces you. You will now work flat across the back 40 stitches only.
Text is cut off in the source at this point; pattern continues beyond available scraped content.
- Row 1(WS): Ch 1, sc i
Left Leg
Work exactly as right leg through Rnd 24. (33 sc)
- Round 25(final leg round): Ch 1, sc in each sc around. Do not join. (33 sc) Do not fasten off. Place a marker in the 17th stitch (inner leg / crotch point).
Assembly
- Step 1Weave in all yarn ends throughout the romper body, bib panels, and straps.
- Step 2Sew the ribbed leg cuffs to the bottom edges of each leg tube.
- Step 3Attach the assembled penguin belly applique to the front bib.
- Step 4Fold the front shoulder straps over the shoulder to the back. Sew one wood button to the center of each back anchor band, positioning so the buttonholes align when straps are laid naturally over the shoulders.
Important notes
Use stitch markers generously — with no turning and no row markers to guide you, it's very easy to lose your place in a long continuous round without them.
Both legs are worked to the same stitch counts before the body begins, so complete the right leg fully and set it aside exactly as instructed before starting the left leg.
The four-chain bridge at the crotch is small but important — don't skip it or substitute a different chain length, as it creates the room needed for movement and comfort.
If you choose safety eyes over embroidered eyes, insert and secure them before you finish stuffing or closing any section near the face, since they can't be added after the fact.
Save small amounts of your orange, black, and blush yarns specifically for the penguin details — you need only a few yards of each, so don't accidentally use them elsewhere.
The romper body works in the round with no side seams. Place a stitch marker at the beginning of each round and move it up as you go.
Both leg tubes are worked separately, then joined to form the lower body. The crotch join uses a small chain bridge of 4 stitches to connect them.
Turning chains do NOT count as a stitch except in the ribbing sections. When the pattern says "ch 1, sc in each sc around," you have the same stitch count you started with.
Right and left refer to the wearer's right and left.
Safety note: If using safety eyes, secure them before attaching the applique to the romper. Once the applique is sewn flat to the bib, there's no access to the back. For unsupervised wear, embroider the eyes instead.
Gauge is mandatory for this garment. Even one stitch per 4 inches difference will result in a romper that doesn't fit. Make a swatch at least 5 inches square, wet block it, let it dry completely, then measure the center.
Gauge with US G-6 / 4.0 mm hook and Yarn A: 18 sc x 20 rows = 4 inches / 10 cm worked in single crochet (sc), blocked.
Ribbing gauge with US F-5 / 3.75 mm hook: 16 sc x 20 rows = 4 inches / 10 cm
This romper fits babies 3 to 6 months old.
Chest circumference: approximately 17 inches / 43 cm
Total length (shoulder to crotch): approximately 12 inches / 30.5 cm
Leg length (ankle to crotch): approximately 5 inches / 12.7 cm
Hat circumference: approximately 15 inches / 38 cm
Size customization tips appear at the end of the pattern for sizing up or down.
FAQ
What size baby does this romper fit?
Based on the leg and body measurements given in the checkpoints, this romper is sized for a baby in the smaller end of typical baby sizing. Always compare your gauge swatch and finished measurements to your specific baby's measurements before gifting.
Can I make this without safety eyes for a newborn?
Yes, the pattern explicitly offers embroidering the eyes instead of using safety eyes, which is the safer choice for any baby item since embroidered features can't come loose. Simply stitch small black French knots or satin stitch circles in place of the hardware.
Why are the legs worked separately instead of both at once?
Working each leg as its own seamless tube first, then joining them with a small chain bridge, is what allows the whole romper to be completely seamless through the body. It's a bit more setup than working both legs simultaneously, but it avoids any side seams later.
How much yarn do I actually need of each color?
You'll need about 400 yards of your main navy color, roughly 60 yards of cream for the belly panel, and only a few yards each of orange, black, and blush for the penguin's face and feet details.