
Free Pattern
Step-by-Step
Crochet
Baby & KidsLavender butterfly baby romper with HDC moss stitch
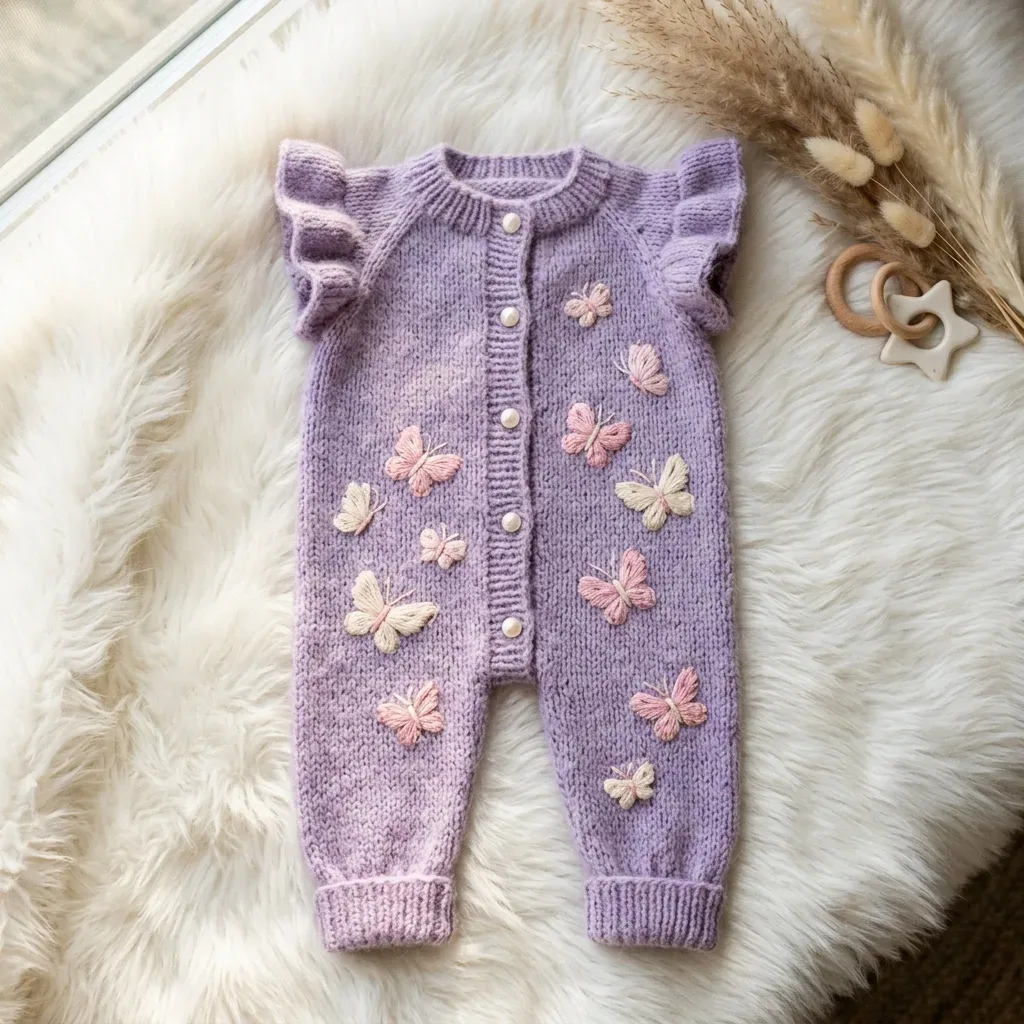
A worsted weight baby romper with hdc moss stitch and hand-embroidered butterfly motifs.
- Level
- Intermediate
- Time
- 8-12 hours
- Hook
- 5.0 mm
- Yarn
- Worsted
Pattern highlights
- Work the back body panel flat from the hem ribbing up through the moss stitch rows to the shoulder.
- Make the front right panel with its buttonhole band worked in single crochet beside the moss stitch fabric.
- Work the front left panel to match, skipping the buttonholes since it sits under the closure.
- Seam the panels together, then pick up stitches around the openings for the leg tubes and ruffle sleeves.
- Work the neckline edging directly onto the assembled yoke to finish the collar.
- Thread a tapestry needle and embroider butterflies across each front panel once the romper is fully assembled.
- Weave in ends, wet block to shape, then sew on the buttons before the first wear.
About This Pattern
This romper lands in the stack of baby garments I keep returning to. The ones that look harder than they are. I file it beside other moss stitch pieces, the kind that fake a knit rib. It is not a weekend pattern. Between the ribbing, the buttonhole band, and the embroidered butterflies, it asks for a few evenings. Worth it, for a garment nobody believes is crochet.
The build leans on hdc moss stitch, worked through the back loop only. Row after row, it fakes a knit rib. Rows 7 through 22 build those ridges up to a checkpoint height. The front right panel splits down the middle. Four stitches run in sc BLO for a narrow buttonhole band, the rest in moss stitch. Leg tubes and ruffle sleeves get worked in short rounds, likely picked up after the panels are seamed. Then come the butterflies, embroidered freehand in contrast yarn once the whole romper is assembled.
Finished, it is a button-front romper with ribbed cuffs and neckline, pearl buttons marching down one side. Five or six butterflies, alternating blush pink and cream, scatter across each front panel. They climb from the upper chest down toward mid-leg, never touching the button band or back. It reads sophisticated for something built from a handful of basic stitches worked with real patience.
Worth knowing
What I like here is the trick of it. Hdc moss stitch, worked only through the back loop, is the trick. It turns a basic stitch into something that photographs like a hand-knit sweater. Nobody checks the back loops. The buttonhole band is a small lesson in itself. Four stitches run in sc while the rest of the row stays in moss stitch. Then comes the embroidery. Two wing shapes, a catch stitch, maybe a French knot antenna, and you have a butterfly. It measures about an inch, done in four quick steps. Scattering five or six per panel, alternating blush and cream, is the finishing touch. It makes a plain romper feel considered instead of generic.
Common mistakes
- Crocheting into both loops Working the moss stitch rows into both loops flattens the ridge texture. Check that you are catching only the back loop every single row.
- Losing the row count in ribbing Six rows of hdc ribbing at the hem look identical and are easy to miscount. Mark row one with a scrap of yarn before you start.
- Mismatched buttonhole and button bands The buttonhole band is only four stitches wide, so a stray stitch throws off alignment with the buttons. Count those four stitches every row on the front right panel.
- Butterflies crowding the button band The pattern keeps embroidery off the button band and back panel for a reason; it reads cleaner. Sketch placement with a pin before threading the needle.
- Machine washing the merino version Cascade 220 Superwash still prefers a gentler hand wash despite the superwash label. Save the machine for the acrylic version only.
Intermediate
Progress Tracker
0 of 0 rounds
Tap a round to tick it off — your place is saved on this device.
The kit
Yarn for Main Color (MC)
- Approximately 350 to 400 yards of worsted weight yarn in lavender
Yarn for Butterflies
- Approximately 20 yards in Contrast Color A (blush pink)
- Approximately 20 yards in Contrast Color B (soft peach or cream)
Recommended Yarn Options
- Lion Brand Pound of Love in Lavender (100% acrylic, machine washable)
- Paintbox Yarns Simply DK held double in Dusty Lavender
- Cascade 220 Superwash in Lavender (100% superwash merino)
- Choose machine washable fiber for a baby garment. Avoid loose plies that could snag on tiny fingers.
Hooks
- US H-8 / 5.0 mm for the body and sleeves
- US G-6 / 4.0 mm for ribbed cuffs and neckline edging
Notions
- Tapestry needle
- 6 pearl or white buttons, approximately 10 mm diameter
- Stitch markers
- Scissors
- Rust-proof pins for blocking
- Measuring tape
HDC Moss Stitch (Worked Flat)
This creates the dense, knit-like texture you see in the photos.
Foundation Row (WS): Work 1 hdc in each chain across. Turn.
Round 1(RS): Ch 1 (does not count as stitch). Working in BLO only, work 1 hdc in each stitch across. Turn.
Round 2(WS): Ch 1. Working in BLO only, work 1 hdc in each stitch across. Turn. Repeat Rows 1 and 2. Always work through the back loop only. The unused front loops create subtle horizontal ridges.
Back Body Panel
The back is worked flat from hem to shoulder in one piece.
Foundation: With MC and H-8 hook, ch 29.
Foundation Row (WS): Hdc in second ch from hook and in each ch across. Turn. (28 hdc)
Round 1through 6 (Ribbing): Ch 1. Hdc in BLO of each st across. Turn. (28 hdc each row)(28)
Round 7through 22: Continue in HDC Moss Stitch (BLO every row). (28 hdc each row) Checkpoint: After Row 22, piece should measure approximately 7 inches tall.
Waist Shaping (Decrease):
Round 23(RS): Ch 1. Hdc2tog over first 2 sts, hdc in BLO to last 2 sts, hdc2tog. Turn. (26 hdc)
Round 24Ch 1. Hdc in BLO of each st across. Turn. (26 hdc)
Round 25Ch 1. Hdc2tog, hdc in BLO to last 2 sts, hdc2tog. Turn. (24 hdc)
Round 26Ch 1. Hdc in BLO of each st across. Turn. (24 hdc) Waist Shaping (Increase):
Round 27(RS): Ch 1. 2 hdc in first st, hdc in BLO to last st, 2 hdc in last st. Turn. (26 hdc)
Round 28Ch 1. Hdc in BLO of each st across. Turn. (26 hdc)
Round 29Ch 1. 2 hdc in first st, hdc in BLO to last st, 2 hdc in last st. Turn. (28 hdc)
Round 30Ch 1. Hdc in BLO of each st across. Turn. (28 hdc)
Round 31through 42: Work even in HDC Moss Stitch. (28 hdc each row) Checkpoint: After Row 42, piece should measure approximately 12.5 inches from hem.
Armhole Shaping:
Round 43(RS): Sl st across first 3 sts, ch 1, hdc in BLO across to last 3 sts. Leave last 3 sts unworked. Turn. (22 hdc)
Round 44Ch 1. Hdc in BLO of each st across. Turn. (22 hdc)
Round 45Ch 1. Hdc2tog, hdc in BLO to last 2 sts, hdc2tog. Turn. (20 hdc)
Round 46Ch 1. Hdc in BLO of each st across. Turn. (20 hdc)
Round 47Ch 1. Hdc2tog, hdc in BLO to last 2 sts, hdc2tog. Turn. (18 hdc)
Round 48Ch 1. Hdc in BLO of each st across. Turn. (18 hdc)
Round 49through 58: Work even in HDC Moss Stitch. (18 hdc each row)(18)
Shoulder Shaping:
Round 59(RS): Ch 1. Hdc in BLO across first 5 sts only. Leave remaining sts unworked. Fasten off. (5 hdc for right shoulder)
Reattach yarn at opposite end.
Round 59Left Shoulder Ch 1. Sk first 8 center sts, hdc in BLO across last 5 sts. Fasten off. (5 hdc for left shoulder)The 8 center stitches form the back neckline.
Front Right Panel (Carries Buttonholes)
Foundation: With MC and H-8 hook, ch 18.
Foundation Row (WS): Hdc in second ch from hook and in each ch across. Turn. (17 hdc)
Note: Stitches 1 through 4 from center edge form the button band worked in sc BLO. Stitches 5 through 17 form the main fabric in HDC Moss Stitch.
Round 1through 6 (Hem Ribbing): Ch 1. Hdc in BLO of each st across. Turn. (17 hdc each row)(17)
Round 7(RS): Ch 1. Sc in BLO of first 4 sts (button band). Hdc in BLO of next 13 sts. Turn. (17 sts)
Round 8(WS): Ch 1. Hdc in BLO of next 13 sts. Sc in BLO of last 4 sts. Turn. (17 sts)Rows 9 through 22: Rep Rows 7 and 8. (17 sts each row) Buttonhole Placement: Work buttonholes on Rows 10, 18, 26, 34, 42, and 50.Buttonhole Row: Ch 1. Sc in BLO of first 1 st, ch 1, sk 1 st (buttonhole), sc in BLO of next 2 sts. Continue in pattern across remaining 13 sts. Turn.Next Row: Work 1 sc in the ch-1 sp to restore stitch count. (17 sts)Continue with waist shaping (Rows 23 through 30), armhole shaping (Rows 43 through 58), and shoulder shaping (Row 59) as written in the full pattern, maintaining the 4 stitch button band throughout.
Leg Tubes (Make 2)
Setup: With MC and H-8 hook, join yarn at inseam of leg opening. Pick up and join 44 sts evenly around. Pm at inseam. Join to work in the round.
Round 1Ch 1. Hdc in BLO of each st around. Sl st to first hdc to join. (44 hdc)
Round 2through 6: Rep Round 1. (44 hdc)
Round 7Ch 1. Hdc2tog, hdc in BLO around to last 2 sts, hdc2tog. Sl st to join. (42 hdc)Continue decreasing every 3rd round until you reach 34 hdc after Round 21.Ankle Ribbing (Rounds 22 through 27): Switch to G-6 hook. Ch 1. Sc in BLO of each st around. Sl st to join. (34 sc each round)Fasten off.
Ruffle Sleeves (Make 2)
Foundation: With MC and H-8 hook, ch 61.
Foundation Row (WS): Hdc in second ch from hook and in each ch across. Turn. (60 hdc)
Round 1(RS): Ch 1. Work 2 dc in each st across. Turn. (120 dc)
Round 2(WS): Ch 1. Sc in each st across. Turn. (120 sc)
Round 3Ch 1. Sc in each st across. Turn. (120 sc) Fasten off with a long tail. Run a gathering thread along the foundation edge. Pull to gather down to approximately 14 stitches. Pin into armhole and whipstitch in place.
Neckline Edging
With MC and G-6 hook, join at center back neckline. Pick up approximately 52 sc evenly around the entire neckline.
Round 1through 3: Ch 1. Sc in BLO of each st around. Sl st to join. (52 sc) Fasten off.
Front Left Panel (No Buttonholes)
Work as a mirror of Front Right Panel. The button band sits on the opposite edge. Follow all shaping rows but omit buttonholes.
Assembly
Step 1Weave in all ends. Wet block by soaking in cool water for 10 minutes, pressing out excess water in a towel, and laying flat to dry. Pin to finished measurements.
Step 2For acrylic yarn: Machine wash cold, tumble dry low. For superwash wool: Hand wash, lay flat to dry. Check buttons before each wear.
Finishing
- Weave in every end from the panels and bands before the butterflies go on. Clean fabric gives the embroidery thread something solid to sit against.
- Thread contrast yarn and embroider the butterflies once the romper is fully seamed. Follow the wing and antenna steps on each front panel.
- Wet block by soaking, blotting in a towel, and pinning to finished measurements before sewing on the buttons.
Why it works
The back body panel is worked flat as one piece, hem to shoulder. No center seam to match.
The front right panel carries its own stitch split. Four stitches run in sc BLO for the button band, the rest in moss stitch.
Leg tubes and ruffle sleeves run only a few rounds each. That short count suggests picked-up stitches at the leg and armhole openings. The panels are already joined by then.
What it becomes
- A baby shower gift that looks hand-knit without the knitting, especially in blush and cream.
- Photo-day outfit for a lavender or pastel nursery theme, paired with simple white socks.
- A keepsake piece for a scrapbook of early baby makes, alongside other moss stitch projects.
FAQ
Can I use a different yarn weight than worsted?
The pattern is written for worsted weight at a US H-8 hook, so swap carefully. A lighter yarn will need a smaller hook and more rows to hit the same checkpoint height.
Why work the moss stitch through the back loop only?
The unused front loops create the little horizontal ridges that mimic knit fabric. Skip a row of BLO and that row goes flat.
Do the butterflies need a separate color for each wing?
No, each butterfly uses one contrast color; just alternate blush pink and cream across the panel. Keep one 18 inch length per butterfly so you are not rejoining mid-motif.
Which side gets the buttonhole band, left or right?
The front right panel carries the buttonholes in this pattern, with four stitches worked in sc BLO. The front left panel is plain moss stitch with no buttonholes.