
Free Pattern
Step-by-Step
Crochet
GarmentsA lightweight crochet ruffle top for everyday wear
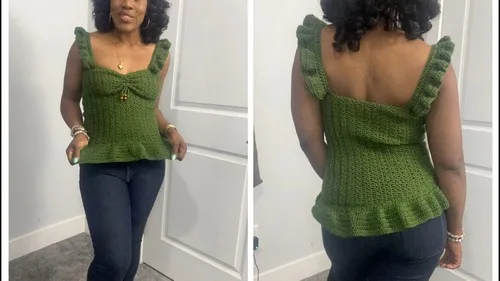
A lightweight crochet ruffle top with ruffled straps and a scrunch detail for everyday wear.
- Level
- Intermediate
- Time
- 4-6 hours
- Hook
- 4.0 mm
- Yarn
- Worsted
Pattern highlights
- Chain a long foundation row and alternate double crochet with half double crochet to build the body.
- Keep repeating that alternating pattern until the fabric reaches your desired body width.
- Fold the fabric and seam the short ends together to turn the flat panel into a tube.
- Single crochet around the top and bottom edges to frame the piece before shaping continues.
- Mark strap points on the front and back, then build each strap through five rounds.
- Finish each strap with a plain double crochet row, knot the ends, and weave them in.
- Chain a long tail at the center front and draw it through to create the scrunch detail.
About This Pattern
This one lands in my notebook under easy warm-weather pieces. I file a lot of tank patterns here, but few build texture into the body stitch itself. The fabric isn't plain double crochet — it alternates with half double crochet, row after row. That's the kind of detail that makes a simple top worth a second look. It sits between my beginner cover-ups and the fussier lace tanks, a middle-shelf project.
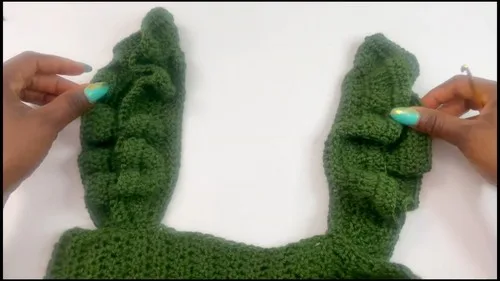
The construction stays straightforward on paper. A long foundation chain starts the body, then two rounds alternate double and half double crochet to build a textured rectangle. A single crochet border frames both edges before the piece gets seamed into a tube. The straps are where the real ruffle lives — plain double crochet gives way to two stitches per stitch, then an alternating ruffle row. It's a lot of technique packed into five small rounds.
What comes off the hook is a close-fitting top with real movement at the straps and hem. The bottom ruffle edge adds drape without adding bulk. A scrunch detail gathers the center front, with a long chain that leaves room for beads if you want some shine. It reads handmade without looking like a costume. Wear it as the whole outfit, or layer it under something open.
Worth knowing
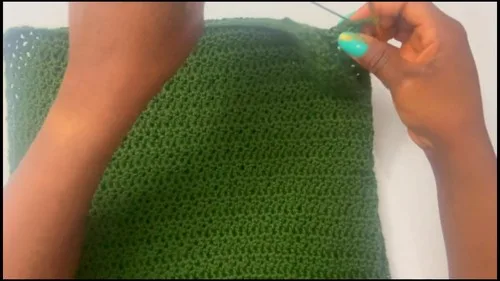
The satisfaction here is in the alternating stitch pattern — dc over hdc, hdc over dc, row after row. It's simple to track once you see the rhythm, and it gives the body a woven look plain double crochet doesn't manage alone. The straps earn their five rounds: a flat dc row, then a 2-dc-per-stitch row, then an alternating ruffle row that actually ruffles. Watching a strap go from straight to frilled in two rounds is a small, repeatable trick. Add the center-front scrunch with its long chain and optional beads, and you've got a piece with more going on than its two-round body suggests. It rewards patience in the small parts, not the big ones.
Common mistakes
- Losing the dc/hdc alternation Mark the first stitch of each row so a double crochet lands on a half double crochet, not on itself. One wrong placement throws off every row after it.
- Rushing the border edge Space single crochets evenly around both edges before joining, or the border pulls the fabric out of shape. Count stitches as you go instead of guessing.
- Skipping the ruffle doubling round Round three's two double crochets per stitch is what creates the ruffle; miss it and the strap stays flat. Check your stitch count before starting round four.
- Twisting the foundation chain A chain that long twists easily before you start the first row. Lay it flat and smooth it before working into it.
- Tangling the scrunch chain A long chain pulled through the center front can knot on itself if you rush. Pull it through slowly and keep the tail clear while threading beads.


Intermediate
Progress Tracker
0 of 0 rounds
Tap a round to tick it off — your place is saved on this device.
The kit
- Cotton or acrylic blend yarn (recommended for structure and comfort)
- 4.0 mm crochet hook (or size that matches gauge)
- Yarn needle
- Stitch markers
Optional
- Beads for the scrunch detail
Main Body
Round 1(Foundation Chain & First Row): Start with a slip knot; chain 55; skip the first two chains; work a double crochet into the third chain; work a half double crochet into the next chain; alternate between double crochet and half double crochet across the entire chain.
Round 2Main Body At the end of the row, chain two and turn your work; insert a double crochet into the first stitch; alternate stitches: place a double crochet on top of a half double crochet and a half double crochet on top of a double crochet from the previous row; continue this alternating pattern for each row; repeat until your fabric measures approximately 27.5 inches (or your desired body width).
Joining the Ends
Round 1Fold the fabric so the short ends align; slip stitch across to join the ends together; chain one; insert the hook through corresponding stitches from each edge, pull through, and complete the seam with slip stitches; continue this until the join is complete.
Border
Round 1Top Edge Work single crochets evenly around the top edge of the top; place one single crochet in each stitch or row edge around; slip stitch to join, cut the yarn, and weave in the end.
Round 2Bottom Edge Repeat this process for the bottom edge.
Straps
Make 2Measure 2.5 inches from the side seam and place a marker; place a second marker directly across on the other side; repeat on the back panel of the top.
Round 1(Strap Base & Row 1 - Single Crochet Foundation): At the marked point, insert your hook and pull up a loop; chain 55; chain one; work single crochets into each chain stitch back toward the top.
Round 2(Strap Row 2 - Double Crochet): Slip stitch into the next stitch at the top edge; chain one and turn; work one double crochet into each stitch across.
Round 3(Strap Row 3 - Ruffles, 2 DC per Stitch): Slip stitch into the next stitch at the top edge; chain one and turn; work two double crochets into each stitch across for a ruffled effect.
Round 4(Strap Row 4 - Alternating Ruffle): Chain one and turn; one double crochet into the first stitch, two double crochets into the next stitch — repeat until end.
Round 5(Strap Row 5 - Final Row): Slip stitch to the top, chain one and turn; work one double crochet into each stitch across; slip stitch, fasten off, tie both ends into a knot, and weave in.Repeat all strap steps for the second strap.
Bottom Ruffle Edge
Round 1(Start Ruffles): Attach yarn at the joining seam; chain two; two double crochets in one stitch, one double crochet in the next stitch — repeat around; slip stitch to join.
Round 2(Repeat Ruffle Pattern): Chain two; one double crochet in one stitch, two double crochets in the next stitch — repeat around; slip stitch to join.
Round 3Solid Row Chain two; work one double crochet into every stitch around; slip stitch to join.
Rounds 4–6(Repeat Solid Rows): Repeat Round 3 for three more rows; total of six rows for the bottom ruffle.
Assembly
Step 1Scrunch Design (Center Detail): Make a slip knot with a long yarn tail (for beads if desired); chain 100; insert hook from the inside of the top at the center front and pull the chain through; skip one or two stitches/posts and pull the chain through again; repeat until scrunched effect is formed; repeat on the opposite side of the center for symmetry.
Step 2Adding Beads (Optional): Thread beads onto the yarn tails using a needle; tie knots at each end to secure the beads; trim excess yarn.
Step 3Finishing: Weave in all ends; turn the top so the seam lies at the side; adjust ruffles and straps as needed.
From the collection
Finishing
- Weave in the yarn end left after each border round.
- Seam the short ends of the main body together with slip stitch to close the tube.
- Thread the long scrunch chain through the center front, adding beads if you're using them.
Why it works
The main body is worked flat in only two rounds, so the alternating dc/hdc pattern just repeats rather than shapes.
The strap ruffle comes from stitch count: round three doubles stitches, round four alternates single and double increases across.
The short-end seam, not any round in the body, is what turns the flat rectangle into a wearable tube.
What it becomes
- Wear it on its own in warm weather, paired with jeans or a simple skirt.
- Layer it under an open cardigan or shirt for cooler days without hiding the straps.
- Pair it with high-waisted pants or a longer skirt to let the ruffle hem show.
Original pattern: https://crocheteverything.com/lightweight-crochet-ruffle-top-pattern-for-everyday-wear/
FAQ
Can I make the body wider or narrower than suggested?
Yes. The body round just repeats until you hit your own desired width, so stop earlier or later as needed.
Do I need beads for the scrunch detail?
No, they're optional. The long chain pulled through the center front works with or without beads threaded on.
Why alternate double and half double crochet instead of just double crochet?
I can't say for certain why this pattern chose it, but the mix gives the body more texture than a single stitch would. Worth swatching to see the effect for yourself.
What yarn works best for this top?
Cotton or an acrylic blend is recommended for structure and comfort. Either should hold up through the ruffle rounds with a 4.0 mm hook.