
Free Pattern
Step-by-Step
Crochet
AmigurumiLittle Dragon Amigurumi with Wings and Spines
A crochet pattern for a little amigurumi dragon with wings, spines, and a belly panel.
- Level
- Intermediate
- Time
- 6-8 hours
- Hook
- 3.5 mm
- Yarn
- Worsted
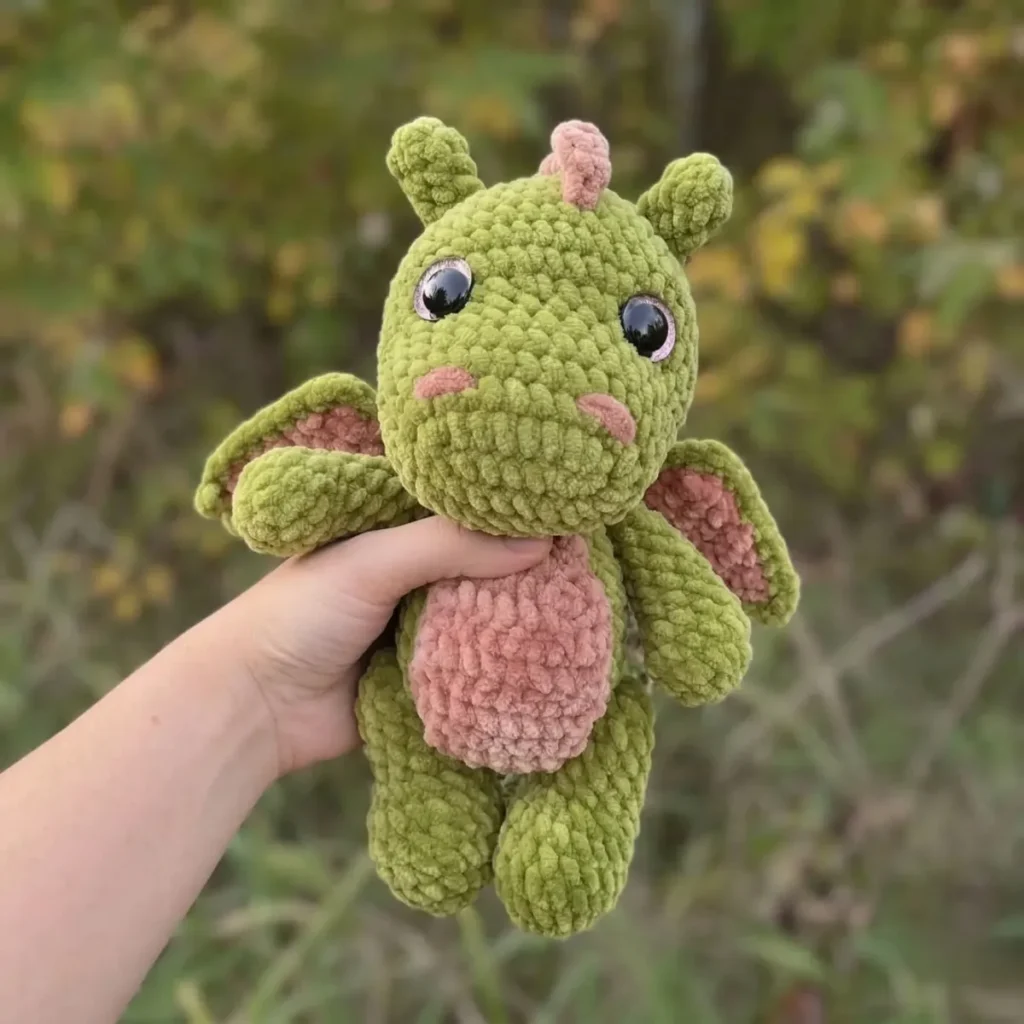
Pattern highlights
- Start with the body worked bottom-up in continuous spiral rounds before moving to smaller pieces.
- Crochet two arms and two legs separately, each shaped with a single decrease round near the top.
- Work the tapering tail in continuous rounds, then crochet the flat belly panel to match it.
- Make two tube-shaped ears and four wings, splitting the wings evenly between brown and green yarn.
- Crochet the head last, since it carries the most rounds and holds the safety eyes.
- Sew every piece to the body, embroider the eyebrows and nostrils, then attach the spine ridge along the back.
About This Pattern
A dragon earns a spot in any amigurumi shelf the way a good mascot does: it has personality without needing a face full of detail. This one sits between the simple round critters and the fussier multi-piece builds, since it asks for wings, spines, and a belly panel on top of the usual limbs. It's the kind of project you make once you're bored of plain bears.
The techniques stack up piece by piece. The body, arms, legs, and tail all work in continuous spiral rounds from a magic ring, while the belly panel is a flat piece meant to be sewn on rather than joined in the round. Two yarn colors — green for the body, brown for accents — keep the wings and details visually separate from the main shape.
Finished, it's a small dragon with a tapered tail, four wings split between the two colors, tube-shaped ears, and a dorsal spine running down its back. Safety eyes and black embroidered eyebrows and nostrils give it the only facial detail it needs. It reads as a toy, not a display piece, though it could be either.
Worth knowing
The appeal here is in the piece count. Nine parts before assembly means constant small progress: finish an ear, finish a wing, finish a leg, and the pile of components grows fast. The wings split four ways between brown and green force you to keep count, which is a nice change from single-color amigurumi. The belly panel, worked flat instead of in the round, breaks up the spiral rhythm. And the dorsal spine sewn along the back at the end turns a fairly standard body shape into something clearly reptilian. It's a pattern that rewards patience with assembly more than speed with stitches — the crochet itself is straightforward, the satisfaction comes from watching a dragon appear out of a dozen small tubes.
Common mistakes
- Losing track of the spiral round Use a stitch marker in the first stitch of every round. Move it up as you go so you always know where a round starts.
- Overstuffing the tail Stuff the tail lightly, especially near the tip. Too much fill flattens the taper the decrease rounds were meant to create.
- Sewing the belly panel off-center Pin the panel to the body before stitching and check it from both sides. It's a flat piece, so it's easy to angle it without noticing.
- Mixing up the wing colors Keep the brown and green wings in separate piles as you crochet all four. It's easy to grab the wrong pair mid-assembly.
- Sewing the head on before embroidering Add the eyebrows and nostrils with black yarn while the head is still a loose piece. It's much harder to embroider neatly once it's attached to the body.


Intermediate
Progress Tracker
0 of 0 rounds
Tap a round to tick it off — your place is saved on this device.
The kit
Yarn
- La Mia Mellow 100g/120m, Color 932 — 1 skein (green)
Yarn
- La Mia Mellow 100g/120m, Color 922 — ¼ skein (brown)
- Black yarn for embroidered eyebrows and nostrils
Crochet hook
- 3.5mm (US E/4)
Tools
- Safety eyes: 18–20mm
- Polyester fiberfill stuffing
- Stitch marker
- Yarn needle for assembly
Body
The body is worked in continuous spiral rounds from the bottom up.
Round 112 sc in magic ring. (12)
Round 2(1 sc, inc) × 6. (18)
Round 3(2 sc, inc) × 6. (24)
Round 4(3 sc, inc) × 6. (30)
Round 5-10sc in each st around. [6 rounds] (30)
Round 116 dec, 18 sc. (24)
Round 1221 sc. — Stop 3 sts before the end of the round; place stitch marker here. (21 worked)(21)
Round 136 dec, 12 sc. (18)
Round 14sc in each st around. (18)Stuff the body firmly before continuing to assembly.
Arms(Make 2)
Round 16 sc in magic ring. (6)
Round 2inc in each st around. (12)
Round 3-4sc in each st around. [2 rounds] (12)
Round 53 dec, 6 sc. (9)
Round 6-10sc in each st around. [5 rounds] (9)Stuff lightly. Fold the piece in half and join the edges together with sl st across the opening.
Legs(Make 2)
Round 16 sc in magic ring. (6)
Round 2inc in each st around. (12)
Round 3(1 sc, inc) × 6. (18)
Round 4-6sc in each st around. [3 rounds] (18)
Round 76 dec, 6 sc. (12)
Round 8-11sc in each st around. [4 rounds] (12)Stuff firmly.
Round 12dec × 6. (6)Fasten off and close the opening.
Tail
The tail is worked in continuous spiral rounds, starting narrow and expanding gradually for a natural taper.
Round 16 sc in magic ring. (6)
Round 2(1 sc, inc) × 3. (9)
Round 3sc in each st around. (9)
Round 4(2 sc, inc) × 3. (12)
Round 5sc in each st around. (12)
Round 6(3 sc, inc) × 3. (15)
Round 7sc in each st around. (15)
Round 8(4 sc, inc) × 3. (18)
Round 9(5 sc, inc) × 3. (21)
Round 10(6 sc, inc) × 3. (24)Stuff lightly to make sewing easier.
Belly Panel
This flat piece adds a lovely contrast belly to your dragon. It is worked in flat turned rows.
Foundation: Ch 8; begin working into the 3rd ch from hook.
Round 16 sc. (6)
Round 2inc, 4 sc, inc. (8)
Round 3-6sc in each st across. [4 rows] (8)
Round 7dec, 4 sc, dec. (6)
Round 8-9sc in each st across. [2 rows] (6)After Row 9, work 1 round of sc evenly around the entire panel border and join with sl st.
Ears(Make 2)
These little tube-shaped ears are quick and simple.
Round 16 sc in magic ring. (6)
Round 2-5sc in each st around. [4 rounds] (6)Leave a long yarn tail for sewing. Do not stuff.
Spines / Dorsal Ridge
This single decorative row creates the iconic spiked ridge running down Drakosha's back.
Foundation: Ch 40.
Spine Row*Skip 2 ch, 6 dc in next ch (shell made), skip 2 ch, sc in next ch; repeat from * to end of chain.
The repeating unit is: [skip 2 ch, 6-dc shell, skip 2 ch, sc]. Repeat across all 40 foundation chains to create a continuous scalloped spike ridge.
Part 3: Head
The head is one of the most satisfying pieces to make. It starts from a flat chain foundation, then grows into a 3D oval worked in continuous spirals, with increases focused on the top of the head to create a rounded domed shape.
Foundation: Ch 8; begin working into the 3rd ch from hook, working along both sides of the chain.
Round 15 sc along chain, 5 sc in last ch (corner); 5 sc back along other side of chain, 5 sc in first ch (corner). (20)
Round 25 sc, inc × 5; 5 sc, inc × 5. (30)
Round 3-6sc in each st around. [4 rounds] (30)Place a stitch marker. All increases from Rnd 7 onward are worked on the TOP of the head only.
Round 712 sc, inc, (1 sc, inc) × 5, 7 sc. (36)
Round 813 sc, inc, (2 sc, inc) × 5, 8 sc. (42)
Round 9-14sc in each st around. [6 rounds] (42)Insert safety eyes between Rnds 7 & 8, with 10 sc between eyes (5 stitches each side from the center of the muzzle). Then begin the decrease rounds.
Round 15(5 sc, dec) × 6. (36)
Round 16(4 sc, dec) × 6. (30)
Round 17(3 sc, dec) × 6. (24)
Round 18(2 sc, dec) × 6. (18)Stuff firmly.
Round 19(1 sc, dec) × 6. (12)
Round 20dec × 6. (6)Stuff to the end and close the opening.
Wings(Make 4 total: 2 brown + 2 green)
Each finished wing consists of one brown piece and one green piece joined together. Work all four individual panels first, then join them in pairs.
Foundation: Ch 3; begin working into the 3rd ch from hook. Worked in flat turned rows.
Round 13 sc in same stitch. (3)
Round 2inc, 1 sc, inc. (5)
Round 3inc, 3 sc, inc. (7)
Round 4inc, 5 sc, inc. (9)
Round 5inc, 7 sc, inc. (11)
Round 6inc, 9 sc, inc. (13)
Round 7sc in each st across. (13)Joining: Without cutting the green yarn, place the brown piece against the green piece. Hold the brown piece facing you and join 2 sides together using sl st. Join the 3rd (bottom/decorative) side as follows: (2 sc, picot) repeat across entire edge.Picot: Ch 3, sl st into the 1st ch made. This forms the decorative scalloped lower wing edge.
Assembly
Step 1Now that all pieces are complete, it's time to bring your little dragon together! Take your time with placement before sewing to make sure everything looks balanced and symmetrical.
Step 2Sew legs, arms, and tail to the body.
Step 3Sew the belly panel to the front of the body.
Step 4Sew the ears to the top of the head.
Step 5Embroider eyebrows and nostrils with black yarn.
Step 6Sew the head to the body.
Step 7Sew the dorsal spine ridge along the back, starting from the tail end and working toward the head.
Step 8Sew the wings to the back of the body.
Finishing
- Weave in yarn tails on each piece as it's finished, since the spiral construction leaves loose ends at the top of every part.
- Stuff the body, limbs, and tail firmly before closing off the last rounds, keeping the tail's taper in mind so it doesn't round out.
- Attach the safety eyes to the head before stuffing it, then sew the head, limbs, tail, ears, wings, and spine to the body.
Why it works
The body starts with a 12-stitch magic ring and increases through early rounds before settling into plain rounds, the standard way amigurumi tubes widen then hold shape.
Arms and legs both begin with a 6-stitch magic ring and increase before a single decrease round narrows them again, giving each limb a slight taper toward the end.
The belly panel is worked as its own short piece rather than joined into the body, which is why it gets sewn on afterward as a flat panel.
What it becomes
- A shelf piece for a growing amigurumi collection, sitting well alongside other small crocheted creatures.
- A gift for anyone who likes dragons or fantasy characters more than the usual bear or bunny.
- A soft toy for imaginative play, sized for handling thanks to its stuffed limbs and tail.
Original pattern: https://amigurumicorner.com/drakosha-the-little-dragon/
FAQ
What yarn weight is best for the Drakosha dragon amigurumi pattern?
The original pattern uses La Mia Mellow yarn at 100g/120m, which is a bulky (Category 5) weight yarn. Paired with a 3.5mm hook, this creates a dense, firm fabric ideal for amigurumi. You can substitute any bulky yarn of similar weight, but always check your gauge to ensure the finished pieces match the expected sizes.
How do I keep my amigurumi rounds from spiraling visibly?
Use a stitch marker at the beginning of every round and move it up as you go. The Drakosha pattern is worked in a continuous spiral (not joined rounds), which is standard for amigurumi. The invisible decrease technique (inserting your hook under the front loops of the next two stitches before pulling through) also helps keep the fabric smooth and minimizes visible gaps.
When should I insert the safety eyes in the head piece?
Insert the safety eyes between Rounds 7 and 8, with 10 sc between the eyes (5 stitches on each side from the center of the muzzle), then continue on with the decrease rounds.