
Free Pattern
Step-by-Step
Crochet
AmigurumiLittle elephant amigurumi: trunk, ears, and tiny strawberry
Notes on stitching a plush elephant amigurumi, from spiral rounds to a tiny strawberry accent.
- Level
- Intermediate
- Time
- 4-6 hours
- Hook
- 4 mm
- Yarn
- Bulky
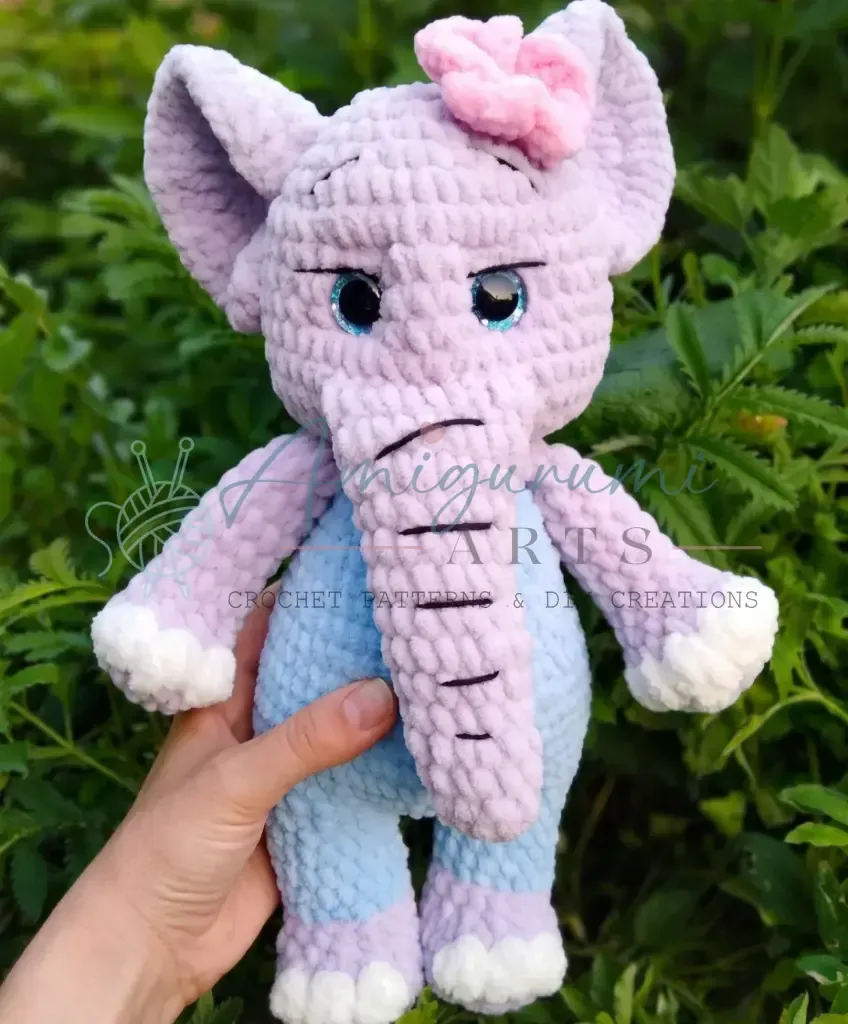
Pattern highlights
- Start with the smaller parts — arms, legs, tail, and ears — so the big body round feels earned.
- Work the spiral sections (arms, legs, trunk, body) using a stitch marker, since nothing joins at the round's end.
- Pick up the smaller hook for the strawberry leaf and bracelet chain, both worked apart from the animal.
- Pin the ears to the head between the rows the pattern specifies, then sew along the outer edge.
- Position the head on the body, check the angle with stitch markers, then sew with doubled fingering yarn.
- Finish with the accent colors — white for toe bobbles, red for the strawberry — added last for contrast.
About This Pattern
This elephant lands on the same shelf as the other soft-animal patterns I keep collecting — a horse, a striped zebra, a giraffe. Each one teaches something different about amigurumi proportions. The elephant's job here is scale: trunk, ears, and a round body all balanced against each other. I like adding it to a lineup because it tests patience with small repeats before the shaping gets interesting.
What comes off the hook is a chenille elephant with a contrast-color lower section, white toe bobbles, and a small red strawberry tucked into the design. The thin fingering yarn does double duty — sewing seams and adding decorative stitching after the plush yarn is done. Nothing about it is oversized; it is built from rounds in the single digits and low teens, which keeps it a tabletop companion.
Common mistakes
- Losing the round marker The spiral parts have no joining slip stitch, so without a stitch marker I lose track of where a round starts. I move the marker up every round, no exceptions.
- Treating ears like the spiral parts I almost worked the ears in a continuous spiral out of habit. After the first magic ring round they turn into rows, so I have to flip the work each time.
- Using one hook for everything The smaller hook is for the strawberry leaf and bracelet chain only; the larger hook does the rest. Swapping hooks mid-project is easy to forget.
- Mixing up the yarn weights The main plush yarn, the contrast plush, and the thin fingering yarn all do different jobs. I keep them in separate bags so I don't grab the wrong one for sewing.
- Rushing the ear-to-head pinning The pattern asks me to position the ear between specific rows on the head before sewing, not just eyeball it. I pin first, check the angle, then commit to stitching.


Intermediate
Progress Tracker
0 of 0 rounds
Tap a round to tick it off — your place is saved on this device.
The kit
Main yarn
- Plush/chenille yarn, approx. 100 g / 120 m — main color (have a small extra amount on hand)
Secondary color yarn
- Accent yarn (small amount): White plush — for toe bobbles
- Accent yarn (small amount): Red plush — for strawberry
- Thin yarn (various colors): Fingering-weight yarn such as a cotton-blend (used for sewing parts together, tightening, and decorative details — approx. 50 g)
Primary hook
- 4 mm (G-6)
Secondary hook
- 2 mm (B-1) — used for strawberry leaf and bracelet chain
Safety eyes
- 18 mm, 1 pair
Stuffing
- Polyester fiberfill, as needed
- Stitch markers
- Tapestry needle (wide-eye / yarn needle)
- Scissors
Arms (Make 2)
Stuff as you work. Begin with a Magic Ring or work into the 2nd chain from the hook.
Worked top to bottom. Stuff as you work. Begin with a Magic Ring or work into the 2nd chain from the hook.
Stuff as you work. Begin with a Magic Ring or work into the 2nd chain from the hook. Use red yarn with the 4 mm hook.
Round 16 sc in MR. (6)
Round 2inc in each st around. (12)
Round 3sc, inc repeat 6 times around. (18)Insert safety eyes now: place them between Rounds 10 and 11, with 9 stitches between the two eye posts, one on each side of the trunk.
Round 4Bobble Round: Using white yarn, work 4 hdc in one stitch with a shared top closure (bobble stitch) to create each toe bobble, then return to main color. Work: 6 sc, bobble stitch in next st, 1 sc repeat 3 times, 6 sc. (18)Step by step: 3 sc, inc repeat 6 times around. (30); 4 sc, inc repeat 6 times around. (36); 5 sc, inc repeat 6 times around. (42); 6 sc, inc repeat 6 times around. (48).
Round 53 sc, dec 6 times, 3 sc. (12)Trunk Attachment Round: Work 19 sc, then work the next 9 sc together with the trunk (hold the open edge of the trunk against the head and sc through both layers for 9 stitches), work 20 sc. (48)
Rounds 6–13sc in each st around. (12) — 8 rounds totalsc, dec repeat 6 times around. (12) At the end of this round, change to green yarn and switch to the 2 mm (B-1) hook.sc, spike sc repeat 6 times around. (12) The spike sc is worked one row below the indicated stitch, pulling the loop up to the current row height.dec 6 times around. (6) Pull tight to close, fasten off. Attach a length of fingering-weight yarn to the strawberry and crochet a bracelet chain: using the 2 mm hook and two strands of yarn held together, chain 20. Attach the chain to the strawberry to form a loop sized to slip over the elephant’s arm.3 sc, dec repeat 6 times around. (24) Then sl st in next st. Fasten off, leaving a long tail for attaching to the body.Attach the ears before sewing the head to the body (see Assembly and Ear instructions below).
Finishing: Work 2 sc to align the round opening (adjust as needed for your tension — you may need more or fewer). Fold the arm flat and sc across the opening, working through both layers, for 6 sc to close. Do not stuff the very end before closing.
Tail
Work a foundation chain of 7 ch. Starting in the 2nd chain from the hook:
Round 1sc in each of the next 6 ch. (6)Fasten off, leaving a tail for sewing.
Legs (Make 2)
Stuff as you work. Begin with a Magic Ring or work into the 2nd chain from the hook.
Round 16 sc in MR. (6)
Round 2inc in each st around. (12)
Round 3sc, inc repeat 6 times around. (18)
Round 42 sc, inc repeat 6 times around. (24)
Round 5Bobble Round: Using white yarn, work 4 hdc bobble stitches as described in the Arms. Work: 9 sc, bobble stitch in next st, 1 sc repeat 3 times, 9 sc. (24)
Round 66 sc, dec 6 times, 6 sc. (18)
Round 7sc in each st around. (18) At the end of this round, change to contrast color yarn.
Round 8sc in BLO of each st around. (18)
Right Leg:
Rounds 9–11sc in each st around. (18) — 3 rounds total
Round 12Partial round: Work 5 sc so the live loop sits at the side of the leg. Adjust the count by a stitch or two if needed for your tension. Do not close this round. Cut yarn, leaving a tail.
Left Leg:
Rounds 9–10sc in each st around. (18) — 2 rounds total
Round 11Partial round: Work 15 sc so the live loop sits at the side of the leg. Adjust as needed. Do not cut yarn — continue to the body join.
Trunk
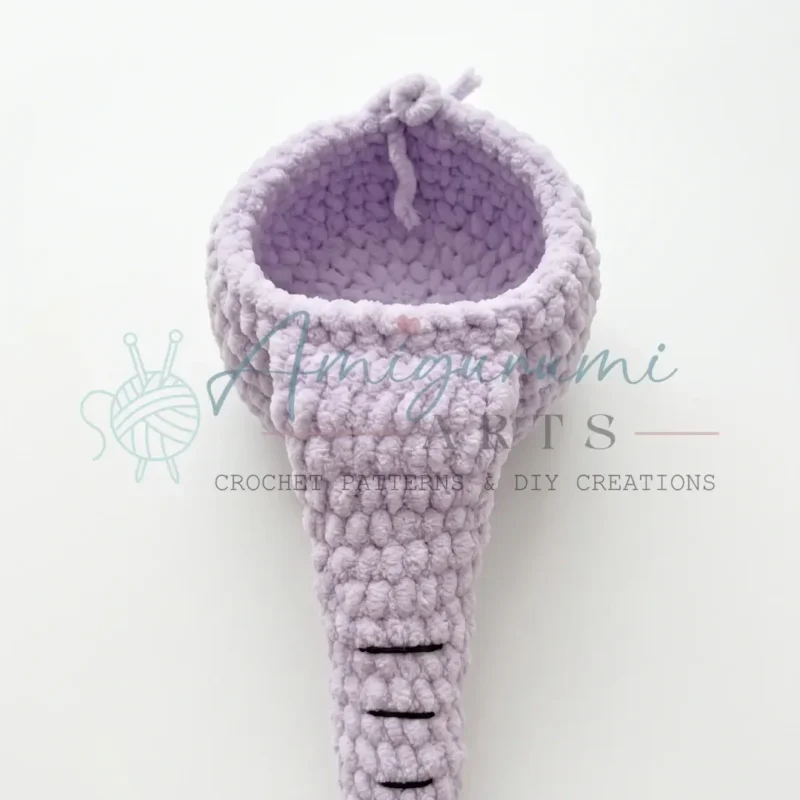
Do not stuff the trunk. Work a foundation chain of 4 ch. Starting in the 2nd chain from the hook:
Round 13 sc in first ch (corner), 1 sc, 3 sc in last ch (corner); working along the opposite side of the chain: 1 sc. (8)
Round 2sc in each st around. (8)
Round 3sc, inc repeat 4 times around. (12)
Rounds 4–5sc in each st around. (12) — 2 rounds total
Round 63 sc, inc repeat 3 times around. (15)
Rounds 7–11sc in each st around. (15) — 5 rounds total
Round 124 sc, inc repeat 3 times around. (18)
Round 13sc in each st around. (18)
Round 14Partial round: Work 7 sc so the live loop sits at the side of the trunk. Adjust as needed.Finishing: Fold the trunk flat and sc across the opening, working through both layers, for 9 sc to close.
Ears (Make 2)
Begin with a Magic Ring or work into the 2nd chain from the hook.
Round 16 sc in MR. (6)
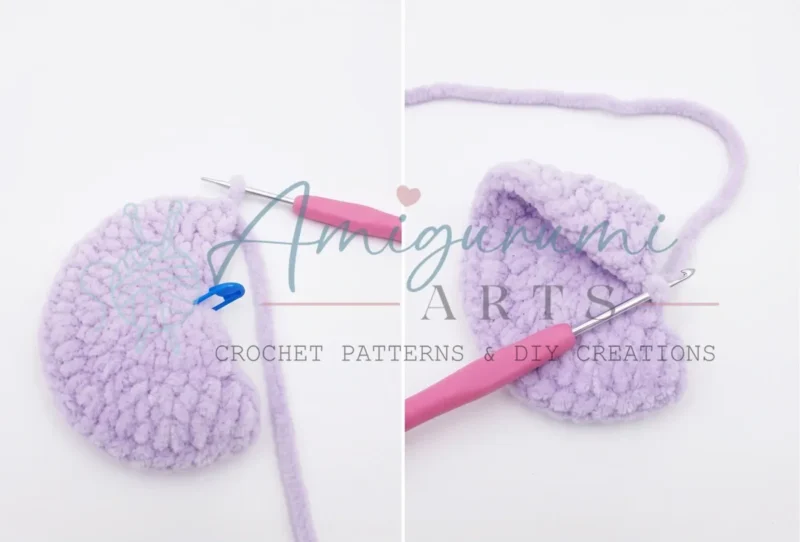
From this point, the ears are worked in turned rows using hdc, with 1 chain as the turning chain.
Round 2Turn, ch 1, inc (2 hdc) in each st across. (12)
Round 3Turn, ch 1, hdc, inc repeat 6 times across. (18)
Round 4Turn, ch 1, 2 hdc, inc repeat 6 times across. (24)
Round 5Turn, ch 1, 3 hdc, inc repeat 6 times across. (30) Do not turn. Continue working along the edge for finishing.For the Left Ear: Starting from the Magic Ring (center), count 1 stitch along the curved edge, sl st in that stitch. Fasten off, leaving a long tail for sewing.For the Right Ear: Rotate (flip) the piece so the opposite side faces you, then repeat the same finishing step as for the Left Ear.Shape each ear into a cup/shell form and position it on the head between approximately Rounds 3 and 9. Sew along the edge from the center of the cup outward along the outer side of the ear.
Flower
Use yellow yarn with the 4 mm hook. Begin with a Magic Ring.
Round 15 sc in MR. Change to petal color at the end of this round. Petals: Work 5 petals as follows: (ch 2, work 3 dc into the same stitch as the chain base, ch 2, sl st in next st) repeat 5 times. (5 petals total)Fasten off, leaving a long tail for sewing.(5)
Body
Join the legs to begin the body.
Joining the legs: Chain 2. Pull the live loop of the Right Leg through the live loop of the Left Leg and secure the yarn tail from the Right Leg. The beginning of the round is now at this joining point.
Joining Rnd: sc in each of the 18 sts around the first leg, 2 sc across the ch-2 bridge + 1 sc into the junction point where the chain meets the leg (this closes any gap), sc in each of the 18 sts around the second leg, 2 sc across the other side of the ch-2 bridge + 1 sc into the junction point. (42)
Wait — you’ll notice a count of 42 is established here. Let’s continue.
Round 218 sc, inc 3 times, 18 sc, inc 3 times. (48)
Round 3sc in each st around. (48)
Round 4Tail Round Work 22 sc normally, then work the next 2 sc together with the tail (hold the tail against the body and sc through both the body stitch and the tail together for 2 stitches to anchor it), then work 24 sc. (48)
Rounds 5–8sc in each st around. (48) — 4 rounds total
Round 96 sc, dec repeat 6 times around. (42)
Round 10sc in each st around. (42)
Round 115 sc, dec repeat 6 times around. (36)
Round 12sc in each st around. (36)
Round 134 sc, dec repeat 6 times around. (30)
Round 14sc in each st around. (30)
Round 153 sc, dec repeat 6 times around. (24)
Round 16Arm Attachment Round Work 4 sc, then work the next 6 sc together with the first arm (hold the arm against the body opening and sc through both layers for 6 stitches), work 6 sc, then work the next 6 sc together with the second arm in the same way, work 2 sc. Arms should be positioned parallel to the legs. (24)
Round 17sc in each st around. (24) Then sl st in next st. Fasten off and weave in end.
Assembly
Step 1Ears to Head: Shape each ear into a cup (shell) and pin it to the head, positioning the attachment point between Rows 3 and 9 of the head. Using the long yarn tail, sew along the outer edge from the center of the cup outward. Secure and weave in the end.
Step 2Head to Body: With the ears attached, position the completed head on top of the body. Pin it in place using needles or stitch markers to check the angle before committing. Using fingering-weight yarn in two strands, sew the head to the body stitch by stitch all the way around, matching stitch to stitch (mattress stitch along the edges). This creates a secure, invisible join.
Step 3Flower to Head: Position the flower on the head wherever it looks most natural to you. Sew it down using the long yarn tail, stitching through the center and between petals to hold it flat.
Step 4Strawberry to Arm: Slip the bracelet chain over one of the elephant’s arms so the strawberry hangs from the wrist.
Step 5Weave in all remaining ends. Use the tapestry needle to bury yarn tails securely inside the stuffed pieces.
From the collection
Finishing
- Stuff each piece as I go, since the pattern builds that in rather than leaving it for the end.
- Close the last round of each limb and the tail's row, weaving in tails with the tapestry needle.
- Save the sewing — ears to head, head to body — for the fingering-weight yarn, held in two strands for strength.
Why it works
The body, legs, arms, and trunk all begin with a magic ring and build outward through increase rounds, which is why no slip stitch marks the start of a round.
The ears stop spiraling after their first magic ring round and turn into rows, which is what lets them fold into a cupped shape before sewing.
The tail is a single flat row worked straight from a foundation chain, so it never develops the dimensional shaping the other parts get.
What it becomes
- A nursery shelf piece that pairs naturally with the horse, zebra, and giraffe from the same series.
- A small toy for a child's bag, light enough given the low round counts on each limb.
- A gift alongside its own strawberry and flower accents, already built into the pattern.
FAQ
Do I need two different hook sizes?
Yes — a larger hook for the main body parts and a smaller one for the strawberry leaf and bracelet chain. Keep both on hand before starting.
What is the fingering-weight yarn for?
It is for sewing parts together, tightening, and adding decorative details, separate from the plush yarn used for the body. I keep it in a different color so I can see my stitches.
Can I skip the strawberry and flower accents?
They are worked separately from the main elephant, so leaving them off does not affect the body construction. I'd still make the flower — it is only one round.