
Free Pattern
Step-by-Step
Crochet
GarmentsMidnight navy pineapple maxi dress crochet pattern
A fingering weight pineapple lace maxi dress worked top down, bodice to diamond waistband to skirt.
- Level
- Intermediate
- Time
- 4-6 hours
- Yarn
- Fingering
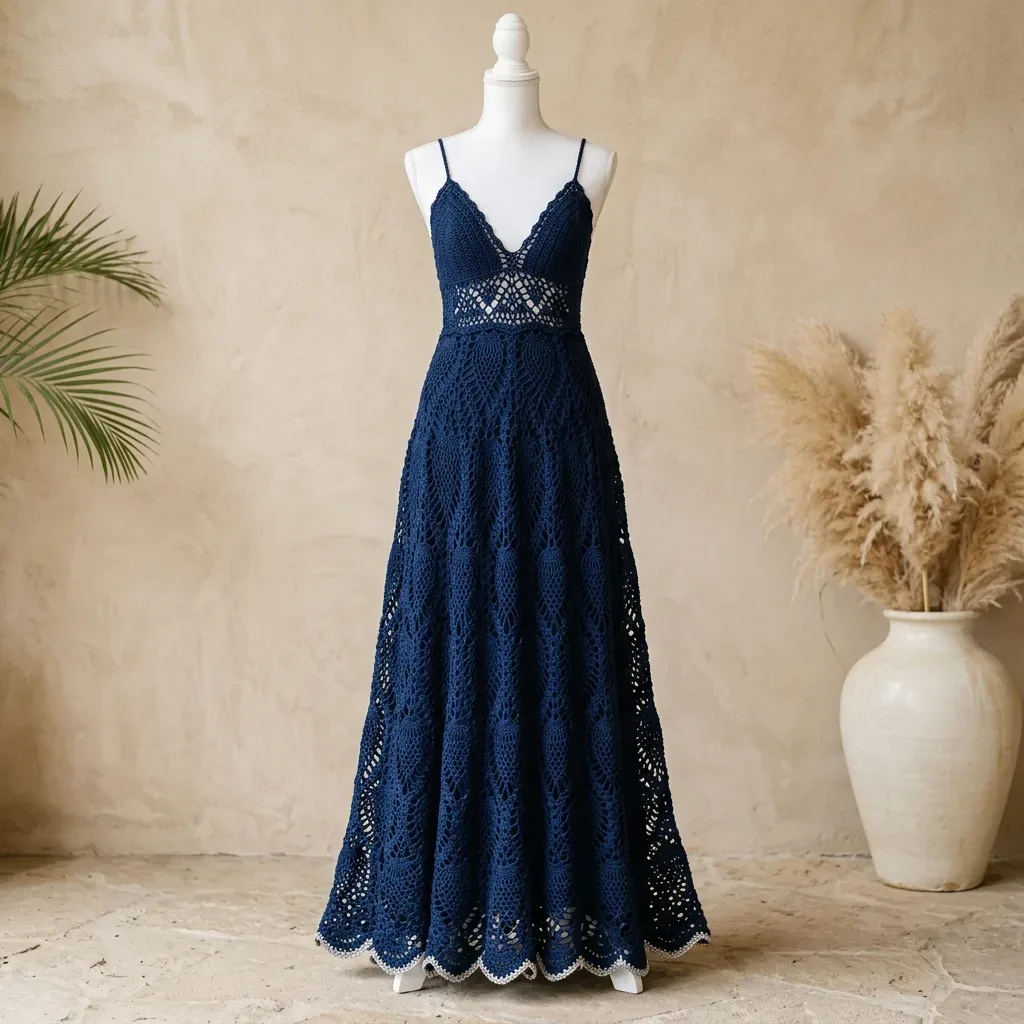
Pattern highlights
- Work the two bodice cup pieces flat with single crochet, shaping each side with sc2tog decreases.
- Join the cups with a center bridge and chain-10 back panel, then work the body in the round.
- Increase steadily through the bodice body rounds to bring the stitch count up for the waistband.
- Return to straight single crochet to normalize the stitch count before the skirt begins.
- Change to the C-2 hook for the skirt section so the pineapple motifs drape rather than stiffen.
- Add straps, then finish the hem with off-white single crochet and picot edging.
About This Pattern
I keep a shelf in my notebook for pieces that outgrow a swatch and become a season of work. This dress belongs there. It is not a weekend pattern. It is the kind of project you return to over weeks, tracking cup shaping, waistband diamonds, and a skirt that finally lets the pineapple motif breathe.
What comes out the other end is a full-length dress in midnight navy cotton, cream picot trim at the hem, straps crossing at the back. It reads as lace from across the room and as careful engineering up close.
Common mistakes
- Losing track of cup decrease direction The decrease moves from one edge to the opposite edge partway through the cup rows. Check which end you are sc2tog-ing before each row, not after.
- Miscounting the diamond repeat 84 stitches only works if each of the six repeats holds exactly 14 stitches. Count after Waistband Round 1 before continuing.
- Skipping lifelines in the diamond mesh Thread a contrasting strand every 10 rounds as suggested. Ripping back through shells without one is slow and frustrating.
- Not returning to 84 sc before the skirt Waistband Round 5 exists to normalize the count. Check you have 84 single crochet before casting into skirt pattern.


Intermediate
Progress Tracker
0 of 0 rounds
Tap a round to tick it off — your place is saved on this device.
The kit
Yarn
- Approximately 2,800 to 3,200 yards of fingering weight (size 1) 100 percent mercerized cotton yarn in midnight navy. You will also need about 50 yards of fingering weight cotton in off-white or cream for the hem edging.
Notions
- Stitch markers, at least 8
- Yarn needle for weaving ends
- Measuring tape
- Rust-proof straight pins for blocking
- Blocking mats
- Spray bottle or basin for wet blocking
Optional
- 2 yards of navy stretch jersey fabric for a lining slip
Optional
- 3 small snap hooks or adjustable sliders for straps
Yarn Suggestions
- Paintbox Yarns Cotton DK used at fingering tension works beautifully. The Navy Blue colorway has excellent stitch definition for lace. You will need approximately 14 skeins of 280 yards each.
- Drops Safran in Navy is another excellent choice. The mercerization gives that subtle sheen you see in the photos. Plan for approximately 10 skeins of 175 yards each, plus a few extra to be safe.
- Whatever you choose, look for tightly spun, mercerized 100 percent cotton. Avoid fuzzy fibers, acrylic, or loosely plied yarns. They will completely obscure the beautiful lace structure.
Main Pattern
Round 1(RS): Single crochet in 2nd chain from hook and in each chain across. (23 sc)
Round 2(WS): Chain 1, turn. Single crochet in each stitch across. (23 sc)
Round 3(RS): Chain 1, turn. Sc2tog over first 2 stitches, single crochet to last 2 stitches, sc2tog. (21 sc)
Round 4(WS): Chain 1, turn. Single crochet in each stitch across. (21 sc)
Round 5(RS): Chain 1, turn. Sc2tog over first 2 stitches, single crochet to last 2 stitches, sc2tog. (19 sc)
Round 6(WS): Chain 1, turn. Single crochet in each stitch across. (19 sc)
Round 7(RS): Chain 1, turn. Sc2tog over first 2 stitches, single crochet to last 2 stitches, sc2tog. (17 sc)
Round 8(WS): Chain 1, turn. Single crochet in each stitch across. (17 sc)
Round 9(RS): Chain 1, turn. Sc2tog over first 2 stitches, single crochet to last 2 stitches, sc2tog. (15 sc)
Round 10(WS): Chain 1, turn. Single crochet in each stitch across. (15 sc)
Round 11(RS): Chain 1, turn. Sc2tog, single crochet to end. (14 sc) From this point, you are only decreasing on the V-neck center edge.
Round 12(WS): Chain 1, turn. Single crochet in each stitch across. (14 sc)
Round 13(RS): Chain 1, turn. Sc2tog, single crochet to end. (13 sc)
Round 14(WS): Chain 1, turn. Single crochet in each stitch across. (13 sc)
Round 15(RS): Chain 1, turn. Sc2tog, single crochet to end. (12 sc)
Round 16(WS): Chain 1, turn. Single crochet in each stitch across. (12 sc)
Round 17(RS): Chain 1, turn. Sc2tog, single crochet to end. (11 sc)
Round 18(WS): Chain 1, turn. Single crochet in each stitch across. (11 sc)
Round 19(RS): Chain 1, turn. Sc2tog, single crochet to end. (10 sc)
Round 20(WS): Chain 1, turn. Single crochet in each stitch across. (10 sc) Fasten off. This is your Left Cup.
Checkpoint: Left cup should measure approximately 4 inches wide at widest point and approximately 3.5 inches tall.
Bodice Body Rounds
Round 1Single crochet across 10 stitches of Right Cup, single crochet in each of the 14 chains of the center bridge, single crochet across 10 stitches of Left Cup, chain 10 for back panel, join with slip stitch to first single crochet.Work into the chain-10 back panel to complete the round. Total: 54 single crochet. Place marker at start of round.
Round 2Single crochet in each stitch around. (54 sc)
Round 3Single crochet in each of first 10 stitches, 2 single crochet in next stitch, single crochet in each of next 32 stitches, 2 single crochet in next stitch, single crochet to end. (56 sc)
Round 4Single crochet in each stitch around. (56 sc)
Round 5Single crochet in each of first 10 stitches, 2 single crochet in next stitch, single crochet in each of next 34 stitches, 2 single crochet in next stitch, single crochet to end. (58 sc)
Round 6Single crochet in each stitch around. (58 sc) Continue in this established pattern, working increase rounds on odd-numbered rounds and even rounds straight, until you reach Round 26 with 78 single crochet.
Round 7through 26: Follow the increase pattern, adding 2 stitches every other round. By Round 26, you should have 78 single crochet.Checkpoint: After Round 26, the bodice body should measure approximately 6 inches from the joining round.
Main Pattern
Round 11(RS): Chain 1, turn. Single crochet to last 2 stitches, sc2tog. (14 sc) Notice the decrease is now at the opposite end.
Round 12(WS): Chain 1, turn. Single crochet in each stitch across. (14 sc)
Round 13(RS): Chain 1, turn. Single crochet to last 2 stitches, sc2tog. (13 sc)
Round 14(WS): Chain 1, turn. Single crochet in each stitch across. (13 sc)
Round 15(RS): Chain 1, turn. Single crochet to last 2 stitches, sc2tog. (12 sc)
Round 16(WS): Chain 1, turn. Single crochet in each stitch across. (12 sc)
Round 17(RS): Chain 1, turn. Single crochet to last 2 stitches, sc2tog. (11 sc)
Round 18(WS): Chain 1, turn. Single crochet in each stitch across. (11 sc)
Round 19(RS): Chain 1, turn. Single crochet to last 2 stitches, sc2tog. (10 sc)
Round 20(WS): Chain 1, turn. Single crochet in each stitch across. (10 sc) Do not fasten off. You will join the cups next.
Assembly
Step 1Straps: Chain a length sufficient to reach from the bodice front, over your shoulder, cross at the back, and attach at the opposite side back. Work single crochet into each chain. Sew securely to the bodice.
Step 2Hem Edging: Join off-white yarn at any point along the bottom edge. Work a round of single crochet, then work picot edging (single crochet, picot, skip 1 stitch) around the entire hem. This creates the delicate cream scalloped trim visible in the photos.
Step 3Blocking: Wet block aggressively. Pin out every pineapple fan to open the lace fully. Allow to dry completely before removing pins.
Step 4Lining: Because of the open lace construction, a slip dress lining or body-con underdress is recommended for modesty.
Finishing
- Weave in ends from the bodice joins and waistband color-free sections before blocking anything.
- Join off-white cotton at the hem and work the single crochet round, then the picot edging around the entire bottom edge.
- Wet block the full dress on mats, pinning the hem scallops so the picots sit evenly, then let it dry flat.
Why it works
The bodice cups are worked flat in two pieces first, then joined into one round with a chain-10 back panel, which is how a flat lace piece becomes a wearable tube.
The waistband's transition round increases 6 stitches evenly to reach 84, a number chosen because it divides cleanly into six 14-stitch diamond repeats.
Waistband Round 5 single-crochets through every stitch and space to deliberately return the count to 84 sc, resetting the stitch count before the skirt section begins.
What it becomes
- A statement piece for a long summer evening, paired with simple sandals so the lace stays the focus.
- Layered over a slip dress in cooler months with the navy jersey lining doing the real warmth work.
- A showcase piece for a lace-focused portfolio or exhibition, worn or displayed flat to show the diamond waistband.
Original pattern: https://crochetwithmia.com/midnight-navy-pineapple-maxi-dress-free-crochet-pattern/
FAQ
Why does the bodice get worked flat first?
The two cups need individual shaping on each side before they can be joined. Working flat lets the sc2tog decreases happen on the correct edge for each cup.
What does the chain-10 back panel actually do?
It bridges the two bodice cups into one continuous round so you can start working in the round from Bodice Body Round 1. Without it, the cups would stay as two flat, unjoined pieces.
Is the lining slip optional?
The materials list calls for 2 yards of navy stretch jersey, which suggests the designer intended it as a working part of the piece. Given the lace openness, I would not skip it unless you are fine with visibility.