
Free Pattern
Step-by-Step
Crochet
AmigurumiMini bunny amigurumi crochet pattern for small hands
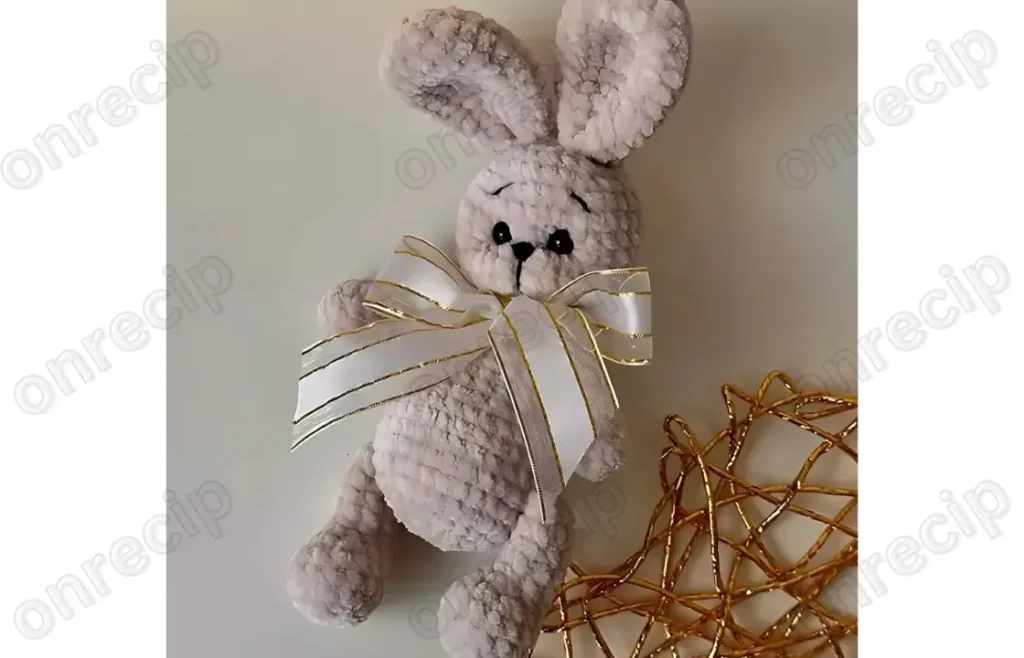
A small amigurumi bunny with jointed-look limbs, worked in plush yarn from the round up.
- Level
- Intermediate
- Time
- 4-6 hours
- Hook
- 4 mm
- Yarn
- Worsted
Pattern highlights
- Start each limb and the ears with a magic ring, then build the base round in single crochet.
- Work the increase rounds on the arms and ears to widen the piece before it narrows again.
- Chain to begin the legs, then work the first few rows flat before shaping continues.
- Stuff the lower portion of each arm before crocheting the two sides together to close it.
- Continue the ear rounds without changes through the middle section to build height.
- Decrease the ear and arm rounds back down once the widest point is reached.
- Finish each piece, then move to embroidering the face and sewing everything together.
About This Pattern
I keep a shelf for the small ones — the amigurumi that fit in a palm rather than a display case. This bunny belongs there. It is not a showpiece; it is the kind of project I reach for between bigger commitments, when I want something finished by the weekend.
The techniques are the basics done well: single crochet in the round, magic ring starts, increases and decreases spaced to shape rather than just enlarge. The legs are the exception, worked flat from a chain, which changes the rhythm of the make partway through.
What comes out the other end is a compact plush figure with ears that stand up from their own increase rounds and limbs sized to be sewn on rather than crocheted in place. It is a toy built for handling, not just sitting on a shelf.
All parts of the bunny are crocheted in a spiral, and the finished toy measures about 25 cm. Any plush yarn works in any color — the contrast comes from the fine smooth yarn used only for embroidering the face.
Common mistakes
- Losing the magic ring's tension Pull the tail firmly before the first round closes so no gap shows at the center.
- Skipping stitch markers on identical rounds Mark the start of each round on the no-change rows of the ears so you don't lose your place across five repeats.
- Overstuffing the narrow arm tip Add stuffing gradually to the lower arm section so the seam closes flat rather than bulging.
- Forgetting the legs start flat Read the chain and turn instructions for the legs before diving in, since the rhythm differs from the ears and arms.
- Uneven increases on the ear Count stitches after each increase round on the ear to confirm the total before moving to the next row.


Intermediate
Progress Tracker
0 of 0 rounds
Tap a round to tick it off — your place is saved on this device.
The kit
- Plush yarn (any color)
- Smooth yarn for embroidering the face
- Crochet hook 3-4 mm
- Eyes for toys
- Toy stuffing
- Ribbon
- Stitch markers
- Needle for sewing parts
- Scissors
Arms
Round 16 sc in KA
Round 2(1 sc, inc) x 3 (9)
Rounds 3–49 sc (2 rows)
Round 51 sc, dec of sc (7)
Rounds 6–97 sc (4 rows) Stuff the lower part. Crochet both sides together.
Ears
Round 17 sc in KA
Round 27 inc (14)
Round 3(1 sc, inc) x 7 (21)
Rounds 4–85 rows without changes, 21 sc
Round 9(1 sc, dec) x 7 (14)
Rounds 10–1114 sc (2 rows) Sew by folding in half to form a hollow in the center of the ear.
Legs
Round 14 ch
Round 2inc in the second stitch, sc, 3 sc in the last stitch, turn, 2 sc
Round 3inc, sc, inc, 6 sc
Round 4inc, sc, inc, sc, inc, 6 sc
Rounds 5–6without changes, 14 sc (2 rows)
Round 7sc, 3 dec, 7 sc (11)
Round 8sc, 1 dec of 3, 6 sc (8)
Rounds 9–128 sc (4 rows) Stuff not completely. Crochet both sides together.
Finishing
- Stuff the lower part of each arm firmly before closing it by crocheting the two sides together.
- Weave in every yarn tail as each small part finishes, before parts pile up and tails get lost.
- Embroider the face with the smooth yarn once the head and body are joined, then attach the eyes.
Why it works
The arm's increases land in round 2, spreading six stitches to nine before the piece holds steady for two rounds.
The legs start from a chain rather than a magic ring, so the first rows are worked flat before the shape closes up.
Crocheting the two sides of the arm together after stuffing forms the seam that gives the lower part its flattened, foot-like close.
What it becomes
- A soft toy for a small child's shelf, paired with other mini amigurumi in the same yarn family.
- A handmade gift topper tied to a wrapped box with the ribbon listed in the materials.
- A desk companion for a crochet collector, sitting alongside other small worked-in-the-round figures.
Original pattern: https://onrecip.com/mini-bunny-free-amigurumi-crochet-pattern/
FAQ
Can I use a different yarn than plush yarn?
The pattern calls for plush yarn for the body and a smooth yarn for the face only. Any color plush yarn works; the contrast in texture is what makes the embroidered face read clearly.
Why do the legs start with a chain instead of a magic ring?
The legs are worked flat for the first few rows before the shape closes into a tube. This is a different technique from the ears and arms, so expect a shift in rhythm partway through.
How much should I stuff the arms?
Stuff only the lower part of each arm, then crochet the two sides together to close it. Firm but not overfull keeps the seam neat.
Do I need a specific hook size?
The pattern lists a 3-4 mm hook. Choose within that range based on how tightly you crochet, since amigurumi benefits from a snug fabric that hides stuffing.