Free Pattern
Step-by-Step
Crochet
Home AccessoriesMint daisy crochet notebook cover with cream border
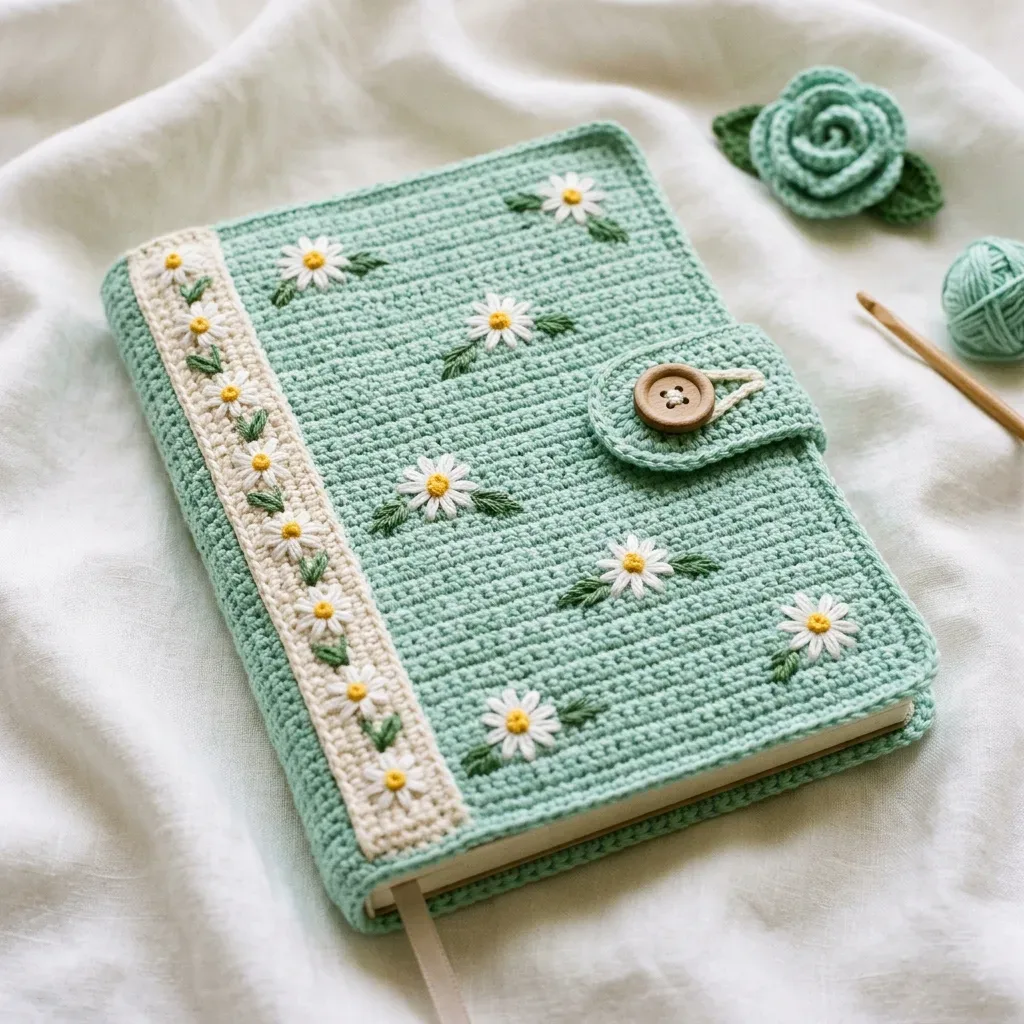
Crochet an A5 notebook cover with daisy motifs, a cream border strip, and button tab closure.
- Level
- Intermediate
- Time
- 8-12 hours
- Hook
- 3.25 mm
- Yarn
- DK
Pattern highlights
- Crochet the main cover strip as one long flat rectangle in single crochet, spanning both panels and the spine.
- Work the narrow cream border strip separately, then position it along the left edge of the front panel.
- Make the daisy motifs one at a time, working the petals in the round before fastening off.
- Embroider a yellow center into each daisy and stitch on a pair of green leaves nearby.
- Construct the closure tab and attach it along with the button for the center right edge.
- Sew the cream strip and daisy motifs onto the main panel, then assemble pocket flaps.
- Weave in every end and wet block the finished cover to set its shape.
About This Pattern
Book covers sit in an odd corner of my collection, between garments and home decor. This one earns its spot. It's practical in a way a lot of my makes aren't, meant to actually get used, tucked into a bag, opened on a train. The daisy motifs keep it from being purely utilitarian. Somewhere between a pencil case and a love letter to cotton yarn.
The whole thing works in single crochet, flat, in rows. No shaping tricks hiding in there. The interest comes from assembly: a main strip, a separate cream border, small daisy motifs worked in rounds then sewn on, plus embroidered leaf pairs. It's a lesson in how plain stitches get dressed up by what you add after the fact.
Finished, it wraps a standard A5 hardcover journal snugly, pocket flaps doing the holding, no sewing to the book itself. The front carries the daisies and that cream strip along the left edge. The back stays plain mint, letting the front do the talking. A button and loop keep it closed.
Worth knowing
There's something satisfying about a project built from small, honest parts. The main strip is just single crochet in rows, meditative, nothing to second-guess. Then you shift gears for the daisies, worked in the round, six petals each from simple chain loops. Sewing them on afterward feels like decorating a cake you already baked. The embroidered leaf pairs add a second layer of handwork, slow and a little fussy in the best way. The cream border strip is a nice bit of color-blocking without any colorwork technique to fuss over. And the payoff is a cover you'll actually use daily, not something destined for a drawer. It rewards patience over skill, which I like in a pattern.
Common mistakes
- Skipping the gauge swatch Cotton yarns vary a lot between brands even at the same weight. Swatch first, since the cover needs to fit the notebook snugly.
- Pulling daisy centers too tight The magic ring closes the six starting stitches, but yank it too hard and the petals in round two won't sit flat. Snug is enough.
- Uneven petal loops Each chain-5 petal should match its neighbors in length. Count your chains rather than eyeballing them for a tidy ring of six.
- Rushing the leaf embroidery The green leaf pairs are a finishing detail, easy to skip when you're tired. Set aside separate time for them after the crochet is done.
- Misplacing the cream strip Hold the border strip against the front panel's left edge before sewing, checking alignment against the checkpoint measurement given.


Intermediate
Progress Tracker
0 of 0 rounds
Tap a round to tick it off — your place is saved on this device.
The kit
- Option 1: Paintbox Yarns Simply DK in Spearmint (Yarn A) and Vanilla Cream (Yarn B). This is a 100 percent cotton DK with excellent stitch definition and a soft hand that holds embroidery well.
- Option 2: Scheepjes Catona 50g in Apple Granny (Yarn A) and Old Lace (Yarn B). Mercerized cotton with a slight sheen that gives the daisies a crisp, fresh appearance.
- Option 3: Lion Brand 24/7 Cotton in Mint (Yarn A) and Ecru (Yarn B). Widely available, machine washable, and holds its shape well over repeated use.
Substitution note
- Any smooth DK weight cotton or cotton blend yarn will work. Avoid textured or fuzzy yarn, as it will obscure the daisy appliques and embroidery. Verify your gauge swatch before beginning, as cotton yarns vary significantly in thickness between brands even within the same weight category.
Yarn
- Yarn A (Mint green): approximately 180 yards (165 meters) of DK weight (CYCA 3) cotton or cotton blend yarn
- Yarn B (Cream or off-white): approximately 60 yards (55 meters) of DK weight cotton or cotton blend yarn
- Yarn C (Dark green): approximately 15 yards (14 meters) of DK weight cotton or cotton blend yarn for the embroidered leaves
Hook
- US size D-3 / 3.25 mm crochet hook
Notions
- Tapestry needle
- One wooden button approximately 0.75 inches (2 cm) diameter
- Stitch markers
- Scissors
- Pins for blocking
Daisy Motif
The daisy is a small flat circle with a raised center and six petals. You’ll make these separately and sew them on later.
Round 1Using Yarn B make a MR. Work 6 sc into the ring. Pull tail to close. Do not join. (6 sc)
Round 2Ch 5, sl st into same st (first petal made). Ch 5, sl st into next st. Rep from * until 6 petals total are worked, ending with sl st into the first st of Round 2. Fasten off, leaving a 6-inch (15 cm) tail for sewing.To add the center: Thread a length of yellow yarn onto a tapestry needle and work 3 to 4 satin stitches across the center hole of the motif. Alternatively, make a small French knot cluster in yellow. The center should be approximately 0.2 inches (0.5 cm) across.
Section 1: Main Cover Strip
The main cover strip is worked as one flat rectangle spanning: front pocket flap + front panel + spine + back panel + back pocket flap. All worked horizontally in rows.
Total working width: 14.75 inches (37.5 cm)
Total height: 8.25 inches (21 cm)
Stitch count per row: 82 sts Total rows: 54 Using Yarn A, ch 83. (This gives 82 working sts.)
Round 1(RS): Sc in 2nd ch from hook and in each ch across. Turn. (82 sc)
Round 2through 54: Ch 1, sc in each st across. Turn. (82 sc) After Row 54, fasten off Yarn A. Weave in ends.
Checkpoint: After completing the main cover strip, the piece should measure approximately 14.75 x 8.25 inches (37.5 x 21 cm). Place the open notebook on top to verify fit before continuing.
Place stitch markers to divide the strip into sections from right to left: Back pocket flap: sts 1 through 8 (approximately 1.5 inches)
Back panel: sts 9 through 38 (approximately 5.5 inches)
Spine: sts 39 through 43 (approximately 0.75 inches)
Front panel: sts 44 through 73 (approximately 5.5 inches)
Front pocket flap: sts 74 through 82 (approximately 1.5 inches)
When the cover is assembled by folding, the pocket flap sections fold inward toward the WS to create the pockets that hold the notebook covers.
Section 2: Cream Border Strip
The cream border strip runs vertically along the left edge of the front panel section and is worked as a narrow rectangle.
Height: 8.25 inches (21 cm) = 54 rows Width: approximately 0.85 inches (2.2 cm) = 5 sts Using Yarn B, ch 6.
Round 1(RS): Sc in 2nd ch from hook and in each ch across. Turn. (5 sc)
Round 2through 54: Ch 1, sc in each st across. Turn. (5 sc) Fasten off Yarn B, leaving a long tail for sewing.
Checkpoint: The cream strip should measure approximately 0.85 x 8.25 inches (2.2 x 21 cm). Hold it against the left edge of the front panel section to verify it aligns.
Section 3: Closure Tab
The closure tab is a small pointed tongue worked in Yarn A.
Using Yarn A, ch 9.
Round 1(RS): Sc in 2nd ch from hook and in each ch across. Turn. (8 sc)
Round 2through 6: Ch 1, sc in each st across. Turn. (8 sc)
Round 7Ch 1, sc2tog, sc in each st to last 2 sts, sc2tog. Turn. (6 sc)
Round 8Ch 1, sc in each st across. Turn. (6 sc)
Round 9Ch 1, sc2tog, sc in each st to last 2 sts, sc2tog. Turn. (4 sc)
Round 10Ch 1, sc in each st across. Turn. (4 sc)
Round 11Ch 1, sc2tog twice. Turn. (2 sc)
Round 12Ch 1, sc2tog. (1 sc) Fasten off, leaving a tail for sewing. Add the button loop at this single tip stitch as described in Special Stitches.
Section 4: Daisy Motifs
Work 12 daisy motifs total following the Daisy Motif instructions in Special Stitches, using Yarn B for petals and yellow yarn for centers.
Assembly
Step 1Weave in all remaining ends securely, burying tails at least 1 inch (2.5 cm) in multiple directions to prevent unraveling.
Step 2Wet block the finished cover by submerging in cool water, gently pressing out excess water in a towel (do not wring), and pinning to a foam mat at the correct measurements. Allow to dry completely before use. This sets the shape and evens out any tension inconsistencies around the daisy appliques.
Finishing
- Sew the cream border strip to the left edge of the front panel using its long starting tail.
- Attach each daisy motif with its leftover tail, then embroider the yellow center and green leaf pairs.
- Weave in all remaining ends, then wet block the whole cover pinned flat to set the final shape.
Why it works
The main cover strip is worked as a single flat rectangle spanning front, spine, and back, which avoids any seaming across the spine itself.
Each daisy starts from a magic ring worked flat with no join, so the petals in round two sit on an open, adjustable base.
The cream border is crocheted as its own narrow strip rather than striped into the main panel, which keeps the single-color block clean-edged for sewing on.
What it becomes
- A daily journal cover for writing at a desk, on a commute, or tucked in a bag.
- A travel notebook wrap that pairs well with a matching pouch for pens and small notions.
- A thoughtful handmade gift for someone who already carries a notebook everywhere.
Original pattern: https://crochr.com/mint-daisy-notebook-cover-free-crochet-pattern/
FAQ
Will this fit a notebook that isn't exactly A5?
It's sized for a standard A5 hardcover with the spine width given in the pattern. A notebook close to those measurements should still work, since the pocket flaps allow a little give.
Can I skip the embroidered leaves?
You can, though they're part of what gives the daisies that cottage garden look. Leaving them off is a fine shortcut if you're short on time.
How many daisy motifs do I need to make?
The pattern has you make them individually and scatter them across the front and spine. Exactly how many is really up to your own layout preference.
What happens if my gauge is off?
The whole cover depends on gauge, since it has to wrap snugly around the notebook. If your swatch doesn't match, adjust your hook size before starting the main strip.