Free Pattern
Step-by-Step
Crochet
WearablesMonochrome Cream Ruffle Crochet Dress Pattern
Crochet an elegant cream midi dress with lace fan bodice, chevron wave skirt, and ruffled cap sleeves. Advanced intermediate pattern with keyhole back deta
Level Advanced IntermediateTime 20-25 HoursHook 3.5 mmYarn DK
Pattern highlights
- Work the Front and Back Bodice Panels flat in fan lace stitch, shaping the waist and hip as you go.
- Seam the two bodice panels together at the sides, leaving the armholes open for the sleeves later.
- Add the Keyhole Opening detail to the back panel for the button closure feature.
- Crochet the Transition Band at the waist to bridge the fan lace bodice into the skirt's chevron pattern.
- Let the final chevron repeat form the scalloped hem naturally without any extra edging.
- Pick up stitches around each armhole opening and work the ruffled cap sleeves directly into place.
- Block the entire dress flat, pinning out the scallop points, then sew on the back button closure.
About This Pattern
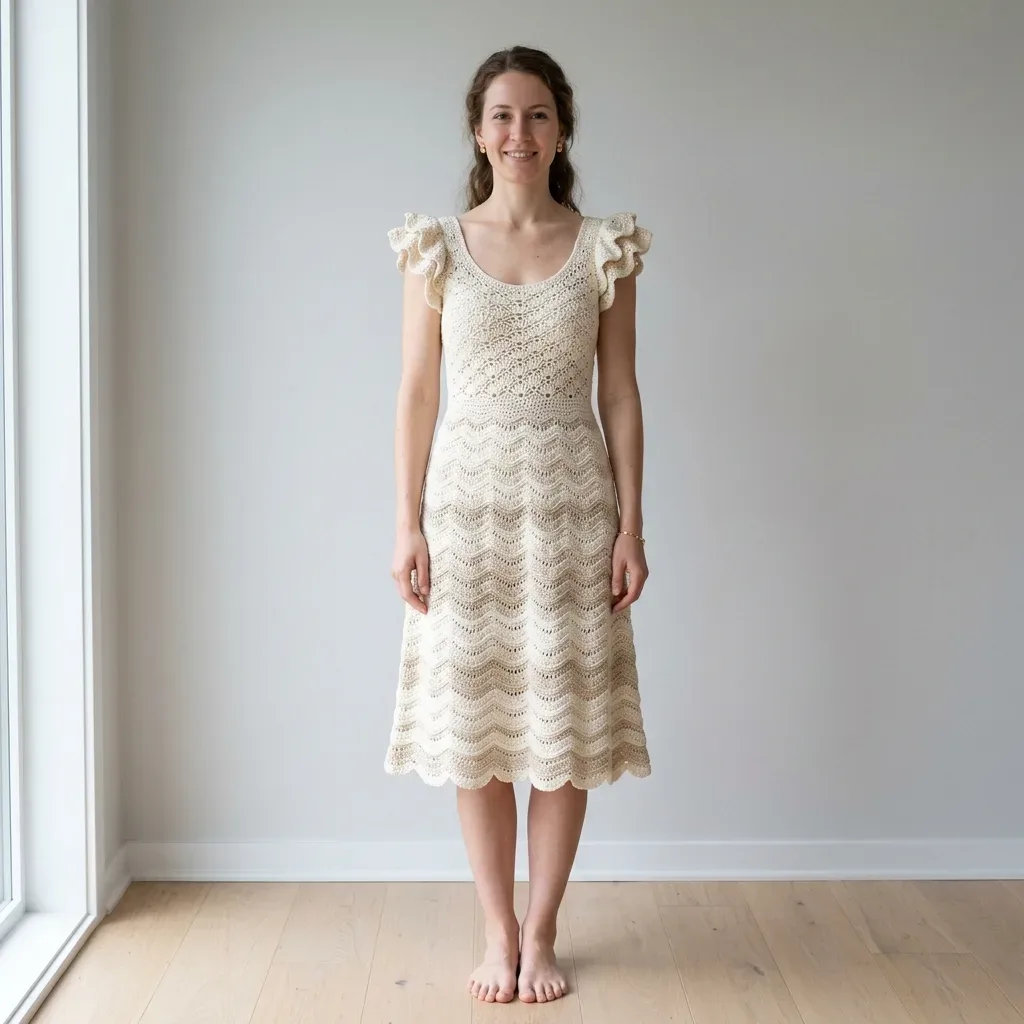
This monochrome cream dress is a garment you'll want to wear on repeat all season long. It pairs a fitted lace fan bodice with a flowing chevron wave skirt, finished off with the most charming ruffled cap sleeves and a keyhole back closure. It's perfect for the crocheter who has mastered garment basics and is ready to combine multiple stitch patterns into one cohesive, elegant piece.
You'll work three distinct stitch sections here: fan lace for the bodice, a transition band at the waist, and chevron wave lace for the skirt, all connected through thoughtful construction. The bodice is worked flat in two panels before joining, while the skirt shifts to in-the-round work with built-in increases. Expect to spend several evenings on this one, as the lace patterning and gauge precision both reward patience and attention.
The finished dress falls at midi length in a single elegant cream or ecru, with a scalloped hem that forms naturally from the final chevron repeat. It's fitted through the bust and waist, then flares beautifully at the hip and hem. This is the kind of piece you finish and immediately want to photograph, whether you're keeping it for yourself or gifting it to a fellow lace lover with garment experience under her belt.
Variations
While the monochrome cream look is stunning in its simplicity, this dress is a wonderful canvas for personalization. Try working the bodice in a soft blush or dusty sage while keeping the skirt cream for a subtle color-blocked effect, or go fully tonal with a warm oatmeal Drops Safran for extra drape and movement. For a bridal or special-occasion version, seek out a DK cotton with subtle sheen, like a mercerized cotton blend, to elevate the lace texture under event lighting. Size adjustments are absolutely possible if you understand the stitch repeats. Since the Fan Lace bodice repeat and Chevron Wave skirt repeat are both multiples of set stitch counts (16 stitches per 4 inches in fan lace, 18 stitches per repeat in chevron wave), you can add or subtract one full repeat at a time to size up or down, just remember to adjust your armhole and waist shaping rows proportionally so the transition band still lines up. Adding length is simple too: repeat additional chevron wave rounds in Skirt Section 2 or 3 before starting the hem scallop, keeping in mind your yardage will increase accordingly. For yarn substitutions beyond the ones listed, look for any DK cotton or cotton-blend with good stitch definition, avoid superwash wool blends here since they can grow with wear and stretch this fitted silhouette out of shape over time. If you want a warmer-weather version, a linen-cotton blend like Rowan Summerlite DK would give beautiful drape to the skirt while keeping the bodice crisp. Finally, if you love the construction but want a different neckline, this same three-section technique adapts well to a V-neck bodice for those who prefer that silhouette.
Common mistakes
- Skipping the gauge swatch
- Since this garment relies on two different stitch patterns meeting at the waist, swatch each one individually and block it before measuring. A half-stitch difference per inch across two lace sections can throw off the entire fit, especially at the bust and hip.
- Losing track of stitch repeats
- Place a stitch marker at the start of every repeat as you work Skirt Increase Sections 1 and 2. This makes it much easier to spot a missed increase before you've worked several more rounds past the error.
- Joining the bodice panels at the sides
- Lay the Front and Back Bodice Panels flat side by side before seaming and count rows to confirm they match. Any mismatch here will cause the armhole openings to sit unevenly once the cap sleeves are added.
- Picking up stitches unevenly around
- Mark the armhole edge into quarters with stitch markers before picking up stitches, then distribute your pickups evenly between markers. This keeps the ruffle symmetrical and prevents puckering or gapping around the shoulder.
- Rushing the Keyhole Opening shaping
- Read through Row 9 onward carefully before starting, since this section changes the working method for the back panel. Working a stitch or two off here can misalign the button closure later, so count carefully as you go.
- Blocking the finished dress unevenly
- Pin out each scallop point individually on your blocking mat using rust-proof pins, taking time to match the depth and spacing of every point. This step makes the biggest visual difference in how polished the finished hem looks.
Advanced Intermediate
Progress Tracker
0 of 0 rounds
Tap a round to tick it off — your place is saved on this device.
Materials
Yarn
- Approximately 1,800 to 2,200 yards of DK weight (light weight, number 3) cotton or cotton-blend yarn in cream or natural ecru.
- Paintbox Yarns Simply DK (100% cotton, 137 yards per 50 gram ball). You will need approximately 14 to 16 balls in shade Paper White or Champagne White. This yarn offers excellent stitch definition for lace work.
- Lion Brand 24/7 Cotton DK (100% cotton, 196 yards per 100 gram ball). You will need approximately 10 to 12 balls in Ecru or Cream. Widely available and affordable.
- Drops Safran (50% cotton, 50% acrylic, 175 yards per 50 gram ball). You will need approximately 12 to 13 balls in Off White. The acrylic content adds drape and reduces stiffness.
- Avoid fuzzy, bouclé, or highly textured yarns. They will obscure your beautiful lace stitch structure.
Hook
- US size E-4 / 3.5 mm crochet hook (or size needed to obtain gauge)
Notions
- Tapestry needle for weaving ends
- Stitch markers (at least 6)
- Rust-proof blocking pins
- Blocking mat or clean flat surface
- Measuring tape
- One small button, approximately 3/8 inch / 10 mm, cream or mother-of-pearl
Front Bodice Panel
The front bodice is worked flat from the top (neckline) down to the waist.
Foundation: Ch 75.
- Row 1(RS): Sc into 2nd ch from hook, sk 2 ch, Fan Shell (5 dc) into next ch, sk 2 ch, sc into next ch ; rep from to across, ending sc into last ch. Turn. (12 Fan Shells, 13 sc = 73 working sts)
- Row 2(WS): Ch 1 (does not count as st), sc into first dc (center of first shell), ch 2, [dc, ch 2, dc] into sc between shells (V-stitch made), ch 2, sc into center dc of next shell ; rep from to across, ending sc into top of t-ch. Turn. (12 sc, 12 V-stitches = 25 structural st units)
- Row 3(RS): Ch 3 (counts as dc), 2 dc into first sc, sc into ch-2 sp of V-st, Fan Shell (5 dc) into next sc ; rep from to , ending sc into last ch-2 sp of last V-st, 3 dc into last sc. Turn. (2 half-shells at edges + 11 full shells + 12 sc = 77 dc/sc working sts)
- Row 4(WS): Ch 1, sc into center dc of first edge half-shell (the 2nd dc of the 3 dc), ch 2, V-st into next sc, ch 2, sc into center dc of next Fan Shell ; rep from to across, ending sc into top of t-ch. Turn. (13 sc, 12 V-st units = 25 structural st units)Rows 5 through 18: Rep Rows 3 and 4 alternately (7 more repeats). Checkpoint: After Row 18, the front bodice panel should measure approximately 7.5 inches tall and approximately 17 to 18 inches wide.
Back Bodice Panel
The back bodice mirrors the front with the addition of the keyhole opening at center back.
Foundation: Ch 75.
- Row 1(RS): Work exactly as Front Bodice Row 1. Turn. (73 working sts, 12 Fan Shells, 13 sc)Rows 2 through 8: Work exactly as Front Bodice Rows 2 through 8.
Transition Band (Waist)
- Round 1With RS facing, join yarn at right side seam at waist edge. Work sc evenly around entire waist opening. Total: 126 sc. Join with sl st to first sc.
- Round 2Ch 3 (counts as dc), dc into each sc around. Join with sl st to top of t-ch. (126 dc)
- Round 3Ch 1, sc into same st as join, sc into each dc around. Join with sl st to first sc. (126 sc)
Skirt Section 1 (Rounds 1 through 16)
Work chevron wave lace pattern over 7 repeats (126 stitches).
- Round 1Ch 1, [sc, ch 3, sc] into first st (wave peak), [ch 1, sk 1, sc] 3 times, ch 1, sk 1, [sc, ch 3, sc] into next st (second peak), [ch 2, sk 2, sc] 2 times, ch 1, sk 2 ; working over 18 sts per rep. Join with sl st to first sc. [7 reps]
- Round 2Ch 1, sl st into first ch-3 sp, ch 1, [sc, ch 3, sc] into ch-3 sp (peak), [ch 1, sc into next ch-1 sp] 3 times, ch 1, [sc, ch 3, sc] into next ch-3 sp (peak), ch 2, sc into ch-2 sp, ch 2, sc into next ch-2 sp, ch 2, sk to next ch-3 sp ; rep from to 6 more times. Join with sl st to first sc.Rounds 3 through 16: Continue in established chevron wave lace pattern. Checkpoint: After Round 16, the skirt should measure approximately 8 inches below the waist transition band.
Cap Sleeve Ruffles
- Round 1(Base round): With RS facing, join yarn at bottom of one armhole. Work sc evenly around entire armhole opening. Target: 48 sc. Join with sl st to first sc. (48 sc)
- Round 2(Ruffle expansion): Ch 3 (counts as dc), 2 dc into same sc as join (3 dc into first sc), 3 dc into each remaining sc around. Join with sl st to top of t-ch. (144 dc)
- Round 3(Ruffle edge): Ch 1, sc into each dc around. Join with sl st to first sc. (144 sc)
- Round 4(Optional scallop finish): Work [sc, ch 3, sc] into every 3rd sc around, sl st into sts between peaks. (48 scallop peaks)Fasten off. Repeat for second armhole.(48)
Skirt Increase Section 1 (Rounds 17 through 20)
Increase from 7 to 9 wave repeats.
- Round 17(Increase Set-up): Work existing chevron wave pattern for 3 complete repeats, then at the 4th repeat, work a wider version with extra ch-1 sc units and an extra valley sc. Insert same expansion into repeat 7.Rounds 18 through 20: Work all 9 established wave repeat positions in standard chevron wave lace pattern. (162 working st positions)Checkpoint: After Round 20, skirt circumference should measure approximately 40 inches.
Waist Shaping (Front Bodice, Rows 19 to 26)
- Row 19(RS): Ch 3, sk first sc, sc into ch-2 sp of first V-st, Fan Shell into next sc, sc into ch-2 sp of V-st ; rep from to across to last V-st, sc into ch-2 sp of last V-st, dc into last sc. Turn. (11 Fan Shells, 12 sc, 2 single dc at edges = 69 working sts)
- Row 20(WS): Ch 1, sc into first dc (edge dc), ch 2, V-st into next sc, ch 2, sc into center of shell, ch 2, V-st into sc ; rep from to across, ending ch 2, sc into top of t-ch. Turn.
- Rows 21-26through 26: Continue in established pattern, working edge stitches as single dc or sc without shell at edges on RS rows. Maintain 11 full Fan Shells in the center.Checkpoint: After Row 26, the front bodice panel should measure approximately 11 inches tall. The waist section should measure approximately 14 to 15 inches wide.
Hip Transition (Front Bodice, Rows 27 to 34)
- Row 27(RS): Ch 3, 2 dc into first sc (restore half-shell at edge), sc into V-st ch-2 sp, Fan Shell into sc ; rep across, ending with 2 dc more at far edge. Turn. (11 full shells + 2 half-shells = 73 working sts)Row 28 (WS): Rep Row 4 pattern.Rows 29 to 30: Rep Rows 3 and 4.
- Row 31(RS): Work as Row 3 but at each edge, work a full Fan Shell (5 dc) instead of half-shell (3 dc). Turn. (13 Fan Shells + 14 sc = 79 working sts)
- Row 32(WS): Ch 1, sc into center of first shell, ch 2, V-st into next sc, ch 2, sc into center of next shell ; rep across. Turn. (14 sc + 13 V-st units = 27 structural units)Rows 33 and 34: Rep Rows 3 and 4 with 13 shells. Checkpoint: After Row 34, the front bodice should measure approximately 15 inches from cast-on edge. Width should be approximately 19 to 20 inches. Set aside.
Keyhole Opening (Back Bodice, Row 9 onward)
The keyhole is worked by splitting the back panel into two halves at the center.
Right Back Half, Row 9 (RS): Ch 3, 2 dc into first sc, sc into V-st ch-2 sp, Fan Shell into sc ; rep for 6 full Fan Shells, sc into next V-st ch-2 sp. Leave remaining sts unworked. Turn. (6 Fan Shells + 1 edge half-shell + 7 sc = 33 working sts)
Right Back Half, Rows 10 through 18: Continue in established fan lace pattern over these 33 sts.
Left Back Half: Rejoin yarn at center, work Row 9 (RS) to match Right Back Half in mirror. Work Rows 10 through 18 to match.
Rows 19 through 26: Work waist shaping on each half separately, mirroring Front Bodice.
- Rows 27-34through 34: Work hip transition on each half, mirroring Front Bodice. At Row 31, add full shell at outer edge only.
Skirt Increase Section 2 (Rounds 37 through 40)
Increase from 9 to 12 repeats.
- Round 37(Increase Set-up): Insert expanded wave at repeat positions 3, 6, and 9.Rounds 38 through 40: Work all 12 repeat positions in standard chevron wave lace. (216 working st positions)
Skirt Section 2 (Rounds 21 through 36)
Work chevron wave lace with 9 repeats for 16 rounds.
Skirt Section 3 (Rounds 41 through 54)
Work chevron wave lace with 12 repeats for 14 rounds.
Hem Scallop (Final Round)
Sl st across to first ch-3 peak sp, then [sc, hdc, 3 dc, hdc, sc] into each ch-3 peak sp around. Between peaks, sl st across the valley chain spaces. Join with sl st to first sc. Fasten off. (24 scallop peaks)
Assembly
- Step 1Weave in all yarn ends securely. Block the entire dress using wet blocking or steam blocking. Pin out the lace sections to open up the stitch patterns. Allow to dry completely before wearing.
Important notes
💡 Use a US size E-4 / 3.5mm hook as your starting point, but don't hesitate to go up or down a size if your fan lace swatch doesn't measure exactly 16 stitches to 4 inches after blocking.
💡 Place at least six stitch markers before you begin: two for the start of chevron wave repeats, two for waist shaping reference points, and two to mark the armhole openings for the cap sleeves later.
💡 Since the entire dress is worked in one cream color, keep a small notebook or stitch counter nearby to track your round numbers, it's easy to lose your place in unbroken monochrome lace.
💡 Buy your full yardage estimate (1,800 to 2,200 yards) from a single dye lot upfront if possible, since even 'natural' or 'ecru' shades can vary slightly between batches and this will show in solid-color lace.
💡 Block your two bodice panels before seaming them together at the sides, this opens up the fan lace pattern fully and makes it much easier to match panel widths accurately.
💡 Save the button for the keyhole back closure until after blocking is complete, since blocking can shift the exact placement of your buttonhole slightly and you'll want to sew it on with the finished drape in mind.
📏 Gauge is critical for this garment and please do not skip it: In Fan Lace pattern (bodice stitch), 16 stitches and 10 rows = 4 inches / 10 cm, blocked. In Chevron Wave Lace pattern (skirt stitch), one full repeat of 18 stitches = 4.5 inches / 11.5 cm, and 8 rows = 4 inches / 10 cm, blocked. A difference of even half a stitch per inch will significantly alter the bust and waist measurements, so work a swatch of at least 6 inches square in each stitch pattern, block it, and measure before beginning.
📏 This pattern is written for size Small/Medium (US sizes 4 to 8). Finished bust: 34 to 36 inches / 86 to 91 cm. Finished waist: 28 to 30 inches / 71 to 76 cm. Finished hip (at fullest skirt point): 54 to 56 inches / 137 to 142 cm. Total length (shoulder to hem): approximately 42 inches / 107 cm. Bodice length (shoulder to waist): approximately 15 inches / 38 cm. Skirt length (waist to hem): approximately 27 inches / 69 cm.
💡 Turning chains matter here: for rows worked in dc, ch 3 at the beginning of RS rows counts as the first dc; for rows worked in sc, ch 1 does not count as a stitch.
💡 The bodice front and back are worked separately as flat panels, then seamed at the side edges using a slip stitch seam on the wrong side. At the transition from flat bodice to circular skirt, pick up stitches evenly around the entire waist opening and join to work in the round.
Original pattern: https://crochetwithmia.com/monochrome-cream-ruffle-crochet-dress-free-crochet-pattern/
FAQ
What size does this pattern fit?
This pattern is written for a Small/Medium, roughly US sizes 4 to 8, with a finished bust of 34 to 36 inches and finished waist of 28 to 30 inches. If you need a different size, you can adjust by adding or removing full stitch repeats in the fan lace and chevron wave sections.
How long does this dress typically take to complete?
Given the two bodice panels, waist transition, full skirt worked in the round, and ruffled cap sleeves, most advanced intermediate crocheters spend several weeks working on this in evening sessions. Expect roughly 40 to 60 hours total, depending on your speed with lace stitch patterns.
Do I need any special construction experience before attempting this pattern?
Yes, this pattern assumes comfort with lace stitch patterns, reading stitch repeats, and both flat and in-the-round construction within the same project. If you haven't made a garment before, practicing with a simpler top or a lace shawl first is recommended.
Why does the hem have a scalloped edge without extra stitching?
The scalloped hem forms naturally from the final chevron wave repeat round, so no additional edging or trim work is needed. This is one of the clever design details built directly into the Hem Scallop final round of the pattern.