
Free Pattern
Step-by-Step
Crochet
AmigurumiMushroom Keychain Crochet Pattern In Simple Steps
Learn to crochet an adorable mushroom keychain with this simple step-by-step pattern. A quick, customizable amigurumi project perfect for gifting or keepin
Level IntermediateTime 2-3 HoursYarn Worsted
Pattern highlights
- Start the mushroom cap with a magic ring and work increasing rounds to build its signature domed shape.
- Continue shaping the cap through several rounds until it reaches its full rounded size.
- Stuff the cap firmly, pressing filling evenly toward the edges for a smooth, rounded dome.
- Work the short single-round piece that adds a small accent detail to the mushroom design.
- Crochet the stem separately in its own set of rounds, building it up to match the cap's proportions.
- Stuff the stem firmly so it stays sturdy enough to support everyday keychain use.
- Join the cap and stem together neatly using a whip stitch for a clean, secure seam.
- Attach a keyring or clasp to the base of the stem to complete your finished mushroom keychain.
About This Pattern
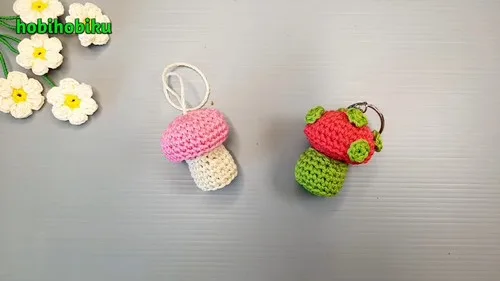
This mushroom keychain pattern creates the sweetest little woodland-inspired accessory you can whip up in an afternoon. With its rounded cap and sturdy stem worked in simple rounds, this tiny amigurumi captures all the charm of a forest mushroom in miniature form. It's the perfect project for crocheters who love quick, satisfying makes, and it doubles as a thoughtful handmade gift for nature lovers, cottagecore enthusiasts, or anyone who appreciates a little whimsy attached to their keys or bag.
Constructed in three distinct pattern pieces worked in the round, this project uses foundational amigurumi techniques including magic ring starts, single crochet increases and decreases, and basic shaping to form the cap and stem separately before joining them together. With one part requiring just a single round, this is an approachable project even for those newer to crocheting in the round, while still offering enough shaping interest to keep more experienced makers engaged. Expect to spend a relaxed two to three hours from start to finish.
The finished mushroom keychain is compact, palm-sized, and irresistibly tactile thanks to its rounded, stuffed silhouette. It has that classic amigurumi charm—soft, huggable, and full of personality despite its small size. Attach a keyring or clasp and it instantly becomes a functional accessory as well as a decorative one, making it an ideal quick-stitch gift for birthdays, teacher appreciation, or just because. Customize the colors and it becomes a completely unique, one-of-a-kind trinket.
Variations
One of the best things about this mushroom keychain is how endlessly customizable it is with just a few yarn swaps. For a classic toadstool look, work the cap rounds in red worsted weight yarn like Super Saver or Vanna's Choice, then add small white spots with embroidery floss or tiny crocheted dots stitched on after assembly. Craving something more woodland and earthy? Try a warm brown or tan for the cap paired with a cream stem for a natural, rustic mushroom that looks like it grew straight from the forest floor. For a whimsical fairycore vibe, experiment with soft pastels—think lavender caps with mint stems, or dusty rose with sage green accents. Metallic or sparkle-blend yarns can also add a magical, fairy-tale quality if you're making these as ornaments rather than functional keychains. If you want to make the mushroom slightly larger or smaller, adjust your hook size up or down half a millimeter rather than changing stitch counts, since this keeps the proportions of the cap and stem balanced. You can also easily turn this into a matching set by making multiple mushrooms in coordinating colors and clustering them onto a single keyring for a fuller, bouquet-like accessory. For seasonal variations, consider deep orange and brown tones for an autumn-inspired mushroom, or icy blues and whites for a winter woodland theme. Finally, swap the keyring for a bag charm clasp, brooch pin backing, or even a magnet to transform this same pattern into an ornament, pin, or fridge decoration—proving just how much mileage you can get from one simple, adorable design.
There's something so satisfying about making a mushroom keychain—it's small enough to finish in one cozy sitting but detailed enough to feel like a real accomplishment. I love how the cap rounds build up with gentle increases to create that classic domed mushroom shape, while the stem works up in clean, simple rounds that give it just the right amount of sturdiness. Joining the two pieces together is where the magic happens, and watching this little forest friend come to life is genuinely delightful every single time. What really makes this pattern special is its versatility—swap in different colors for the cap and you've got a completely different mushroom personality, from classic red-and-white toadstools to earthy browns and creams. It's also wonderfully practical as a keychain since the compact size and sturdy construction hold up beautifully to everyday use. Whether you're making one for yourself or a whole basket of them as gifts, this pattern delivers big charm in a small package, and that's exactly the kind of project I can't resist making again and again.
Common mistakes
- Starting the magic ring too loosely, leaving a visible hole at the top of the mushroom cap.
- Pull the tail firmly after your first round of single crochets and give it an extra tug before weaving in the end to fully close the gap.
- Losing track of stitch count during the increase rounds on the cap, resulting in an uneven, lopsided dome shape.
- Place a stitch marker at the start of each round and count your stitches out loud or on a tally counter before moving to the next round.
- Stuffing the cap too sparsely, causing it to look flat or collapse inward once attached to the stem.
- Stuff firmly in small pinches as you go, pressing stuffing all the way to the edges of the cap so it holds its rounded dome shape.
- Joining the stem and cap pieces with visible gaps or uneven tension, making the seam look sloppy.
- Use a whip stitch or mattress stitch with matching yarn and work slowly, checking alignment every few stitches before pulling tight.
- Forgetting to weave in ends before assembly, leading to tails getting tangled or trapped inside the stuffing.
- Weave in and trim all loose ends immediately after finishing each piece, before you begin joining the cap and stem together.
- Skipping the single-round piece or misreading it as a full multi-round section, which throws off the mushroom's proportions.
- Read through all three pattern parts before starting so you know exactly which piece is the quick one-round accent and don't over-build it.


Intermediate
Progress Tracker
0 of 0 rounds
Tap a round to tick it off — your place is saved on this device.
Materials
- Worsted weight yarn
- Crochet hook (size to suit your yarn)
Main Pattern
- Round 1Create a magic ring with 6 single crochet (SC) stitches.
- Round 2Increase in each stitch by placing 2 SC in each hole, for a total of 12 stitches.
- Round 3Alternate 1 SC with an increase (2 SC in one hole), repeated around the circle.
- Round 4Work in the back loop only, placing 1 SC in each stitch around the circle.
- Round 5& 6: Work 1 SC in each stitch for two full rounds.
- Round 7Create a decrease round by working 4 SC followed by a decrease, repeated around the circle.
- Round 8Work 1 SC in each stitch, then slip stitch and cut the yarn, leaving a long tail for sewing.
Final Step: Stuff the stem with fiberfill.
Main Pattern
- Round 1Create a magic ring with 6 SC stitches. Final Step: Slip stitch into the first SC and cut the yarn to finish the circle.
Main Pattern
- Round 1Create a magic ring with 8 SC stitches.
- Round 2Increase in each stitch by placing 2 SC in each hole.
- Round 3Alternate 1 SC with an increase, repeated around the circle.
- Round 4Work 2 SC followed by an increase, repeated around the circle.
- Round 5, 6, & 7: Work 1 SC in each stitch for three full rounds.
- Round 8Work in the back loop only. Work 2 SC followed by a decrease, repeated around the circle.
- Round 9Work 1 SC followed by a decrease, repeated around the circle.
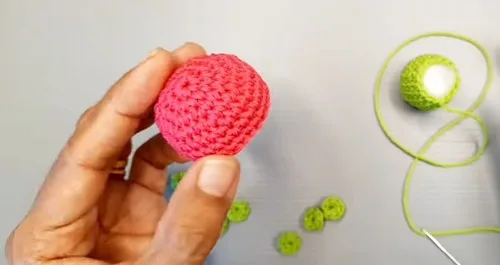
- Round 10Decrease in each stitch 8 times. Final Step: Stuff the mushroom cap with fiberfill, then slip stitch and cut the yarn.
Assembly
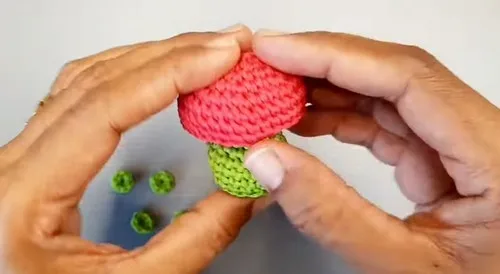
- Step 1Sew the mushroom cap to the stem, using the long yarn tail left from the stem pattern.
- Step 2Use a hot glue gun to attach the smaller decorative circles to the mushroom cap.
Important notes
💡 Use a hook one size smaller than what's recommended on your yarn label to keep stitches tight and prevent stuffing from peeking through.
💡 Keep a stitch marker on the first stitch of every round throughout all three pattern parts so you never lose your place during increases.
💡 Stuff the cap and stem separately before joining, packing firmly but not so tight that the pieces lose their rounded shape.
💡 If working with a lighter or darker color combo, weave in ends as you finish each piece rather than waiting until the end, since tangled tails are trickier to fix later.
💡 Attach your keyring or clasp to the bottom of the stem before final stuffing so it's securely anchored inside the seam rather than just glued on afterward.
💡 Block your finished mushroom lightly with a damp cloth if the cap looks uneven after stuffing, gently reshaping it into a smooth dome while it dries.
More photos
FAQ
What yarn weight works best for this mushroom keychain?
Worsted weight yarn gives the best結果 for size and sturdiness, holding its shape well for everyday keychain use. Cotton or acrylic worsted blends both work great and are easy to find in craft stores.
How long does it take to crochet one mushroom keychain?
Most crocheters finish this pattern in about 2-3 hours, including stuffing and assembly time. It's a great one-sitting project if you have a free afternoon or evening.
Can I make this pattern without a keyring attachment?
Absolutely, simply skip attaching the keyring and use the finished mushroom as a small ornament, pin, or decorative accent instead. The pattern works beautifully as a standalone amigurumi too.
What's the best way to attach the cap to the stem?
Whip stitching with a yarn needle and matching thread gives the cleanest, most secure seam between the two pieces. Take your time aligning the pieces evenly before you start stitching them together.
Is this pattern good for someone new to amigurumi?
Yes, the simple rounds and basic increase and decrease techniques make this a great beginner-friendly project. The single-round piece in particular is very approachable for those just starting to crochet in the round.