Free Pattern
Step-by-Step
Crochet
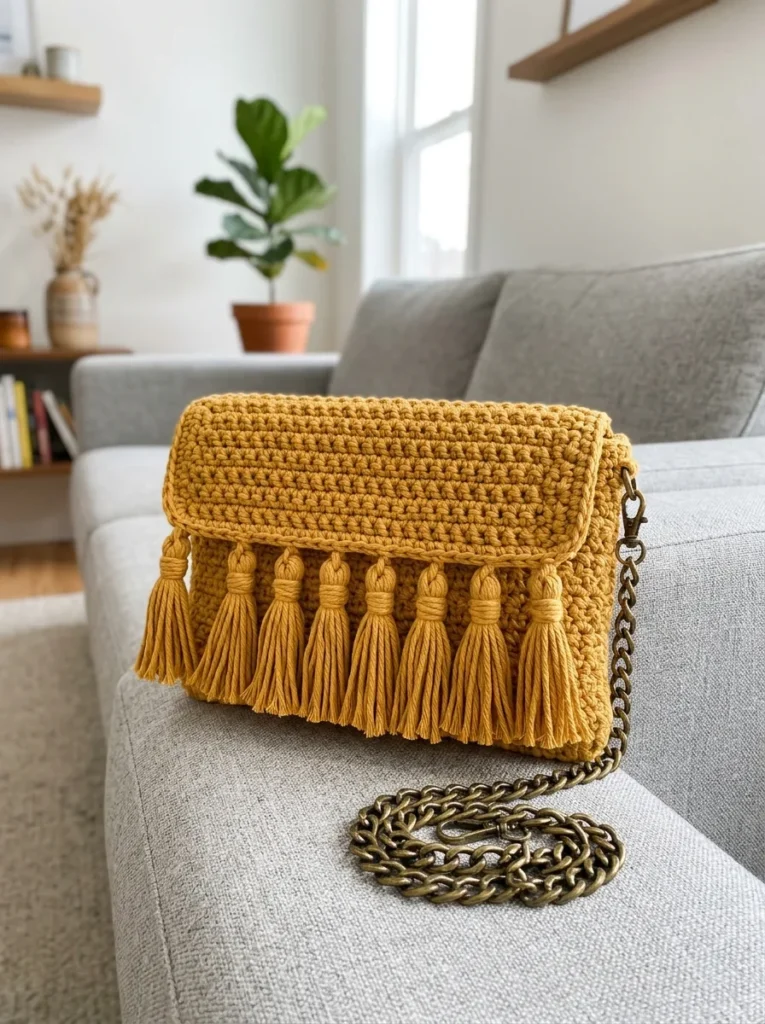
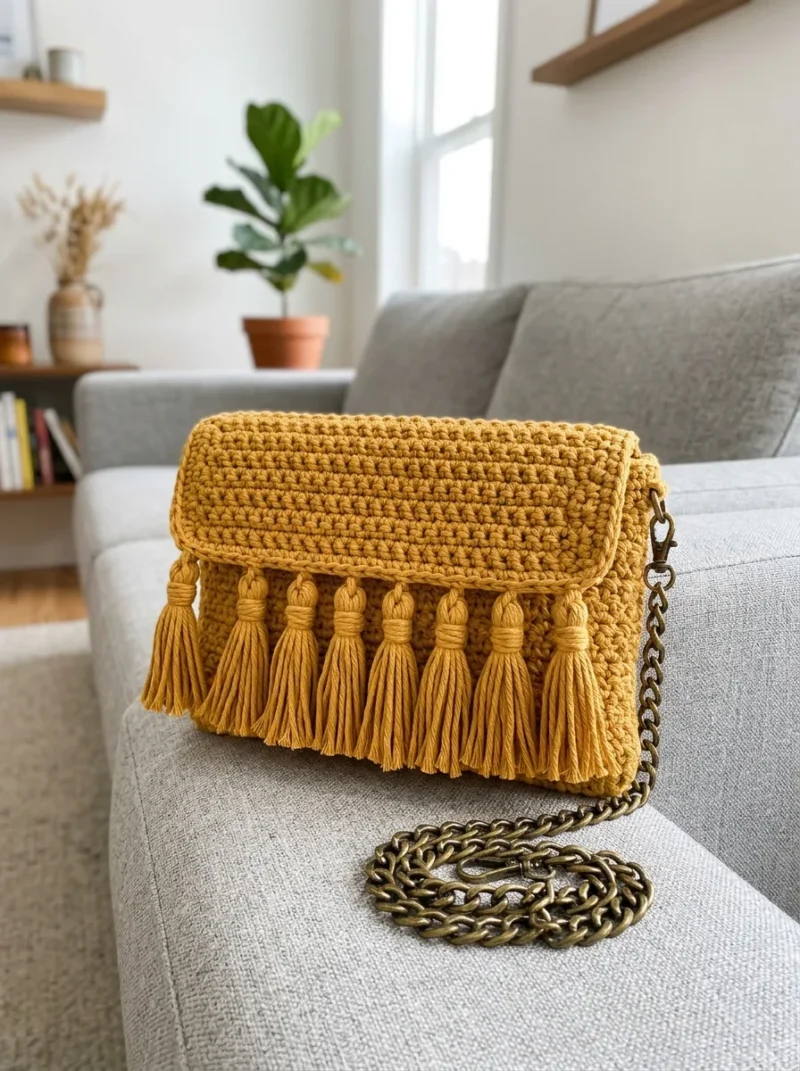
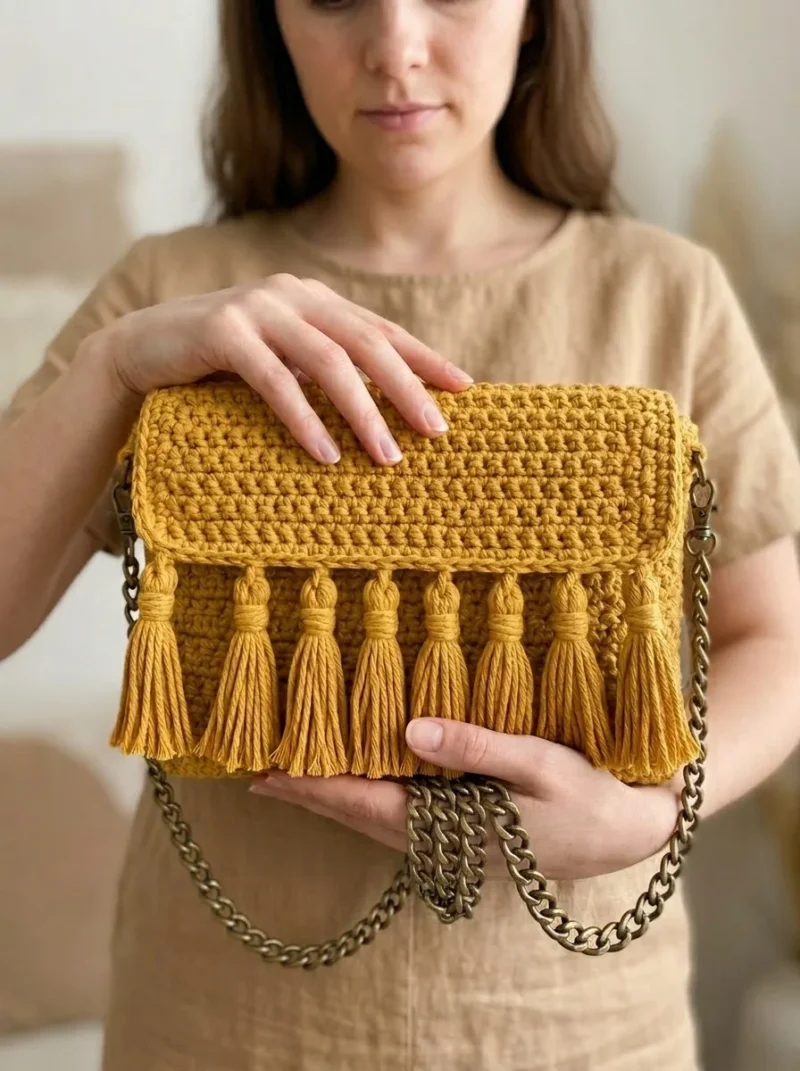
BagsMustard yellow boho tassel bag with chain strap
A structured crochet bag in mustard cotton, with a fold-over flap and tassel trim.
- Level
- Intermediate
- Time
- 4-6 hours
- Hook
- 5.0 mm
- Yarn
- Worsted
Pattern highlights
- Start with the back panel, working the textured sc-and-hdc pattern straight up in rows.
- Make the front panel using the same approach, then set both panels aside to block.
- Work the flap the same way, finishing its edge with a row of reverse sc for a rolled look.
- Crochet two small tabs, fold each around a D-ring, and sew them to the back panel's top corners.
- Whip stitch the front and back panels together along the bottom and sides, wrong sides facing.
- Attach the flap to the back panel's top edge so it folds forward over the opening.
- Add the tassels along the front edge and clip the chain strap to the D-ring tabs.
About This Pattern
This is the kind of project that sits in the practical corner of a collection, next to market totes and pouches. It is a bag you actually carry, not a swatch for a shelf. I like keeping a few of these in rotation because they teach structure without the commitment of a garment.
The techniques are modest on paper: single crochet, half double crochet, a reverse sc edge, and a basic sc tab for hardware. But the textured row alternating sc and hdc is doing real work here, building fabric dense enough to hold a bag's shape rather than slump.
What comes off the hook is a compact fold-over bag with a mustard cotton body, a brass-toned chain strap, and tassels along the front edge. It reads boutique, not homemade, which is the whole point of choosing cotton over acrylic.
Worth knowing
I like this one because the textured row is so simple and so effective. Alternating sc and hdc across a row sounds unremarkable, but it gives the fabric a woven look and real body. There is also something satisfying about the reverse sc edge on the flap, that small reversal of direction that leaves a neat, rolled finish. The tab-and-D-ring hardware is a nice bit of problem-solving too, a tiny crocheted loop doing the job a metal finding usually does alone. By the time the tassels go on the front edge, the bag has stopped looking like a swatch and started looking like something you would buy.
Common mistakes
- Gauge too loose for a bag If your swatch is floppy, go down a hook size or tighten your tension. The fabric needs enough body to hold the bag's shape on its own.
- Mixing up sc and hdc placement The textured row depends on alternating sc and hdc exactly as written. Use a stitch marker at the start of the row until the rhythm feels automatic.
- Reverse sc worked in the wrong direction Crab stitch is worked left to right, the opposite of normal sc. Turn your work and double-check direction before starting the flap edging.
- Skipping blocking before seaming Unblocked panels can be slightly uneven, which makes whip stitching lumpy. Wet block each piece and let it dry flat first.
- Tabs sewn on loosely The D-ring tabs carry the full weight of the chain strap. Sew them down securely with the yarn tail, going through both layers of the folded tab.
Intermediate
Progress Tracker
0 of 0 rounds
Tap a round to tick it off — your place is saved on this device.
The kit
Yarn
- Approximately 200 grams of worsted weight cotton yarn in mustard yellow
- I recommend a sturdy, tightly spun cotton like Drops Paris, Lion Brand 24/7 Cotton, or Paintbox Cotton Aran
- Cotton holds its shape better than acrylic for bags and gives you that crisp stitch definition
Hook
- 5.0mm crochet hook (US H/8)
- You want a slightly tighter gauge than the yarn label suggests so your bag has nice structure
Notions
- Tapestry needle for weaving ends
- Scissors
- Stitch markers (optional but helpful)
- Two D-rings or jump rings (15-20mm) for attaching the chain
- One crossbody chain strap, approximately 120cm long, with lobster claw clasps
Gauge
- 14 stitches and 12 rows = 10cm (4 inches) in the textured pattern
- Always check your gauge. A looser gauge means a floppy bag that will not hold its shape.
Back Panel
The bag is constructed in three pieces: a back panel, a front panel, and a flap. We start with the back.
Before we dive into the full pattern, let me explain how this beautiful texture happens. You will alternate between rows of single crochet and rows that combine sc and hdc in a specific rhythm. The key is working your hdc stitches into the sc stitches from two rows below, creating those raised bumps. Pattern stitch (worked over an even number of stitches): Row A: Sc in each st across. Row B: *Sc in next st, hdc in next st* repeat across. When you work the hdc into every other stitch, it creates vertical lines of texture. The mustard cotton yarn really shows this off beautifully.
Foundation: Ch 37.
Round 1(RS): Sc in 2nd ch from hook and in each ch across. (36 sts)
Round 2(WS): Ch 1, turn. Sc in first st, *hdc in next st, sc in next st* repeat across. (36 sts)
Round 3Ch 1, turn. Sc in each st across. (36 sts)
Round 4Ch 1, turn. Sc in first st, *hdc in next st, sc in next st* repeat across. (36 sts)
Rounds 5–28Repeat Rows 3 and 4, alternating between the plain sc row and the textured row. You should have 28 rows total.Fasten off and weave in your end. Set this piece aside.
Your back panel should measure approximately 26cm wide by 23cm tall (about 10 inches by 9 inches).
Flap
The flap creates that elegant fold-over closure. It is worked the same way but with fewer rows.
Foundation: Ch 37.
Rounds 1–18Follow the same stitch pattern as the body panels. Alternate between sc rows and textured rows.
Round 19Edging Ch 1, turn. Sc in each st across. (36 sts)
Round 20Ch 1, turn. Working from left to right (reverse sc, also called crab stitch), sc in each st across. This creates a finished, slightly rolled edge.
If you have never done reverse single crochet before, here is the trick: instead of inserting your hook from front to back in the next stitch to the right, you work backwards. It feels awkward at first but creates a beautiful corded edge.
Fasten off and weave in ends.
Your flap should measure approximately 26cm wide by 15cm tall (about 10 inches by 6 inches).
Adding the Chain Strap Hardware
To attach your chain strap, you will need to create two small tabs with D-rings.
Tab (make 2): Ch 8, sl st in first ch to form a ring. Do not twist.
Round 1Ch 1, work 12 sc around the chain ring, sl st to join. (12 sts) Fasten off, leaving a 30cm tail.
Attachment:
Slide a D-ring onto each crocheted tab. Fold the tab in half around the ring. Position one tab at each top corner of the bag, on the back panel side. Sew securely in place using the yarn tail.
Clip your chain strap to the D-rings. If your chain came without clasps, you can add lobster claw clasps or large jump rings.
Front Panel
The front panel is worked exactly the same as the back.
Foundation: Ch 37.
Rows 1-28: Follow the same instructions as the back panel. Fasten off but leave a long tail of about 60cm for seaming later.
Making the Tassels
The tassels are what make this boho bag so special. You will make 9 tassels to line the bottom edge of the flap.
For each tassel: 1. Cut approximately 20 strands of yarn, each 20cm long (about 8 inches).
2. Cut one additional strand about 30cm long. This is your tie.
3. Lay the 20 strands together, aligning the ends.
4. Fold the bundle in half.
5. Insert your crochet hook through one stitch along the bottom edge of the flap, from front to back.
6. Grab the folded center of your tassel bundle with the hook and pull it through to create a loop.
7. Pull all the tassel ends through the loop and tug firmly to secure.
8. Take your 30cm strand and wrap it tightly around the tassel about 1.5cm below the top fold. Wrap 5 or 6 times.
9. Tie the wrapping strand in a secure knot, then use your tapestry needle to hide the ends inside the tassel head.
10. Trim the tassel ends evenly.
Space your 9 tassels evenly across the flap edge. I placed mine in every 4th stitch, with one tassel at each corner and one in the center.
Take your time trimming. Even, neat tassels look so much more polished than raggedy ones.
Assembly
Step 1Now we put it all together. Take your time with this part. Good seaming makes all the difference in how professional your finished bag looks.
Step 2Step 1: Place the front and back panels together with wrong sides facing (so the right sides face outward). Line up the edges carefully.
Step 3Step 2: Using the long tail from your front panel and your tapestry needle, whip stitch the bottom edge closed. Work through both layers, catching just the outer loops of each stitch.
Step 4Step 3: Continue whip stitching up both side edges, stopping when you reach the top. Leave the top open.
Step 5Step 4: Turn the bag right side out through the opening. The seams should now be hidden inside.
Step 6Step 5: Position the flap at the back top edge of the bag. The flap should fold over toward the front. Pin in place.
Step 7Step 6: Whip stitch the top edge of the flap to the back panel along the entire width. Make sure your stitches are secure but not too tight.
From the collection
Finishing
- Weave in all ends with a tapestry needle before assembly, since seaming over loose tails makes whip stitching harder.
- Block the back panel, front panel, and flap to size before joining them.
- Whip stitch the panels together, attach the flap and tabs, then clip on the chain strap and sew on the tassels last.
Why it works
Both panels and the flap start from the same 37-chain foundation, so all three pieces share a width.
The textured pattern alternates a plain sc row with an sc/hdc row, which is what gives the fabric its structure.
The flap's reverse sc row is worked after the stitch pattern ends, turning a cut edge into a finished one without adding bulk.
The tabs are worked in the round from a small chain ring, which is why they come off the hook already joined and seamless.
What it becomes
- A compact evening bag for a phone, cards, and keys, paired with jeans or a sundress.
- A crossbody for running errands when you want your hands free and nothing heavy to carry.
- A boho-leaning accessory that pairs well with denim, suede, or anything with a little texture already.
Original pattern: https://crochr.com/mustard-yellow-boho-tassel-bag-free-crochet-pattern/
FAQ
Can I make the strap longer or shorter?
Yes, the chain strap length is yours to customize. Measure where you want the bag to hang against your body before committing to a chain length.
Do I need to line the bag?
Lining instructions are not included, but I recommend adding one. A simple cotton rectangle, hand sewn inside, protects your belongings and tidies up the inside.
Why cotton instead of acrylic?
Cotton holds its shape better than acrylic, which matters for a structured bag. It also gives crisper stitch definition in the textured pattern.
What if my hook size gives floppy fabric?
Go down a hook size or crochet tighter until the fabric feels sturdy. A bag with loose gauge will not hang nicely once it has weight in it.