Free Pattern
Step-by-Step
Crochet
WearablesNavy Blue Elegant Crochet Lace Dress Free Pattern
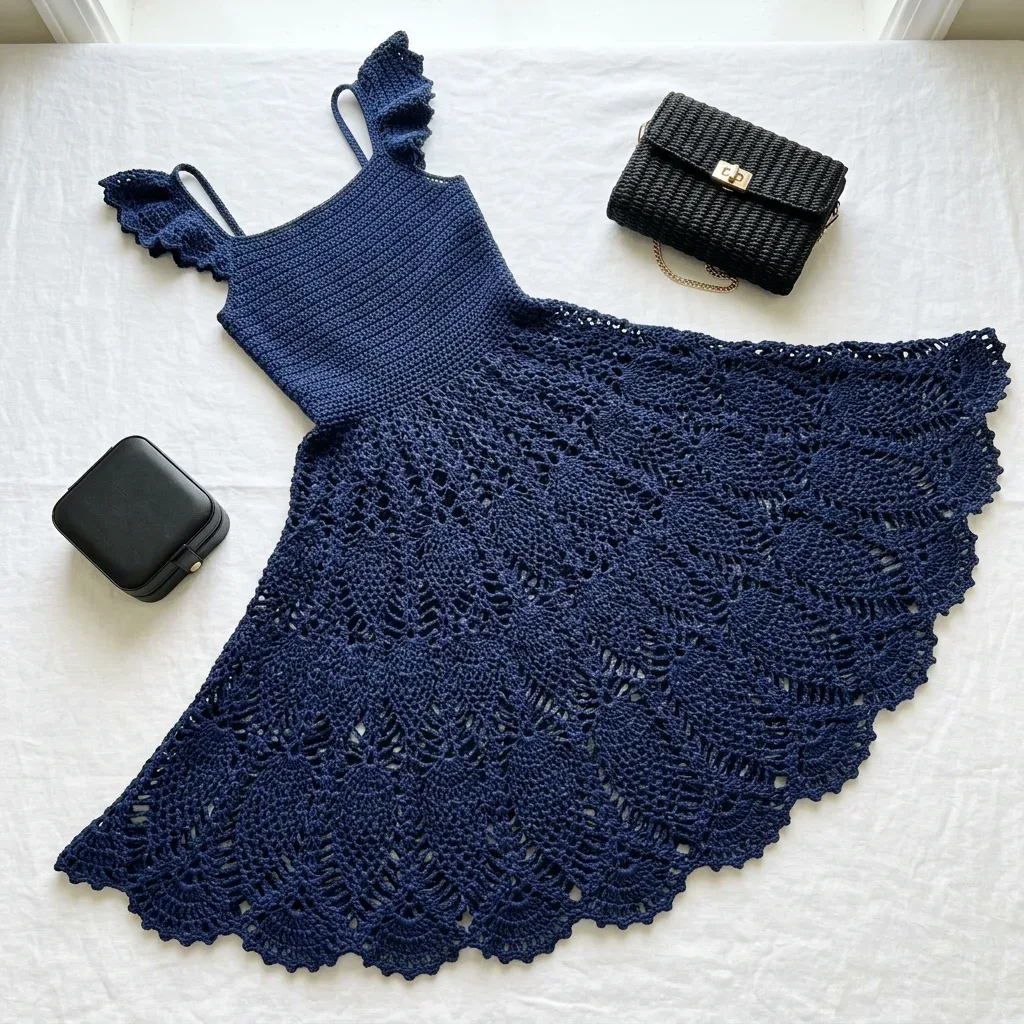
Crochet a navy blue lace dress with a ribbed bodice, flutter sleeves, and a flowing pineapple lace skirt. Free pattern with sizing and yarn tips.
Level IntermediateTime 20-30 HoursHook 3.5 mmYarn DK
Pattern highlights
- Start with the ribbed bodice panel, alternating front post and back post double crochet to build fitted vertical columns.
- Finish the top edge of the bodice with the two edging rounds for a clean, polished neckline.
- Add the flutter sleeve ruffles by working fan shells directly into each armhole opening.
- Attach the straps using the two strap rounds, optionally adding sliders or D-rings for adjustability.
- Work the waistband transition rounds to smoothly shift from the structured ribbing into the flowing lace skirt.
- Build the pineapple lace skirt motif by motif, using layered incomplete treble clusters joined at the top.
- Repeat the pineapple shell pattern around the entire skirt circumference until it reaches your desired length.
- Assemble all sections together, weave in ends, and block the finished dress to open up the lace fully.
About This Pattern
This Navy Blue Elegant Crochet Lace Dress pairs a fitted, ribbed bodice with a dreamy pineapple lace skirt for a piece that feels equal parts structured and romantic. The alternating front post and back post double crochet columns hug the body while the skirt below moves freely, giving you the best of both worlds in one garment. It's perfect for the crocheter who wants to graduate from amigurumi and blankets into wearable lace, or for anyone dreaming of a handmade dress for a summer wedding, garden party, or beach vacation.
You'll work through six distinct sections here: bodice ribbing, bodice edging, flutter sleeve ruffles, adjustable straps, a waistband transition, and the pineapple lace skirt itself. Key techniques include FPdc/BPdc ribbing, 5-dc fan shells for the sleeves, and the layered incomplete treble crochet clusters that build each pineapple motif. This is an advanced project — comfortable stitch counting and post stitch experience will make it flow much more smoothly. Expect to spend approximately 40 to 60 hours on it total, as the lace skirt alone is a labor of love.
When it's finished, you'll have a flowing navy blue lace dress with a fitted bodice, flirty flutter sleeves, and a skirt full of romantic pineapple motifs that sway with every step. Made in DK weight cotton, it has beautiful stitch definition and drape without feeling heavy. It's the kind of dress that photographs stunningly and makes a gorgeous handmade gift for a bride, bridesmaid, or anyone who loves classic crochet lace with a modern silhouette.
Variations
I designed this dress because I wanted a garment that didn't sacrifice comfort for elegance, and the FPdc/BPdc ribbed bodice does exactly that — it stretches with you while still looking polished and fitted. There's something so satisfying about watching those vertical rib columns line up perfectly row after row, especially once you get the rhythm of alternating post stitches down. The flutter sleeves are my favorite little detail; those 5-dc fan shells worked around the armhole edge add just enough ruffle to feel feminine without being fussy. And then there's the pineapple lace skirt — building each motif with layered incomplete treble clusters feels almost architectural, like you're sculpting lace rather than just stitching it. By the time you reach the waistband transition and see the structured bodice meet the flowing skirt, it genuinely feels like magic. This is a project that rewards patience, and every single round teaches you something new about combining texture and drape in one piece.
Common mistakes
- Losing track of which stitches were
- Place a stitch marker in the first FPdc column of each row before you start, and always work FPdc around stitches that were FPdc the row before — this keeps your rib columns perfectly aligned.
- Working the 5-dc fan shells
- Keep your tension relaxed on the 5-dc shells and make sure you're skipping exactly 2 stitches between shells as instructed — a tighter gauge here will pucker the ruffle instead of letting it flare.
- Miscounting skipped stitches
- Count out loud or mark every shell point with a stitch marker as you go so the skip-2 pattern stays consistent all the way around the armhole.
- Joining the incomplete treble crochet
- Pull up each loop to the same height before the final yarn-over join, and don't rush the top closure — an even join keeps every pineapple looking symmetrical.
- Skipping gauge swatching before
- Swatch the FPdc/BPdc rib pattern first and check both width and stretch, since post stitches behave differently than plain dc and can throw off sizing if skipped.
- Not planning yarn quantity ahead
- Order slightly more skeins than the estimate (12 skeins of Paintbox Simply DK rather than 11) since dye lots can vary and lace sections use yarn unpredictably.
Intermediate
Progress Tracker
0 of 0 rounds
Tap a round to tick it off — your place is saved on this device.
Materials
Yarn
- DK weight cotton or cotton blend yarn in navy blue. You will need approximately 1,400 to 1,600 yards total.
- Paintbox Yarns Simply DK in Sailor Blue works wonderfully. This 100% cotton yarn has excellent stitch definition for lace work. You will need about 11 to 12 skeins.
- Lion Brand 24/7 Cotton DK in Navy is widely available and affordable. It has great drape and durability. Plan for 8 to 9 skeins.
- Drops Safran in Navy Blue contains 70% cotton and 30% viscose. The viscose adds a subtle sheen that looks elegant in the finished dress. You will need 9 to 10 skeins.
Hook
- US size E-4 (3.5 mm) crochet hook, or the size needed to obtain gauge.
Notions
- At least 6 stitch markers
- Tapestry needle for weaving ends
- Scissors
- Blocking mats and rust-proof T-pins
- Measuring tape
- 2 small adjustable bra strap sliders or 4 D-rings (optional for adjustable straps)
- Lining fabric (optional but recommended for the lace skirt)
Section 1: Bodice Ribbing Panel
The bodice is worked flat as a ribbed rectangle, then seamed into a tube at the back.
Foundation chain: Chain 29.
- Round 1(RS): Double crochet in the 4th chain from hook and in each chain across. Turn. (27 dc)
Rib Stitch: The ribbed bodice uses alternating front post and back post double crochet stitches, creating vertical columns that stretch horizontally for a fitted feel. Row pattern: Chain 1, turn. Work FPdc in next stitch, BPdc in next stitch, repeating this alternation to the end of the row. The key is consistency — if you worked FPdc around a stitch in the previous row, you will work BPdc around that same stitch position in the current row, and vice versa. This keeps your rib columns aligned.
- Round 2Chain 3 (counts as first dc throughout). Work FPdc around next stitch, BPdc around next stitch. Repeat this alternation to the last stitch, dc in top of turning chain. Turn. (27 sts)
- Round 3Chain 3. Work BPdc around the next FPdc from the previous row, FPdc around the next BPdc. Repeat this alternation to the last stitch, dc in top of turning chain. Turn. (27 sts)Rows 4 through 115: Repeat Rows 2 and 3 alternately until you have 115 rows total. Your ribbed panel should measure approximately 25.5 inches (65 cm) wide and 6 inches (15 cm) tall.Fasten off, leaving a long tail for seaming.Seaming the bodice: Fold the panel so Row 1 meets Row 115 at center back. Using your tapestry needle and the yarn tail, whipstitch or mattress stitch the short ends together, matching the rib columns carefully. You now have a tube.
Section 2: Bodice Top Edging
With the right side facing and the bodice tube positioned with ribbing running vertically, find the top edge.
- Round 1Join yarn at center back seam. Chain 1, work single crochet evenly around the top edge, placing 1 sc per row end. Work exactly 116 sc around. Join with slip stitch to first sc. (116 sc)
- Round 2Chain 1, sc in each sc around. Join. (116 sc) Mark these positions with stitch markers: Center front: stitch 58Center back seam: stitch 1 Left armhole start: stitch 38 Left armhole end: stitch 78
Section 3: Flutter Sleeve Ruffle
Work this ruffle into each armhole opening. The armhole edge has approximately 12 to 14 row ends available.
- Round 1(Ruffle Foundation): Join yarn at the bottom of the armhole (underarm point). Chain 1, work 2 sc in each row end around the armhole curve. You should have approximately 28 sc. Join with slip stitch to first sc. (28 sc)Shell Stitch: Work 5 double crochet stitches all into the same stitch or space. This creates a fan shape that gives the flutter sleeves their pretty ruffled appearance.
- Round 2Chain 3 (counts as dc), 2 dc in same stitch. Skip 1 stitch, slip stitch in next stitch, skip 1 stitch, 5 dc in next stitch. Repeat from around, ending with skip 1, slip stitch, skip 1, 2 dc in first stitch to complete the last shell. Join with slip stitch to top of chain 3. (7 shells)(7)
- Round 3Slip stitch to center dc of first shell, chain 1, sc in same stitch. Chain 3, sc in center dc of next shell. Repeat around. Chain 3, join with slip stitch to first sc. (7 sc + 7 ch-3 spaces)
- Round 4Slip stitch into chain 3 space, chain 3, 4 dc in same space (5 dc shell). Slip stitch into next sc, 5 dc in next chain 3 space. Repeat around. Slip stitch in next sc. Join. (7 shells)(7)
- Round 5Repeat Round 3. (7 sc + 7 ch-3 spaces)
- Round 6Slip stitch into chain 3 space, chain 3, 6 dc in same space. Slip stitch into next sc, 7 dc in next chain 3 space. Repeat around. Slip stitch in next sc. Join. (7 shells of 7 dc)Fasten off and weave in ends. Repeat for the second armhole.
Section 4: Straps
Each strap is a simple double-thick cord.
Foundation: Chain 100 (approximately 18 inches).
- Round 1Single crochet in 2nd chain from hook and in each chain across. (99 sc)
- Round 2Chain 1, turn. Single crochet in each sc across. (99 sc) Fasten off, leaving a 12 inch tail for attaching.Make 4 straps total (2 for each shoulder).Pin the straps to the front and back of the bodice top edge, spaced approximately 2.5 inches apart at each shoulder. Try on the dress or use a dress form to determine the correct length before final attachment. Sew each strap securely through 4 to 6 stitches.
Section 5: Waistband Transition
With right side facing, locate the bottom long edge of the bodice tube.
- Round 1Join yarn at center back seam. Chain 1, sc evenly around, placing 1 sc per row end. Work exactly 168 sc around. Join with slip stitch. (168 sc)
- Round 2Chain 1, sc in each sc around. Join. (168 sc)
- Round 3Chain 1. Single crochet in next 12 stitches, 2 sc in next stitch. Repeat this pattern 12 times around. Join. (180 sc)
- Round 4Chain 1, sc in each sc around. Join. (180 sc) Your bottom edge now has exactly 180 stitches, which provides the foundation for 12 pineapple motifs.
Section 6: Pineapple Lace Skirt
The skirt is worked in rounds from waist to hem. The 12 pineapple motifs grow wider as you work down, creating the A-line silhouette. Each pineapple repeat uses 15 stitches across the foundation.
- Round 1Skirt Setup Round: Chain 5 (counts as dc + chain 2). Skip 2 stitches. Work 7 dc in next stitch (this is your pineapple base fan). Chain 2, skip 2 stitches, dc in next stitch (anchor). Chain 2, skip 2 stitches. Repeat the sequence from around 11 more times. Join with slip stitch to 3rd chain of beginning chain 5.(7)
Pineapple Cluster: This is the signature stitch that creates the layered fan shape within each pineapple motif. Yarn over twice, insert hook into the designated space, and pull up a loop. Yarn over, pull through 2 loops. Yarn over, pull through 2 loops — you now have 2 loops remaining on your hook. Without completing the stitch, repeat this process (yarn over twice, insert into the same space, and work down to 2 loops remaining) until you have the required number of incomplete trebles. Then yarn over and pull through all remaining loops at once. The number of trebles per cluster decreases as you work up the pineapple, creating the tapered shape.
- Round 2Continue working the pineapple motifs according to traditional pineapple lace construction, with chain mesh backgrounds between each motif. The pineapples taper from their 7 dc base to a single stitch at the tip over approximately 14 rounds of decreasing clusters.After completing the pineapple tiers, work the scallop edging around the entire hem for a beautiful finished edge. Step by step: slip stitch into the first stitch; chain 3, then work 4 more dc into the same stitch for a 5 dc shell total; skip 2 stitches, slip stitch into the next stitch; skip 2 stitches, work 5 dc into the next stitch; repeat these last two steps across the entire edge.(7)
Assembly
- Step 1Block all pieces before final assembly. Wet blocking works best for cotton yarn. Soak the dress in lukewarm water, gently squeeze out excess moisture without wringing, and pin it to blocking mats. Shape the skirt into a full circle and pin out the scalloped hem so each scallop point is visible.
- Step 2Let dry completely before unpinning. This may take 24 to 48 hours depending on humidity.
- Step 3If desired, add a lining to the lace skirt for modesty. A simple A-line slip in a matching navy or neutral color works perfectly.
Important notes
💡 Use a US size E-4 (3.5 mm) hook as your starting point, but always swatch the ribbing panel first since post stitches can tighten your gauge more than expected.
💡 Place stitch markers at the start of every FPdc/BPdc row to track which stitch you left off on — this is the single easiest way to keep the rib columns from drifting out of alignment.
💡 Block your finished pineapple lace skirt panels with rust-proof T-pins on blocking mats to open up the motifs fully and let the drape shine before assembly.
💡 If using Drops Safran, note the viscose content adds sheen but also stretch — pin and block gently and let pieces dry flat to avoid the lace stretching out of shape.
💡 Consider adding lining fabric behind the pineapple lace skirt if you plan to wear the dress for photos or events, as it prevents see-through in bright light.
💡 Keep at least 6 stitch markers on hand throughout — you'll want them for bodice ribbing tracking, sleeve shell placement, and marking the waistband transition rounds.
📏 Finished size: this dress fits a women's size Small to Medium with a 32 to 34 inch bust and 26 to 28 inch waist. The skirt falls about 18 inches from waist to hem with a scalloped edge all around.
📏 Gauge for the bodice (single crochet): 18 sc = 4 inches (10 cm) and 22 rows of sc = 4 inches (10 cm).
📏 Gauge for the lace skirt section: one full pineapple repeat (14 stitches wide at base) measures approximately 3 inches (7.5 cm), and one vertical pineapple motif (full height from base to tip) measures approximately 4.5 inches (11.5 cm).
📏 Work a 6 inch square swatch in single crochet, wash it, block it flat, and measure before you begin. If your gauge is off, adjust your hook size — too many stitches per inch means you need a larger hook, too few means you need a smaller hook.
FAQ
What yarn weight works best for this dress?
DK weight cotton or cotton blend is ideal, as used in the pattern with Paintbox Simply DK, 24/7 Cotton DK, or Drops Safran. These give the lace skirt good stitch definition while keeping the bodice comfortably stretchy.
How much yarn do I actually need?
Plan for approximately 1,400 to 1,600 yards total, which translates to roughly 8-9 skeins of 24/7 Cotton DK or 11-12 skeins of Paintbox Simply DK. It's smart to buy slightly extra since lace sections can use yarn unevenly.
Can I skip the lining fabric for the skirt?
Yes, the lining is optional and the dress will still hold its shape and lace pattern without it. Just keep in mind that unlined lace can be somewhat see-through, so factor that into how and where you plan to wear it.
Why do my FPdc/BPdc rib columns look uneven?
This usually happens when you lose track of which stitches were front post versus back post in the previous row. Using a stitch marker to mark your starting column each row will keep the alternation consistent and the ribbing aligned.
Are the straps adjustable?
Yes, the pattern includes an option to use 2 small adjustable bra strap sliders or 4 D-rings to make the straps customizable to your fit. This is especially helpful since the ribbed bodice already has some built-in stretch, and adjustable straps let you fine-tune the overall length.