Free Pattern
Step-by-Step
Crochet
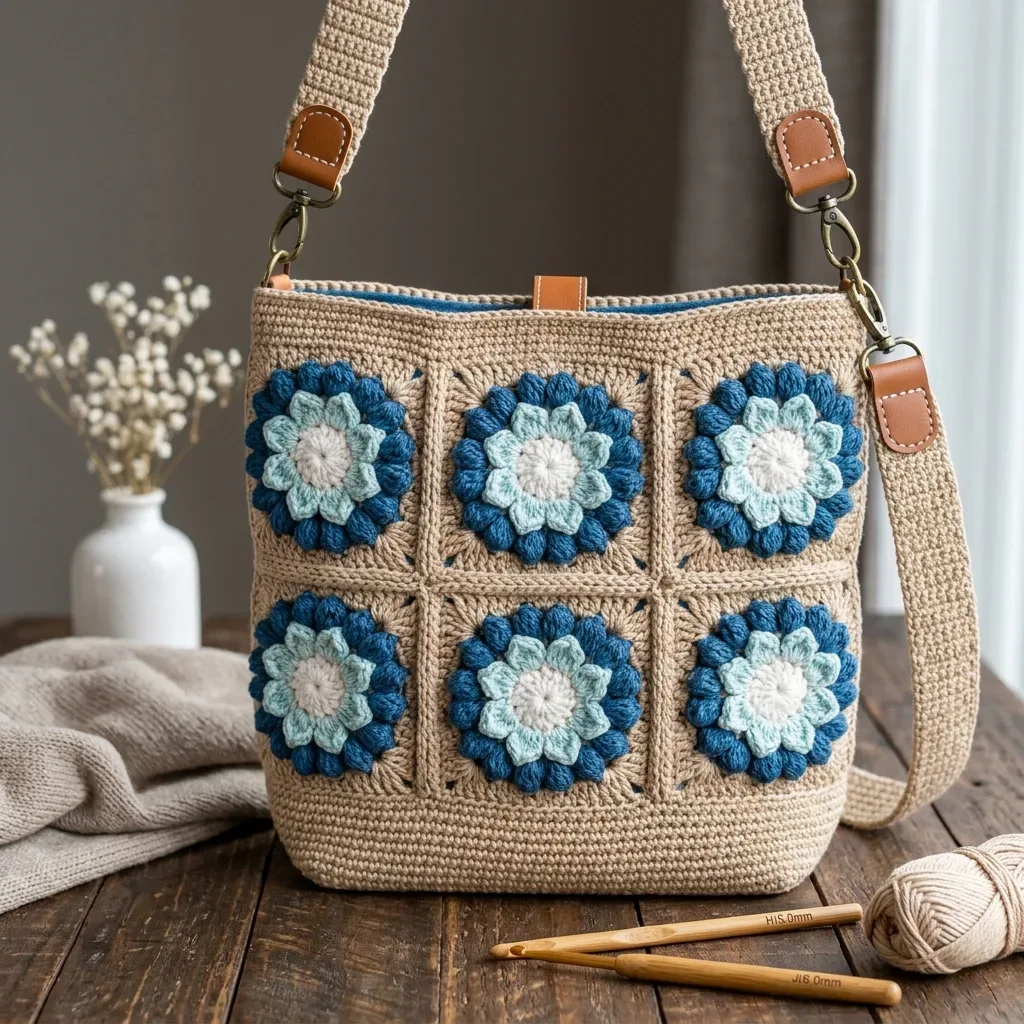
BagsOcean blue floral granny square crossbody bag pattern
A dimensional-petal granny square bag with zipper, lining, and strap. Crochet notes included.
- Level
- Intermediate
- Time
- 15-22 hours
- Hook
- 6.0 mm
- Yarn
- Worsted
Pattern highlights
- Work each dimensional flower first, building the petal clusters around a magic-ring center before anything else.
- Complete the granny square base rounds separately, then attach the finished flower to the front of each square.
- Repeat the floral granny square twelve times, since each square takes about forty-five minutes to an hour.
- Crochet the two side panels and the base panel flat in single crochet, following the same color and hook.
- Seam the front panel, side panels, and base panel together to form the three-dimensional body of the bag.
- Install the zipper, attach the leather tabs and strap, then sew in the fabric lining to finish.
About This Pattern
I keep a shelf for bags that started as granny squares and got ambitious. This one belongs there. It is not a blanket square pretending to be useful; it is a bag that happens to be built from squares, which is a different animal entirely. Twelve of them, each with a flower that stands up off the surface.
The technique worth noting here is the petal cluster: four unfinished double crochets joined at the top, closed with a chain 1. It is a puff stitch by another name, repeated twelve times per flower to ring a magic-ring center. Nothing exotic, just patience and a willing hook.
What comes out the other end is a structured crossbody with side and base panels worked flat in single crochet, a 10-inch zipper, and a fabric lining. It holds a phone, a wallet, keys, the usual daily clutter. Ocean blue and aqua against sandy tan, texture you can actually feel.
Worth knowing
The satisfaction here is tactile before it is visual. That petal cluster puffs up off the flat granny square center the moment you draw through five loops, and you feel it happen under your fingers. Making twelve of these flowers, one per square, turns a repetitive task into something closer to a ritual. Then there is the construction itself: flat granny squares meeting flat-worked side and base panels, a zipper going in, a lining going in after that. It is not just squares joined and called finished. You get color-change discipline in Part B, dimensional stitchwork in Part A, and actual bag-making skills by Section 7. Few granny square patterns ask this much of you or give this much back.
Common mistakes
- Loose petal clusters Keep tension even across all four yarn overs in the cluster. A floppy petal usually means one loop got pulled too wide.
- Working Round 2 into the wrong round Round 2's petal clusters go into the same stitches as Round 1, not into new stitches. Count your 12 original double crochets before starting.
- Fuzzy yarn hiding the petals Stick to smooth, well-defined yarn as the pattern suggests. A fluffy fiber will flatten the dimensional effect you worked hard to create.
- Side panel rows drifting off count Check your stitch count against the pattern every few rows, especially through fifty-five rows of single crochet. A gained or dropped stitch early becomes a crooked panel later.
- Skipping the seam reinforcement Don't skip the figure-eight stitch at seam intersections. It is a small step that keeps corners from working loose under daily bag use.
Intermediate
Progress Tracker
0 of 0 rounds
Tap a round to tick it off — your place is saved on this device.
The kit
- You’ll need worsted weight yarn (CYCA 4) in four colors:
- Color Name Yardage Needed
- A Sandy Tan 350 yards (320 m)
- B Deep Ocean Blue 200 yards (183 m)
- C Light Aqua 100 yards (91 m)
- D White or Cream 60 yards (55 m)
Yarn Suggestions
- Paintbox Yarns Simply Worsted in Champagne White (A), Slate Blue (B), Seafoam Blue (C), and Paper White (D). This is the easiest option since all four colors exist in one affordable line.
- Lion Brand Fishermen’s Wool in Oatmeal (A) paired with Cascade 220 Superwash in Blue Hawaii (B) for a premium feel.
Substitution tip
- Choose smooth yarn with good stitch definition. Avoid fuzzy or fluffy yarns because they’ll hide your beautiful dimensional petals. Cotton blends work wonderfully for bags since they hold their shape and resist stretching.
- US size J / 6.0 mm crochet hook (primary)
- US size H / 5.0 mm crochet hook (optional, for tighter seaming)
- Yarn needle for weaving ends and seaming
- One 10-inch (25 cm) zipper in blue or teal
- Approximately 0.25 yard (23 cm) blue cotton or linen fabric for lining
- Stitch markers
- Scissors
- Sewing needle and matching thread
- Straight pins
Part A: The Dimensional Flower
Round 1Center Ring with Color D (White): Make a magic ring (adjustable loop). Ch 3 (counts as first dc), work 11 dc into the ring. Pull the ring closed. Sl st to the top of the beginning ch-3 to join. (12 dc)Checkpoint: You have a small, flat disc of 12 double crochets. The ring should lie completely flat.Round 2 (Inner Petals, continuing with Color D): Ch 1, do not turn. Working in the same stitches of Round 1: PC in next st, ch 1 repeat around all 12 stitches.Sl st to the top of the first PC to join. Fasten off Color D. (12 Petal Clusters, 12 ch-1 spaces)
Checkpoint: You now have a raised white flower center with 12 petals pointing upward. The work is dimensional and rounded. This is supposed to look puffy!
Round 3Outer Petal Ring with Color C (Light Aqua): Join Color C with a standing sc in any ch-1 space between petals of Round 2.Ch 3 (counts as first dc), work 2 more dc in the same ch-1 space to make a 3-dc group. This is your first outer petal cluster.Ch 1, skip next PC, 3 dc in next ch-1 space around.Final repeat: Ch 1, skip last PC. Sl st to the top of beginning ch-3 to join. (6 groups of 3 dc, 6 ch-1 spaces)
Note: You’re working in every OTHER ch-1 space from Round 2, skipping over the PC tops. This gives you 6 larger outer petal groups.
Fasten off Color C.
Round 4Outer Petal Definition with Color B (Deep Ocean Blue): Join Color B with a standing sc in any ch-1 space between the 3-dc groups of Round 3.Ch 3 (counts as first dc), work 4 dc in the same ch-1 space (5 dc total in this space).Ch 1, skip next 3-dc group, 5 dc in next ch-1 space around.Final repeat: Ch 1, skip last 3-dc group. Sl st to the top of beginning ch-3 to join. (6 groups of 5 dc, 6 ch-1 spaces)Fasten off Color B.
Checkpoint: Your dimensional flower is complete! The center is white, surrounded by aqua petals, surrounded by a ring of large deep blue petal clusters. It should measure approximately 2.25 to 2.5 inches in diameter. Set it aside without flattening it.
Side Panel (Make 2)
With Color A and 6.0 mm hook, ch 16.
Round 1(RS): Sc in 2nd ch from hook and in each ch across. Turn. (15 sc)
Round 2through 55: Ch 1, sc in each st across. Turn. (15 sc) After Row 55, fasten off, leaving a long tail for seaming.
Checkpoint: Your side panel should measure approximately 3.5 inches wide by 12 inches tall . Hold it up against your assembled front panel to check the height matches.
Make 2 side panels.
Base Panel
With Color A and 6.0 mm hook, ch 50.
Round 1(RS): Sc in 2nd ch from hook and in each ch across. Turn. (49 sc)
Round 2through 15: Ch 1, sc in each st across. Turn. (49 sc) After Row 15, fasten off, leaving a long tail.
Checkpoint: Your base panel should measure approximately 12 inches long by 3.5 inches wide .
Part B: The Granny Square Base
Work this separately with Color A (Sandy Tan).
Round 5A (Base Round 1): Make a magic ring. Ch 3 (counts as first dc), 2 dc in ring, ch 2, 3 dc in ring, ch 2 3 times. Sl st to top of beginning ch-3. Pull ring closed. (4 groups of 3 dc, 4 ch-2 corner spaces)
Round 5B (Base Round 2): Sl st to the first ch-2 corner space. Ch 3 (counts as first dc), (2 dc, ch 2, 3 dc) in same corner space.Ch 1, (3 dc, ch 2, 3 dc) in next ch-2 corner space 3 times. Ch 1. Sl st to top of beginning ch-3. (8 groups of 3 dc, 4 ch-2 corner spaces, 4 ch-1 side spaces)
Round 5C (Base Round 3): Sl st to the first ch-2 corner space. Ch 3, (2 dc, ch 2, 3 dc) in same corner space.Ch 1, 3 dc in next ch-1 space, ch 1, (3 dc, ch 2, 3 dc) in next ch-2 corner space 3 times.Ch 1, 3 dc in last ch-1 space, ch 1. Sl st to top of beginning ch-3. (12 groups of 3 dc, 4 ch-2 corner spaces, 8 ch-1 side spaces)Checkpoint: Your base square measures approximately 3.75 to 4 inches across. It’s a classic 3-round granny square in sandy tan.
Section 1: Floral Granny Square (Make 12)
You’ll make 6 squares for the front panel and 6 for the back panel. Each square has two parts: the dimensional flower and the granny square base.
Part C: Attach the Flower to the Base
Center the completed flower on top of the granny square base with both right sides facing up.
Using Color B and a yarn needle (or a slip stitch join with your hook), tack the flower to the base at approximately 8 evenly spaced points around the outer edge of Round 4 of the flower. Catch only the back of the petal loops and the top surface of the base square. The flower should be firmly attached, but the petals should remain free and dimensional.
Alternative: Use a thin layer of fabric glue appropriate for yarn to bond the flower to the base. Press firmly and allow to dry completely.
One complete square = one Color A base + one attached 3D flower.
Block each square to exactly 4 inches by 4 inches before assembly.
Section 2: Assemble Front Panel
Arrange 6 squares in a 3-wide by 2-tall grid with right sides facing up.
To seam: Hold two squares with wrong sides together. Using Color A and a 5.0 mm hook, sl st through the outermost dc or space of both squares along the shared edge. This creates a ridge on the wrong side that won’t show from the front.
Join Row 1 squares: Seam Square 1 to Square 2 along their shared edge. Seam Square 2 to Square 3.
Join Row 2 squares: Seam Square 4 to Square 5, then Square 5 to Square 6.
Join Rows 1 and 2 together along their horizontal shared edge.
Your completed front panel measures approximately 12 inches wide by 8 inches tall .
Repeat to assemble the back panel with the remaining 6 squares.
Section 3: Side and Base Panels
These are worked in single crochet with Color A for a dense, structured fabric.
Section 6: Leather Tabs and Strap Attachment
Fold one leather rectangle in half lengthwise (short end to short end) to create a loop approximately 0.5 inch by 2 inches.
At the center of one side panel’s top edge, insert the folded tab between the last sc round and the bag body so approximately 0.5 inch of the loop extends above the top edge.
Using a sewing needle and sturdy thread, sew the leather tab firmly to the bag side, stitching in a rectangle through all layers for strength.
Repeat for the second tab on the opposite side.
Clip or thread the adjustable crossbody strap hardware through the leather tab loops.
Section 7: Zipper Installation
Pin the zipper tape along the inside top edge of the bag with the right side of the zipper facing the interior. Center the zipper across the 12-inch top opening. Fold any excess zipper tape to the inside at the ends.
Using a sewing needle and matching thread, backstitch the zipper tape to the sc top edge. Work slowly and keep stitches even.
Once both sides are attached, open and close the zipper to test smooth movement.
Section 8: Lining
Cut lining fabric into two rectangles, each measuring 13 inches wide by 13.5 inches tall (allowing 0.5 inch seam allowance on all sides).
With right sides together, sew the two lining rectangles along the sides and bottom, leaving a 0.5-inch seam allowance. Leave the top open and a 4-inch opening in the bottom seam for turning. Trim corners and press seams open.
To create the boxed bottom: After sewing the sides and bottom, pinch each bottom corner so the side seam aligns with the bottom seam, forming a triangle. Stitch across 1.75 inches from the corner point to form a 3.5-inch gusset.
Turn lining right side out through the bottom opening. Press. Slip stitch the bottom opening closed.
Insert lining into the bag. Fold the top edge of the lining 0.5 inch to the wrong side. Pin lining just below the zipper tape. Slip stitch the lining to the bag interior using a sewing needle and matching thread.
Assembly
Step 1Weave in all remaining yarn ends securely on the wrong side. Work each end in at least two directions for at least 1 inch each way.
Step 2Using a yarn needle and Color A, reinforce any seam joints (where horizontal and vertical seam lines cross) with a figure-eight stitch on the inside.
Finishing
- Weave in every yarn end on the wrong side, running each one at least an inch in two directions.
- Reinforce the seam joints where horizontal and vertical seams cross with a figure-eight stitch for durability.
- Install the zipper, attach the lining, then add the leather tabs and strap last.
Why it works
Round 1 of the flower starts flat with 12 double crochets into a magic ring, giving each petal cluster an even anchor point.
Round 2 works back into the same Round 1 stitches rather than building outward, which is why the petals rise instead of spreading.
The side and base panels are worked flat in straight rows of single crochet, not in the round, because they need to seam to flat granny square edges.
What it becomes
- An everyday crossbody for a phone, wallet, keys, and a small notebook on errands.
- A statement bag to pair with plain linen or denim, letting the floral squares do the talking.
- A handmade gift for someone who collects granny square projects or dimensional stitch work.
Original pattern: https://bunnypatterns.com/ocean-blue-floral-granny-square-bag-free-crochet-pattern/
FAQ
Can I make the flowers before finishing the granny square base?
Yes, that is the order the pattern follows. Complete Part A, then Part B, then attach the flower in Part C.
Why are the side and base panels worked flat instead of in the round?
They need straight edges to seam against the flat sides of the granny squares. Working them in rows keeps those edges even and easy to match up.
What if my petal clusters look flat instead of puffy?
Check that you are drawing through all five loops at once in step 5, not partially. A fluffy or fuzzy yarn can also mute the dimensional effect, so smooth yarn works best.
Do I need the optional H hook?
No, the J hook handles the whole pattern. The H hook is only there if you want tighter, neater seams during assembly.