
Free Pattern
Step-by-Step
Crochet
AmigurumiPikachu Crochet Pattern: Free Amigurumi Pattern (2 Sizes)
Make an adorable Pikachu amigurumi with this free crochet pattern in two sizes. Includes lightning bolt tail, ears, and full assembly instructions.
Level IntermediateTime 4-6 HoursHook 4.0 mmYarn Worsted
Pattern highlights
- Start with the legs, working each one separately before setting them aside to attach later.
- Crochet the body and head as one continuous piece, shaping the rounded head shape as you decrease near the top.
- Make the arms next, keeping them slim enough to sew on without overwhelming the body's proportions.
- Shape the two-toned tail, building the brown base first before curving it into the classic lightning bolt silhouette.
- Stuff each piece firmly but evenly as you close up the final rounds so nothing looks lumpy.
- Pin the ears, arms, legs, and tail in place to check placement and symmetry before sewing anything permanently.
- Sew all the pieces onto the body with a yarn needle, then weave in every yarn tail to finish.
About This Pattern
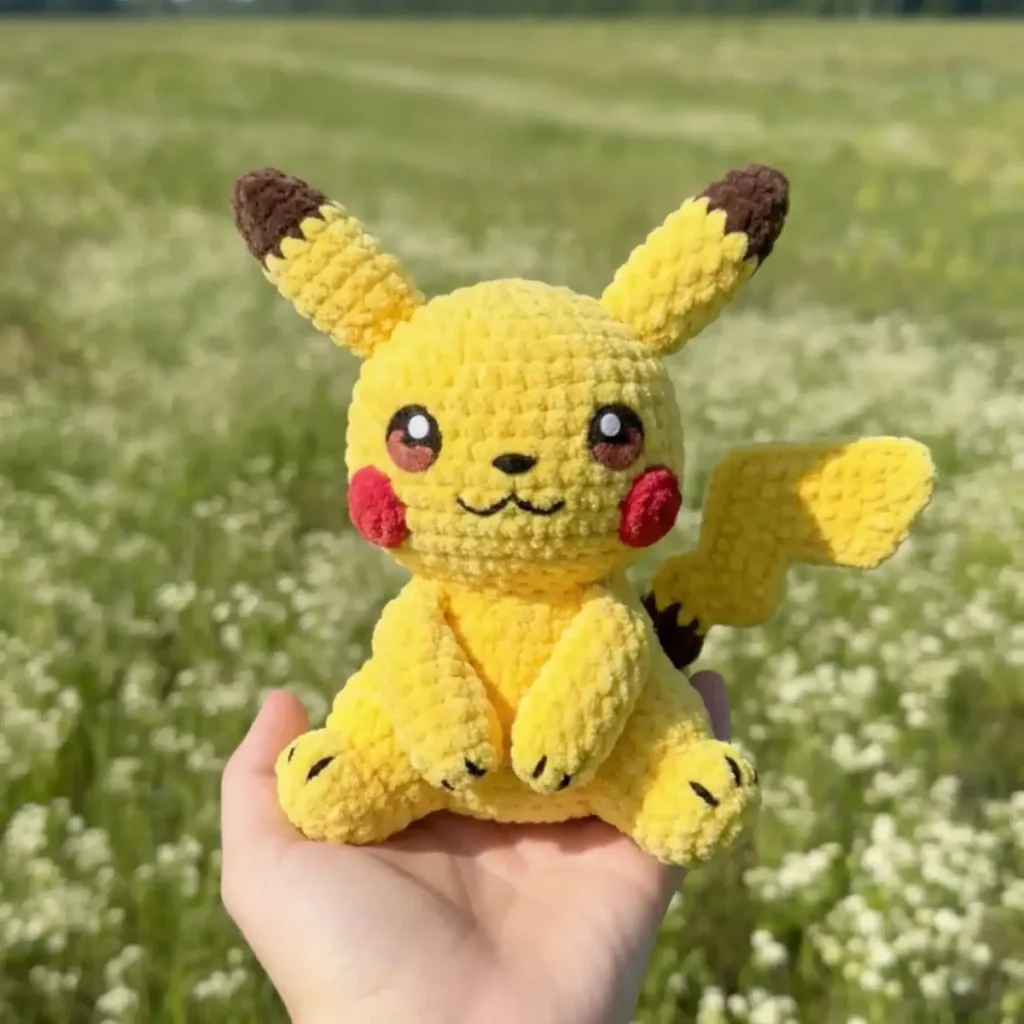
This Pikachu crochet pattern turns a handful of yarn scraps into everyone's favorite electric mouse, complete with rounded cheeks, perky black-tipped ears, and that unmistakable lightning bolt tail. What makes this design so special is how the pieces snap together into a shape that's instantly recognizable the moment you set down your hook. It's perfect for Pokémon fans, nursery decor lovers, and anyone who wants to gift a nostalgic, huggable plush that feels genuinely handmade rather than mass-produced.
You'll work the body and head in one continuous piece across 22 rounds, then build out the legs, arms, ears, and that clever two-toned tail separately before joining everything with a yarn needle. Expect techniques like magic rings, single crochet increases and decreases, and clean color transitions between yellow, black, and brown. This isn't a beginner's first project, but if you've made a round amigurumi before, you'll move through this one steadily in a weekend.
The finished Pikachu comes together as a plump, squeezable little creature sized to sit comfortably in two hands or perch on a shelf, with the two-size option letting you scale it up for a bigger cuddle buddy or down for a pocket-sized keepsake. The plush yarn version feels irresistibly soft, while the worsted cotton version holds crisp stitch definition for display. Either way, it's the kind of handmade gift that gets an immediate 'aww' the moment it's unwrapped.
Variations
I adore how this Pikachu pattern rewards every stitch with personality — by the time you close up round 22 on the body and head, you already have that signature round face staring back at you. The lightning bolt tail is my favorite part of this whole design; shaping the brown base into a crisp bolt point across 14 rounds feels like a little engineering puzzle, and it's so satisfying when it finally looks unmistakably 'Pikachu' instead of just a lumpy tail. I also love that the ears work up quickly at 11 rounds each but pack in a clean black-to-yellow color change that makes them pop. Assembling the four limbs onto the body is genuinely relaxing after all the counting — it's the fun, meditative payoff round. And because you can make it in soft plush yarn or sturdy worsted cotton, this pattern flexes to whatever mood you're in, whether you want a squishy cuddle toy or a crisp display piece. It's a project that keeps surprising you with how much character shows up in such simple shapes.
Common mistakes
- Losing track of stitch count
- Place a stitch marker at the start of every round and move it up each time — with 22 rounds worked continuously, it's easy to drift off count without a clear marker to anchor you.
- Pulling the magic ring too loosely
- Cinch the magic ring closed firmly and give it an extra tug before continuing — a loose center hole will show as a visible gap even after stuffing.
- Overstuffing the head before finishing
- Stuff gradually as you decrease rather than all at once at the end — this keeps the head round instead of lopsided and makes closing the last few stitches much easier.
- Attaching the ears, arms, or tail
- Use stitch markers or pins to place both ears and both arms before sewing, stepping back to check alignment from the front and side before committing with the yarn needle.
- Skipping definition on the lightning bolt tail's angles
- Work single crochet decreases exactly where the pattern shifts direction rather than spreading them out evenly — sharp, deliberate turns are what make the tail read as a bolt instead of a rounded triangle.


Intermediate
Progress Tracker
0 of 0 rounds
Tap a round to tick it off — your place is saved on this device.
Materials
Option A – Large Size (10-11 inches / 25-28 cm tall)
- Yellow plush yarn (Himalaya Dolphin, Bernat Blanket) – 200 yards for body, head, limbs, and tail
- Black plush yarn – 30 yards for ear tips and back stripes
- Brown plush yarn – 20 yards for tail base
- Red plush yarn – 20 yards for cheeks
- Black and white fine yarn – small amount for eyes and embroidery
- 4.0mm (G/6) crochet hook for main pieces
- 2.0mm (B/1) crochet hook for eyes only
- 10mm safety eyes (2) – optional
Option B – Small Size (5.5 inches / 14 cm tall)
- Yellow worsted weight yarn (cotton or acrylic) – 150 yards for body, head, limbs, and tail
- Black worsted yarn – 20 yards for ear tips and back stripes
- Brown worsted yarn – 15 yards for tail base
- Red worsted yarn – 15 yards for cheeks
- Black and white fine yarn – small amount for eyes and embroidery
- 2.5mm (C/2) crochet hook for main pieces
- 1.5mm (steel 7) crochet hook for eyes only
- 6mm safety eyes (2) – optional
Additional Materials (Both Options)
- Polyester stuffing
- Yarn needle
- Stitch markers
- Scissors
Legs (Make 2)
Using yellow yarn:
- Round 18 sc in mr (8)
- Round 2[inc] 8 times (16)
- Round 316 sc BLO (16)
- Round 43 sc, [dec] 5 times, 3 sc (11)
- Round 511 sc (11)
- Round 63 sc, [inc] 5 times, 3 sc (16)
- Round 716 sc (16)Sl st, FO, leaving long tail for joining. Stuff legs lightly. Make 2 legs.
Body & Head (Continuous)
Using yellow yarn: Foundation: Ch 4 Body Section:
- Round 1Starting in 2nd ch: 2 sc, 4 sc in last ch, rotate, 2 sc, 4 sc in last (12)
- Round 2[2 sc, [inc] 4 times] twice (20)
- Round 32 sc, [inc, 1 sc] 4x, 2 sc, [inc, 1 sc] 4x (28)
- Round 45 sc, inc, 7 sc, [inc] 2x, 7 sc, inc, 5 sc (32)Before Rnd 5: Position your 2 completed legs. You will crochet through the leg stitches to join them seamlessly to the body.
Attaching Legs:
- Round 53 sc, inc, 4 sc in body, [now work 6 sc by inserting hook through 6 stitches of left leg, working them together with body], inc, 2 sc, inc in body, [work 6 sc through 6 stitches of right leg], 4 sc, inc, 3 sc in body (36 total)
- Round 69 sc along body edge, [work remaining 10 sc around left leg to close it], 6 sc along body, [work remaining 10 sc around right leg to close it], 9 sc along body edge (44 total)
- Round 714 sc, [dec] 2x, 8 sc, [dec] 2x, 14 sc (40)
- Round 85 sc, dec, 5 sc, [dec] 2x, 8 sc, [dec] 2x, 5 sc, dec, 5 sc (34)
- Round 94 sc, dec, 5 sc, dec, 8 sc, dec, 5 sc, dec, 4 sc (30)Begin stuffing body firmly. Continue as you work.
- Round 10[2 sc, dec] 2x, 3 sc, 8 sc, 3 sc, [dec, 2 sc] 2x (26)
- Round 119 sc, dec, 4 sc, dec, 9 sc (24)
- Round 122 sc, dec, 5 sc, 6 sc, 5 sc, dec, 2 sc (22)
- Round 132 sc, dec, 4 sc, 2 sc, dec, 2 sc, 4 sc, dec, 2 sc (19)Head Section: Work 1 additional sc to center marker at front.
- Round 14[inc] 19 times (38)
- Round 15[1 sc, inc] 19 times (57)
- Round 16[2 sc, inc] 19 times (76)
- Rounds 17-2476 sc (76) — Work 8 rounds even Insert safety eyes between Rnds 19-20, spaced 8-10 sts apart (For plush yarn: 10mm eyes, For worsted: 6mm eyes)
- Round 25[2 sc, dec] 19 times (57)
- Round 26[1 sc, dec] 19 times (38)
- Round 27[dec] 19 times (19)Stuff head very firmly to maintain perfect round shape!
- Round 28[dec] 9x, 1 sc (10)
- Round 29[dec] 5 times (5)Close opening by weaving yarn through remaining loops, pull tight, FO, and weave in end inside head.
Arms (Make 2)
Using yellow yarn:
- Round 16 sc in mr (6)
- Round 2[inc] 6 times (12)
- Rounds 3-512 sc (12) — 3 rounds
- Round 6[2 sc, dec] 3 times (9)
- Rounds 7-99 sc (9) — 3 rounds
- Round 101 sc, dec, 6 sc (8)
- Round 118 sc (8)Work 1 additional sc to center opening.
- Round 12Flatten arm so front and back align. Work 4 sc through both layers simultaneously to close.
FO, leaving long tail for sewing. Stuff arms lightly. Make 2.
Ears (Make 2)
Start with black yarn:
- Round 16 sc in mr (6)
- Round 26 sc (6)
- Round 36 sc (6)Change to yellow yarn:
- Round 46 sc (6)
- Round 5[1 sc, inc] 3 times (9)
- Rounds 6-79 sc (9) — 2 rounds
- Round 8[2 sc, inc] 3 times (12)
- Rounds 9-1112 sc (12) — 3 rounds
- Round 12[3 sc, inc] 3 times (15)
- Rounds 13-1515 sc (15) — 3 rounds Work 1 additional sc.
- Round 16Flatten ear. Work 7 sc through both layers to close.
FO, leaving long tail for sewing. Don’t stuff ears. Make 2 ears.
Tail (Lightning Bolt Shape with Brown Base)
Pikachu’s tail features an authentic brown base that distinguishes this Pokemon character. This detail is essential for accuracy.
Start with brown yarn, Ch 12:
- Row 1Starting in 2nd ch: 11 sc, turn (11)
- Row 2Ch 1, 11 sc, turn (11)
- Row 3Ch 1, 11 sc, turn (11)Change to yellow yarn:
- Row 4Ch 1, dec, 7 sc, dec, turn (9)
- Row 5Ch 1, dec, 5 sc, dec, turn (7)
- Row 6Ch 1, dec, 3 sc, dec, turn (5)
- Row 7Ch 1, 5 sc, ch 8, turn
- Row 8Starting in 2nd ch: 7 sc along chain, 5 sc along tail piece, turn (12)
- Row 9Ch 1, 12 sc, turn (12)
- Row 10Ch 1, dec, 8 sc, dec, turn (10)
- Row 11Ch 1, dec, 6 sc, dec, turn (8)
- Row 12Ch 1, dec, 4 sc, dec, turn (6)
- Row 13Ch 1, dec, 2 sc, dec, turn (4)
- Row 14Ch 1, [dec] twice (2)Make a second identical piece (also starting with brown for Rows 1-3, then yellow). Place both pieces together (wrong sides facing, brown bases aligned) and sc around all edges to join using yellow yarn, stuffing lightly as you go to create a 3D zigzag lightning bolt shape. The brown section forms the base that connects to the body. Make sure this brown part is visible when attaching!
FO, leaving long tail.
Cheeks (Make 2)
Using red yarn:
- Round 16 sc in mr (6)
- Round 2[inc] 6 times (12)
- Round 3[1 sc, inc] 6 times (18)Sl st, FO, leaving long tail for sewing. Don’t stuff – these will lie flat. Make 2 cheeks.
Eyes (Crocheted – Optional)
If using safety eyes, skip this section.
Use fine weight yarn with 2.0mm hook (for plush yarn option) or 1.5mm hook (for worsted option).
White Base (Make 2):
- Base Rnd 16 sc in mr (6)
- Base Rnd 2[inc] 6 times (12)
- Base Rnd 3[1 sc, inc] 6 times (18)
- Base Rnd 4[2 sc, inc] 6 times (24)Sl st, FO, leaving long tail.
Black Pupil (Make 2):
- Pupil Rnd 16 sc in mr (6)
- Pupil Rnd 2[inc] 6 times (12)Sl st, FO, leaving long tail.
White Highlight (Make 2):
- HighlightWork 4 sc in mr. FO, leaving tail.Assembly: Center black pupil (12 sts) on white base (24 sts). Sew pupil securely to base using black yarn. Add tiny white highlight to upper-right of pupil for that anime sparkle effect. Position completed eyes on head at Rnds 19-21, spaced 8-10 stitches apart. Pin first and check expression before final sewing!(4)
Assembly
- Step 1Follow this assembly order for best results:
- Step 2Arms: Attach to body sides at Rnds 11-14 using whip stitch or ladder stitch with matching yellow yarn
- Step 3Eyes: Position at Rnds 19-21, space 8-10 sts apart. Pin first to check expression before sewing!
- Step 4Cheeks: Position below and slightly outside eyes at Rnds 19-22. Sew flat against face – this is Pikachu’s signature! Must be symmetrical.
- Step 5Ears: Attach to top of head at Rnd 24-25. Angle slightly outward (not straight up). Sew entire flattened base securely so they stand upright.
- Step 6Tail: Position at back-upper body at Rnd 8-10 (where body meets head). Orient tail so brown base is at bottom (connecting to body) and visible from behind! Sew securely so tail stands upright or angles slightly up.
Important notes
💡 Use a hook one size smaller than what's recommended on your yarn label — tighter stitches mean stuffing won't peek through the fabric on any of the pieces.
💡 Keep a separate stitch marker color for 'round start' versus 'increase point' if you're working the body and head for the first time, since 22 rounds is a lot to track by memory alone.
💡 When working with plush yarn like Himalaya Dolphin or Bernat Blanket, stuff a little firmer than usual since the fluffy texture can make pieces look understuffed even when they're not.
💡 Cut yarn tails at least 6 inches long before color changes on the ears and tail so you have plenty to weave in without stress later.
💡 Weigh out your yellow, black, and brown yarn before starting so you know you have enough — running short mid-tail on the brown base is a frustrating stop-and-shop moment.
💡 Pin the arms and legs in place with removable stitch markers before sewing so you can check the pose and stance of your Pikachu before committing permanently with the yarn needle.
📏 Finished Size (Option A – Plush Yarn): Height 10-11 inches (25-28 cm); height with ears 14-16 inches (35-40 cm); head diameter approximately 7 inches (18 cm); body width approximately 5 inches (13 cm). Gauge: 9 sc × 10 rows = 4 inches (10 cm).
📏 Finished Size (Option B – Worsted Yarn): Height 5.5 inches (14 cm); height with ears 8-9 inches (20-23 cm); head diameter approximately 4 inches (10 cm); body width approximately 3 inches (7.5 cm). Gauge: 14 sc × 15 rows = 4 inches (10 cm).
📏 The pattern stitch counts remain identical for both size options — only the yarn weight and hook size determine the final dimensions.
Original pattern: https://amigurumicorner.com/pikachu-crochet-pattern-free-amigurumi-tutorial-2-sizes/
FAQ
Can I make this Pikachu pattern with only worsted weight cotton yarn instead of plush yarn?
Yes, the pattern gives yardage for both a plush yarn version and a worsted cotton/acrylic version. The cotton version will have crisper stitch definition and a firmer finished look, while the plush version feels softer and fuzzier.
How much yarn do I actually need to finish the whole project?
the plush version you'll need about 200 yards of yellow, 30 yards of black, and 20 yards of brown. For the worsted version, plan for roughly 150 yards yellow, 20 yards black, and 15 yards brown.
What size hook should I use for this pattern?
Match your hook to your yarn weight and go one size smaller than the label suggests for a tight, stuffing-proof fabric. This keeps the amigurumi's stitches dense enough to hold their shape without gaps.
Is this pattern good for a first amigurumi project?
This is better suited to someone who has completed at least one round amigurumi before, since it involves continuous rounds, multiple color changes, and shaping a distinct tail silhouette. If you're brand new to amigurumi, practice magic rings and basic increases/decreases on a simple ball first.
How do I make the two different sizes mentioned in the pattern?
The size is primarily controlled by your yarn weight and hook size pairing — using the plush yarn with a larger hook yields the bigger size, while the worsted cotton with a smaller hook creates the more compact version. Stitch counts and rounds stay the same across both sizes.