Free Pattern
Step-by-Step
Crochet
WearablesPink Gingham Crochet Summer Dress Pattern
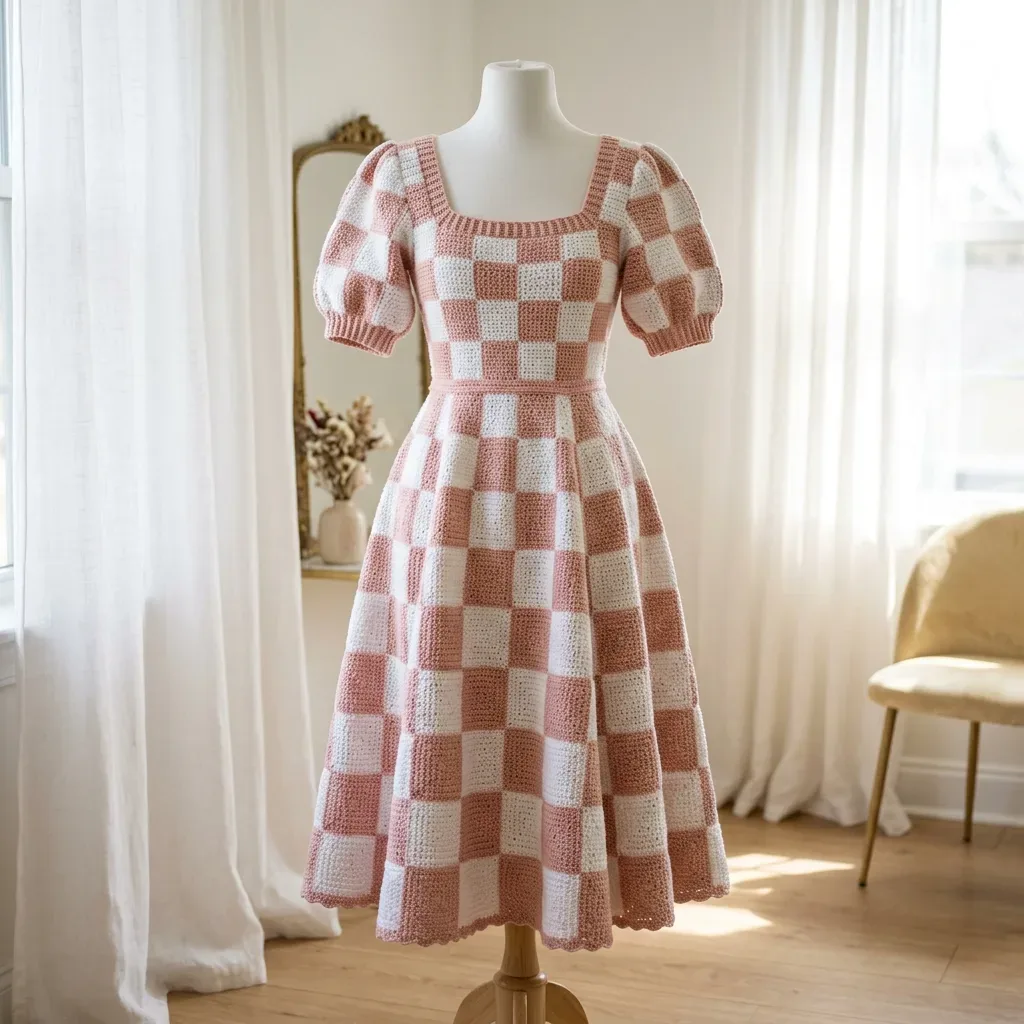
Make a fitted pink gingham crochet summer dress with puff sleeves, square neckline, and scallop hem using join-as-you-go checkerboard squares.
Level Advanced IntermediateTime 80-120 HoursHook 6.0 mmYarn Worsted
Pattern highlights
- Crochet a large batch of solid four-round square motifs in alternating dusty rose and off-white to build your checkerboard supply.
- Join squares as you complete them using the join-as-you-go technique instead of sewing everything together at the end.
- Arrange and connect squares into the fitted bodice sections, keeping colors alternating correctly for the checkerboard effect.
- Seam the bodice sections together and shape the square neckline opening at the top edge.
- Work the ribbed neckline band with the smaller I-9 hook to finish and stabilize the neckline edge.
- Build and join the A-line skirt squares, then attach the completed skirt to the finished bodice at the waist seam.
- Finish the hem with the delicate scallop edging worked around the entire lower skirt edge.
- Crochet the puff sleeves with their ribbed cuffs using the I-9 hook, then attach them to the bodice armholes.
About This Pattern
This pink gingham crochet summer dress is built entirely from solid granny-style squares arranged in a classic dusty rose and off-white checkerboard, giving you the charm of gingham without a single woven thread. A fitted bodice with a square neckline meets a defined waist seam and a flowing A-line skirt, while puff sleeves with ribbed cuffs add a romantic, vintage touch. It's the perfect project for crocheters who love garment-making and want a truly one-of-a-kind piece that looks like it walked out of a boutique window.
You'll rely on join-as-you-go (JAYG) construction to connect your 4-round square motifs as you finish them, plus colorwork planning, basic garment shaping, and comfortable in-the-round work. Each skill is manageable alone, but juggling them together in a fitted silhouette is what earns this pattern its advanced intermediate rating. Budget 80 to 120 hours for a size Medium — this is a slow, satisfying make meant to be enjoyed section by section, not rushed to the finish line.
The finished dress is a midi-length, fitted-through-the-waist showstopper with a delicate scallop hem and a bust range of 34 to 46 inches across four sizes. Worked in smooth worsted weight yarn, the checkerboard motif reads crisp and graphic once blocked, giving the whole garment beautiful drape and structure. Whether you keep it for your own summer wardrobe or gift it to a fellow maker who deserves a showpiece, this is the kind of dress people ask about at every picnic.
Variations
There's something so satisfying about watching a pile of tiny 3.5-inch squares transform into an actual wearable dress, and that's exactly what happens here. I love that the JAYG technique means no marathon sewing session at the end — you connect each square the moment it's finished, so the checkerboard pattern grows right before your eyes. The square neckline paired with puffed sleeves and ribbed cuffs gives this dress such a sweet, retro silhouette, and the scallop hem edging is the kind of detail that makes people ask 'wait, you MADE that?' I also appreciate that the pattern is honest about its difficulty — nothing here is technically hard on its own, but managing colorwork, garment shaping, and joining all at once genuinely earns its advanced intermediate label. It's a project I return to over weeks, not days, and every finished row of squares feels like real progress. If you've been wanting to level up from amigurumi or blankets into true garment crochet, this dress is the perfect, rewarding next challenge.
Common mistakes
- Losing track of which square edges have already been joined during JAYG construction, resulting in gaps or accidental double-joins.
- Place a stitch marker on each completed joining edge as you finish it, and always lay your work flat to visually confirm which sides are free before starting Round 4 on a new square.
- Working the join-as-you-go stitch incorrectly, which creates a lumpy or twisted seam instead of a flat, invisible join.
- Remember the join replaces a standard sc: insert your hook in the corresponding stitch on the existing square, yarn over, pull up a loop, yarn over, and pull through both loops in one motion — practice on two scrap squares first if this is your first JAYG project.
- Mixing up Color A and Color B placement across squares, which breaks the checkerboard pattern once several rows are joined.
- Lay out your entire garment section on a flat surface or design board before joining, checking that colors alternate correctly in both directions, and count squares aloud row by row before you start connecting them.
- Using a fuzzy or bouclé yarn that obscures the clean checkerboard motif the pattern depends on.
- Stick with a smooth, low-halo worsted weight yarn with strong stitch definition, such as Pound of Love or WeCrochet Brava Worsted, so each square's edges stay crisp and visible.
- Skipping blocking on individual squares before joining, leading to a wavy, uneven checkerboard once assembled.
- Block your squares to the stated 3.5 x 3.5 inch measurement before joining wherever possible, and block the full garment sections again after seaming to even out any remaining tension differences.
- Not checking gauge before starting, which throws off both the square size and the overall bust and waist measurements.
- Work a test square first and measure it against the 3.5 x 3.5 inch blocked measurement, and check that your single crochet fabric matches 16 sc x 18 rows over 4 x 4 inches before committing to a full size.
Advanced Intermediate
Progress Tracker
0 of 0 rounds
Tap a round to tick it off — your place is saved on this device.
Materials
- Color A (Dusty Rose/Mauve Pink): approximately 800 (900, 1000, 1100) yards / 731 (823, 914, 1006) meters of worsted weight yarn
- Color B (Off-White/Cream): approximately 800 (900, 1000, 1100) yards / 731 (823, 914, 1006) meters of worsted weight yarn
Recommended yarns
- Lion Brand Pound of Love (100% acrylic, worsted weight, 1020 yards per 16 oz skein). Excellent stitch definition for showing the checkerboard motif clearly.
- Paintbox Yarns Simply DK held double (100% acrylic, worsted weight equivalent when doubled, 275 yards per 100g skein). Soft hand and consistent color saturation.
- WeCrochet Brava Worsted (100% acrylic, worsted weight, 218 yards per 100g skein). Budget-friendly with excellent stitch definition.
Substitution note
- Choose a smooth worsted weight yarn (Craft Yarn Council weight 4) with low halo and good stitch definition. Avoid fuzzy or bouclé fibers, which will obscure the checkerboard pattern. Cotton or cotton-blend yarns work beautifully for a cooler summer weight. If substituting cotton, reduce hook size by half a millimeter.
- US size J-10 / 6.0 mm for main fabric
- US size I-9 / 5.5 mm for ribbed cuffs and neckline edging
- Stitch markers (at least 12)
- Yarn needle for weaving ends and seaming
- Measuring tape
- Scissors
Optional
- blocking mats and T-pins
Solid Square Motif
Each square is worked in a single color and measures 3.5 inches square when blocked. This is the building block of your entire dress.
- Round 1Using color of choice, make a magic ring. Ch 3 (counts as first dc), work 2 dc in ring, ch 2, (3 dc in ring, ch 2) 3 times, join with sl st to top of beg ch-3. (4 groups of 3 dc, 4 ch-2 corner spaces)
- Round 2Sl st into next 2 dc and into ch-2 corner sp. Ch 3 (counts as dc), 2 dc in same sp, ch 2, 3 dc in same sp (corner made), ch 1, (3 dc, ch 2, 3 dc) in next ch-2 sp (corner), ch 1. Rep from ( to ) around all 4 corners. Join with sl st to top of beg ch-3. (4 corner groups of 6 dc, 4 ch-1 side spaces)
- Round 3Sl st to corner ch-2 sp. Ch 3, 2 dc in same sp, ch 2, 3 dc in same sp (corner), ch 1, 3 dc in next ch-1 side sp, ch 1, (corner), ch 1, 3 dc in next ch-1 side sp, ch 1. Rep around all 4 corners. Join with sl st to top of ch-3. (4 corner groups, 2 side groups of 3 dc per side)
- Round 4(Closing Round with sc): Join with sc in any corner ch-2 sp, 2 more sc in same sp (corner), sc across all dc and ch-1 spaces along each side working 1 sc per dc and 1 sc per ch-1 sp, work 3 sc in each corner ch-2 sp. Join with sl st to beg sc. Fasten off leaving a tail for seaming or JAYG.Final count: Each side of the finished square has 13 sc (including 1 corner sc at each end shared with corners). Corner stitch count: 3 sc at each corner. Total sc around square: 52 sts.
Ribbed Cuff and Neckline Band
Worked in BLO sc for the ribbed texture.
Foundation: Ch 8.
- Round 1Sc in 2nd ch from hook and each ch across. (7 sc)
- Round 2and all following rows: Ch 1, turn, sc BLO across. (7 sc) Work rows until the band fits the cuff or neckline circumference when slightly stretched. Seam short ends together.
Section 5: Neckline Band
Using smaller hook (I-9 / 5.5 mm) and Color A, work the ribbed neckline band.
Neckline opening circumference: S: 14 in front + 14 in back = 28 inches / 71 cm M: 17.5 + 17.5 = 35 inches / 89 cm L and XL: 21 + 21 = 42 inches / 107 cm
Ch 9.
- Round 1Sc in 2nd ch from hook and in each ch across. (8 sc)
- Round 2and all subsequent rows: Ch 1, turn, sc BLO across. (8 sc) Continue until strip reaches neckline circumference (lightly stretched).S: approximately 56 rows M: approximately 70 rows L and XL: approximately 84 rowsSeam the short ends of the band together to form a loop. With RS facing, sl st band to neckline edge of assembled bodice, placing seam of band at center back neckline.
Section 8: Sleeves
Work 2 sleeves identically.
Armhole circumference: Each armhole opening is formed by 3 unsewed square edges = 78 sc around the armhole opening for all sizes.
Work the sleeve squares independently as a 2-wide x 3-tall panel (6 squares per sleeve). Seam the left and right edges together to form a tube.
Gathering Round at sleeve cap: Join yarn at top edge of sleeve tube. (Ch 1, sl st in next st) across all top edge sts, pulling the edge in as you go to gather. This creates the puff effect at the sleeve cap.
Attach sleeve to armhole: With RS facing, sl st the gathered sleeve cap evenly around the armhole opening, distributing the gathers evenly.
Ribbed Cuff: Ch 9.
- Round 1Sc in 2nd ch from hook and in each ch. (8 sc)
- Round 2and on: Ch 1, turn, sc BLO across. (8 sc) Continue for approximately 33 rows. Seam short ends. Sl st cuff to sleeve bottom edge. Repeat for second sleeve.
Checkpoint: Both sleeves should be attached with puffed caps and ribbed cuffs. The neckline band should be attached. The hem scallop should be complete.
Section 1: Square Motifs
Make each square following the Solid Square Motif instructions above. Alternate colors in a strict checkerboard arrangement. Wherever you have a Color A square, the square immediately to its right, left, above, and below is Color B.
Always start a new square motif with a magic ring rather than a starting chain for the cleanest center.
I highly recommend blocking all individual squares before assembling. This gives you the most accurate finished dimensions and makes joining much easier.
Section 4: Bodice Seaming
With RS facing, align Bodice Front and Bodice Back panels along their side edges. Using a yarn needle and a length of Color A or B (matching edge color), seam the side edges together using a flat mattress stitch or sl st seam.
Armhole placement: Leave the top 3 squares (10.5 inches / 27 cm) of each side edge unseamed to create the armhole opening. Seam only the bottom 1 square (3.5 inches / 9 cm) of each side edge below the armhole.
After seaming both side seams, you have a tube with a neckline opening at top, two armhole openings on each side, and a waist opening at the bottom.
Attaching Skirt to Bodice
With RS facing, align the waist edge of the assembled skirt tube with the bottom edge of the assembled bodice tube. Match side seams.
Working with Color A and the larger hook, sc the waist edge of the skirt to the waist edge of the bodice. Distribute any extra skirt width evenly around the seam by working 2 skirt edge sts into the same bodice edge st where needed.
For size S, the waist edges match exactly (104 sc total waist circumference). For sizes M through XL, slight gathering at the waist seam creates a fitted waist.
Checkpoint: After joining the skirt to the bodice, the full dress tube should hang smoothly with a defined waist transition.
Section 7: Hem Scallop Edging
With larger hook and Color A, join yarn at a side seam at the hem edge of the dress.
- Round 1Preparation Round: Sc evenly around the entire hem edge, working 1 sc per sc along each square base edge, and 3 sc at each corner where squares meet at the hem.(3)
- Round 2Stitch count adjustments: Size S: 156 sc total (156 divided by 6 = 26 scallops)(156)
- Round 3Size M: Adjust to 180 sc by working 2 sc2tog evenly spaced (30 scallops)(180)
- Round 4Size L and XL: Adjust to 210 sc by adding 2 extra sc in 2 corner positions (35 scallops)(210)
- Round 5Scallop Round: (Skip 2 sts, 5 dc in next st, skip 2 sts, sl st in next st). Rep around. Join with sl st to beg sl st. Fasten off.(5)
Assembly
- Step 1Weave in all yarn ends securely with a yarn needle, using a figure-eight path through the crochet fabric on the WS for at least 2 inches in two different directions. Trim ends after securing.
- Step 2Block the completed dress by soaking in cool water with a small amount of wool wash. Gently squeeze out water (do not wring). Lay flat on blocking mats. Pin hem scallop points out gently to define scallop shape. Pin neckline corners square. Allow to dry completely flat.
Important notes
💡 Place stitch markers generously — you'll want at least 12 on hand to mark joining edges, waist seam points, and neckline placement so you never lose your spot mid-square.
💡 Since this pattern is written for size Small with Medium, Large, and Extra Large in parentheses, circle or highlight your size throughout before you begin so you don't accidentally follow the wrong stitch counts.
💡 If substituting cotton or a cotton-blend yarn for a cooler summer wear, drop your hook size by half a millimeter as the materials note suggests, and re-check your gauge swatch before diving into the full 80+ hour project.
💡 Because this dress is constructed from many individual squares, keep a small project bag or bin dedicated just to finished-but-unjoined squares so you always know exactly how many are ready to attach.
💡 Buy your Color A and Color B yardage together and from the same dye lot batch if possible, since the checkerboard motif makes any subtle color variation between skeins very noticeable across the finished garment.
FAQ
Do I need to know join-as-you-go (JAYG) before starting this dress?
It helps to have some familiarity, but the pattern explains the joining stitch clearly at each transition. I'd recommend practicing the join on two scrap squares first if you've never done JAYG before, just to get the rhythm down before committing to the full garment.
How much yarn do I actually need for this dress?
You'll need approximately 800 to 1100 yards each of Color A and Color B depending on your size, so roughly 1600 to 2200 yards total. Buying a full pound-sized skein like Pound of Love in each color is a great way to have enough with some left over for swatching.
Can I make this dress in a lighter or cooler yarn for summer?
Yes, cotton or cotton-blend yarns work beautifully and give a cooler, crisper drape than acrylic. Just remember to drop your hook size by half a millimeter to keep your gauge and checkerboard motif accurate.
Why is this pattern rated advanced intermediate instead of just intermediate?
No single skill here is difficult on its own — colorwork, JAYG, basic shaping, and working in the round are all individually manageable. What raises the difficulty is combining all of them together in a fitted garment, which requires more planning and attention than any one technique alone.
How long will this dress realistically take me to finish?
Plan for roughly 80 to 120 hours for a size Medium, which varies based on your working speed and experience with garment construction. Most makers treat this as a slow, ongoing project worked in sessions over several weeks rather than something to finish in a weekend.