
Free Pattern
Step-by-Step
Crochet
AmigurumiPink strawberry bear amigurumi crochet pattern
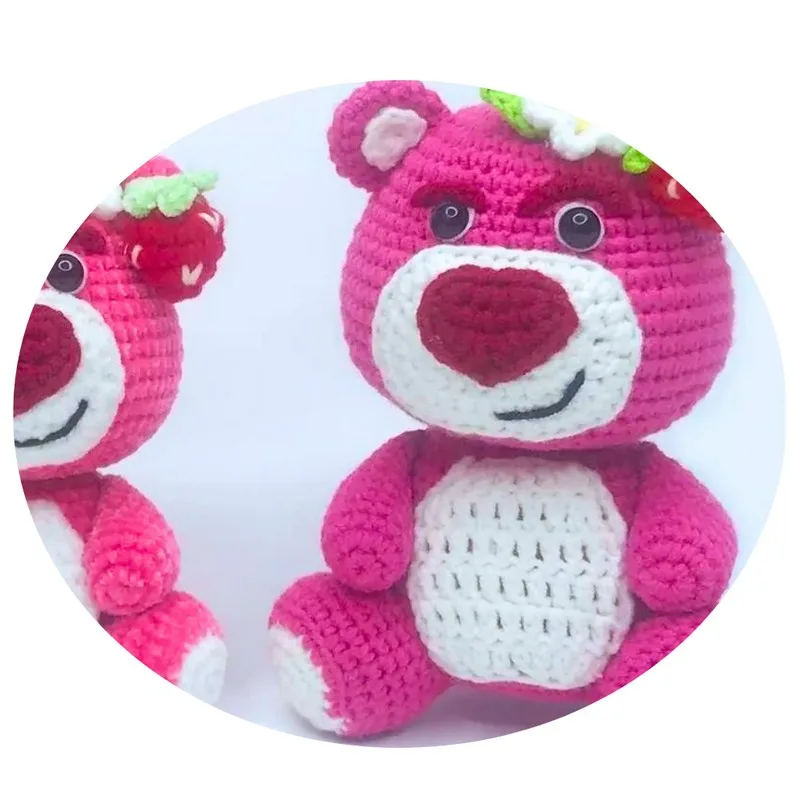
A crocheted pink bear with a felt strawberry, built in amigurumi rounds from the head down.
- Level
- Intermediate
- Time
- 4-6 hours
- Hook
- 1.5 mm
- Yarn
- Lace (1.5mm)
Pattern highlights
- Start with the head, building it in a spiral from a magic ring toward its full curve.
- Shape the nose and its small mouth piece separately, each starting from its own foundation chain.
- Work the body and its separate belly panel, then stuff and close them as you finish the rounds.
- Crochet the hind legs and front legs, then sew each one to the body with a long tail.
- Sew the finished ears onto the head using their own long yarn tails.
- Finish with the small extras: a flower, a leaf, and a strawberry with its stalk.
About This Pattern
A pink bear with a stitched strawberry patch earns a spot near the front of my amigurumi shelf. I like keeping character-inspired pieces together, and this one holds its own without needing a matching gift set. It is built from familiar amigurumi bones: a rounded head, a stuffed body, four small limbs. What sets it apart is the produce riding along beside it. A tiny strawberry, its stalk, and a leaf are separate makes. The whole project reads as a cluster of parts, not one long round count.
The technique list is small but precise. Every main piece starts in a magic ring and grows through single crochet increases worked in spiral rounds. The ears break that rhythm. They finish with a turned row of half doubles and doubles for the white edging. The nose skips the ring and starts from a foundation chain instead. An oval needs a different base than a circle. Working this small, on a 2mm hook, keeps every increase and color change easy to track.
The finished bear is small, round, and pink from ear to paw. The felt and glued eyes give it a fixed, gentle expression rather than a stitched one. A tiny strawberry with its own leaf and stalk sits beside it, more charm than toy. Fiberfill keeps the head and body firm enough to hold their shape on a shelf. It reads as a soft, huggable collectible rather than a play-first toy. Nothing stops a child from claiming it anyway.
Common mistakes
- Losing the round count in spiral shaping Drop a stitch marker at the start of each round and recount before adding the next increase.
- Twisting the nose foundation chain Keep the starting chain flat and untwisted before joining the first round, or the oval will spiral.
- Overstuffing the mouth and nose pieces Use a light hand with fiberfill on these small pieces so they stay flat rather than bulging.
- Gluing felt before the eyes are set Place the plastic eyes with tweezers first, then add felt details once their position is fixed.


Intermediate
Progress Tracker
0 of 0 rounds
Tap a round to tick it off — your place is saved on this device.
The kit
- Crochet hook suitable with your yarns.
- The designer used yarn 1.5mm with a hook size of 2mm.
- Yarn colors: dark pink, white, dark red, green, yellow, red, and skin-tone.
- Stuffed fiberfill, sewing needle, scissors, fabric glue, felt cloth, plastic doll eyes (8mm), tweezers, and pins.
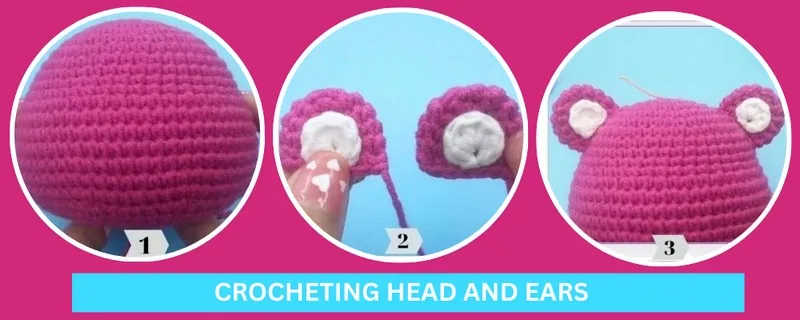
Head
Work in spiral rounds.
Begin with pink yarn.
Round 1Mr, 7sc. (7)
Round 27inc. (14)
Round 3(sc, inc)*7. (21)
Round 4(2sc, inc)*7. (28)
Round 5(3sc, inc)*7. (35)
Round 6(2sc, inc, 2sc)*7. (42)
Round 7(5sc, inc)*7. (49)
Rounds 8–1149sc. (49)
Round 1210sc, inc, (sc, inc)*14, 10sc. (64)
Rounds 13–1864sc. (64)
Round 19(6sc, dec)*8. (56)
Round 20(5sc, dec)*8. (48)
Round 21(4sc, dec)*8. (40)
Round 22(3sc, dec)*8. (32)
Round 23(2sc, dec)*8. (24)
Round 24(4sc, dec)*4. (20)
Ears
Make 2Work in spiral rounds.
Begin with pink yarn for rounds 1-6.
Change to white yarn for round 7 (the ear edging).
Round 1Ch2, turn: 7sc in 1st st. (7)
Round 27inc. (14)
Rounds 3–514sc. (14)
Round 6Together 6sc.
Round 7Ch2, turn: sc, hdc, 3dc, hdc, sc.
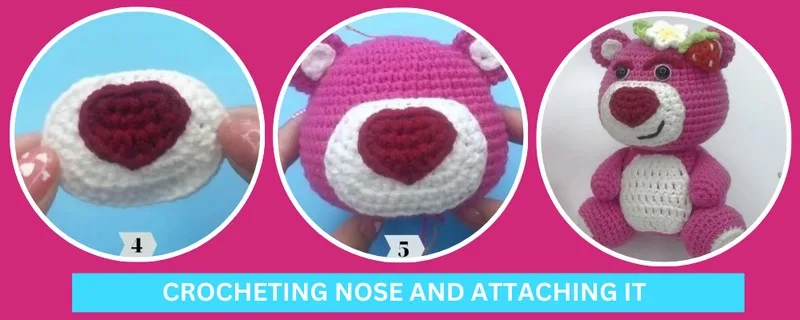
Nose
Work around the foundation chain.
Rounds 1-4 (nose piece): begin with white yarn.
Rounds 1-2 (mouth piece): begin with dark pink yarn; this is a separate small piece worked after the nose.
Round 1Ch8, turn: inc, 5sc, 4sc in 1st st, 5sc, inc, slst.
Round 2Slst, ch2, 2hdc in 1st st, 5hdc, 2hdc in 1st st, 2hdc, 2hdc in 1st st, 5hdc, 2hdc in 1st st, hdc, slst.
Round 3Ch2, (2hdc in 1st st)*2, 5hdc, (2hdc in 1st st)*2, 2hdc, (2hdc in 1st st)*2, 5hdc, (2hdc in 1st st)*2, hdc, slst.
Round 4Ch2, 2hdc in 1st st, hdc, 2hdc in 1st st, 7hdc, (2hdc in 1st st, hdc)*2, (hdc, 2hdc in 1st st)*2, 7hdc, (2hdc in 1st st, hdc)*2, slst.
Round 1 (mouth)Ch5, turn: inc, 2sc, 4sc in 1st st, 2sc, inc. (11)
Round 2 (mouth)Sc, inc, 2hdc in 1st st, ch2, 2hdc in 1st st, inc, sc.
Belly
Begin with white yarn.
Work in rows to make a flat piece.
Cut yarn and fasten off after round 6.
Round 1Ch8, start crocheting in the 3rd chain from the hook: 2dc in 1st st, 3dc, 2dc in 1st st, dc.
Round 2Ch2, turn: 2dc in 1st st, 5dc, 2dc in 1st st, dc.
Rounds 3–5Ch2, turn: 10dc.
Round 6Ch2, turn: 2dc dec, dc, 2dc dec.
Hind Legs
Make 2Work in spiral rounds.
Begin with white yarn.
Change to pink yarn at round 4.
Round 5 is worked in back loop only (BLO).
Cut a long yarn tail after round 9 and sew the leg to the body.
Round 1Mr, 7sc. (7)
Round 27inc. (14)
Round 3(sc, inc)*7. (21)
Round 4(2sc, inc)*7. (28)
Round 5BLO: 28sc. (28)
Rounds 6–728sc. (28)
Round 85sc, (dec, 3sc)*4, 3sc. (24)
Round 95sc, (dec, sc)*4, 3sc. (20)
Front Legs
Make 2Work in spiral rounds.
Begin with pink yarn.
Cut a long yarn tail after round 12 and sew the leg to the body.
Round 1Mr, 7sc. (7)
Round 27inc. (14)
Rounds 3–1114sc. (14)
Round 126sc together.
Flower
Begin with yellow yarn.
Change to white yarn for round 3.
Round 1Mr, 5sc. (5)
Round 2(ch3, slst)*5.
Round 3(slst, 5sc in 1st st)*5.
Leaf
Begin with green yarn.
Round 1Ch5, start crocheting in the 3rd chain from the hook: 2dc in 1st st, hdc, sc, sc, ch2, sc in 1st st, sc, hdc, 2dc in 1st st, slst.
Strawberry
Work in spiral rounds.
Begin with red yarn.
Round 1Mr, 6sc. (6)
Round 26inc. (12)
Round 312sc. (12)
Round 4(2sc, dec)*3. (9)
Round 62dec.
Strawberry stalk
Begin with green yarn.
Round 1Mr: (ch3, turn: sc, hdc, slst)*5.
Body
Continue crocheting from round 21 at the top of the head to begin the body.
Round 25 is worked in front loop only (FLO).
Cut yarn and fasten off after round 43.
Round 25FLO: (inc, 4sc)*4. (24)
Round 26(3sc, inc)*6. (30)
Round 27(2sc, inc, 2sc)*6. (36)
Round 28(5sc, inc)*6. (42)
Round 29(3sc, inc, 3sc)*6. (48)
Round 30(5sc, inc)*8. (56)
Rounds 31–3756sc. (56)
Round 38(5sc, dec)*8. (48)
Round 39(4sc, dec)*8. (40)
Round 40(3sc, dec)*8. (32)
Round 41(2sc, dec)*8. (24)
Round 42(sc, dec)*8. (16)
Round 438dec. (8)
Assembly
Step 1Cut a long yarn tail on the ears and sew them to the head.
Step 2Cut a long yarn tail on each hind leg and sew them to the body.
Step 3Cut a long yarn tail on each front leg and sew them to the body.
From the collection
Finishing
- Stuff the head and body firmly before closing the final rounds.
- Weave in every yarn tail as I sew each piece into place.
- Set the plastic eyes with tweezers, then glue on felt details for the face and strawberry.
Why it works
The head's first five rounds add stitches at a steady, widening rate. That builds the classic amigurumi dome before the piece settles into plain rounds.
The nose starts from a foundation chain rather than a magic ring. An oval shape needs a straight starting edge, not a closed circle.
What it becomes
- A shelf piece for a small collection of pink or fruit-themed amigurumi animals.
- A soft, huggable toy sized for a child who already has a favorite stuffed bear.
- A handmade gift for a crochet swap, paired with the tiny strawberry as a matching set.
Original pattern: https://redagapeblog.com/crochet-lotso-bear-pattern/
FAQ
What hook and yarn does this bear call for?
The pattern uses a 2mm hook with a light, 1.5mm weight yarn. That fine gauge is what keeps a bear this size so detailed.
Why does the nose start with a chain instead of a magic ring?
An oval shape needs a straight base, not a closed circle. Starting from a foundation chain lets the nose grow outward on both sides evenly.
Do I need plastic doll eyes, or can I embroider them instead?
The materials list calls for 8mm plastic doll eyes, set with the help of tweezers. Felt and fabric glue then finish the rest of the face.
How many separate pieces make up the finished bear?
Counting every piece, including the ears, legs, and the strawberry set, it comes to fourteen in total. Each one gets sewn or glued into place at the end.