
Free Pattern
Step-by-Step
Crochet
AmigurumiPlush Duck Amigurumi: Easy Crochet Pattern for Beginners
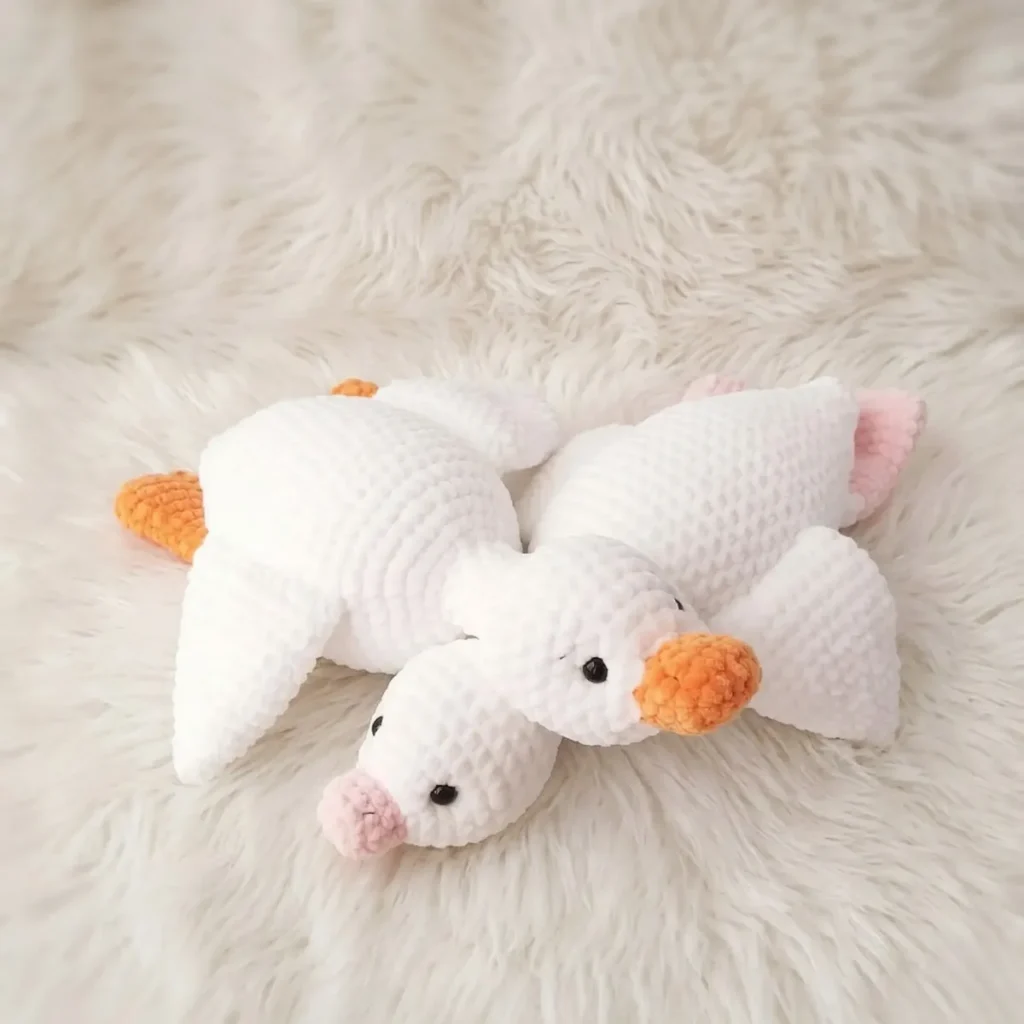
Crochet an adorable plush duck amigurumi with this beginner-friendly pattern featuring a shaped beak, wings, and safety eyes for a huggable finished toy.
Level Beginner-IntermediateTime 4-6 HoursHook 4 mmYarn Worsted
Pattern highlights
- Start the wings first, working two matching flat pieces that will later attach to the sides of the body.
- Crochet a pair of simple legs next, giving the finished duck a stable base to sit upright on.
- Move into the beak-head-body section, working all 52 rounds in one continuous spiral without joining.
- Shape the beak through the early rounds, then use increases to build outward into the rounded head.
- Insert the safety eyes once the head curvature is visible, checking spacing before locking them into place.
- Continue the spiral down through the neck and into the plump body, stuffing firmly in small amounts as you go.
- Sew the wings and legs onto the body, using pins to keep both sides symmetrical before stitching.
- Weave in all yarn tails and give the duck a final gentle shaping so it sits smooth and even.
About This Pattern
This plush duck amigurumi is a cheerful little companion that combines a plump, rounded body with a distinctive shaped beak, two flat wings, and sturdy little legs that let it sit up on its own. What makes this pattern special is the seamless beak-head-body construction, worked in one continuous piece across 52 rounds so you avoid extra seaming on the trickiest part of the toy. It's perfect for crocheters who love amigurumi with personality and want a project that feels like a genuine character by the time you finish.
You'll work primarily in single crochet through continuous spiral rounds, using increases and decreases to sculpt the rounded body and shape that signature duck beak. The wings and legs are made separately as flat, simple pieces before being sewn on, making this an approachable project even if you're newer to amigurumi. Expect to spend around 6 to 10 hours as a beginner, or 3 to 5 hours if you're more experienced, including stuffing and assembly, making it a satisfying weekend project you can complete in one or two relaxed sittings.
The finished duck has a soft, huggable plush texture thanks to the plush yarn, with a rounded belly that sits nicely thanks to the two-color design—an accent shade for the beak and wings against the main body color. It's a cuddly, gift-ready size that works beautifully as a nursery decoration, a baby shower present, or a cheerful shelf companion. Handmade and full of character, it's the kind of amigurumi people want to hold the moment they see it.
Variations
This duck pattern is wonderfully easy to make your own. For a classic look, try bright yellow plush yarn for the main body with a warm orange accent for the beak and wings—instant rubber-duck nostalgia. For something softer, swap in a cream or pale gray main color with a coral or dusty pink accent for a more muted, nursery-friendly palette that pairs beautifully with neutral decor. If you want to try a different fiber, Bernat Baby Blanket or Pounds of Love both mimic the plush yarn's soft, forgiving texture while being easy to find in craft stores. To make a mini version, drop down to a 3mm hook and use a DK weight yarn instead of the plush yarn—your stitch counts will naturally shrink into a smaller, more delicate duck perfect for keychains or ornaments. Conversely, sizing up with a bulky yarn and 6mm hook will give you an oversized cuddle-buddy duck, though you'll want extra stuffing to keep the shape firm. Seasonal fans can have fun too: a white body with an orange beak makes a sweet snow-duck for winter displays, while pastel main colors with floral-embroidered wings turn this into a springtime centerpiece. You could also experiment with the wings by adding a simple surface crochet or embroidered feather detail for extra texture, or attach a small crocheted bow or bandana around the neck for an easy personalized touch. If you're making several as gifts, varying just the accent color across an otherwise identical batch is a quick way to create a whole flock of unique-looking ducks without any extra pattern changes.
I adore how this little duck comes together almost like a puzzle you get to solve with your hook. The beak-head-body section is the real star here—working all 52 rounds continuously means you get this wonderfully smooth transition from beak to face to belly without a single seam interrupting the shape. There's something so satisfying about watching the increases build that rounded head and then taper down into the plump body. The wings and legs are quick, meditative makes on their own, perfect for evening TV-watching crochet. I love using two contrasting plush yarn colors here; swapping to the accent shade for the beak and wings gives the duck so much personality without any complicated colorwork. Setting the 10mm safety eyes is my favorite moment in any amigurumi project—it's the second the duck actually starts looking back at you! And because everything is worked in continuous spirals with a stitch marker keeping you on track, there's a lovely rhythm to the whole process. By the time you're stuffing that firm little belly, you'll be genuinely excited to see your duck sitting up on its own two feet.
Common mistakes
- Losing track of the first stitch in continuous spiral rounds
- Always place a stitch marker in the first stitch of each round and move it up every time you complete a round—this is essential since the duck is never joined and it's easy to drift off count without a clear marker.
- Stuffing too loosely, causing the shape
- Stuff firmly and in small pieces as you go rather than one big handful at the end, working the stuffing into the beak and head first so those defined shapes hold before you close up the body.
- Leaving gaps between stitches that let stuffing peek through
- Keep your tension slightly tighter than you would for a garment—if your stuffing is visible between stitches, try dropping down half a hook size for a denser fabric.
- Placing the safety eyes before
- Insert the eyes only after you can clearly see the head's curvature emerging in the rounds, then temporarily push the backs on and step back to check spacing before locking them in place with the washers.
- Sewing the wings and legs
- Use pins or stitch markers to test-fit both wings and both legs symmetrically before sewing, checking the duck from the front and top to confirm even placement prior to committing with the tapestry needle.


Beginner-Intermediate
Progress Tracker
0 of 0 rounds
Tap a round to tick it off — your place is saved on this device.
Materials
- Plush yarn in 2 colors (approx. 85g main color, 20g accent color)
- 4 mm crochet hook
- 10 mm safety eyes
- Stuffing
- Stitch marker
- Hot glue (optional, for securing eyes)
- Tapestry needle for sewing and sculpting
Wing (Make 2)
Start with main color yarn.
- Round 16 sc in mr (6)
- Round 26 sc (6)
- Round 3(1 sc, inc) *3 (9)
- Round 41 sc, inc, (2 sc, inc) *2, 1 sc (12)
- Round 5(3 sc, inc) *3 (15)
- Round 62 sc, inc, (4 sc, inc) *2, 2 sc (18)
- Round 718 sc (18)
- Round 8(5 sc, inc) *3 (21)
- Round 9-1021 sc (21)
- Round 113 sc, inc, (6 sc, inc) *2, 3 sc (24)
- Round 12-1524 sc (24)Fold the wing in half and single crochet through both layers across, 12 sc. Leave a long tail (approx. 20 cm) for sewing. Fasten off.
Leg (Make 2)
Start with accent color yarn.
- Round 1Ch 9, inc in 2nd ch from hook, 6 sc, 3 sc in next ch, 7 sc (18)
- Round 2-318 sc (18)
- Round 4(dec, 7 sc) *2 (16)
- Round 5(dec, 6 sc) *2 (14)
- Round 6(dec, 5 sc) *2 (12)
- Round 7(dec, 4 sc) *2 (10)
- Round 8-1110 sc (10)Change to main color yarn.
- Round 12-1310 sc (10)Fold in half and single crochet through both layers, 5 sc. Do not cut yarn, leave a long tail (approx. 20 cm) for sewing. Fasten off.
Beak-Head-Body
Start with accent color yarn.
- Round 1Ch 4, inc in 2nd ch from hook, 1 sc, 3 sc in next ch, 2 sc (8)
- Round 2(inc, 3 sc) *2 (10)
- Round 3-510 sc (10)Change to main color yarn.
- Round 6inc *10 (20)
- Round 76 sc, inc, 8 sc, inc, 4 sc (22)
- Round 86 sc, inc, 4 sc, inc, 6 sc, inc, 3 sc (25)
- Round 925 sc (25)
- Round 10(7 sc, inc) *2, 8 sc, inc (28)
- Round 11-1328 sc (28)Insert safety eyes between Rnds 8-9, with 7 stitches between them. Secure with hot glue if desired. Continue stuffing firmly as you go.
- Round 14(5 sc, dec) *4 (24)
- Round 152 sc, dec, (4 sc, dec)*3, 2 sc (20)
- Round 161 sc, dec, (2 sc, dec)*4, 1 sc (15)
- Round 17(3 sc, dec) *3 (12)
- Round 18-2212 sc (12)
- Round 23inc *12 (24)
- Round 24(3 sc, inc) *6 (30)
- Round 252 sc, inc, (4 sc, inc)*5, 2 sc (36)
- Round 26(5 sc, inc) *6 (42)
- Round 27-3942 sc (42)
- Round 40(5 sc, dec)*6 (36)
- Round 4136 sc (36)
- Round 422 sc, dec, (4 sc, dec)*5, 2 sc (30)
- Round 4330 sc (30)
- Round 44(3 sc, dec) *6 (24)
- Round 45-4624 sc (24)
- Round 471 sc, dec, (2 sc, dec)*5, 1 sc (18)
- Round 48(1 sc, dec) *6 (12)
- Round 49-5112 sc (12)
- Round 526 dec (6)Fasten off and weave in the remaining tail to close the hole.
Assembly
- Step 1Eyes: Insert 10mm safety eyes between Rnds 8-9 of the Head section, ensuring there are 7 stitches between them. You can add a dab of hot glue to the back of the washers for extra security, especially if the toy is for a child.
- Step 2Wings: Using the long tails, sew the wings to the sides of the body between Rnds 28-39. Position them symmetrically, with approximately 14 stitches apart across the back.
- Step 3Legs: Using the long tails, sew the legs to the bottom of the body between Rnds 41-42. Ensure they are evenly spaced, with about 4 stitches between them on the front.
- Step 4Facial Sculpting (Optional): You can leave the face as is or add sculpting for more definition. Thread your tapestry needle with a length of the main color yarn.
- Step 5Insert the needle into the center of the beak at the color change (between Rnds 5-6).
- Step 6Bring the needle out at the bottom outer corner of the right eye.
- Step 7Insert the needle into the top outer corner of the right eye.
- Step 8Bring the needle out at the top outer corner of the left eye.
- Step 9Insert the needle into the bottom outer corner of the left eye.
- Step 10Bring the needle out at the initial insertion point in the beak.
- Step 11Gently pull the yarn ends to create the desired indentation around the eyes, then tie off securely with a knot and hide the ends inside the head.
- Step 12Face Embellishment (Optional): For added character, you can embroider small nostrils on the beak and tiny eyebrows above the eyes using cotton yarn or 4 strands of embroidery floss.
Important notes
💡 Keep a stitch marker moving up every round without exception—since this duck is worked in continuous spirals with no joins, losing your round marker is the single easiest way to end up miscounted.
💡 Use a 4mm hook and check that your plush yarn tension is snug enough that stuffing doesn't peek through, especially around the increases in the head and body. Gauge is not critical for this project—fit and firmness matter more than an exact stitch count per inch.
💡 Stuff the beak and head firmly before you close those sections off, since it's much harder to add stuffing to tight, curved spaces once more rounds are worked on top.
💡 Test your 10mm safety eye placement with the backing loosely on before securing permanently—small shifts in position dramatically change the duck's expression.
💡 A dab of hot glue behind the safety eye washers gives extra security for a toy that will be hugged and handled often, though it's optional if your washers already fit snugly.
💡 This pattern uses US crochet terminology throughout, so if you're used to UK terms, double-check your stitch conversions before you begin.
💡 For a seamless finish on every decrease, use the invisible decrease method: insert your hook into the front loop of the first stitch, then immediately into the front loop of the second stitch, yarn over and pull through both loops (2 loops on hook), then yarn over and pull through the remaining 2 loops.
Original pattern: https://amigurumicorner.com/plush-duck-amigurumi-easy-crochet-pattern-for-beginners/
FAQ
What skill level is required for this Plush Duck Amigurumi pattern?
This pattern is designed for beginners. It primarily uses basic stitches like single crochet, increases, and decreases. Clear instructions and detailed assembly steps make it accessible even if you're new to amigurumi.
Can I use a different type of yarn for this pattern?
Yes, you can! While plush yarn gives the duck its cuddly texture and specified size (approx. 33 cm), you can substitute with worsted weight acrylic or cotton yarn. Be aware that changing yarn weight will result in a smaller finished toy, and you may need to adjust your hook size accordingly to maintain tight stitches.
How long does it typically take to complete this crochet duck?
The completion time can vary based on individual crocheting speed and experience. For a beginner, it might take anywhere from 6-10 hours. More experienced crocheters might finish it in 3-5 hours. The use of plush yarn and a larger hook helps the project work up relatively quickly.
Am I allowed to sell items made from this pattern?
While the pattern doesn't explicitly state commercial rights, most independent designers appreciate it if you credit them when selling finished items. It's always best practice to contact the pattern designer directly for specific permissions regarding selling items made with this pattern.