
Free Pattern
Step-by-Step
Crochet
AmigurumiPlush mouse amigurumi pattern with a tiny frog hat
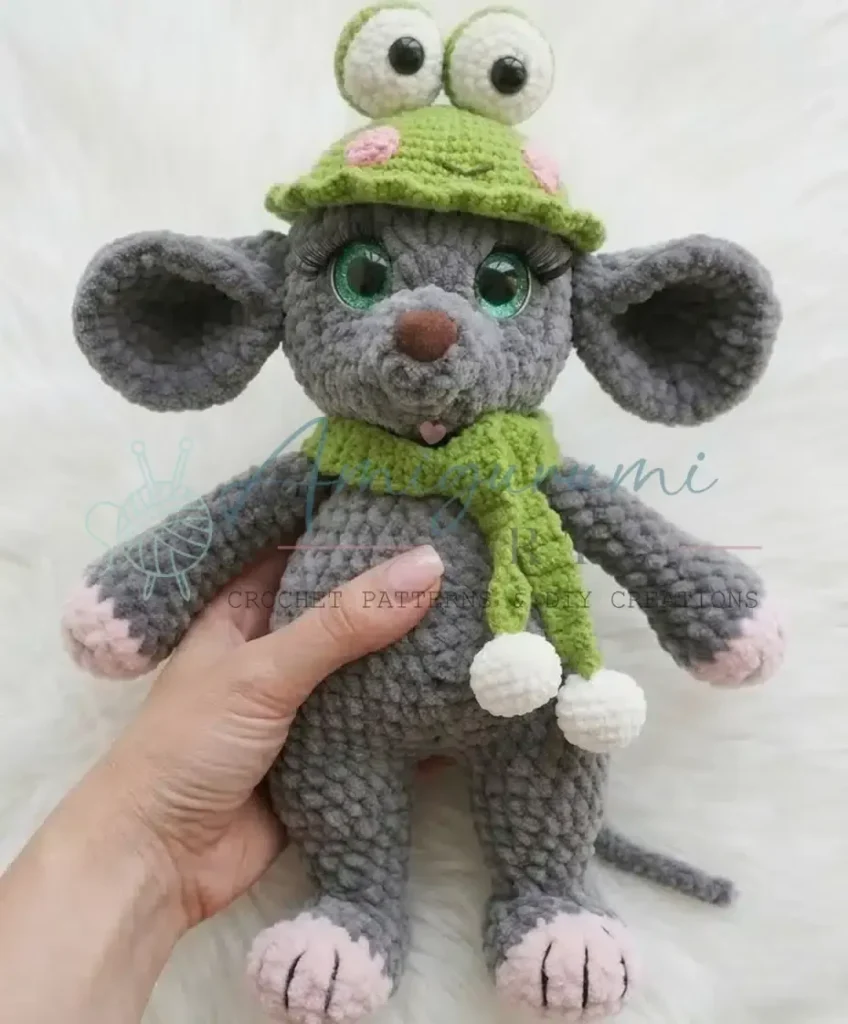
A plush crochet mouse in a frog hat, built from simple rounds and plush yarn.
- Level
- Intermediate
- Time
- 4-6 hours
- Hook
- 3.5 mm
- Yarn
- Super Bulky
Pattern highlights
- Work the arms and legs separately, then join the legs directly into the body rounds.
- Build the head as its own continuous spiral, shaping it before attaching it to the body.
- Crochet two ears separately and set them aside until assembly.
- Sew the head to the body, then move into facial sculpting with strong cotton thread to shape the eyes.
- Attach the hat, cheeks, and any remaining pieces once the face is sculpted.
About This Pattern
This one lands in the toy-shelf section of my collection, next to the other small plush animals I keep making because they never stop being satisfying. A mouse feels like a safe bet for a first amigurumi with accessories. The frog hat is the detail that makes it worth the extra skein.
What comes out the other end is a soft, bulky-yarn mouse with a joined body, two ears, and a two-piece hat sitting on top. It's small enough to sit on a shelf, dense enough to survive a toddler's grip, and plush enough that nobody will ask what yarn weight you used.
Common mistakes
- Losing track of the spiral rounds Keep a stitch marker on the first stitch of every round and move it up each time. Plush yarn hides stitch definition, so you'll lose your place fast without one.
- Using the plush hook size for the hat Swap to the 2mm hook when you move into the worsted-weight yarn for the hat and scarf. The 3.5mm hook is sized for the bulky plush, not the accessories.
- Rushing the facial sculpting thread Go slowly when pulling the strong cotton thread through the head for the eyes. Too much tension too fast can pucker the plush fabric permanently.
- Under-stuffing before closing the head Pack the head firmly before the final rounds close up. Thin stuffing makes the later facial sculpting steps pull unevenly.


Intermediate
Progress Tracker
0 of 0 rounds
Tap a round to tick it off — your place is saved on this device.
The kit
Plush Yarn
- Main Color (MC): One skein of Himalaya Dolphin Baby (or similar super bulky weight plush yarn)
- Accent Color (AC): A small amount of Lavitayarn (or similar super bulky weight plush yarn)
Worsted/DK Weight Yarn (for clothes and details)
- YarnArt Jeans in White (for eye whites)
- YarnArt Jeans in Green (for hat)
- YarnArt Jeans in Pink (for scarf and hat cheeks)
Crochet Hooks
- 3.5mm (for plush yarn)
- 2mm (for worsted/DK weight yarn)
Safety Eyes
- 16mm (for main plush), 8mm (for hat)
- Safety Nose: 14-16mm
Polyfill Stuffing
- Generous amount
Tapestry Needle
- For sewing and weaving in ends
- Scissors
Stitch Marker
- Highly recommended
- Dressmaker’s Pins: For positioning parts
- Strong Cotton or Half-Cotton Thread: For facial sculpting, embroidery details, and securely attaching parts
Arms (Make 2)
We’ll start with the accent color for the little paws.
Using Accent Color (AC) and 3.5mm hook:
Step by step: Using Main Color (MC) and 3.5mm hook:.
Step by step: Using YarnArt Jeans in White and 2mm hook:.
Step by step: Using YarnArt Jeans in Pink and 2mm hook:.
Step by step: Using Main Color (MC) and 3.5mm hook:.
Round 16 sc in a MR (6)
Round 26 inc (12)Step by step: Sl st into the next stitch, fasten off, and leave a long tail for sewing; Sweet little rosy cheeks for the hat!.Step by step: Place an 8mm safety eye into Rnd 2. Secure the back.
Round 3(1 sc, inc) \* 6 (18)Step by step: 18 sc (2 rounds) Stuff lightly.Step by step: 1 sc, inc, (2 sc, inc) \* 5, 1 sc (24).
Round 418 sc (18)Step by step: Now for a little color on the hat eyes! Let’s switch to green; Switch to YarnArt Jeans in Green:; 24 sc (24) – Work in BLO; 24 sc (2 rounds) – Work through both loops now.
Now it’s time for a color change! Let’s switch to our main color for the arm.
Switch to Main Color (MC):
Round 518 sc (18)Step by step: 2 sc, inc, (4 sc, inc) \* 5, 2 sc (36).Fold the ear flat and sc 3 through both layers to close the bottom. Leave a long tail for sewing.
Step by step: Two precious ears ready to frame that sweet face!.
Round 64 sc, dec, 7 sc, dec, 3 sc (16)
Round 7dec, 12 sc, dec (14)Start stuffing the arm lightly up to Rnd 7. Focus on shaping a cute little paw and hand.
Round 82 dec, 6 sc, 2 dec (10)
Rounds 9–1710 sc (9 rounds) Add a few extra single crochet stitches to align the seam neatly if needed.Fold the opening flat and sc 4 through both layers to close.Fasten off and weave in the yarn tail securely inside the arm.
Your little arms are looking absolutely charming!
Legs (Make 2)
We’ll start with the accent color for the feet.
Using Accent Color (AC) and 3.5mm hook:
Round 16 sc in a MR (6)
Round 26 inc (12)
Round 3(1 sc, inc) \* 6 (18)
Rounds 4–518 sc (2 rounds) Time for another lovely color change! Let’s switch to our main color for the leg.Switch to Main Color (MC):
Round 6(7 sc, dec) \* 2 (16)
Round 7(6 sc, dec) \* 2 (14)
Rounds 8–914 sc (2 rounds) Stuff the foot and lower leg firmly as you go.
Round 10(5 sc, dec) \* 2 (12)
Round 1112 sc (12)
Round 126 dec (6)Sl st into the next stitch, fasten off, and weave in the yarn tail, cinching the opening closed.
Two lovely legs ready to join our pal!
Head
Using Main Color (MC) and 3.5mm hook:
Round 16 sc in a MR (6)
Round 2(1 sc, inc) \* 3 (9)
Round 39 sc (9)
Round 4(2 sc, inc) \* 3 (12)
Round 512 sc (12)
Round 6(1 sc, inc) \* 6 (18)From this point, try to keep your stitch marker centered at the back of the head. Adjust with slip stitches if needed.
Round 76 sc, 6 hdc inc (2 hdc in same stitch), 6 sc (24)
Round 86 sc, (1 hdc, hdc inc) \* 6, 6 sc (30)
Round 96 sc, (2 hdc, hdc inc) \* 6, 6 sc (36)
Round 106 sc, (3 hdc, hdc inc) \* 6, 6 sc (42)
Round 116 sc, (4 hdc, hdc inc) \* 6, 6 sc (48)
Rounds 12–1348 sc (2 rounds) Now for our facial features! Place the safety nose between Rnd 2 and Rnd 3 from the magic ring.Insert the safety eyes into Rnd 7, at the beginning and end of the hdc increases. There should be approximately 12 hdc stitches between the eyes.Secure the backs of the safety eyes and nose.
Round 14(6 sc, dec) \* 6 (42)
Round 15(5 sc, dec) \* 6 (36)
Round 1636 sc (36)Start stuffing the head firmly, shaping it as you go.
Round 17(4 sc, dec) \* 6 (30)
Round 18(3 sc, dec) \* 6 (24)
Round 19(2 sc, dec) \* 6 (18)
Round 20(1 sc, dec) \* 6 (12)
Round 216 dec (6)Sl st into the next stitch, fasten off, and weave in the yarn tail, cinching the opening closed. Leave a long tail for sewing.
Step by step: Fluffy pom-poms for a playful touch!.
Sl st into the next stitch, fasten off, and weave in the yarn tail, cinching the opening closed.
Step by step: These little hat eyes are so charming!.
Sl st into the next stitch, fasten off, and weave in the yarn tail, cinching the opening closed.
Oh, what a sweet face! Your pal’s head is looking so endearing.
Hat
Using YarnArt Jeans in Green and 2mm hook:
Round 16 sc in a MR (6)
Round 26 inc (12)
Round 3(1 sc, inc) \* 6 (18)
Round 4(2 sc, inc) \* 6 (24)
Round 5(3 sc, inc) \* 6 (30)
Round 6(4 sc, inc) \* 6 (36)
Round 7(5 sc, inc) \* 6 (42)
Round 8(6 sc, inc) \* 6 (48)
Round 9(7 sc, inc) \* 6 (54)
Round 10(8 sc, inc) \* 6 (60)
Rounds 11–1360 sc (3 rounds) Now we’ll create the ruffled brim of the hat. We’ll work into the front loops only for the next two rounds.
Round 14(1 sc, inc) \ 30 (90) – Work in FLO*
Round 15(2 sc, inc) \ 30 (120) – Work in FLO* Sl st into the next stitch, fasten off, and weave in the yarn tail.
Your hat is looking so stylish already!
Scarf
Using YarnArt Jeans in Pink and 2mm hook:
Round 1Ch 5, sc in the 2nd ch from hook and in each ch across. (4)
Round 2Ch 1, turn, sc in each stitch across. (4)
Round 386 Repeat Row 2. (4)
You can adjust the length of the scarf by adding or subtracting rows. Feel free to make it as long or short as you like!
Fasten off and weave in ends.
A cozy scarf ready to complete the look!
Assembly
Step 1Now for the truly magical part – bringing your plush pal to life with all the wonderful finishing touches!
Step 2Attach the Head: Using the long tail from the body, carefully sew the head to the body. Make sure it’s centered and securely attached, giving your pal a strong neck.
Step 3Facial Sculpting (Eyes): Thread your strong cotton/half-cotton thread onto a tapestry needle. Insert the needle from the bottom center of the head (1) and bring it out at the outer corner of one eye (2). Go back into the inner corner of the same eye (3) and out through a neighboring stitch at the bottom of the head (1). Repeat for the second eye. Gently pull on the threads to create a subtle indentation around the eyes, then tie a secure knot at the bottom of the head. Hide the tails inside.
Step 4Facial Sculpting (Nose): Insert the needle from the bottom center of the head (1) and bring it out near the inner corner of one eye (2). Lay the thread across the bridge of the nose, then insert the needle near the inner corner of the other eye (3) and bring it out at the bottom center of the head (1). Gently pull to lift the nose slightly, creating a cute, upturned look. Tie a secure knot and hide the tails.
Step 5Embroider Eye Whites: Using YarnArt Jeans in White and your tapestry needle, insert the needle from the bottom of the head and come out at the lower outer corner of an eye. Lay the thread along the lower edge of the eye, then insert the needle into the upper outer corner of the eye. Repeat for the second eye. This adds a lovely sparkle!
Step 6Embroider Eyelashes: Using YarnArt Jeans (I like black or a dark brown) and your tapestry needle, insert the needle from the bottom of the head and come out one row to the side of the eye. Lay the thread along the top edge of the eye, then insert the needle into the upper inner corner of the eye. Repeat for the second eye. For an extra sweet gaze, you can even glue on a pair of doll eyelashes!
Step 7Embroider Eyebrows: Using a double strand of YarnArt Jeans (matching your eyelash color), embroider the eyebrows two rows above the eyes. Give them a gentle arch to express your pal’s personality!
Step 8Attach the Ears: Using the long tails from the ears and your strong thread, pin the ears in place on the head, level with the eyes and about 3-4 rows back from the eye line. Sew them securely all around.
Step 9Embroider Hand and Foot Details:
Step 10Hands: Insert your strong thread from the inside of the arm, three rows up from the bottom, and bring it out on the outside of the arm at the same row. Lay the thread across the hand, then re-insert the needle on the inside, two stitches to the right and one row down. Lay the thread again, then re-insert on the inside, two stitches to the left and one row down. Lay the thread, then re-insert on the inside at your starting point. Tie the ends together on the inside and hide them. This creates sweet little finger lines!
Step 11Feet: Repeat the same embroidery technique on the feet.
Step 12Attach the Tail: Take your plush yarn. Join it to the body at the center back, around Rnd 8 from the bottom, with a sl st. Chain 20 stitches. Fasten off and weave in the ends. Your pal has a cute little curly tail!
Step 13Assemble the Hat: Sew the hat eyes and hat cheeks onto the hat. Pin them in place first to find the perfect expression! Then, sew the two pom-poms onto the top corners of the hat.
Step 14Dress Your Pal: Gently place the hat on your pal’s head and wrap the scarf around its neck.
Step 15Look at that! Your new best friend is absolutely perfect and ready for adventures!
Finishing
- Weave in every color-change tail as you go, since plush yarn hides ends less forgivingly than regular worsted.
- Stuff the body and head firmly before closing, aiming for dense fill so the facial sculpting thread has something to pull against.
- Sew the head to the body first, then move through the facial sculpting steps before attaching the hat and remaining small parts.
Why it works
The legs are worked to completion and then joined straight into the body rounds, avoiding a separate sewing step for attaching them.
The hat and scarf use rows instead of continuous rounds, which is why they're worked with a different, smaller hook and a different yarn weight.
What it becomes
- A shelf companion for a nursery or playroom, sitting alongside other soft toys in the same yarn family.
- A handmade gift for a baby shower, paired with a matching small amigurumi from the same plush yarn skein.
- A photo prop for craft-fair or shop displays, where the frog hat gives it a distinct silhouette next to plainer toys.
Original pattern: https://amigurumiarts.com/plush-mouse-amigurumi-pattern/
FAQ
Can I use a different plush yarn than Himalaya Dolphin Baby?
Yes, any similar super bulky weight plush yarn should work with the 3.5mm hook. Just keep your stitches tight so the stuffing doesn't peek through.
Do I need safety eyes, or can I embroider them instead?
The pattern calls for 16mm safety eyes for the main plush and 8mm for the hat, plus a safety nose. The facial sculpting step with cotton thread works alongside the safety eyes to shape the face, so I'd stick with the hardware.
How are the legs joined to the body?
The legs are worked first, then joined directly into the body rounds as you crochet, rather than sewn on afterward. That's why the body section is titled around joining legs.