
Free Pattern
Step-by-Step
Crochet
AmigurumiRainbow Pastel Jellyfish Keychain Free Crochet Pattern
Make an adorable pastel jellyfish keychain with this free crochet pattern featuring striped dome shaping, a ruffled frill, and curly beaded tentacles.
Level IntermediateTime 4-6 HoursHook 25 mmYarn DK
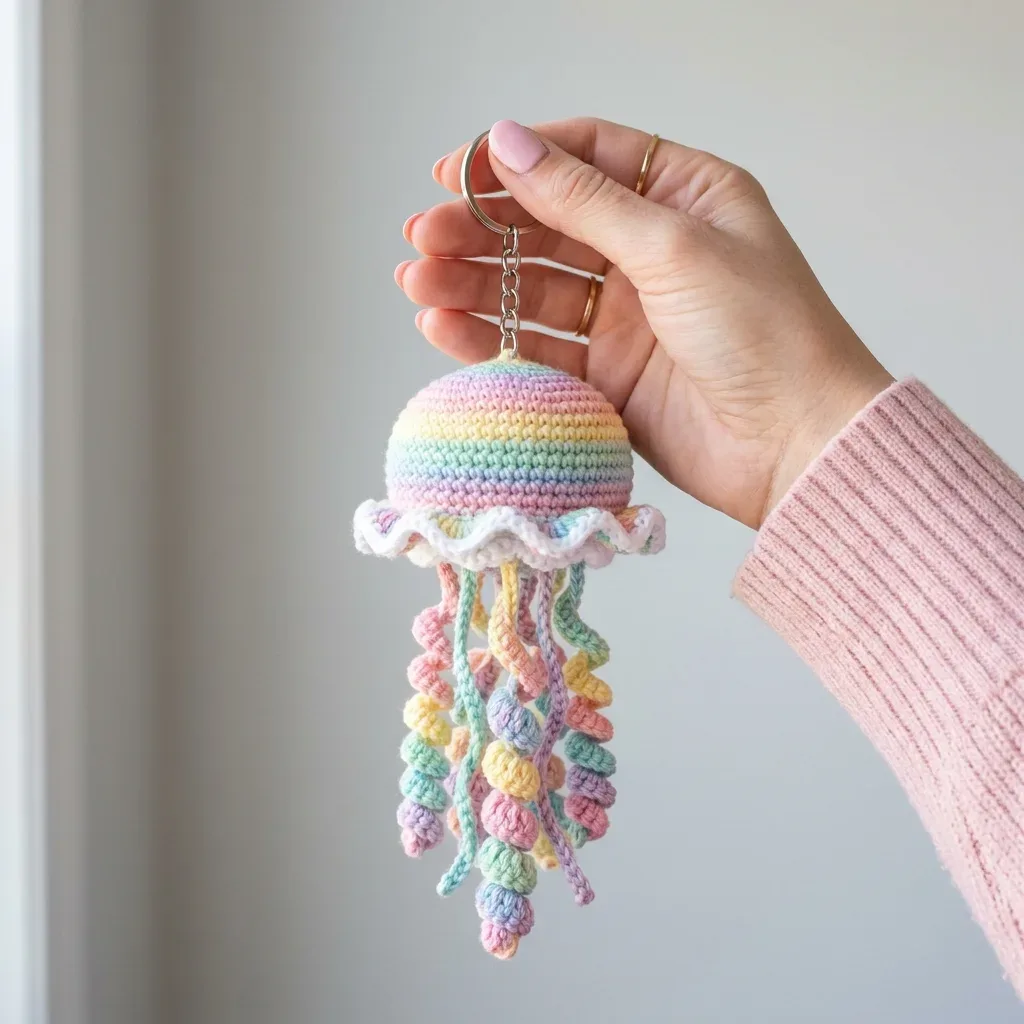
Pattern highlights
- Begin the dome at the crown with a magic ring and work continuous rounds, increasing to shape the rounded top.
- Change colors smoothly as you stitch downward, creating horizontal pastel stripes across the dome's surface.
- While the dome is still open, work the ruffled white frill at an angle into a specific row near the base.
- Continue the dome through its decrease section, shaping the sides inward toward the opening.
- Stuff the dome with fiberfill to a soft, huggable firmness before closing the remaining opening.
- Crochet each curly tentacle using a foundation chain and a special stitch count trick that makes it spiral naturally.
- Attach the finished tentacles along the base of the dome beneath the frill collar.
- Secure the keychain ring and connector at the crown to complete the whimsical jellyfish accessory.
About This Pattern
This pattern creates a tiny stuffed jellyfish keychain with a dome shaped bell worked in smooth pastel stripes, a ruffled white frill collar, and a cascade of curly tentacles dangling below. What makes it so charming is the way the colors flow from pink into lavender, yellow, mint, and blue, giving it that dreamy candy-shop ocean look. It's perfect for crocheters who love amigurumi bags, want a quick handmade gift, or simply adore anything jellyfish shaped and pastel colored.
The finished jellyfish measures a petite 2.25 inches across the dome, with a total length of about 5.5 to 6 inches once the tentacles are hanging free. It has a soft, squishy feel thanks to the fiberfill stuffing, and the crisp stripe definition makes it look almost candy-like. Clipped to a bag, keys, or a zipper pull, it makes an irresistibly cute handmade gift for kids, ocean lovers, or anyone who appreciates a whimsical little accessory.
Variations
I adore how this little jellyfish comes together in such a satisfying, logical sequence. You crochet the dome first, working continuous rounds through smooth pastel color changes, then dip into the frill technique while the dome is still open, working at an angle into a specific row for that ruffled, wavy edge. Stuffing and closing the dome feels like tucking in a tiny pillow, and then the real magic happens with the tentacles. That stitch count trick that makes them spiral into perfect curls is genuinely delightful to watch happen right off your hook. I also love the bead-like gathered nodes along each tentacle, they add so much personality and make each strand feel intentional rather than just a plain string. By the time you clip on the keychain hardware, you have this whimsical, huggable little creature that took barely an afternoon but looks like it came from a boutique shop. It's the kind of small project that keeps your hands busy and your heart happy the whole way through.
Common mistakes
- Losing track of the round when working continuous rounds on the dome.
- Place a stitch marker in the first stitch of every round and move it up as you go so you always know exactly where each round begins and ends.
- Carrying color changes sloppily, leaving loose or bulky yarn ends inside the dome.
- Change colors on the last yarn over of the final stitch in the old color, and weave in ends as you go rather than saving them all for the finish, keeping the inside tidy for stuffing.
- Working the frill into the wrong row or straight on instead of at the specified angle.
- Read the frill instructions carefully to identify the exact row and angle called for, and go slowly on your first repeat to confirm the ruffle is forming correctly before continuing around.
- Over-stuffing or under-stuffing the dome before closing it up.
- Stuff gradually in small pinches, checking the shape against the stated 2.25 inch measurement, and stop once the dome feels firm but still slightly squishy rather than rock hard.
- Loose tension on the tentacles preventing them from curling properly.
- Use a smaller hook, such as the optional US D-3 (3.25 mm), and keep your stitches snug and consistent so the stitch count trick can create that spiral curl effect reliably.
- Forgetting to secure the keychain ring firmly at the crown before it bears weight.
- Attach the keychain hardware with several secure passes of yarn or thread through a sturdy point at the top of the dome, and give it a gentle tug test before considering the project finished.


Intermediate
Progress Tracker
0 of 0 rounds
Tap a round to tick it off — your place is saved on this device.
Materials
- Any smooth, plied DK or light worsted yarn works beautifully here. I recommend avoiding fuzzy or textured yarns like mohair blends because they obscure the striped stitch pattern on the dome.
Some specific suggestions
- Lion Brand Comfy Cotton Blend in shades Blush, Lavender Ice, Lemon Drop, Spearmint, and Sky. The cotton acrylic blend gives excellent stitch definition for those crisp stripes.
- Paintbox Yarns Simply DK in shades Dusty Rose, Soft Lilac, Buttercup Yellow, Mint Green, and Powder Blue. Consistent twist and smooth fiber make color changes very clean.
- Scheepjes Catona held single strand. This fingering or sport weight produces a slightly smaller dome (around 2 inches) but gives extremely crisp stitch definition and comes in a gorgeous range of pastels.
- Cotton or cotton blend yarns help the tentacles hold their curl shape more firmly over time compared to 100% acrylic.
Yarn
- DK weight (CYCA #3) or light worsted in the following colors. You only need small amounts of each.
- Color A, Soft Pink: approximately 10 yards (9 m)
- Color B, Lavender: approximately 8 yards (7 m)
- Color C, Pale Yellow: approximately 8 yards (7 m)
- Color D, Mint Green: approximately 8 yards (7 m)
- Color E, Pale Blue: approximately 8 yards (7 m)
- Color F, Peach or Coral: approximately 5 yards (4.5 m)
- Color W, White: approximately 6 yards (5.5 m) for the frill
Notions
- Polyester fiberfill stuffing, small amount
- 1 keychain ring with short chain connector (standard split ring hardware, approximately 25 mm diameter)
- 2 stitch markers
- Yarn needle
- Scissors
The Dome (Bell)
The dome is worked from the top (where your keychain attaches) downward to the widest point, then decreased back inward to form a closed bottom hemisphere. Work in continuous rounds without joining or turning. Use a stitch marker to track the beginning of each round and move it up as you go.
Color sequence for dome stripes (top to bottom): Rounds 1 to 2: Color A (Soft Pink)
Round 3: Color B (Lavender)
Round 4: Color C (Pale Yellow)
Round 5: Color D (Mint Green)
Round 6: Color E (Pale Blue)
Round 7: Color C (Pale Yellow)
Round 8: Color B (Lavender)
Rounds 9 to 17: Color A (Soft Pink) Color change tip: Make color changes at the last yarn over of the final stitch of the current round. Drop the old color, pick up the new color, and pull through to complete the stitch.
- Round 1With Color A, make a MR. Work 6 sc into the ring. Pull ring closed. Do not join. (6 sc)
- Round 2Work 2 sc into each st around. (12 sc)
- Round 3Change to Color B. [Sc in next st, inc in next st] 6 times. (18 sc)
- Round 4Change to Color C. [Sc in next 2 sts, inc in next st] 6 times. (24 sc)
- Round 5Change to Color D. [Sc in next 3 sts, inc in next st] 6 times. (30 sc)
- Round 6Change to Color E. [Sc in next 4 sts, inc in next st] 6 times. (36 sc)
- Round 7Change to Color C. [Sc in next 5 sts, inc in next st] 6 times. (42 sc)
- Round 8Change to Color B. [Sc in next 6 sts, inc in next st] 6 times. (48 sc)
- Round 9Change to Color A. Sc in each st around. (48 sc) Checkpoint: Your dome should measure approximately 2.25 inches (5.7 cm) across at its widest point. It will look like a flat disk with gentle cupping. Place a locking stitch marker in the front loop of Round 9 so you can find this row for frill attachment.
Stop here and work the frill before continuing.
The Tentacles
Each tentacle is a foundation chain worked with 3 sc per chain, creating automatic spiral curl. The bead like nodes along the tentacles come from working 5 sc into every 3rd chain, creating gathered points.
Use any single pastel color per tentacle, or change colors for a multicolor effect. The pictured piece uses individual solid color tentacles in Colors A, B, C, D, E, and F mixed randomly.
Standard Tentacle (make 6): Foundation: Ch 21.
- Round 1Starting in 2nd ch from hook, [3 sc in next ch, 3 sc in next ch, 5 sc in next ch (bobble gather point)] across, ending with 3 sc in last ch.Fasten off, leaving a 10 inch (25 cm) tail for attachment.Long Tentacle (make 3): Foundation: Ch 31.
- Round 1Starting in 2nd ch from hook, [3 sc in next ch, 3 sc in next ch, 5 sc in next ch] across, ending with 3 sc in last ch.Fasten off, leaving a 10 inch (25 cm) tail.Short Tentacle (make 2): Foundation: Ch 16.
- Round 1Starting in 2nd ch from hook, [3 sc in next ch, 3 sc in next ch, 5 sc in next ch] across, ending with 3 sc in last ch.Fasten off, leaving a 10 inch (25 cm) tail.Checkpoint: Each tentacle should curl and spiral freely when held by one end. If a tentacle lies flat, your tension may be too loose. Try working with a hook one size smaller (US D-3 / 3.25 mm).
Total: 11 tentacles (6 standard, 3 long, 2 short)
Dome Decrease Section
Return to working the dome body with Color A. You will now work into the back loops of Round 9 (the back loops that were left unused when you worked the frill into the front loops).
Join Color A to any back loop of Round 9 with a sl st, ch 1, then continue in continuous rounds.
- Round 10Working in BLO of Round 9, sc in each st around. (48 sc)
- Round 11[Sc in next 6 sts, sc2tog] 6 times. (42 sc)
- Round 12[Sc in next 5 sts, sc2tog] 6 times. (36 sc)
- Round 13[Sc in next 4 sts, sc2tog] 6 times. (30 sc) Stuff the dome firmly with polyester fiberfill now, before the opening becomes too small.
- Round 14[Sc in next 3 sts, sc2tog] 6 times. (24 sc)
- Round 15[Sc in next 2 sts, sc2tog] 6 times. (18 sc)
- Round 16[Sc in next st, sc2tog] 6 times. (12 sc)
- Round 17[Sc2tog] 6 times. (6 sc) Add any additional stuffing needed now to fill out the dome before closing.Fasten off, leaving a 6 inch (15 cm) tail. Thread the tail onto a yarn needle and draw through the front loops of all 6 remaining stitches. Pull tight to close. Weave the tail to the inside and knot securely.
The Frill
Work the frill into the front loops of Round 9 while the dome is still open. Do not stuff yet.
- Round 1Join Color W (White) to any front loop of Round 9 with a sl st.
- Round 2Ch 3. This counts as the first dc.
- Round 3Work 2 more dc into the same front loop. (3 dc in first st)(3)
- Round 4Work 3 dc into the front loop of each remaining stitch of Round 9. (144 dc total)(144)
- Round 5Sl st to the top of the starting ch-3 to join the round.Step 6: Fasten off and weave in the White end to the interior.Checkpoint: The frill should ruffle and wave freely around the base of the dome. It will not lie flat. If it seems too stiff, check that you are working into front loops only and that your tension is relaxed.
Attaching the Keychain Hardware
- Round 1Method 1 (recommended): Before pulling the magic ring completely closed at the top of the dome during Round 1, thread the small chain connector of the keychain hardware through the loop of the magic ring. Then pull the ring closed firmly. The hardware is now locked to the top of the dome.
- Round 2Method 2 (post assembly): Cut a 10 inch (25 cm) length of Color A. Thread it onto a yarn needle and stitch a small loop through the top center of the dome, going through the closed magic ring area several times to reinforce. Thread the keychain chain connector through this loop and secure with a knot. Trim excess.
Attaching the Tentacles
Step 1: Thread the long tail of each tentacle onto a yarn needle.
Step 2: Insert the needle up through the bottom of the dome, entering at the row just above where the frill is attached (Round 10 of the decrease section).
Step 3: Pull the tentacle through until approximately 0.25 inch (0.6 cm) of the tail is inside the dome, then tie a secure overhand knot with the tail against the nearest interior strand of yarn.
Step 4: Thread the remaining tail back through the interior of the dome and trim close.
Step 5: Repeat for all 11 tentacles, distributing them evenly around the underside of the dome. Place long tentacles toward the center back and sides, short tentacles at the front, and standard tentacles filling the remainder. Space them approximately every 4 stitches around the 48 stitch base row.
Assembly
- Step 1Weave in all remaining ends securely, especially color change tails inside the dome. Knot each tail against an interior yarn strand before weaving to prevent unraveling over time.
- Step 2For cotton or cotton blend yarn: You may lightly mist the tentacles with water and gently stretch and reshape them, then allow to dry flat. This relaxes uneven tension and sets the spiral shape. Do not block the dome itself, as this can cause stuffing to lump.
- Step 3For acrylic yarn: No blocking needed. Simply fluff and shape the tentacles by hand.
- Step 4The frill can be lightly starched with diluted fabric starch spray if you want it to hold a more defined wavy shape, though this is entirely optional.
Important notes
💡 Use a smooth, plied DK or light worsted yarn rather than fuzzy or textured yarn, since fuzzy fibers will hide the crisp horizontal stripes that make this jellyfish so pretty.
💡 Swatch in the round before starting if this is your first amigurumi project, since gauge (5 stitches and 5 rounds per inch) directly affects whether your dome ends up 2.25 inches as intended.
💡 Keep two stitch markers on hand, one for tracking the start of each round and one for marking the specific row where the frill needs to be worked.
💡 Choose cotton or cotton-blend yarn for the tentacles if possible, since cotton holds the curled shape from the stitch count trick more firmly over time than 100% acrylic.
💡 Consider dropping to a US D-3 (3.25 mm) hook just for the tentacles, even if you used the E-4 (3.5 mm) for the dome, to encourage a tighter, more defined curl.
💡 Stuff the dome only lightly to moderately, since an amigurumi keychain needs to stay soft and pliable enough to bounce around comfortably on a bag or keyring.
Original pattern: https://crochetwithmia.com/rainbow-pastel-jellyfish-keychain-free-crochet-pattern/
FAQ
What yarn weight works best for this jellyfish keychain?
DK weight (CYCA #3) or light worsted yarn is ideal for the stated 2.25 inch dome size. Smooth, plied cotton or cotton-acrylic blends like Comfy Cotton Blend or Paintbox Simply DK give the crispest stripe definition.
How do the tentacles get their curly spiral shape?
The curl comes from a specific stitch count trick worked over a foundation chain, which naturally causes the tentacle to spiral as you crochet it. Using a slightly smaller hook and keeping tension snug and consistent helps the curl form more tightly and reliably.
How much yarn do I actually need for one jellyfish?
You'll need small amounts of six colors for the dome and tentacles (5 to 10 yards each) plus about 6 yards of white for the frill. Since amounts are so small, this is a great project for using up leftover DK weight scraps from your stash.