
Free Pattern
Step-by-Step
Crochet
GarmentsRiley shrug pattern with adjustable mesh sleeves
An adjustable mesh-stitch shrug with sleeves sized to your own arm measurements.
- Level
- Intermediate
- Time
- 4-6 hours
- Hook
- 4 mm
- Yarn
- Sport
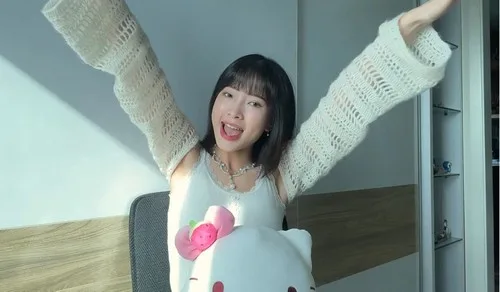
Pattern highlights
- Start each sleeve with a loose foundation chain sized to your arm circumference, then join into a round.
- Alternate single crochet rounds with half double crochet and treble crochet mesh rounds to build drape and texture.
- Repeat that six-round sequence until each sleeve reaches the length you want, ending on a solid round.
- Add the back panel extension by chaining a few more stitches from a marked point, then work it flat in rows.
- Move through mesh and solid rows in the extension, echoing the rhythm from the sleeve rounds.
- Seam each sleeve to the back panel with single crochet, keeping edges flush without shaping.
- Finish with a single crochet round worked around the whole shrug for a clean edge.
About This Pattern
A shrug like this sits somewhere between a cardigan and a scarf in my collection. It covers the shoulders without committing to full sleeves or a closed front. I like pieces that solve a specific temperature problem — bare arms, a chilly office — without adding bulk. The Riley shrug does that with an open, adjustable build. It's the kind of project I reach for when I want the fit dialed to my own body, not a generic size chart.
Finished, it reads as two adjustable sleeves joined by a mesh-textured back panel, single crocheted together at the edges. There's no fitted body to fight with, just an open shrug that layers over whatever's underneath. The final border ties the whole thing together in one clean pass. It's a piece built for movement between seasons, not for one specific week of weather.
Common mistakes
- Chaining too tightly A snug foundation chain won't stretch enough for the arm opening. Chain loosely, or size up a hook just for the chain.
- Losing count in mesh rounds Half double crochet and treble mesh rounds look similar at a glance. Use a stitch marker at the round's start to catch drift early.
- Mixing up round and row direction The extension is worked flat, not in the round like the sleeves. Turn your work at the end of each row instead of continuing around.
- Seaming with increases Adding stitches while joining sleeve to back panel puffs the seam. Match single crochet stitch for stitch and keep the edges flush.
- Stopping mid-mesh round Ending the sleeve on a mesh round leaves a stretchy, uneven hem. Always finish on a solid treble or single crochet round.


Intermediate
Progress Tracker
0 of 0 rounds
Tap a round to tick it off — your place is saved on this device.
The kit
- Size 2 sport weight yarn
- 4 mm crochet hook
- Scissors
- Tapestry needle
- Stitch markers
- Measuring tape
B
Round 1Distance between bra straps Sleeves Foundation Chain: Chain an even number to match measurement A (make it loose).
Round 1Single crochet all around.
Round 2Work a half double crochet mesh stitch. For Round 3: Repeat Round 2.
Round 4Treble crochet all around.
Round 5Treble crochet mesh stitch. For Round 6: Repeat Round 5.
Round 7Treble crochet all around. Repeat Rounds 2–7 until sleeves reach your desired length, ending on a non-mesh round.
Add Extension
Place a stitch marker at the end of the chain and chain 5 more stitches.
Round 1Treble crochet mesh stitch across.
Round 2Double crochet across. For Row 3: Half double crochet mesh stitch.
Round 4Single crochet across.
Round 5Treble crochet mesh stitch. For Row 6: Single crochet across.
Round 7Double crochet mesh stitch.
Round 8Treble crochet across. For Row 9: Single crochet mesh stitch.
Round 10Half double crochet across. Repeat Rows 1–10 until the panel reaches half of measurement A. End on a non-mesh row.Assembly Attach the sleeves to the back panel using single crochet stitches.Ensure the edges align without any increase or decrease.Repeat the process for the second sleeve.Single crochet around the entire shrug to give it a polished finish.Final Touches Fasten off and weave in all ends.
For extra flair, tag @Moon and Bailey on Instagram with your finished piece!
Assembly
Step 1Attach the sleeves to the back panel using single crochet stitches.
Step 2Ensure the edges align without any increase or decrease.
Step 3Repeat the process for the second sleeve.
Step 4Single crochet around the entire shrug to give it a polished finish.
From the collection
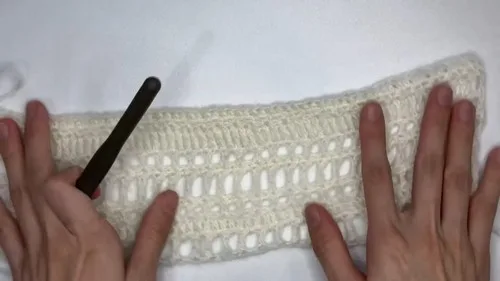
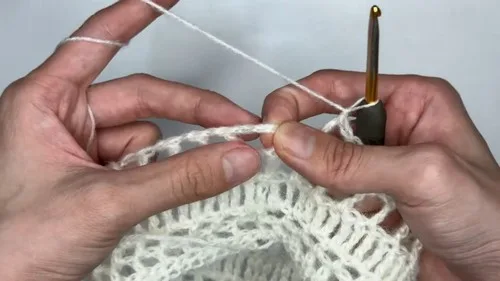
Finishing
- Weave in every yarn end from the sleeve rounds and the extension rows before seaming.
- Pin each sleeve to the back panel so the edges line up evenly.
- Single crochet around the finished shrug for a neat, uniform edge.
Why it works
The sleeve foundation chain is sized to arm circumference, so the tube starts at final width with no shaping.
The extension is worked in rows instead of rounds, which lets it lie flat to meet the back panel edge.
The single crochet join and border use no increases or decreases, keeping the seam and edge perfectly flat.
What it becomes
- Layer it over a plain tank for a coffee-shop errand run, sleeves doing the visual work.
- Wear it open over a sundress on a cool spring evening walk.
- Pair it with a fitted top for a call where the mesh sleeves show without bulk.
Original pattern: https://crocheteverything.com/crochet-riley-shrug-pattern-thats-perfect-for-all-seasons/
FAQ
Can I resize the sleeves for a different arm size?
Yes. The foundation chain is based on your own arm circumference, so just adjust that even number before you start.
What if my treble mesh rounds don't line up with my half double crochet rounds?
Check that you finished each mesh round at the same point as the previous one. A stitch marker at the seam line makes this easy to see.
How long should I make the sleeves before starting the extension?
Keep repeating the six-round sequence until the sleeve reaches the length you want, then stop on a non-mesh round.