
Free Pattern
Step-by-Step
Crochet
HatsRuffle Edge Bucket Hat Crochet Pattern for Beginners
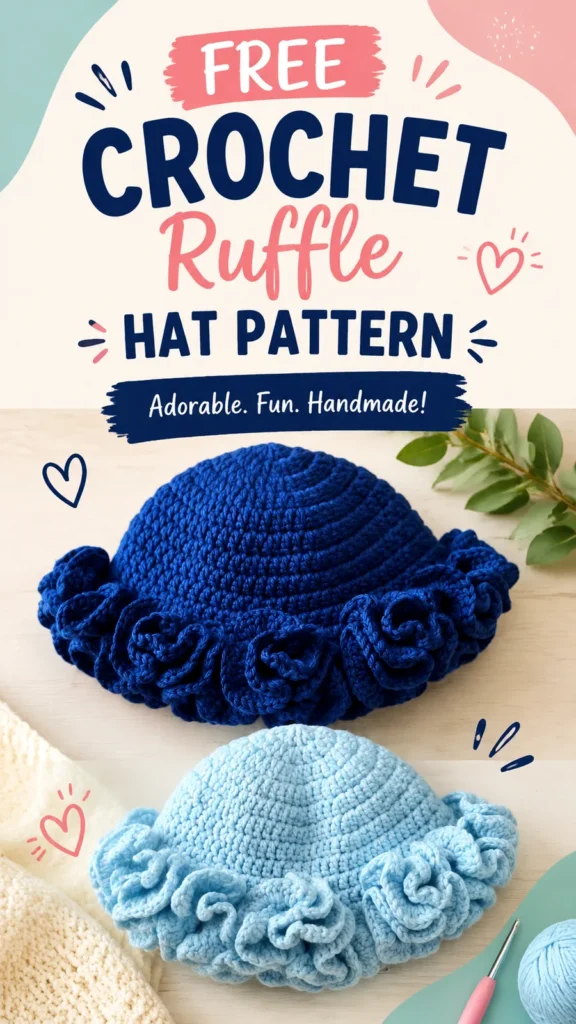
A top-down crochet bucket hat with a rippled ruffle brim, worked in single crochet.
- Level
- Intermediate
- Time
- 4-6 hours
- Hook
- 4 mm
- Yarn
- Worsted
Pattern highlights
- Start the crown with a magic ring and increase every round until the circle reaches the right width.
- Continue the straight sides until the body reaches the depth noted before starting the brim.
- Begin the brim with a new increase pattern spaced further apart than the crown increases.
- Work a couple of plain rounds between brim increases to let the fabric settle.
- Finish with the ruffled-edge rounds, which add increases close enough together to make the fabric wave.
- Join each round with a slip stitch and fasten off once the ruffle is complete.
About This Pattern
I keep a running list of hats that earn their place in a collection, and the ones with a ruffle always make the cut. This one sits closer to the structured end than the floppy end. The crown holds a dome, the sides run straight, and only the brim gets to misbehave. It is the kind of piece I'd photograph flat before I'd ever wear it.
The build is a top-down joined-round single crochet piece, no shaping tricks beyond steady increases. The crown grows by one extra stitch per repeat each round, the body holds flat for over a dozen rounds, then the brim takes over with its own increase pattern. The ruffle itself is just increases stacked faster than the fabric can lie flat, so it waves instead of sitting.
What comes off the hook is a bucket-style hat with a firm crown, a straight side wall long enough to cover the ears, and a brim that flares and ripples at the edge. In cotton, it should hold that ruffle without sagging. I'd call it a warm-weather piece more than a winter one.
Gauge for this piece runs 18 single crochet stitches by 20 rounds to a 4 x 4 inch (10 x 10 cm) square, written in US crochet terms. The finished hat comes out to about 22 inches (56 cm) around, 6.5 inches (16.5 cm) tall, with a 3.5 inch (9 cm) brim.
The pictured version comes in deep blue and light blue, but this also works nicely in a neutral cream, soft pink, lavender, sage green, or natural cotton shade.
Worth knowing
There's something satisfying about a hat that teaches you two different increase rhythms in one project. The crown increases are gentle and evenly spaced, the kind you can do without counting twice. The brim increases come faster, and watching the single crochet fabric stop lying flat and start rippling is the whole payoff. It's a project built entirely from one stitch, so there's no new technique to learn mid-pattern, just a change in math. I like that the ruffle isn't a separate piece sewn on afterward. It grows straight out of the brim rounds. For a hat this structured, that feels like a neat trick, and a dry sort of satisfaction once the last round curls over on itself.
Common mistakes
- Crown becomes wavy If the crown starts curling or becoming wavy too early, there may be too many increases. Check your stitch count after each increase round and adjust your tension.
- Brim does not hold shape A floppy brim can happen when the yarn is too soft or the stitches are too loose. Cotton yarn and a smaller hook can help create a firmer structure.
- Ruffle looks too small Add another round of increases around the edge to create a fuller ruffle. More increases create more fabric movement.
Intermediate
Progress Tracker
0 of 0 rounds
Tap a round to tick it off — your place is saved on this device.
The kit
- Medium weight cotton or cotton-blend yarn: approximately 220 yards (201 meters).
- 4 mm crochet hook (US G-6).
- Stitch marker.
- Yarn needle.
- Scissors.
- Tape measure.
Main Pattern
Pattern notes: the chain 1 at the beginning of each round does not count as a stitch. Join every round with a slip stitch into the first single crochet, and place a stitch marker in that first stitch if it helps you keep track.
Round 1Make a magic ring. Work 8 sc into the ring. Join with sl st. (8 sts)
Round 2Ch 1. Work 2 sc in each stitch around. Join. (16 sts)
Round 3Ch 1. *Sc in next stitch, inc in next stitch.* Repeat around. Join. (24 sts)
Round 4Ch 1. *Sc in next 2 stitches, inc in next stitch.* Repeat around. Join. (32 sts)
Round 5Ch 1. *Sc in next 3 stitches, inc in next stitch.* Repeat around. Join. (40 sts)
Round 6Ch 1. *Sc in next 4 stitches, inc in next stitch.* Repeat around. Join. (48 sts)
Round 7Ch 1. *Sc in next 5 stitches, inc in next stitch.* Repeat around. Join. (56 sts)
Main Pattern
Rounds 8–18Ch 1. Sc in each stitch around. Join. (56 sts)
Round 19Ch 1. Sc in each stitch around. Join. (56 sts)
The body should measure approximately 6 to 6.5 inches (15 to 16.5 cm) from the top center to the bottom edge before beginning the brim.
Main Pattern
Round 20Ch 1. *Sc in next 6 stitches, inc in next stitch.* Repeat around. Join. (64 sts)
Round 21Ch 1. *Sc in next 7 stitches, inc in next stitch.* Repeat around. Join. (72 sts)
Round 22Ch 1. Sc in each stitch around. Join. (72 sts)
Round 23Ch 1. *Sc in next 8 stitches, inc in next stitch.* Repeat around. Join. (80 sts)
Round 24Ch 1. Sc in each stitch around. Join. (80 sts)
Creating the Ruffled Edge
Round 25Ch 1. Work 2 sc in every stitch around. Join. (160 sts)
Round 26Ch 1. Sc in every stitch around. Join. (160 sts)
Round 27Ch 1. Sc in every stitch around. Join. Fasten off.
Special Stitch Explanation
Ruffle Increase: Work 2 single crochets into every stitch around. This creates extra fabric that naturally folds into a ruffled edge.
Assembly
Step 1After completing the hat, lightly shape the crown and brim with your hands. If needed, dampen the hat slightly and allow it to dry flat while shaping the ruffles.
Step 2Wash gently according to the yarn fiber instructions.
Step 3Avoid stretching the brim while drying.
Step 4Store the hat flat or supported to maintain the ruffle shape.
Step 5Refresh the shape by gently arranging the ruffles with your fingers.
Finishing
- Weave in the starting tail from the magic ring and the final fastened-off tail with a yarn needle.
- Lightly dampen the hat and shape the crown and ruffle by hand, then let it dry flat.
- Once dry, gently arrange the ruffle rounds with your fingers to even out the wave before wearing.
Why it works
The crown increases follow a widening repeat, from inc every stitch down to inc every seventh stitch, which is what keeps the circle flat instead of cupping.
The body rounds between the crown and the brim have no increases at all, so the straight wall comes purely from working even in single crochet.
Every round joins with a slip stitch into the first stitch, which keeps the spiral from drifting and gives each increase round a clean start point.
Tension matters more than usual here: loose stitches can leave the crown floppy, so pick a hook size that keeps the fabric firm while still letting the hook move through the stitches comfortably.
What it becomes
- A warm-weather accessory to pair with a linen dress or a plain cotton tee.
- A sun hat for garden work or a farmers market trip, paired with a canvas tote.
- A handmade gift for someone who prefers structured hats over slouchy knit ones.
Original pattern: https://duniarecipe.com/cute-ruffle-hat-crochet-pattern-ideas-for-beginners-and-handmade-lovers/
FAQ
Can I make this hat smaller without changing the whole pattern?
Yes, the notes say to stop the crown increases earlier and continue the body with fewer stitches. Just compare your head circumference to the crown before starting the brim.
Why does the brim use a different increase pattern than the crown?
The crown increases widen the repeat gradually to keep the circle flat. The brim increases are spaced to flare the fabric outward instead, which sets up the ruffle.
Does the yarn choice really affect how the ruffle looks?
I'd say yes. A smooth cotton holds the increase waves crisp, where a fuzzier fiber can blur them into something softer and less defined.
What makes the fabric ripple instead of lying flat?
Stacking extra increases into the final rounds adds more stitches than the round can hold flat. The excess fabric has nowhere to go but wave.