Free Pattern
Step-by-Step
Crochet
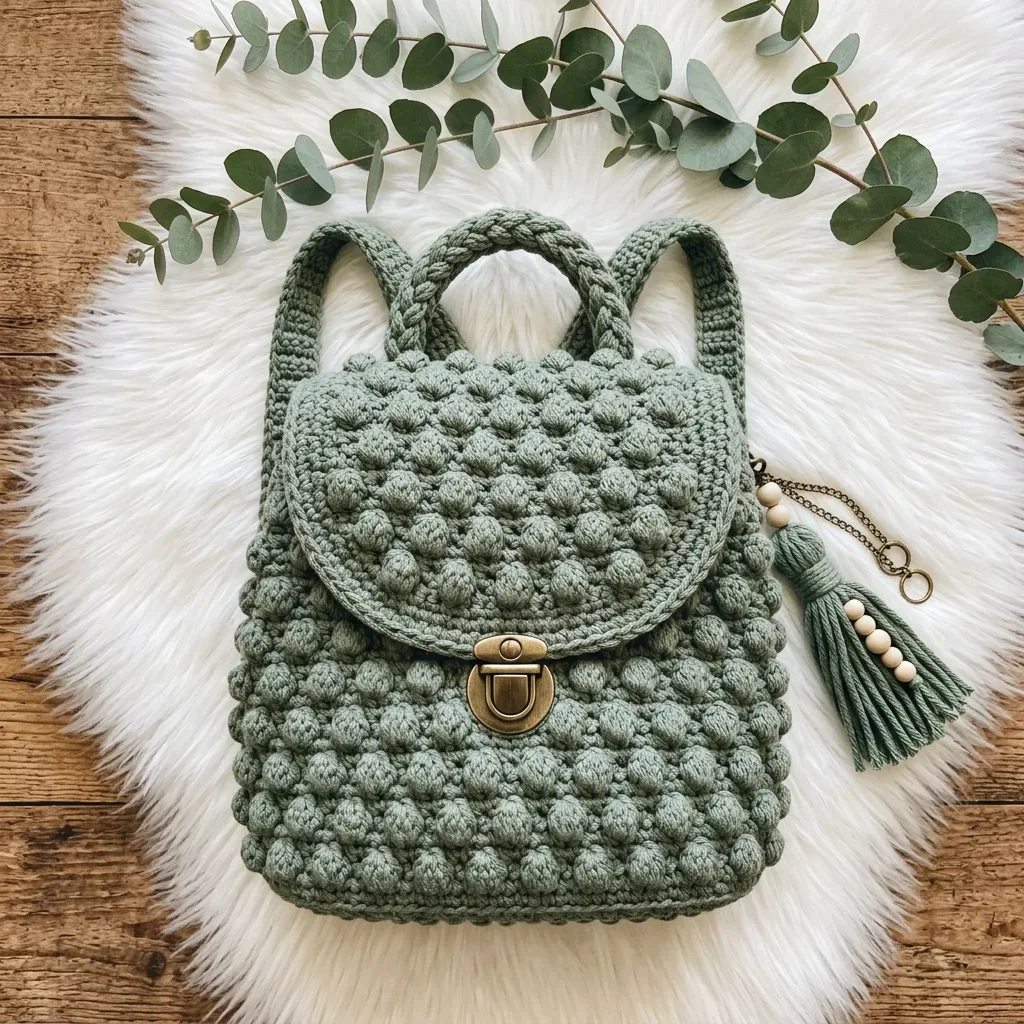
BagsSage green boho backpack with puff stitch front panel
A crochet backpack pattern with a puff stitch front panel, boxy gusset, and flap closure.
- Level
- Intermediate
- Time
- 8-12 hours
- Hook
- 4.0 mm
- Yarn
- Worsted
Pattern highlights
- Hook the front panel first, working rows of plain single crochet into the puff stitch pattern that defines the textured field.
- Work the back panel as a flat single crochet rectangle, matching it to the front panel's width and height.
- Crochet the long side and bottom gusset strip, checking it against the front panel before moving on.
- Crochet the rounded flap separately, since it has the most rows of any single piece.
- Seam the gusset around the front panel using the single crochet join, keeping tension firm but not tight.
- Join the back panel to the gusset the same way, then attach straps, D-rings, and the clasp.
About This Pattern
I keep a shelf for bags that actually earn their keep, and this backpack belongs there. It's not a novelty shape stitched for show. It has a gusset, a flap, hardware, and a job to do. In my notebook it sits next to the pieces I reach for when I want structure, not just stitches.
The puff stitch front panel is the obvious draw, but the back panel's plain single crochet is doing quiet, necessary work. The gusset strip wraps the sides and bottom in one long run, which is the kind of construction I always want to understand before I start hooking. Firm cotton yarn holds all of it honest.
What comes out the other end is a compact, boxy backpack with a rounded flap, D-rings, and a turn-lock clasp. It reads boho without trying too hard. I'd carry it to a market, not a hike. It wants to be seen, and it wants to hold its shape doing it.
Worth knowing
The puff stitch here isn't decorative fuss. It's a textured field built from incomplete double crochets, and watching those bobbles stack into a pattern across the front panel is genuinely satisfying. The back panel's flat single crochet fabric is the quiet counterpoint, proof that restraint has its own appeal. Then there's the gusset strip, worked long and narrow, that wraps one side, the bottom, and the opposite side in a single unbroken run. Joining it to the front with a firm sc seam is where the bag stops being flat pieces and starts being a bag. Add a turn-lock clasp, D-rings, and a tasseled flap, and the hardware turns a textured swatch into something you'd actually sling over a shoulder.
Common mistakes
- Uneven puff stitch tension Pull each loop to the same working-row height before closing the puff. Inconsistent loop height is what makes the bobbles look lumpy instead of uniform.
- Front and back panels don't match Check your panel against the stated width after the early rows and adjust hook size if it's off. Mismatched panels will fight you at the seaming stage.
- Gusset seamed in the wrong orientation Mark the center bottom of the front panel and the center of the gusset strip before pinning. This keeps the strip centered as it wraps the sides and bottom.
- Seam too tight or too loose Keep the single crochet join seam firm but not tight, working evenly through both layers. A seam that's too tight will pucker the gusset's long edge.
- Skipping the gauge swatch Match the single crochet gauge before starting any panel, since the pieces need to line up when joined. A loose gauge will throw off every checkpoint measurement that follows.
Intermediate
Progress Tracker
0 of 0 rounds
Tap a round to tick it off — your place is saved on this device.
The kit
Yarn Suggestions
- Lion Brand 24/7 Cotton gives you crisp stitch definition and a sturdy body that’s perfect for bags.
- Paintbox Yarns Cotton Aran offers smooth texture with a wide color range if you want to customize.
- WeCrochet Dishie is a durable cotton that works beautifully for bags and accessories.
- When substituting yarn, avoid very stretchy acrylic if you want your backpack to hold its shape. Match gauge before starting your panels.
Yarn
- Worsted weight cotton or cotton-blend, approximately 430 yards / 393 meters total
- Main color (Sage Green): 400 yards / 366 meters
- Accent (Ecru or Beige): 30 yards / 27 meters for beads and tassel accents if desired
Hook
- US G/6 / 4.0 mm crochet hook, or size needed to achieve gauge
Hardware
- 1 small turn-lock clasp
- 2 D-rings
- 2 O-rings or strap rings
- Split ring or key chain for tassel attachment
Extras
- Tapestry needle
- Locking stitch markers
- Scissors
- 4 wooden beads
- Optional fabric lining
Front Panel with Puff Texture
This panel showcases all those gorgeous puff stitches. Your target size after Row 42 is approximately 7.9 inches / 20 cm wide x 8.4 inches / 21.3 cm tall before edging.
Row 1WS foundation Ch 37. Sc in 2nd ch from hook and in each ch across. Turn. (36 sc)
Row 2Ch 1, sc in each st across. Turn. (36 sc)
The 5-dc Puff Stitch creates the beautiful textured bobbles on your front panel and flap. It's just a series of incomplete double crochets pulled together. Step by step: Yarn over, insert hook in the indicated stitch, yarn over and pull up a loop to the height of your working row. Repeat that four more times in the same stitch, so you have 11 loops on your hook. Yarn over and pull through all loops on hook. Chain 1 to close the puff; this closing chain is not counted as a stitch. The key to uniform puffs is pulling each loop up to the same height. Take your time on the first few rows until you find your rhythm.
Row 3Ch 1, [puff in next st, sc in next 2 sts] 12 times. Turn. (12 puffs, 24 sc; 36 sts)
Row 4Ch 1, sc in each st across, working 1 sc into each puff and each sc. Turn. (36 sc)
Row 5Ch 1, sc in first st, [puff in next st, sc in next 2 sts] 11 times, puff in next st, sc in last st. Turn. (12 puffs, 24 sc; 36 sts)
Row 6Ch 1, sc in each st across. Turn. (36 sc)Rows 7-40: Repeat Rows 3-6 eight more times, then repeat Rows 3-4 once more. Keep 36 sts each row.
Rows 41–42Ch 1, sc in each st across. Turn at end of Row 41 only. (36 sc) Panel edging: Ch 1. Work 1 round of sc evenly around the panel, placing 3 sc in each corner. Join with sl st. Fasten off, leaving a long tail for seaming. (Approximately 160 sc around)
Back Panel with Firm Flat Fabric
The back panel uses simple single crochet throughout. This creates a smooth, comfortable surface that sits against your back.
Rows 1–42Ch 37. Work as for a plain sc rectangle: Row 1 gives 36 sc; Rows 2-42 each remain 36 sc.Back edging: Work the same edging as the front panel. (Approximately 160 sc around)
Checkpoint: Your front and back panels should match in width and height before joining.
Side and Bottom Gusset Strip
This long strip wraps around the sides and bottom of your bag, giving it that boxy structure.
Row 1Ch 17. Sc in 2nd ch from hook and in each ch across. Turn. (16 sc)
Rows 2–124Ch 1, sc in each st across. Turn. (16 sc) Optional texture edge: Work 1 sl st or crab stitch along each long edge for a corded outline.
Gusset checkpoint: Your strip should measure approximately 3.5 inches / 9 cm wide x 24.8 inches / 63 cm long. It wraps one side, the bottom, and the opposite side. The top remains open.
Rounded Flap
Make 1. The flap is worked flat from the top edge downward. The first 10 rows build the puff field, and Rows 11-20 round the lower edge.
Row 1Ch 31. Sc in 2nd ch from hook and across. Turn. (30 sc)
Row 2Ch 1, sc across. Turn. (30 sc)
Row 3Ch 1, [puff in next st, sc in next 2 sts] 10 times. Turn. (30 sts)
Row 4Ch 1, sc across. Turn. (30 sc)
Row 5Ch 1, sc in first st, [puff in next st, sc in next 2 sts] 9 times, puff in next st, sc in last st. Turn. (30 sts)
Rows 6–10Repeat Rows 2-5 once, then repeat Row 2 once. (30 sc)
Row 11Ch 1, sc2tog, sc across to last 2 sts, sc2tog. Turn. (28 sc)
Row 12Repeat Row 11. Turn. (26 sc)
Row 13Repeat Row 11. Turn. (24 sc)
Row 14Repeat Row 11. Turn. (22 sc)
Row 15Repeat Row 11. Turn. (20 sc)
Row 16Repeat Row 11. Turn. (18 sc)
Row 17Repeat Row 11. Turn. (16 sc)
Row 18Repeat Row 11. Turn. (14 sc)
Row 19Repeat Row 11. Turn. (12 sc)
Row 20Repeat Row 11. Do not turn. (10 sc) Flap edging: Ch 1, sc evenly around the flap, placing 3 sc at each upper corner and working 2 sc into the end of every other row along the curved sides. Join and fasten off. Sew the straight top edge to the back top edge, centered.
Flap checkpoint: Before sewing, your flap should be about 6.7 inches / 17 cm wide at top and 4.1 inches / 10.5 cm deep.
Backpack Straps
Make 2 straps.
Row 1Ch 126. Sc in 2nd ch from hook and across. Turn. (125 sc)
Rows 2–5Ch 1, sc across. Turn after Rows 2-4 only. (125 sc) Edging: Sl st evenly around each strap. Fasten off, leaving long tails. Finished strap length: approximately 27.5 inches / 70 cm.
Assembly
Step 1Single Crochet Join Seam Technique: Hold two pieces with wrong sides together. Insert your hook through both layers, yarn over, pull up a loop, yarn over and pull through both loops. Work evenly, keeping seam tension firm but not tight.
Step 2Join Front to Gusset: Mark the center bottom of the front panel and the center of the gusset strip. With wrong sides together, pin or clip the gusset around one side, the bottom, and the opposite side of the front panel. Join with sc seam through both layers. Work 3 sc in bottom corners if needed to turn cleanly. Keep the top edge open.
Step 3Join Back to Gusset: Repeat the same joining process with the back panel. Check that the front and back top edges are level before fastening off. Weave in seaming tails securely, especially at lower corners. Joining checkpoint: Your bag body should stand at approximately 7.9 inches / 20 cm wide x 9.5 inches / 24 cm tall including edging, with 3.5 inches / 9 cm depth.
Finishing
- Weave in every yarn end on the front, back, and gusset pieces before any seaming begins.
- Block the front and back panels lightly so their dimensions match before you join them.
- Seam the gusset to the front and back panels, then attach the flap, D-rings, strap rings, clasp, and beaded tassel.
Why it works
The front panel starts and ends in plain single crochet rows, with the puff texture confined to its own band in the middle rows.
The back panel is worked as a single flat rectangle rather than textured, which keeps it smooth against your back.
The gusset strip is worked as one long, narrow piece rather than three separate panels, so there's only one seam line to manage around the sides and bottom.
Finished measurements: Width 7.9 inches / 20 cm, Height 9.5 inches / 24 cm, Depth 3.5 inches / 9 cm, Strap Length 27.5 inches / 70 cm, Handle Rise 2 inches / 5 cm.
Skill level: intermediate. You'll use standard US crochet stitches throughout, but achieving a polished finish depends on keeping your puff texture even, seaming firmly, placing hardware correctly, and attaching straps neatly. Plan for about 8 to 12 hours of crochet time, plus additional time if you add a fabric lining.
Gauge: Single crochet (sc) gauge is 18 sc x 20 rows = 4 inches / 10 cm after light blocking. Puff stitch gauge is 6 puff clusters x 8 puff rows = approximately 4 inches / 10 cm across the textured field. Checkpoint: measure your front panel after Row 12; it should be about 7.9 inches / 20 cm wide. If it's too big, go down a hook size. Too small? Go up a size.
Pattern notes: The chain 1 at the beginning of single crochet rows does not count as a stitch. Turn after every panel row unless instructed otherwise. Place a marker at the first and last stitch of each panel before seaming to make joining easier. For a firmer bag, line the inside with cotton fabric or add plastic canvas between the lining and crochet. Left-handed makers can follow these same instructions; your seaming direction may mirror, but stitch counts and placement remain the same.
What it becomes
- An everyday carry for errands, paired with a cotton tee and jeans for that boho market look.
- A lightweight travel bag for essentials, worn alongside a woven sun hat or layered scarf.
- A statement piece for a weekend outfit, paired with the beaded tassel and simple sandals.
Original pattern: https://crochr.com/sage-green-boho-backpack-free-crochet-pattern/
FAQ
Can I make this without the wooden beads or tassel?
Yes, the beads and tassel are listed as optional accents. The bag's structure and clasp don't depend on them.
Why does the back panel use plain single crochet instead of puffs?
The flat fabric sits against your back, so smoothness matters more than texture there. The puff stitch is reserved for the front panel and flap, where it shows.
What happens if my gusset strip comes out the wrong length?
Check it against the stated length checkpoint before seaming, since it needs to wrap one side, the bottom, and the opposite side. A short strip will leave the sides gaping at the top.
Do I need a fabric lining?
No, it's listed as optional and will add extra time beyond the core crochet hours. A firm cotton yarn like the ones recommended holds its shape without one.