
Free Pattern
Step-by-Step
Crochet
AmigurumiSebastian the crab amigurumi: a tiny crochet pattern
A small crab amigurumi worked in fingering weight yarn with a 1.75 mm hook.
- Level
- Intermediate
- Time
- 4-6 hours
- Hook
- 1.75 mm
- Yarn
- Fingering
Pattern highlights
- Start the shell with a short foundation chain, working corner increases until it grows into a rounded rectangle base.
- Continue the shell in spiral rounds until it reaches the final round used for the head join.
- Attach the head yarn into the back loops of that round, leaving a section of stitches set aside.
- Work the belly, eyebrows, eyes, legs, and claws as separate small pieces alongside the shell and head.
- Stuff each piece before closing it so the fiberfill stays hidden under snug stitches.
- Sew the eyes, eyebrows, belly, legs, and claws onto the shell and head to finish assembly.
About This Pattern
Sebastian the Crab lands in that small drawer of amigurumi that fit in a palm. I keep a shelf for pieces under an inch tall, and this one earns its spot. It is not a beginner's first project, but it is not a marathon either. Six legs, two claws, a shell, and a head — a full creature in miniature. Collectors of tiny crochet animals will recognize the appeal here: more parts, less yarn.
The construction leans on a few tricks worth noting. The shell starts from a short foundation chain, then grows through corner increases into a rounded rectangle. The head attaches through the back loops of that same shell, leaving a gap of set-aside stitches. Partway through, the head drops the spiral and moves to flat, back-and-forth rows with no turning chain. Small parts — eyebrows, eyes, claws, legs — each work up fast on their own.
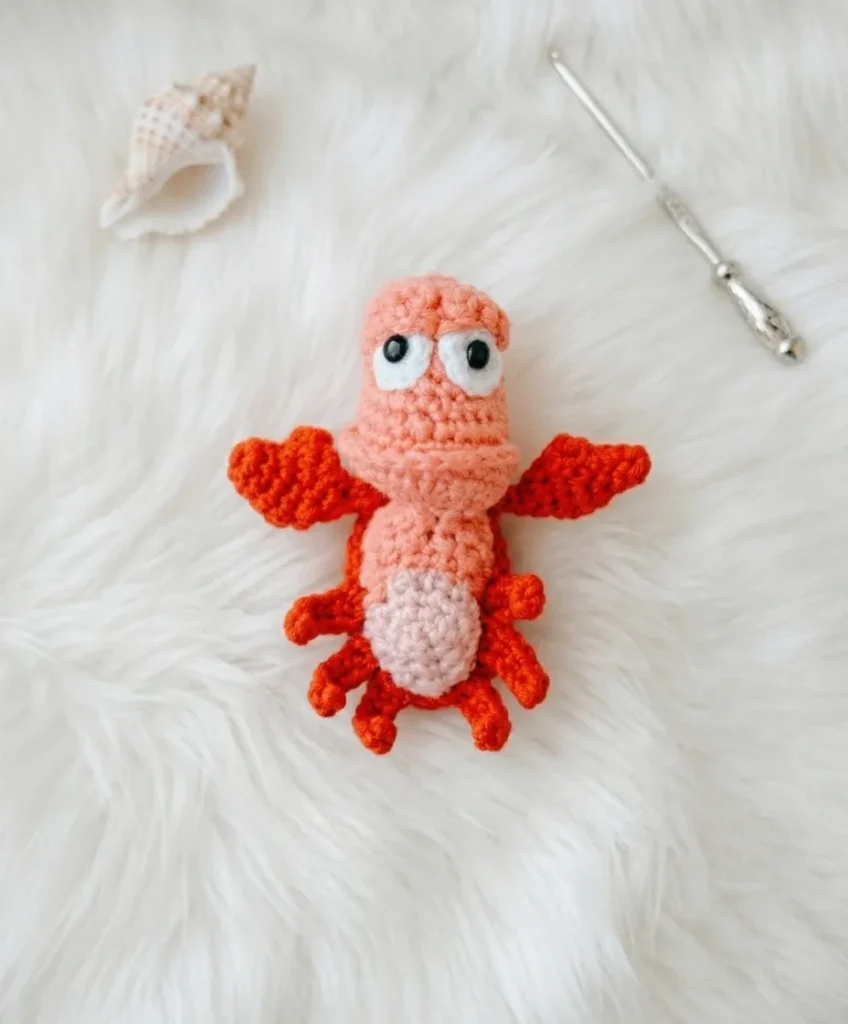
What comes off the hook is small — about 6 to 7 centimeters across, shell red, head and belly pink. The legs splay out in a ring of six, claws lifted like a shrug. Safety eyes give it a fixed stare, and the pink eyebrows add an expression that reads as mildly annoyed. It sits happily on a desk, or in a bowl of other tiny amigurumi.
Worth knowing
The satisfaction here is in the shell. A five-chain foundation grows into a rounded rectangle through corner increases. Watching that flat start curl into shape is the fun part. The back-loop join is a neat trick too — attach the head to the shell without a bulky seam. That leaves the front loops as a visible ridge between the two colors. Then the head shifts gears, from spiral rounds to flat back-and-forth rows, no turning chain needed. Six identical legs and two seven-round claws keep the hands busy once the shaping is done. Sewn on one after another, small pieces turn into a crab that looks back at you.
Common mistakes
- Losing track of the spiral Mark the first stitch of each round with a locking marker. It keeps the corner increases landing in the right spot.
- Joining both loops, not back loops Work only into the back loops when attaching the head. Skipping this closes the seam meant to sit as a visible ridge.
- Adding a turning chain by habit The head's flat rows are worked without one, so skip the turning chain entirely there. Adding it shifts the stitch count for every row after.
- Overstuffing the tiny claws The claws are only seven rounds, so pack stuffing in lightly with a small tool. Too much filling stretches the tiny stitches out of shape.
- Starting the head at wrong point Attach the pink yarn exactly at the left marker, not anywhere along the round. Starting elsewhere shifts where the gap in the shell lines up.


Intermediate
Progress Tracker
0 of 0 rounds
Tap a round to tick it off — your place is saved on this device.
The kit
Yarn
- Fingering weight with acrylic or cotton content in red , pink , and white (sample uses Gazzal Baby Cotton: White 3410, Red 3443, Pink 3435)
Hook
- 1.75 mm (no standard US letter equivalent — use the hook appropriate for your chosen yarn)
Safety eyes
- Black, 3 mm, × 2 (alternatively, embroider with black sewing thread)
Stuffing
- Polyester fiberfill
Stitch markers
- 4–6 pins or locking stitch markers
- Yarn needle / tapestry needle
- Scissors
- Sewing needle and thread for attaching parts
- Clear-drying craft glue for securing safety eyes if needed
Shell(Red yarn)
Row 1Foundation chain of 5 ch.
Row 2Starting in the 2nd ch from hook: inc, 2 sc, 3 sc in next st (corner); working along the opposite side of the foundation chain: 3 sc. (10)
Row 32 inc, 2 sc, 3 inc, 2 sc, 1 inc. (16)
Row 43 inc, 4 sc, 4 inc, 4 sc, 1 inc. (24)
Round 524 sc. (24)
Round 6Working in FLO: 24 sc. (24)
Round 7Working in FLO: (5 sc, inc) – 4 times. (28)
Round 83 sc, 1 inc, 2 sc, 1 sl st. (29)Fold the shell in half along the direction of working. Count 7–8 stitches from the fold toward the center and place a stitch marker. Directly opposite that marker, count 9 stitches along Rnd 6 (the round worked in FLO) and place a second marker. These markers define the boundary between the head and the belly.
Head(Pink yarn)
Work into the back loops of Rnd 6. There are 24 stitches total; 9 stitches are set aside between the markers. Attach pink yarn at the left marker and begin working from that same stitch.
Round 115 sc, 3 ch. (18)
Round 21 dec, 3 sc, 5 inc, 3 sc, 1 dec, 3 sc. (21)
Rounds 3–42 dec, 3 sc, 5 inc, 3 sc, 3 dec. (21)Now switch to flat, back-and-forth rows. Do not make a turning chain.Turning Row 1: 3 sc, turn.Turning Row 2: Skip first st, 1 sc in 2nd st, 1 inc; then working into stitches of Rnd 4: 1 inc, 2 sc, turn.Turning Row 3: Skip first st, 1 sc in 2nd st from hook, 4 inc, 1 sc, 1 sc into next stitch of Rnd 4, turn.Turning Row 4: Skip first st, 1 sc in 2nd st from hook, (1 sc, inc) – 2 times , (1 inc, 1 sc) – 2 times , 1 sc, 1 sc into next stitch of Rnd 4, turn.Turning Row 5 (FLO): Working through front wall of stitches only, skip first st, 14 sc in 2nd st from hook.After completing the turning rows, 13 stitches should remain in Rnd 4; 8 of those stitches were used during the turning row section.
Round 5Resume working in the round Work 13 sc across Rnd 4 stitches; then working through the front wall of Turning Row 5 stitches (14 sts in that row): 3 sc, 1 inc, 6 sc, 1 inc, 3 sc. (29)
Round 66 sc, 1 inc, 6 sc; then working along the 14 stitches of Turning Row 5 through the back wall — skip 2 sts, 10 sc, skip 2 sts. (24)
Round 718 sc, 1 dec, 4 sc. (23)
Round 84 sc, 1 inc, 4 sc, 1 inc, 6 sc, 1 dec, 1 sc, 1 dec, 2 sc. (23)
Rounds 9–105 sc, 1 inc, 4 sc, 1 inc, 6 sc, 1 dec, 1 sc, 1 dec, 1 sc. (23)Switch back to flat, back-and-forth rows. Do not make a turning chain.Turning Row 1: 3 sc, turn.Turning Row 2: Skip first st, 8 sc in 2nd st from hook, turn.Turning Row 3: Skip first st, 7 sc in 2nd st from hook, 1 sc into next stitch of Rnd 10.
If you are using safety eyes, insert them now — place them in Turning Row 2 of this second set of turning rows, then secure the backings before continuing.
Eyebrows(Pink yarn — make 2)
Row 1Foundation chain of 5 ch. (4 working sts)
Row 2Starting in 2nd ch from hook: 4 sc, ch 1 (turning chain counts as start of next row). (4)
Row 33 sc, 1 ch, 1 dc.Sew the eyebrows onto the head overlapping slightly over the top of the eyes.
Belly(Pink yarn)
Attach pink yarn in the 3rd chain of the 3-ch space that separates the head section from the belly area.
Round 13 sc along the chain-3 space, 13 sc along the shell. (16)
Round 2(2 sc, 1 dec) – 4 times. (12)
Round 3(1 sc, 1 dec) – 3 times. (9)
Round 4(1 sc, 1 dec) – 3 times. (6)Stuff the belly. Pull the opening closed, weave in and trim the yarn end.
Legs(Red yarn — make 6)
Row 1Foundation chain of 6 ch. (4 working sts)
Row 2Starting in 2nd ch from hook: 5 sc.Leave a long yarn tail for sewing. Sew three legs to each side of the belly, alternating between leg stitches and shell stitches as you attach them. Secure and hide all yarn ends inside the toy.
Claws(Red yarn — make 2)
Row 1Foundation chain of 3 ch. (2 working sts)
Round 2Starting in 2nd ch from hook (1 loop of the chain): 7 sc, join into a ring. (7)
Round 3Skip 1 st, 6 sc. (6)
Round 46 inc. (12)
Round 53 ch; starting in 2nd ch from hook: 1 sl st, 1 sc; then working into stitches of Rnd 4: 1 hdc, 11 sc. (12)
Round 6Count back 10 stitches from the hook in the reverse direction and place a marker on that stitch. Continue working forward into that marked stitch — this skips 2 stitches (the small claw tip you just made): 1 sc, (1 sc, 1 dec) – 3 times. (7)
Round 7Work 2 dec. Do not complete the round. (5)Chain 4; working back along those 4 chains starting from the 2nd chain: 3 sl st. Fasten off, leaving a long yarn tail for sewing.Thread the yarn tail onto your needle and pass the needle through the body of the claw as indicated by the arrows in the schematic — this tacks the small claw tip against the main claw piece. Sew the claws to the toy by picking up loops from the shell. Secure all yarn ends with a knot and hide them inside the toy.
Eyes(White yarn — make 2)
Work 9 sc into a Magic Ring . Pull the yarn tail to close the ring, leaving a small opening in the center. Fasten off, leaving a tail for sewing.
Attach the safety eyes through the white eye pieces and into the head at the position established in the turning rows above.
Continue working the Head after attaching the eyes.
Round 11(5 sc, 1 dec) – 3 times. (18)
Round 12(1 sc, 1 dec) – 3 times. (12)Stuff the head firmly at this point.
Round 136 dec. (6)Pull the opening closed, weave in and trim the yarn end.
Assembly
Step 1The Shell forms the base structure — all other pieces connect to it or to each other through it.
Step 2Head : already integrated with the shell through the back loops of Rnd 6. Ensure the head is fully stuffed before closing.
Step 3Eyes (white circles) : sew the white eye pieces onto the head at the turning-row position, then press safety eyes through the center of each circle and secure the backings. Apply a small dot of clear craft glue around each safety eye stem for extra hold if desired.
Step 4Eyebrows : using a sewing needle and matching thread, sew each eyebrow slightly overlapping the top of the eye, angled inward for expression.
Step 5Belly : already integrated with the shell via the chain-3 join. Stuff before closing.
Step 6Legs : pin all six legs in position first (three per side along the belly) before sewing, so the spacing is even. Attach each leg using a whipstitch, alternating between the leg stitches and the shell edge stitches.
Step 7Claws : sew each claw to the front sides of the shell, tucking the needle under shell loops so the stitching is hidden. Secure with a firm knot and bury the ends inside.
Step 8Weave in all remaining yarn ends.
Finishing
- Weave in the tail ends on the shell, head, belly, legs, and claws before assembly begins.
- Stuff the shell and head firmly so the tight fabric hides the fiberfill completely.
- Sew the belly, eyebrows, eyes, legs, and claws onto the body, adding glue behind the safety eyes if needed.
Why it works
The shell begins with a five-stitch foundation chain. Corner increases each round build it into a rounded rectangle, not a circle.
The head attaches through the back loops of the shell's last shown round. Nine stitches are set aside between markers, leaving a gap for the join.
The head shifts from spiral rounds to flat, back-and-forth rows partway through its rounds. This lets it curve forward off the shell instead of closing into a full sphere.
This pattern is written in US crochet terminology. All pieces are worked in the round as a continuous spiral unless flat, back-and-forth rows are explicitly indicated — do not join rounds unless stated. Gauge is not critical, but the fabric should be tight enough that stuffing does not show through; size the hook down if needed. Finished size with the recommended yarn and hook is approximately 6–7 cm in length. Stitch counts appear in parentheses at the end of each round or row, and a bracketed section followed by a number (e.g., (2 sc, inc) – 3 times) means repeat everything inside the brackets that many times.
What it becomes
- A spot on a shelf of tiny amigurumi, grouped with other palm-sized crochet animals.
- A small desk companion that sits next to a mug or a stack of books.
- A clip-on charm for a bag or pouch, paired with a short length of cord.
FAQ
What hook size does this pattern need?
The pattern calls for a 1.75 mm hook, which has no standard US letter size. Use whichever hook matches the tension of your chosen fingering weight yarn.
Can I substitute a different yarn weight?
The pattern is written for fingering weight yarn with acrylic or cotton content. A heavier weight will grow the crab well past the 6–7 cm size given in the pattern.
Do I need safety eyes, or can I embroider instead?
The pattern lists 3 mm black safety eyes as the main option. It also notes you can embroider with black sewing thread instead.