
Free Pattern
Step-by-Step
Crochet
AmigurumiSleeping bunny amigurumi pattern for a curled softie
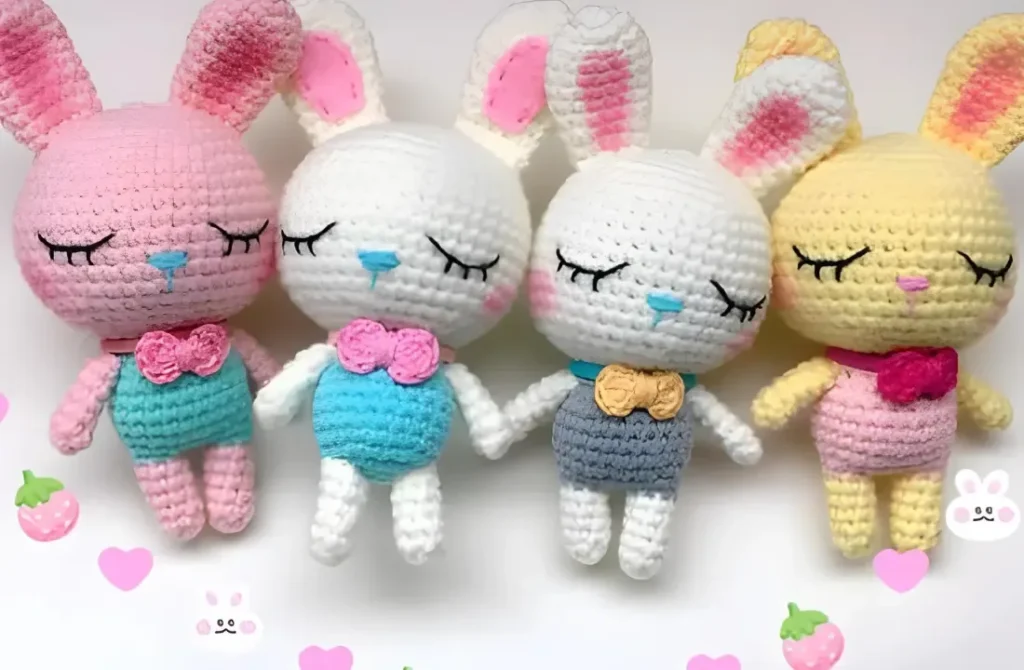
A crocheted sleeping bunny amigurumi worked in rounds from a tight magic ring out.
- Level
- Intermediate
- Time
- 4-6 hours
- Yarn
- Worsted
Pattern highlights
- Start the first piece with a magic ring and build the early rounds through steady six-stitch increases.
- Let the rounds settle into a plain stretch once the dome is wide enough, no more shaping needed yet.
- Set that piece aside and pick the pattern back up much later for a second shaped section.
- Repeat the same increase rhythm on that later section to curve its own small rounded form.
- Keep every piece worked in continuous rounds rather than turning and working in rows.
- Leave a long tail at the end of each piece so you have something to sew with later.
About This Pattern
This one lands in the sleepy-animal corner of my amigurumi shelf, the pieces curled up rather than standing. A sleeping bunny asks for softer shaping than an alert one. It is the kind of pattern I reach for when I want a small, quiet make between bigger projects, something that closes up neat and doesn't fight me on balance.
The build is all rounds, starting from a magic ring and growing by six stitches at a time through the early shaping. That steady increase is what turns a flat circle into a dome, and the pattern leans on it more than once across the piece. No fancy stitches here, just careful counting and a willingness to keep the hook moving in one direction.
What comes out the other end is a rounded little bunny, tucked into a curled, resting pose rather than sitting upright. It reads as soft and self-contained, the kind of shape that holds together well once stuffed. It is a piece built for touch more than for display, though it manages both.
Worth knowing
There's something satisfying about a shape that builds itself through plain math: six increases a round, over and over, until a sphere appears out of a ring. This pattern leans on that rhythm hard, and getting the increase placement right is most of the skill involved. I like that the shaping does the work, not elaborate stitch combinations. The later rounds, worked separately for a second part of the body, give me a reason to practice the same increase sequence again, which is good for muscle memory. By the time I reach the last round, I've repeated the trick enough times that it stops feeling like counting and starts feeling like shaping by hand.
Common mistakes
- Losing the magic ring count Count the stitches in the ring before pulling it closed, since a loose or short start throws off every round after it.
- Uneven increase spacing Keep the increase stitch in the same position within each repeat so the round grows evenly instead of puckering to one side.
- Stuffing after closing the round Fill the piece before the last stitches close it up, since reaching in afterward distorts a shape that's already set.
- Overpacking the early small rounds Go light on stuffing while the rounds are still tiny, since too much filling stretches the stitches and the increases start to show.
- Mismatched paired pieces Work any matching pieces to the same round before stopping, so the finished bunny sits symmetrically once assembled.


Intermediate
Progress Tracker
0 of 0 rounds
Tap a round to tick it off — your place is saved on this device.
The kit
- Worsted weight yarn
- Crochet hook (size to suit your yarn)
R 1
Round 16 sc in magic ring [6](6)
R 2
Round 2(inc) repeat 6 times [12](12)
R 3
Round 3(1 sc, inc) repeat 6 times [18](18)
R 4
Round 4(2 sc, inc) repeat 6 times [24](24)
R 5
Round 5(3 sc, inc) repeat 6 times [30](30)
R 6
Round 6(4 sc, inc) repeat 6 times [36](36)
R 7
Round 7(5 sc, inc) repeat 6 times [42](42)
R 8-16
Rounds 8–1642 sc (9 rows)
R 17
Round 17(5 sc, dec) repeat 6 times [36](36)
R 18
Round 18(4 sc, dec) repeat 6 times [30](30)
R 19
Round 19(3 sc, dec) repeat 6 times [24](24)
R 20
Round 20(2 sc, dec) repeat 6 times [18] Sl st. Fasten off.(18)
Legs
Legs (make 2) - work this piece twice.
Round 17 sc in magic ring [7](7)
Rounds 2–67 sc (5 rows)Sl st. Fasten off. Don't cut the yarn when you'll finish the second leg.Continue crocheting the body.
Finishing
- Weave in every starting and ending tail before any piece gets stuffed, so nothing works loose later.
- Stuff each piece before closing its final round, packing enough to hold the curve without over-filling it.
- Sew the separate pieces together into the curled, sleeping pose once each one is closed and firm.
Why it works
Rounds 2 through 7 each add six stitches, which is the standard way a flat ring turns into a rounded dome.
The pattern restarts numbering at Round 1 for at least one other piece, meaning each part grows from its own magic ring rather than sharing a base.
Rounds 8 through 16 are worked plain at the same stitch count, nine rounds in total, before the decreases begin at Round 17.
What it becomes
- A shelf piece to sit alongside other curled amigurumi animals, since the sleeping pose reads well at rest.
- A soft toy for a child's room, paired with a small knit blanket for scale.
- A desk companion for close-up work, tucked near pens and other small handmade pieces.
Original pattern: https://onrecip.com/sleeping-bunny-free-amigurumi-pattern/
FAQ
Do I need to work every piece in the same yarn color?
No, the pattern doesn't specify colors, so I'd pick one main body shade and a contrast for smaller details. A bunny reads fine in a single color too, if you'd rather keep it simple.
Why does the pattern jump from Round 7 to Round 17?
Rounds 8 through 16 are plain, non-increasing rounds worked straight at 42 stitches for nine rounds. They're shown together here as one stretch before the decreases begin at Round 17.
Can I work this bunny in a different weight yarn than intended?
You can, since the stitch counts stay the same regardless of yarn weight. Just expect the finished bunny to come out larger or smaller depending on your yarn and hook.
Is this a good pattern for someone newer to amigurumi?
If you're comfortable with magic rings and counting increases, yes. The shaping repeats the same six-stitch increase often enough that it becomes familiar quickly.