
Free Pattern
Step-by-Step
Crochet
AmigurumiSoft crochet dove amigurumi for beginners
A white crochet dove amigurumi worked in continuous spiral rounds, built for beginners.
- Level
- Intermediate
- Time
- 4-6 hours
- Hook
- 12 mm
- Yarn
- Bulky
Pattern highlights
- Begin the head with a tiny ring of stitches and increase it outward until it matches the body's width.
- Keep working without fastening off so the body grows directly out of the head in one spiral.
- Crochet both wings separately, starting from the same small ring the head used.
- Pull sturdy thread through the head to set both eyes at once, looping and knotting them together.
- Embroider the lash line by hand once the eyes are placed and secure.
- Stuff the body firmly before the last rounds close it off.
- Attach the wings with thread, then add the feather, tail, and head crest details.
About This Pattern
This dove would sit well on a shelf of soft birds — the kind of amigurumi collection that grows one small creature at a time. It reads as a beginner piece, but the head-to-body join and wing shaping give it a bit more structure than a basic round ball. I like that it earns its place without needing a long skill list first.
The build leans on continuous spiral rounds for the head, body, and wings, with no joining seam breaking the rhythm. Increases are scattered rather than stacked, which keeps the shaping smooth instead of pointed. A sturdy-thread pull-through method shapes the eyes, and a black embroidered lash line finishes the face by hand.
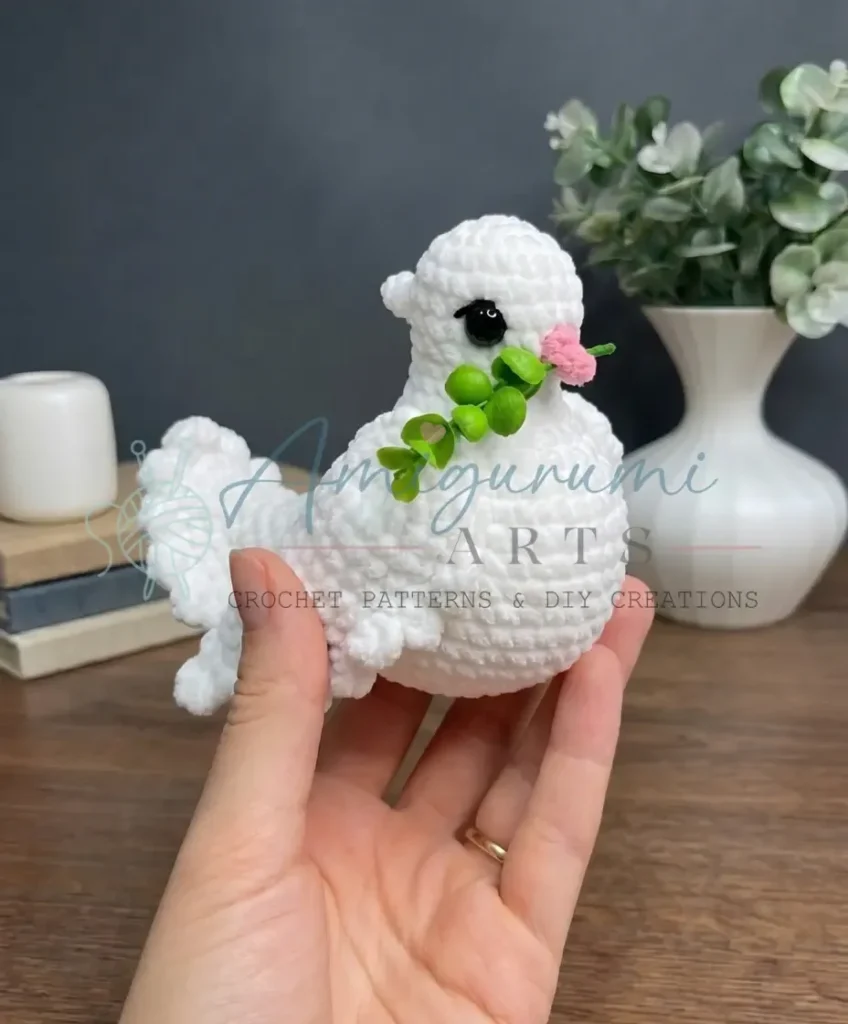
What comes out the other end is a plump white dove with pink fluffy accents, dark plastic eyes, and a pair of wings attached after the fact. Feathers, a tail, and a small head crest get added as separate touches. It's soft, a little fluffy at the edges, and clearly meant to be held.
Worth knowing
There's a satisfaction in watching the head flow straight into the body with no fastening off — one spiral, no seam at the neck. The wings repeat that same small-to-wide increase logic on their own, so by the second one your hands already know the rhythm. The eye pull-through is the fiddly part, and also the most rewarding: one length of thread, looped twice through both sockets, and the face suddenly has a gaze. Embroidering the lash line afterward is the last small decision that gives the dove its expression. None of it is hard. It's just attentive, in a way that rewards slowing down for ten minutes at the face.
Common mistakes
- Losing track of round starts Keep the stitch marker in the first stitch of every round and move it up as you go. Without it the spiral drifts and the count slips.
- Wings that don't match Check the stitch count in parentheses at the end of each round before starting the next. Do this on both wings so they grow at the same rate.
- Fastening off after the head Leave the yarn attached and move straight into the body rounds. The head and body are meant to be one continuous piece.
- Rushing the eye pull-through Pull the thread slowly and check both eyes sit level before knotting. A quick knot now means lopsided eyes later.
- Stitching the lash line too early Place and secure the eyes first, then embroider the lash line around them. Working it first makes alignment a guess.


Intermediate
Progress Tracker
0 of 0 rounds
Tap a round to tick it off — your place is saved on this device.
The kit
Main yarn
- White bulky/fluffy yarn (e.g., YarnArt Dolce or Himalaya Dolphin Baby) — 1 skein
Accent yarn
- Pink fluffy yarn (e.g., Himalaya Dolphin Baby 309) — small amount
Strong thread
- A few lengths of sturdy thread for eye pull-through and wing attachment
Embroidery thread
- Black, for stitching the lash line
Safety eyes
- Black round plastic, 12 mm — 2
Hook size
- E-4 / 3.5 mm or F-5 / 4.0 mm
Long sharp needle
- For thread attachment of wings
Stuffing
- Polyester fiberfill (ball-type fiberfill recommended)
- Stitch markers
- Scissors
Tools
- Yarn needle / tapestry needle: Wide-eye, for sewing and weaving ends
Wings (Make 2)
Place your stitch marker in the first stitch of each round. Watch the start-of-round line along the upper edge of the wing. Use the shift stitch if the line drifts.
Round 1Ch 2, work 8 sc in the 2nd ch from hook. (8)
Round 2Inc in each st around. (16)
Round 33 sc, inc repeat 4 times. (20)
Rounds 4–8Sc in each st around — 5 rounds. (20)
Round 96 sc, dec, dec, 8 sc. (18)
Round 10Sc in each st around. (18)
Round 117 sc, dec, dec, 7 sc. (16)
Round 12Sc in each st around. (16)
Round 136 sc, dec, dec, 6 sc. (14)
Round 14Inc, 4 sc, dec, dec, 4 sc, dec. (14)
Round 155 sc, dec, dec, 5 sc. (12)
Round 164 sc, dec, dec, 4 sc. (10)
Round 17Inc, dec, dec, dec, dec, inc. (8)
Round 18Dec, dec, dec, dec. (4)
Round 19Dec, dec — leaving (3) remaining stitches. For the left wing: fasten off and secure the yarn. For the right wing: do not fasten off — you will continue directly to the feathers.
Head and Beak
Work in a continuous spiral. The start-of-round line runs along the body’s centerline from head to tail.
Round 1Ch 2, work 8 sc in the 2nd ch from hook. (8)
Round 2Inc in each st around. (16)
Round 33 sc, inc repeat 4 times. (20)
Round 4Sc in each st around. (20)
Round 5Beak round — color change. With white: 9 sc. With pink: 1 sc, then work beak as follows — ch 3, starting from the 2nd ch from hook work: sl st, 1 sc; back in main round: 1 sc. With white: 9 sc. (20) The beak chain stitches are not included in the stitch count.
Round 64 sc, dec, dec, dec, dec, 4 sc. (14) Fold the beak forward while working the decreases so it stays clear of your hook.
Rounds 7–8Sc in each st around — 2 rounds. (14)
Body
Continue from the head without fastening off.
Round 94 sc, inc, inc, inc, inc, inc, inc, 4 sc. (20)
Round 107 sc, inc, 1 sc, inc, inc, 1 sc, inc, 7 sc. (24)
Round 117 sc, (inc, 2 sc) repeat 3 times, inc, 7 sc. (28)
Round 128 sc, inc, 3 sc, inc, 2 sc, inc, 3 sc, inc, 8 sc. (32)
Round 138 sc, (inc, 4 sc) repeat 3 times, inc, 8 sc. (36)
Round 14Sc in each st around. (36)
Round 152 sc, inc, 30 sc, inc, 2 sc. (38)
Round 162 sc, inc, 32 sc, inc, 2 sc. (40)
Round 172 sc, inc, 34 sc, inc, 2 sc. (42)
Round 182 sc, inc, 36 sc, inc, 2 sc. (44)
Round 19(1 sc, inc) repeat 2 times, 36 sc, (inc, 1 sc) repeat 2 times. (48)
Round 202 sc, inc, 42 sc, inc, 2 sc. (50)
Round 21(1 sc, inc) repeat 2 times, 18 sc, dec, 2 sc, dec, 18 sc, (inc, 1 sc) repeat 2 times. (52)
Round 222 sc, inc, 20 sc, dec, 2 sc, dec, 20 sc, inc, 2 sc. (52)
Round 232 sc, inc, 17 sc, dec, 1 sc, dec, 2 sc, dec, 1 sc, dec, 17 sc, inc, 2 sc. (50)
Rounds 24–27(1 sc, inc) repeat 2 times, 15 sc, dec, 1 sc, dec, 2 sc, dec, 1 sc, dec, 15 sc, (inc, 1 sc) repeat 2 times — repeat this round 4 times. (50)
Round 28(1 sc, inc) repeat 2 times, 15 sc, dec, dec, dec, dec, dec, dec, 15 sc, (inc, 1 sc) repeat 2 times. (48) Work standard (non-invisible) decreases in this round.
Round 292 sc, inc, 13 sc, dec, dec, dec, dec, dec, dec, dec, dec, 13 sc, inc, 2 sc. (42) Begin stuffing firmly now. Do not fasten off — you will continue to work the tail.Sew the 12 center stitches together in pairs. Leave the yarn attached.
Feathers — Right Wing
Turn the right wing and begin working feathers along the lower edge, starting 1 round in from the tip.
Round 1(Ch 5, work 3 hdc along the chain starting from the 3rd ch from hook, sl st into the wing) — repeat 5 times.(3)
Round 2(Ch 4, work 2 hdc along the chain starting from the 3rd ch from hook, sl st into the wing) — repeat 1 time.(2)
Round 3(Ch 3, work 1 hdc along the chain starting from the 3rd ch from hook, sl st into the wing) — repeat 1 time.Fasten off, secure yarn, and weave the tail end inside the wing.(1)
Feathers — Left Wing
Turn the left wing and attach yarn between rounds 6 and 7. Work feathers along the lower edge in the reverse order:
(Ch 3, work 1 hdc along the chain starting from the 3rd ch from hook, sl st into the wing) — repeat 1 time.
(Ch 4, work 2 hdc along the chain starting from the 3rd ch from hook, sl st into the wing) — repeat 1 time.
(Ch 5, work 3 hdc along the chain starting from the 3rd ch from hook, sl st into the wing) — repeat 5 times.
Fasten off, secure yarn, and weave the tail end inside the wing.
Tail
Mark a point at the top of the body between rounds 25 and 26. Sew the tail closed, curving smoothly upward toward the back to meet that marked point.
Continue crocheting the tail downward: 14 sc, sl st. Transition to the other side of the tail with 1 sl st.
Now work the tail feathers: Ch 3, work 1 dc in the 3rd ch from hook, skip 1 st, sl st into the tail.
(Ch 4, work 2 hdc along the chain starting from the 3rd ch from hook, skip 1 st, sl st into the tail) — repeat 13 times.
Ch 3, work 1 dc in the 3rd ch from hook, skip 1 st, sl st into the tail.
Fasten off and weave the tail end inside.
Head Crest
Attach yarn to the head at the level of rounds 5–6 and work the crest: Ch 3, starting from the 2nd ch from hook work: 1 sc, 1 hdc. Sl st into the head.
Fasten off and secure.
Assembly
Step 1Eye pull-through: Thread a long needle with sturdy black thread. Insert the needle under the beak and bring it out at the lower side point of the first eye. Insert through to the upper point of the same eye and bring out at the upper point of the second eye. Pass back down to the lower point of the second eye, then back out under the beak. Repeat this loop once more for security. Knot the thread tails firmly and hide them inside the body.
Step 2Embroider the lash line using black embroidery thread, stitching a short curved line along the upper edge of each eye position.
Step 3Feet: Mark 4 points on the underside of the body for foot placement. Attach yarn at the lower point and work 4 sc along the body. Leave a longer yarn tail and embroider the toe lines using a crochet hook or needle to pull yarn loops through. Repeat for the second foot. Alternatively, embroider both feet entirely by hand.
Step 4Wing attachment: Mark the center point of the chest at the level of rounds 14–15. Count 11 stitches to the left and 11 stitches to the right — these are your two wing attachment points. Thread a long needle with sturdy thread matching the body yarn. Insert the needle from the top of the body and bring it out at one attachment point. Pass the needle through the wing at the level of rounds 3–4, catching 2–3 stitches. Return the needle into the same attachment point, pass through the entire body, and bring it out at the second attachment point. Attach the second wing the same way and return through the body. Repeat this circuit 3–4 times, pulling the wings snug against the body each time. Always enter and exit at exactly the same attachment points — this is what keeps the wings movable. Bring the thread out at the starting point on top of the body, trim, knot the tails securely, and hide them inside.
Step 5Weave in all remaining ends throughout the piece.
Finishing
- Weave in loose ends as each spiral section finishes, rather than leaving them all for last.
- Stuff the head and body firmly with polyester fiberfill before the final rounds close the opening.
- Attach the wings with sturdy thread, then add the feathers, tail, and head crest as the last touches.
Why it works
The head and the wings open with the identical sequence — 8 single crochet into the second chain, doubling to 16, then increasing to 20 — so the maker learns one growth pattern and reuses it twice.
Round 9 continues the head's stitch count straight into the body instead of starting fresh, meaning there's no seam or join at the neck at all.
Feathers, tail, and head crest are listed with no rounds of their own, which tells me they're added as embellishments after the main spiral pieces, not built stitch by stitch like the head and wings.
This pattern is written in US crochet terminology.
Stitch counts are given at the end of each round in parentheses: (##). The beak chain stitches and feather chains are not counted in the main stitch count.
Shift stitch: if the start-of-round line drifts noticeably off the correct line of symmetry, work 1 extra sc at the end of the round and move your marker forward by 1 stitch. This correction stitch is not counted in the round total. The start-of-round line runs along the upper edge on the wings, and along the centerline from head to tail on the body.
Gauge is not critical for this project, but aim for a tight, even fabric with no visible gaps. Insert the safety eyes and begin stuffing when instructed, and stuff firmly so the dove holds its shape.
What it becomes
- A shelf piece for an amigurumi bird collection, sitting alongside other soft animal makes.
- A nursery or reading-corner decoration, paired with other plush toys in white and soft colors.
- A handmade gift for a beginner crocheter who wants a project with a bit more shaping than a basic ball.
FAQ
What hook size does this pattern call for?
The pattern lists an E-4 / 3.5 mm or F-5 / 4.0 mm hook. Either works; the main difference is how tight your fabric ends up.
Why is everything worked in a continuous spiral?
Joining rounds would leave a visible seam line running down the head and body. A spiral keeps the surface smooth, which matters on a piece this simple in shape.
Can I skip the plastic safety eyes?
You could, but the eye pull-through technique in the assembly steps is built around them. Swapping to embroidered eyes would mean adjusting that whole step.
How do I keep my two wings looking the same?
Work them back to back rather than one long after the other, checking stitch counts at the same round each time. It's easier to catch a mismatch while both are fresh in your hands.