
Free Pattern
Step-by-Step
Crochet
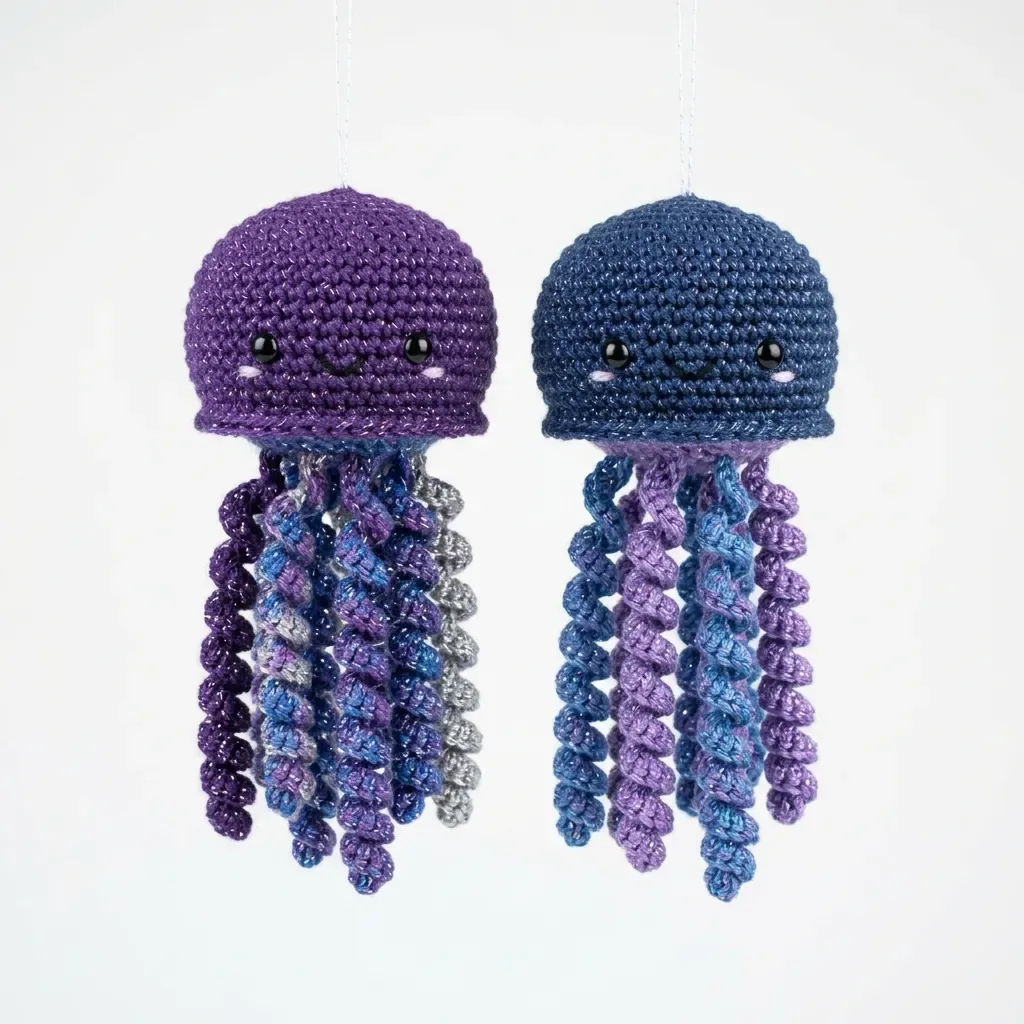
AmigurumiSparkle galaxy jellyfish crochet pattern with spiral tentacles
An amigurumi jellyfish with a sparkly dome bell and spiral slip-stitch tentacles.
- Level
- Intermediate
- Time
- 3-5 hours
- Hook
- 1.65 mm
- Yarn
- Fingering
Pattern highlights
- Work the bell from the top down in continuous rounds, increasing steadily to shape a smooth dome.
- Work a ruffle round into both loops, tripling stitches to flare the brim outward.
- Fasten off Color A, weave in the end, and set the bell aside to stuff and close later.
- Chain and slip-stitch twelve tentacles in alternating Color B and Color C, in short and medium lengths.
- Attach all twelve tentacles to the finished bell, then embroider the face and add a hanging loop.
About This Pattern
I keep a small shelf for the pieces that are more technique than toy, and this jellyfish earns its spot there. It is not a beginner amigurumi. The bell is straightforward, but those tentacles ask for patience and a steady hand with a steel hook.
The whole thing turns on one trick: three slip stitches worked into each chain instead of one. That overcrowding is what coils the tentacle into a spring. I had not met this technique before writing it up, and I like that it does its work quietly, with no special stitch name attached.
What comes out the other end is a dome just 3.5 inches wide with twelve cascading tentacles trailing below it, nine inches total. Hang it near a window and the mercerized or metallic thread catches the light the way the pattern promises it will.
Gauge: 10 single crochet stitches by 11 rounds equals 1 inch by 1 inch (2.5 cm by 2.5 cm), worked in continuous rounds with size 10 crochet thread on a US size 7 steel hook. Gauge matters here for achieving the correct bell size and tentacle proportions, so take a few minutes to swatch before diving in.
Worth knowing
The satisfaction here is mostly tactile. Watching a flat chain curl itself into a tight spiral, just from tripling the slip stitches, feels like a small magic trick every time. The bell is a familiar amigurumi build, worked in continuous rounds with a stitch marker tracking your place, so it is a calm warm-up before the fiddlier part. Then the brim flips that calm on its head: single crochet in the back loop only, followed by three stitches into every stitch, turns a plain dome edge into a flared ruffle. Twelve tentacles split between two colors and two lengths means the repetitive part never gets dull. By the end you have built a dome, a ruffle, and a whole cluster of coiled legs using maybe four distinct techniques, which is a lot of mileage from one small hank of thread.
Common mistakes
- Fuzzy yarn hides the chain Stick with smooth, firmly twisted thread so each chain stitch stays visible for the triple slip stitch. Fuzzy fiber makes it easy to miss a chain or double up by accident.
- Slip stitches worked too tight Keep tension even but not choked, or the tentacle will stiffen instead of coiling. A relaxed hand lets the spiral form on its own.
- Losing count on the increase rounds Use a stitch marker at the start of every round, since continuous rounds have no join to mark your place. Recount after each increase round before moving on.
- Skipping the gauge swatch This pattern leans on gauge for both bell size and tentacle proportion, so swatch before starting. A hook adjustment now saves a mismatched dome later.
- Machine washing the finished piece Machine washing loosens the tentacle spirals and can damage metallic fiber. Hand wash in cool water and reshape by hand instead.


Intermediate
Progress Tracker
0 of 0 rounds
Tap a round to tick it off — your place is saved on this device.
The kit
- Aunt Lydia’s Classic Crochet Thread Size 10 works wonderfully. It is widely available, has excellent stitch definition, and the mercerization gives it a subtle sheen.
- DMC Petra Crochet Cotton No. 5 offers beautiful drape and color clarity. You may need to adjust your hook size slightly.
- Paintbox Simply Glitter DK held at fingering tension adds extra sparkle. Just swatch first to hit your gauge.
- Whatever you choose, stick with smooth, firmly twisted yarn. Avoid anything fluffy or fuzzy because you need clear stitch visibility for the spiral tentacle technique.
Yarn
- Color A (Bell): Approximately 40 yards of size 10 crochet thread or fingering weight yarn with a metallic or mercerized sheen. Use bright violet for Cosmic Purple or steel blue for Deep Ocean.
- Color B (Tentacle set 1): Approximately 30 yards of size 10 crochet thread or fingering weight in a contrasting shade. Deep purple or multicolor for Cosmic Purple, medium blue or teal for Deep Ocean.
- Color C (Tentacle set 2): Approximately 30 yards of size 10 crochet thread or fingering weight in a second contrasting shade. Light lavender or silver-grey for Cosmic Purple, soft lavender or lilac for Deep Ocean.
Hook
- US size 7 steel crochet hook (1.65 mm), or size needed to obtain gauge.
Other supplies
- 2 black safety eyes, 6 mm
- Small amount of fiberfill stuffing
- Tapestry needle
- Scissors
- 12 inches of white or silver thread for hanging loop
- Stitch marker (optional but helpful)
Bell (worked in Color A)
Round 1Work 6 sc into MR. Pull ring closed. (6 sc)
Round 2Inc in each st around. (12 sc)
Round 3[Sc in next st, inc in next st] 6 times. (18 sc)
Round 4[Sc in next 2 sts, inc in next st] 6 times. (24 sc)
Round 5[Sc in next 3 sts, inc in next st] 6 times. (30 sc)
Round 6[Sc in next 4 sts, inc in next st] 6 times. (36 sc)
Round 7[Sc in next 5 sts, inc in next st] 6 times. (42 sc)
Round 8[Sc in next 6 sts, inc in next st] 6 times. (48 sc)
Round 9[Sc in next 7 sts, inc in next st] 6 times. (54 sc)
Round 10Sc in each st around. (54 sc) Checkpoint: Your dome should measure approximately 1.75 inches across. Now is the time to insert your safety eyes. Space them 6 stitches apart, centered between increase groups. Snap the backings on firmly.
Round 11Sc in each st around. (54 sc)
Round 12Sc in each st around. (54 sc)
Round 13Sc in each st around. (54 sc)
Round 14[Sc in next 7 sts, sc2tog] 6 times. (48 sc)
Round 15Sc in each st around. (48 sc)
Round 16[Sc in next 6 sts, sc2tog] 6 times. (42 sc) Begin stuffing the bell lightly with fiberfill now. Do not overstuff. You want the dome to hold its shape but remain soft. Keep adding stuffing as you work the final decrease rounds.
Round 17[Sc in next 5 sts, sc2tog] 6 times. (36 sc)
Round 18[Sc in next 4 sts, sc2tog] 6 times. (30 sc)
Round 19Sc in each st around. (30 sc)
Round 20Sc in each st around. (30 sc) Do not fasten off yet. Add any final stuffing through the opening before working the brim.
Brim
Round 21Brim foundation Working in BLO only, sc in each st around. (30 sc)Ruffle Increase Round: this creates the flared brim at the bottom of the bell. Simply work 3 single crochets into every stitch around. This triples your stitch count and produces that beautiful frill.
Round 22Ruffle Working in both loops, work 3 sc into every st around. (90 sc) Fasten off Color A. Weave in the end securely on the inside of the bell.
Checkpoint: Your ruffle should flare outward clearly. The bell should sit dome-up with the ruffled brim forming a flat fringe around the opening. Total bell height should be approximately 2.75 inches from top to brim.
Tentacles
Spiral Technique Slip Stitch Spiral Cord (Tentacles): this technique creates those tightly coiled, springy tentacles that make this jellyfish so charming. Chain the required number of stitches, then starting in the second chain from hook, work 3 slip stitches into each chain all the way back to the start, inserting your hook into the same chain three times in succession and completing a slip stitch each time before moving to the next chain. The magic happens because you are putting three slip stitches where normally you would put one. This forces the cord to curl into a natural spiral without any blocking or shaping. Trust the process and watch your tentacle come to life.
Make 12 tentacles total per jellyfish. You will alternate between Color B and Color C, making 6 of each color. The varied lengths create that beautiful cascading effect.
Short tentacle (make 4 total, 2 in Color B and 2 in Color C):
Short TentacleCh 30. Beginning in 2nd ch from hook, work 3 sl st into each ch across. (87 sl sts total across 29 chain spaces) Fasten off, leaving a 6-inch tail.(87)
Medium tentacle (make 4 total, 2 in Color B and 2 in Color C):
Medium TentacleCh 40. Beginning in 2nd ch from hook, work 3 sl st into each ch across. (117 sl sts total across 39 chain spaces) Fasten off, leaving a 6-inch tail.(117)
Long tentacle (make 4 total, 2 in Color B and 2 in Color C):
Long TentacleCh 50. Beginning in 2nd ch from hook, work 3 sl st into each ch across. (147 sl sts total across 49 chain spaces) Fasten off, leaving a 6-inch tail.(147)
Attaching Tentacles
The 30 brim stitches from Rnd 21 serve as your attachment ring. Use your tapestry needle to thread each tentacle tail through the back loop ridge at evenly spaced intervals.
Space your 12 tentacles by attaching one every 2 to 3 stitches around the 30-stitch brim ring. Alternate short, medium, and long tentacles as you go. Also alternate Color B and Color C so no two same-color tentacles sit directly next to each other.
Suggested attachment order (repeat twice to use all 12): short B, long C, medium B, short C, long B, medium C.
Pull each tail through from outside to inside, knot securely, and weave the tail into the inner surface of the bell. After attaching all tentacles, give each one a gentle tug to test security. Then let those spiral curls drape freely.
Face Embroidery
Thread your tapestry needle with 12 inches of white or off-white thread. Bring the needle up from inside the bell approximately 2 rounds below the eyes, centered between them.
Create a small curved smile using 3 to 4 short straight stitches. Form a gentle upward arc approximately 4 stitches wide and 1 stitch tall. Knot the thread securely inside the bell and trim.
For extra cuteness, add a single tiny straight stitch highlight below each eye for that eye glint you see in the finished piece. Just one perpendicular stitch, 1 stitch wide, works perfectly.
Hanging Loop
Cut 12 inches of white or silver hanging thread. Thread both ends onto your tapestry needle and push through the top center of the dome at the magic ring closure point. Go from outside to inside and back out again to form a loop.
Tie a knot at your desired loop length above the dome. Approximately 3 to 4 inches of loop above the bell works well. Trim the excess below the knot and tuck the tail into the magic ring center.
Assembly
Step 1Wet-block the finished bell if the dome looks uneven. Dampen with cool water, shape with your fingers into a smooth hemisphere, and let it air dry dome-side up. Let the tentacles hang freely during drying to preserve their spiral curl.
Step 2For care, hand wash in cool water with mild detergent. Do not wring or twist. Gently press water out, reshape, and hang or lay flat to dry. Machine washing will cause the tentacle spirals to lose their curl and may damage metallic fibers. Store these hanging or uncompressed to keep those tentacles looking perfect.
Finishing
- Stuff the bell lightly before closing, since too much fill will fight the dome shape set at the brim.
- Weave in every tail securely on the inside, especially the Color A end left after fastening off at the ruffle.
- Wet-block the bell into a smooth hemisphere and let the tentacles hang free while everything air-dries.
Why it works
The bell increases in a steady spiral, adding six stitches each round through Round 5, which keeps the dome rounding evenly rather than peaking or flattening.
The brim foundation round works in the back loop only, which leaves the front loop free and gives the ruffle round a cleaner, more defined edge to flare from.
Working the tentacles as separate flat chains, rather than in the round, lets the tripled slip stitches coil freely without any seam pulling against the spiral.
What it becomes
- Hang it in a sunny window where the metallic or mercerized thread can catch the light.
- Add it to a cluster of small amigurumi on a shelf, paired with other thread-weight sea creatures.
- Give it as a small handmade piece for someone who collects miniature fiber art.
FAQ
Can I use regular worsted yarn instead of crochet thread?
The pattern is built around size 10 thread or fingering weight for stitch definition, so worsted will change the scale considerably. If you do swap, expect a much larger bell and looser tentacle coils.
Why do my tentacles look loose instead of spiraled?
That usually means the slip stitches were worked too loosely, or the chain itself was too tight to triple up on. Try a firmer, smoother thread and slightly more relaxed tension on each slip stitch.
Do I need both Color B and Color C, or can I use one color?
The pattern alternates two contrasting shades across the twelve tentacles for the cascading color effect. You can use one color throughout, but you will lose that layered look.
How long does this jellyfish actually take to make?
The pattern estimates three to five hours total, with the tentacles taking the longest. The bell and brim move quickly; it is the twelve individual tentacles that add up.