
Free Pattern
Step-by-Step
Crochet
AmigurumiWeb-slinger amigurumi keychain crochet pattern
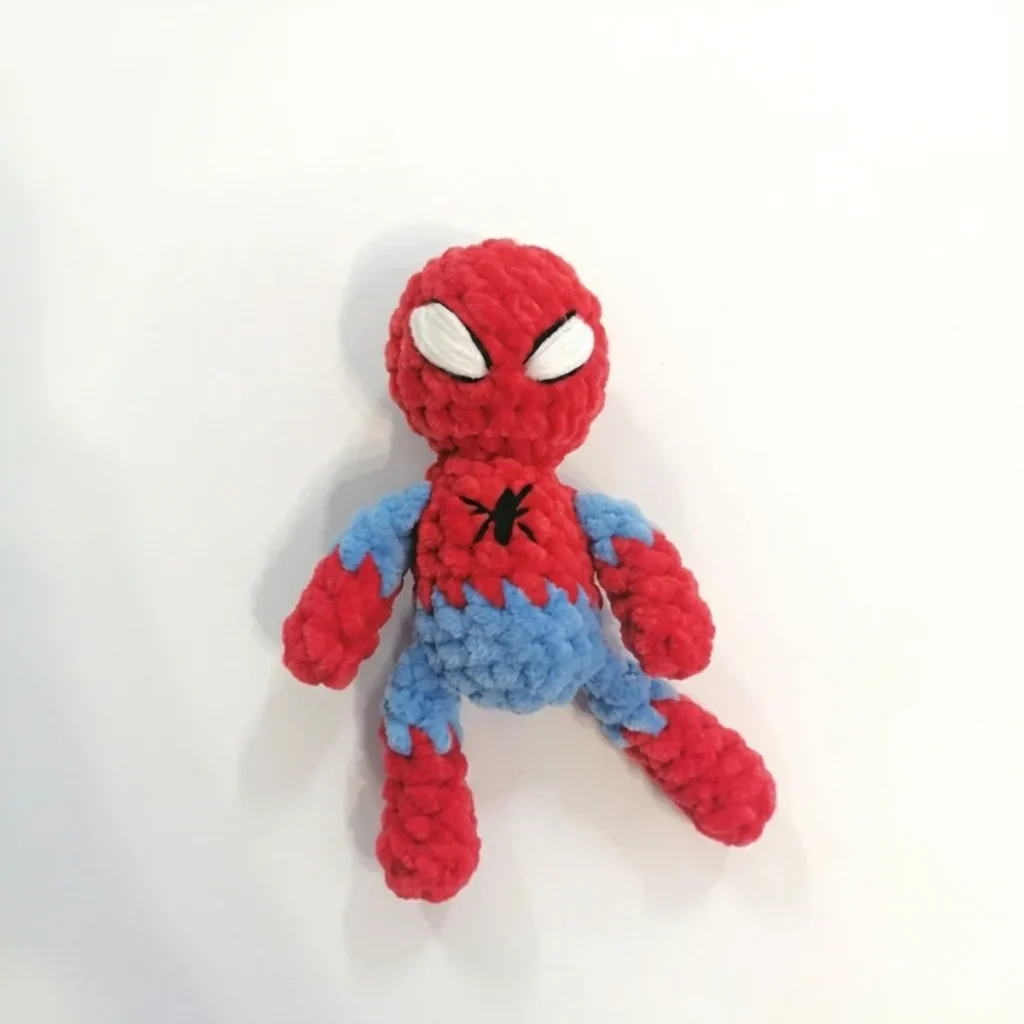
A chenille amigurumi keychain pattern with color-changed limbs and a spiral body-head.
- Level
- Intermediate
- Time
- 4-6 hours
- Hook
- 3.75 mm
- Yarn
- Bulky
Pattern highlights
- Begin the body in blue at the bottom, increasing evenly, then join both legs directly into the round as you work.
- Thread a cord through the finished body to act as the keychain's hanging spine.
- Knot the arms and legs onto that same cord so the figure hangs in a swinging pose.
- Embroider the eyes and web detail, then attach the keychain ring.
About This Pattern
This is the kind of piece I stash in the small-projects drawer, next to the other keychain figures that took an evening instead of a week. It is built from chenille, which changes the math on amigurumi a little — bulkier yarn, fewer rounds needed to reach a believable shape. A figure this size lives on a bag or a hook by the door, not on a shelf.
The construction leans on two things I like tracking in a notebook: a color change worked mid-round rather than at a round's start, and legs joined directly into the body rather than sewn on after the fact. The body-head is one continuous spiral, no breaks, which keeps the whole torso-to-head transition invisible from the outside.
What comes out the other end is a small red-and-blue figure, arms and legs finished separately then pulled into the main piece as it grows. It is not a display amigurumi. It is a keychain, meant to be handled, so the chenille's slight loft actually works in its favor — small dents from a pocket won't show.
Worth knowing
The satisfaction here is in the joins, not the shaping. Working the legs flat at the tip and then stitching them into the body mid-round, through a body stitch and an edge stitch at once, is a small trick worth learning once. The mid-round color change from red to blue on the arms and from blue to red on the body means no dye-lot matching at a seam — the transition happens inside a round instead. And because the whole body-head is one continuous spiral with a stitch marker tracking the back seam, there is no assembly step for the head at all. It is already there when the last round ends. For a first project using chenille, this one teaches the yarn's forgiving stitch definition without asking for a lot of rounds to prove it.
Common mistakes
- Losing the round marker in a spiral Move the stitch marker up at the end of every round, right as you finish it, not after starting the next one.
- Color change leaving a lump Change yarns cleanly at the end of the stated round, not mid-stitch, and pull the old color snug before continuing.
- Skipping the back-loop-only round on legs Work that single round into back loops only, since it's what creates the bend line the leg needs.
- Joining legs asymmetrically Count stitches on both sides of the center front before joining, so both legs land at matching points in the round.
- Stuffing the arms or legs anyway Leave the arms and legs unstuffed as directed — they need to lie flat for the joining stitches to work.
- Chenille looking loose or gappy Keep your tension tight throughout — chenille is forgiving but can show gaps if you crochet loosely, letting the fiberfill show through the finished fabric.
- Cramming stuffing in at the very end Add fiberfill in small amounts every few rounds as you close the head, rather than all at once, to avoid lumpy shaping and keep more control over the final silhouette.


Intermediate
Progress Tracker
0 of 0 rounds
Tap a round to tick it off — your place is saved on this device.
The kit
- Yarn (Main): Plush chenille yarn, approx. 100g / 120 yds — Red (approx. 15g per keychain) and Blue (approx. 5g per keychain). Recommended: any bulky-weight chenille such as Wolans Bunny Baby. CYCA weight: Bulky (#5).
- Yarn (Detail): White and black yarn for embroidering eyes and web detail. Recommended: a lighter-weight chenille or soft DK-weight yarn.
- Hook (Main): US F-5 / 3.75 mm
- Hook (Detail): US B-1 to C-2 / 2.5–3 mm (for embroidery yarn)
- Fiberfill stuffing
- White felt + super glue (alternative to embroidered eyes)
- Stitch marker
- Tapestry needle
- Scissors
- Sewing thread or tightening thread (for securing legs)
- Keychain ring
Arms (Make 2)
Begin with red yarn. Do not stuff.
Round 15 sc in MR. (5)
Round 25 sc. (5)
Round 35 sc. (5)
Round 45 sc. At the end of this round, change to blue yarn. Fasten off red. (5)
Round 55 sc. (5)
Round 65 sc. (5) Flatten the piece in half. Working through both layers, sc across — 2 sc total — to close the seam. Fasten off, leaving a long tail for assembly.
Legs (Make 2)
Begin with red yarn. Do not stuff.
Round 16 sc in MR. (6)
Round 26 sc BLO. (6)
Round 32 sc, dec, 2 sc. (5)
Round 45 sc. (5)
Round 55 sc. At the end of this round, change to blue yarn. Fasten off red. (5)
Round 65 sc. (5)
Round 75 sc, then work 1 additional sc to center the seam. Flatten the piece in half. Working through both layers, sc across — 2 sc total — to close the seam. Fasten off, leaving a long tail for assembly.
Body-Head (worked as one continuous piece)
Begin with blue yarn. Place SM at the back/spine position and move it up each round. — Bottom / Hips —
Round 17 sc in MR. (7)
Round 2inc in each st around. (14)
Round 32 sc, [join Left Leg: sc through next body st AND first open edge st of flattened Leg, sc through same body st AND second open edge st of Leg], 6 sc, [join Right Leg: sc through next body st AND first open edge st of flattened Leg, sc through same body st AND second open edge st of Leg], 2 sc. (14) Ensure both legs hang symmetrically relative to the center front.
Round 414 sc. At the end of this round, change to red yarn. Fasten off blue. (14) — Torso —
Round 514 sc. (14)
Round 614 sc. (14)
Round 714 sc. (14)
Round 83 sc, [join Left Arm: sc through next body st AND first open edge st of flattened Arm, sc through same body st AND second open edge st of Arm], 5 sc, [join Right Arm: sc through next body st AND first open edge st of flattened Arm, sc through same body st AND second open edge st of Arm], 2 sc. (14) Verify arms are level and symmetrical. Add a sl st adjustment if needed to realign marker position. Stuff the body firmly now before continuing. — Neck —
Round 9dec 7 times around. (7)
Round 107 sc. (7) — Head —
Round 11inc in each st around. (14)
Round 12[3 sc, inc, 2 sc, inc] repeat twice. (18)
Round 1318 sc. (18)
Round 1418 sc. (18)
Round 1518 sc. (18)
Round 1618 sc. (18) Stuff the neck and head firmly before closing.
Round 17[sc, dec] repeat 6 times. (12)
Round 18dec 6 times. (6) Fasten off, leaving a tail. Weave the tail through the remaining 6 stitches, pull tight to close the opening, and weave in the end.
Assembly
Step 1Attach the keychain cord first. Crochet a twisted cord (I-cord) or a length of chain to your desired length. This cord will thread through the body and serve as the hanging spine of the keychain.
Step 2Thread arms and legs onto the cord. Position them so the figure hangs upside-down in Spider-Man’s classic web-swinging pose.
Step 3Secure all limbs. Use sewing thread to knot each limb firmly onto the cord so they don’t slip.
Step 4Embroider the eyes — Method A: Using white yarn and your detail hook or tapestry needle, embroider the eye whites onto the head. Outline and add detail using black yarn.
Step 5Embroider the eyes — Method B (felt alternative): Cut eye shapes from white felt and attach with super glue.
Step 6Embroider the chest emblem. Using black yarn, sew Spider-Man’s spider emblem onto the chest area of the body.
Step 7Attach the keychain ring to the top of the cord.
Step 8Weave in all remaining ends securely.
Finishing
- Weave in the color-change ends from red to blue on the arms and blue to red on the body before assembly.
- Skip stuffing the arms and legs as directed, but stuff the body-head firmly enough to hold its shape on the cord.
- Embroider the eyes and web detail last, once all limbs are knotted onto the cord and hanging correctly.
Why it works
The body-head is worked as a single continuous spiral with a stitch marker held at the back seam, so torso, neck and head form without a seam or restart.
Legs are joined into the body mid-round by crocheting through a body stitch and a leg edge stitch together, which sets the leg's angle at the moment it's attached rather than after.
What it becomes
- Clip it to a backpack zipper alongside other small amigurumi keychains for a collected, well-worn look.
- Hang it from a bag strap where its bulky chenille body can take some bumping around without losing shape.
- Give it as a small handmade extra tucked into a larger gift, since it stands alone as a finished object.
Original pattern: https://amigurumicorner.com/spider-man-amigurumi-keychain-pattern/
FAQ
Do I need to stuff the arms and legs?
No, the pattern says not to stuff them. They stay flat on purpose so the leg-joining stitches catch both edges cleanly.
What if I don't want embroidered eyes?
The materials list includes white felt and super glue as an alternative to embroidery. Either method finishes the face after the limbs are attached. For young children, embroidered eyes are the safer choice since there's nothing to pull off or swallow; felt eyes give a crisper, more graphic look for display pieces or older fans.
How do the legs stay attached long-term on a keychain?
Sewing thread is used to knot each limb onto the cord after threading, which is sturdier than relying on the crochet join alone. That knot is what takes the daily stress of being carried around.
How do I prevent the arms and legs from twisting on the cord?
After threading each limb onto the cord, secure it with a double knot of sewing thread tied tightly around the cord at the limb's attachment point. You can also add a small dab of fabric glue to the knot for extra security. Check that each limb is positioned symmetrically before the glue sets.
Is this pattern suitable for beginners?
Yes — this is a great beginner amigurumi project. The stitch list is limited to single crochet, increase, and decrease, with no advanced stitches required. The trickiest step is the joined limb rounds (Rnds 3 and 8 of the Body-Head), but taking it slowly and counting stitches on both sides before joining makes it manageable.