
Free Pattern
Step-by-Step
Crochet
GarmentsSunflower granny square baby dress crochet pattern
A top-down baby dress with sunflower motifs, fan shell lace, and a scalloped hem.
- Level
- Intermediate
- Time
- 18-25 hours
- Hook
- 12 mm
- Yarn
- Worsted
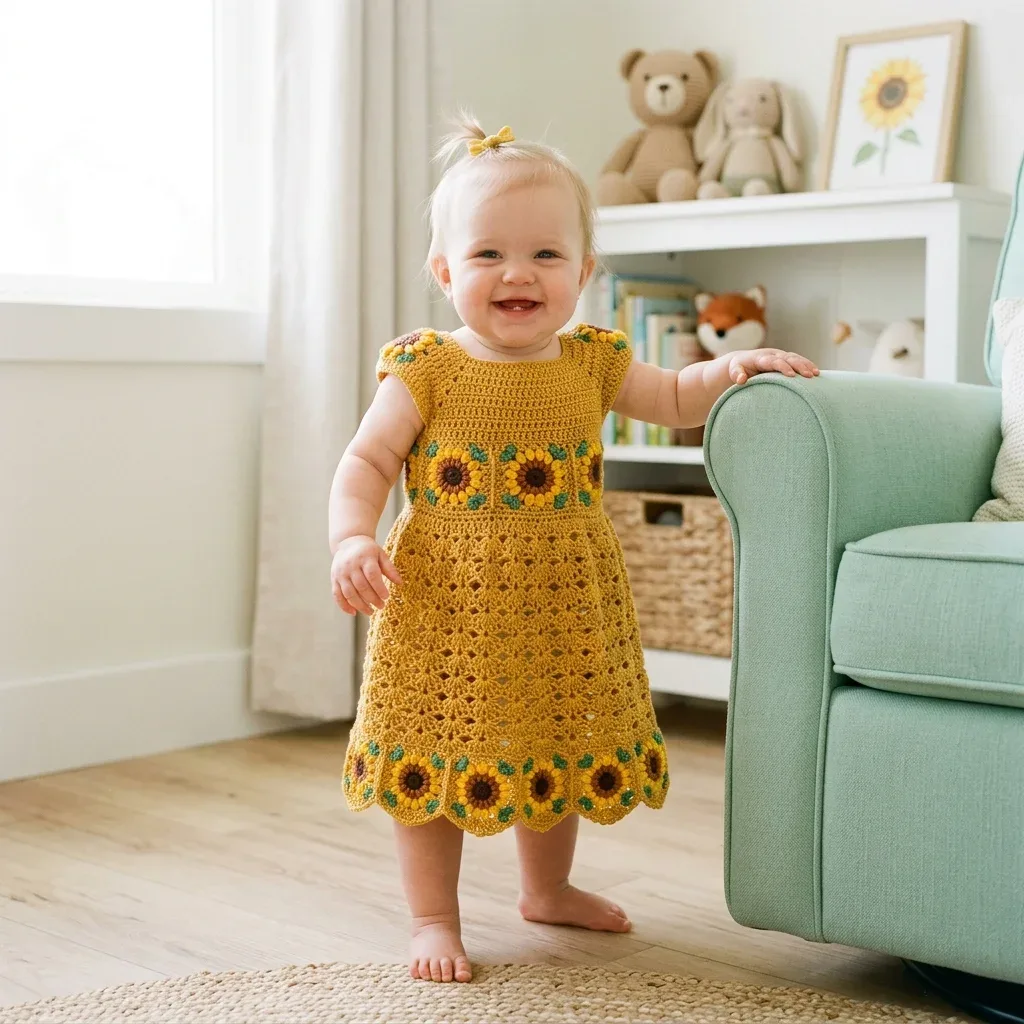
Pattern highlights
- Work the yoke flat in rows to build the back button placket before joining it into a round.
- Make twenty sunflower motifs in advance, since they are needed for the band, hem, and shoulders.
- Join the yoke into a seamless round from the underarm down once the placket rows are complete.
- Attach nine sunflower motifs around the waistline to form the accent band.
- Work the fan shell lace skirt section, which opens up the drape below the waistband.
- Add nine more sunflower motifs for the hem border, then finish with the scalloped edging.
- Sew on the two shoulder sunflowers and the buttons, then weave in every end.
About This Pattern
This is the kind of pattern I file under 'ambitious weekend project, several weekends.' It sits near the top of a baby-garment collection, past the simple hats and burp cloths. Twenty sunflower motifs is a real commitment. I like that it rewards patience rather than speed.
The techniques stack up. You work a flat yoke for the button placket, join into the round, build sunflower granny squares with bobble or cluster centers, then open into a fan shell lace skirt. Color changes happen inside the motifs, not just between rounds, which keeps you honest about tension.
What comes out the other end is a top-down dress sized for 12 months, with a sunflower band at the waist, a sunflower hem border, and two more motifs sitting on the shoulders. The scalloped edge finishes it like a hem that was pressed, not just bound off.
Worth knowing
I love a pattern that makes you repeat a technique until it becomes muscle memory, and twenty sunflower motifs will do that. Each one uses a magic ring center, a color change into CB, and petals worked into the round below rather than the round just made. That front-post petal trick is the detail that makes the motif look dimensional instead of flat. Then the skirt shifts gears entirely into fan shell lace, open and drapey, which is a nice contrast after all that dense motif work. Finishing with a scalloped edge ties the whole thing together. It is a project that teaches you three or four skills in one go, and you end up with something a baby will actually wear.
Common mistakes
- Losing the marker positions on the yoke Mark all four raglan points on Row 1 before increasing. If you skip this, the five sections will not line up by the increase row.
- Cutting CB between motif rounds The pattern has you carry CB loosely rather than cut it, since Round 4 reattaches it. Snipping it early means rejoining yarn you did not need to rejoin.
- Working petals into the wrong round Round 4 petals go into Round 2's stitches, not Round 3's. Check which round sits in front before inserting your hook.
- Skipping the gauge swatch Wash and dry the swatch before measuring, since this yarn is machine washable and will relax. A tight swatch now means a dress that does not fit at 12 months.
- Uneven motif placement around the waistband Count sunflower motifs before attaching, nine for the waist and nine for the hem. Mismatched spacing will throw off the fan shell lace round that follows.


Intermediate
Progress Tracker
0 of 0 rounds
Tap a round to tick it off — your place is saved on this device.
The kit
- Lion Brand Pound of Love in the Mustard colorway works beautifully for this project. It is 100% acrylic, machine washable, soft against baby skin, and widely available.
- Paintbox Yarns Simply DK held double also works well. Technically it is DK weight, but when you hold two strands together, it achieves a worsted equivalent gauge with excellent stitch definition for the lace sections. Try the Mustard Yellow colorway.
- WeCrochet Brava Worsted is another excellent choice. It is 100% premium acrylic, fully machine washable and dryer safe at low heat. Use Canary for MC, Chocolate for CA, Caution for CB, and Peapod for CC.
- Whatever you choose, make sure it is machine washable and safe for sensitive baby skin. Avoid yarns with mohair content because they are difficult to unravel for corrections and can irritate baby eyes.
Yarn
- Main Color (MC) Golden Mustard: approximately 400 to 450 yards or 366 to 411 meters, worsted weight
- Color A (CA) Dark Brown: approximately 30 yards or 27 meters
- Color B (CB) Bright Golden Yellow: approximately 30 yards or 27 meters
- Color C (CC) Leaf Green: approximately 20 yards or 18 meters
Notions
- Stitch markers (at least 4)
- Yarn needle
- Scissors
- Two buttons, half inch or 12 mm (natural or cream color)
- Sewing needle and thread to match MC
How to Make the Sunflower Motif
You will make 20 of these sunflowers total, so it is worth getting comfortable with the technique. Each finished motif is approximately 2 inches or 5 cm across after blocking.
Round 1Center, CA Make a magic ring or ch 4 and join with sl st to form ring. Ch 1, work 8 sc into ring, join with sl st to first sc. (8 sc)
Round 2(CA): Ch 1, work 2 sc into each sc around, join with sl st to first sc. (16 sc)
Round 3Inner petal setup, CB Join CB into any sc. Ch 1. In each sc around, work 1 sc. Join with sl st to first sc. Fasten off CB temporarily but do not cut. Carry loosely or use a separate length. (16 sc)
Round 4Petals, CB Do not turn. Working in front of Round 3, reattach CB to the first sc of Round 2, which is the round below Round 3. Insert your hook under the sc from Round 2. Ch 1. Work the following into each sc of Round 2: (sc, ch 2, sc). Join with sl st. (32 sts, 16 ch 2 loops forming inner ring of petals)
Round 5Outer petals, CB Sl st into first ch 2 sp. Ch 1. In each ch 2 sp from Round 4 work (sc, hdc, bo, hdc, sc). Join with sl st to first sc. (16 petals, 80 sts total)
Round 6Green border, CC Join CC between any two petals, in the sc that sits between petals. Ch 1. Work sc in same sp, then ch 3, skip the 5 st petal group, sc between next petals. Rep around. (16 ch 3 arches)
Round 7(CC): Sl st into first ch 3 arch. Ch 1. Work (sc, hdc, dc, hdc, sc) into each ch 3 arch around. Join with sl st to first sc. Fasten off. (16 leaf bumps, 80 sts)Weave in ends and block each motif flat to exactly 2 inches or 5 cm.
Section 1: Yoke
The yoke is worked flat in rows first to establish the back opening, then joined into a round.
Set up: With MC and hook, ch 55.
Round 1(RS): Sc into 2nd ch from hook and into each ch across. Turn. (54 sc) This is the neckline edge. Place stitch markers at positions 10, 19, 36, and 45 counting from the right edge. These four markers designate your raglan points. You now have five sections: right back (9 sts), right sleeve (9 sts), front (17 sts), left sleeve (9 sts), left back (9 sts).(9)
Round 2(WS): Ch 1, turn. Sc across all 54 sts. (54 sc)
Round 3RS, increase row Ch 1, turn. Sc to 1 st before first marker, (sc, sc) into next st, slip marker up, sc into marker st, (sc, sc) into next st. Continue this pattern at each of the four marker points. Sc to end. (8 increases, 62 sc)
Round 4(WS): Ch 1, turn. Sc across all sts, slipping markers. (62 sc)
Round 5RS, increase row Rep Row 3 increases at all four markers. (70 sc)
Round 6(WS): Ch 1, turn. Sc across. (70 sc)
Round 7RS, increase row Rep Row 3 increases. (78 sc)
Round 8(WS): Sc across. (78 sc)
Round 9RS, increase row Rep Row 3 increases. (86 sc)
Round 10(WS): Sc across. (86 sc)
Round 11RS, increase row Rep Row 3 increases. (94 sc)
Round 12(WS): Sc across. (94 sc)
Round 13RS, increase row Rep Row 3 increases. (102 sc)
Round 14(WS): Sc across. (102 sc) Checkpoint: Your yoke should measure approximately 3 inches or 7.5 cm tall from the foundation chain and 18 inches or 45.5 cm wide across the last row.
Section 4: Skirt Lace Section
Attach MC to the bottom edge of the sunflower waistband ring.
Round 1of Skirt (foundation): Join MC with sc into bottom of any motif. Work sc evenly around the lower border of all 9 motifs, placing 8 sc per motif bottom edge. Join with sl st. (72 sc)
Round 2Ch 3 (counts as dc). Dc in each st around. Join with sl st to top of ch 3. (72 dc)
Round 3(begin fan lace): Ch 1. Sc in first st. (Skip 2 dc, Fan Shell into next dc, skip 2 dc, sc into next dc) rep around. Join with sl st to first sc. (12 fan shells, 12 anchor sc)
Round 4Ch 3. Dc into ch 1 sp of first fan, (ch 1, dc) into each ch 1 sp of same fan shell. Ch 2. Dc into anchor sc. Ch 2. (Dc, ch 1, dc, ch 1, dc, ch 1, dc, ch 1, dc) into center ch 1 sp of next fan shell. Ch 2. Dc into anchor sc. Ch 2. Rep around. Join with sl st to top of ch 3. (12 fans with dc columns between, 24 ch 2 sps)
Round 5Ch 1. Sc in first ch 2 sp. (Fan Shell into center ch 1 sp of fan from previous round, sc into ch 2 sp, sc into dc column, sc into next ch 2 sp) rep around. Join with sl st to first sc. (12 fans plus 36 sc anchor sts)
Round 6Ch 3 (counts as dc). Working across Round 5, dc into each sc anchor, into each dc of each fan, and into each ch 1 sp of each fan. Join. (144 dc)
Round 7Second fan tier Ch 1. Sc in first dc. (Skip 2 dc, Fan Shell into next dc, skip 2 dc, sc into next dc) rep around. Join with sl st to first sc. (24 fan shells, 24 anchor sc)
Round 8Ch 3. (Dc into ch 1 sps of fan, ch 2 between fans into anchor sc, ch 2) rep around. Join. (24 fans continued)
Round 9Ch 1. Sc in first ch 2 sp. (Fan Shell into center ch 1 sp of fan, sc into ch 2 sp, sc into dc, sc into ch 2 sp) rep around. Join. (24 fans plus 72 sc)
Round 10(solid dc reset): Ch 3 (counts as dc). Dc into each st and ch sp around. Join. (288 dc)Checkpoint: After Round 10, the piece should measure approximately 8 inches or 20 cm from the shoulder.
Section 6: Sleeve Edging
Place the 21 held sleeve sts back on hook. Attach MC to underarm.
Round 1Ch 1. Sc across 21 held sleeve sts, then work 4 sc into the underarm bridge chain. Join with sl st. (25 sc)
Round 2Ch 1. Sc in each st around. Join. (25 sc)
Round 3Picot edging Sc in first st. (Picot, sk 1, sc in next st) rep around. Join with sl st. Fasten off.Repeat for second sleeve.
Section 7: Neckline Edging
Attach MC to right edge of back opening at the neckline.
Round 1Button band, right side Ch 1. Work 8 sc evenly down the right back opening edge. Turn. (8 sc)
Round 2Ch 1. Sc in each of 8 sc. Turn. (8 sc)
Round 3Buttonholes Ch 1. Sc in 2 sc. (Ch 2, sk 2, sc in 2 sc) twice. Turn. (2 ch 2 sps formed)
Round 4Ch 1. Sc in 2 sc. (2 sc into ch 2 sp, sc in 2 sc) twice. Fasten off. (8 sc) Attach MC to left back opening at bottom edge. Work 4 rows of sc (8 sc each, no buttonholes) as a plain button band. Fasten off.Neckline round: Attach MC to top right corner of right button band. Ch 1. Work sc evenly along the right band top, across the neckline foundation chain (approximately 54 sc), and down the left band. Work (sc, ch 1, sc) at each corner. Join with sl st to first sc. Work one round of picot edging. Fasten off.
Section 5: Hem Border and Scallop Edging
Round 11Ch 1. Sc in each dc around. Join. (288 sc)
Round 12(Sc in next 14 sc, sc2tog) 18 times. Join. (270 sc) Make 9 more sunflower motifs and block them. Pin the 9 motifs evenly around the skirt at Round 12, leaving 21 free sc sts between each pair of adjacent motifs. Sew the top border of each motif to Round 12.
Round 13Hem scallop edging Attach MC at the bottom edge of any hem motif’s CC border. Ch 1. Sc across bottom of motif (8 sc), then between motifs work: ch 3, skip 2 sts, sc into next st, (ch 3, skip 2, sc) across the 21 free sts to next motif. Rep around all 9 motifs. Join.
Round 14(scallop shells): Sl st into first ch 3 arch. Ch 1. (Sc, hdc, dc, dc, dc, hdc, sc) into each ch 3 arch around. Between arches adjacent to motif bottoms, work 1 sl st into the motif join. Join with sl st to first sc. Fasten off MC.
Section 3: Waistline Sunflower Band
Round 19Ch 3 (counts as first dc), dc in each st around. Join with sl st to top of ch 3. (72 dc)
Round 20Ch 3 (counts as dc), dc in each st around. Join. (72 dc) Now make 9 sunflower motifs using the instructions above. Join them into a ring using the join as you go method on Round 7. When working the last leaf bump of each motif, insert your hook through the corresponding ch 3 arch of the adjacent motif simultaneously and sl st to join.Sew the completed sunflower band ring to Round 20 of the bodice using MC and yarn needle. Space the 9 motifs evenly, which works out to every 8 stitches of Round 20 aligning with one motif center. Pin all motifs before sewing.
Shell (3 dc shell)
Work (dc, dc, dc) all into same stitch or space.
Section 8: Shoulder Sunflower Embellishments
Make 2 additional sunflower motifs. Place one at each shoulder, centered over the raglan yoke line, with the bottom of the motif sitting just at the armhole edge. Sew in place using CC yarn and a yarn needle.
Assembly
Step 1Weave in all ends securely using a yarn needle. Bury ends at least 1 inch or 2.5 cm in matching color fabric before trimming.
Step 2Sew the two buttons to the left back button band, aligning them with the buttonholes in the right band. Use sewing thread doubled and sew a small fabric scrap or felt circle behind each button on the inside to prevent the buttons from pulling through.
Step 3Button placement: First button at 1 inch or 2.5 cm from top of neckline. Second button at 2.5 inches or 6.3 cm from top of neckline.
Finishing
- Weave in all ends from the motifs, color changes, and seams, burying each one in matching-color fabric.
- Sew the two shoulder sunflower motifs in place as the final embellishment detail.
- Attach the two buttons to the left back band at the marked positions, backed with a small fabric scrap.
Why it works
The yoke rows place increases at four marker points, which is how the five sections, two backs, two sleeves, and a front, come to be.
The yoke is worked flat before joining because the back placket needs two separate edges for the buttonholes and button band.
Round 4 of the sunflower motif works into the round below Round 3, which is what lifts the petals forward instead of leaving them flat against the base.
What it becomes
- A dressed-up outfit for a 12-month-old, paired with simple leggings so the sunflower band stands out.
- A baby shower gift that reads as handmade without looking like a blanket everyone else brought.
- A keepsake piece for a nursery shelf between wearings, since the motifs hold their shape well.
Original pattern: https://bunnypatterns.com/crochet-sunflower-baby-dress-free-pattern/
FAQ
Can I make this dress in a different size?
The pattern is written specifically for 12 months, fitting approximately 18 to 20 pounds. Resizing would mean recalculating the yoke increases and motif counts yourself.
Do I need to know bobble stitches before starting?
Yes, the sunflower motif centers rely on bobble or cluster stitches. I would practice a sample motif first if you have not made one before.
Why is the yoke worked flat instead of in the round?
The flat rows create the two separate edges needed for the back button placket. Once that opening is established, the piece joins into a seamless round.
What happens if my gauge is off?
This pattern is gauge-sensitive because the fit depends on the yoke increases and the fan shell lace repeats lining up. Swatch, wash, and dry before you commit to the full dress.