Free Pattern
Step-by-Step
Crochet
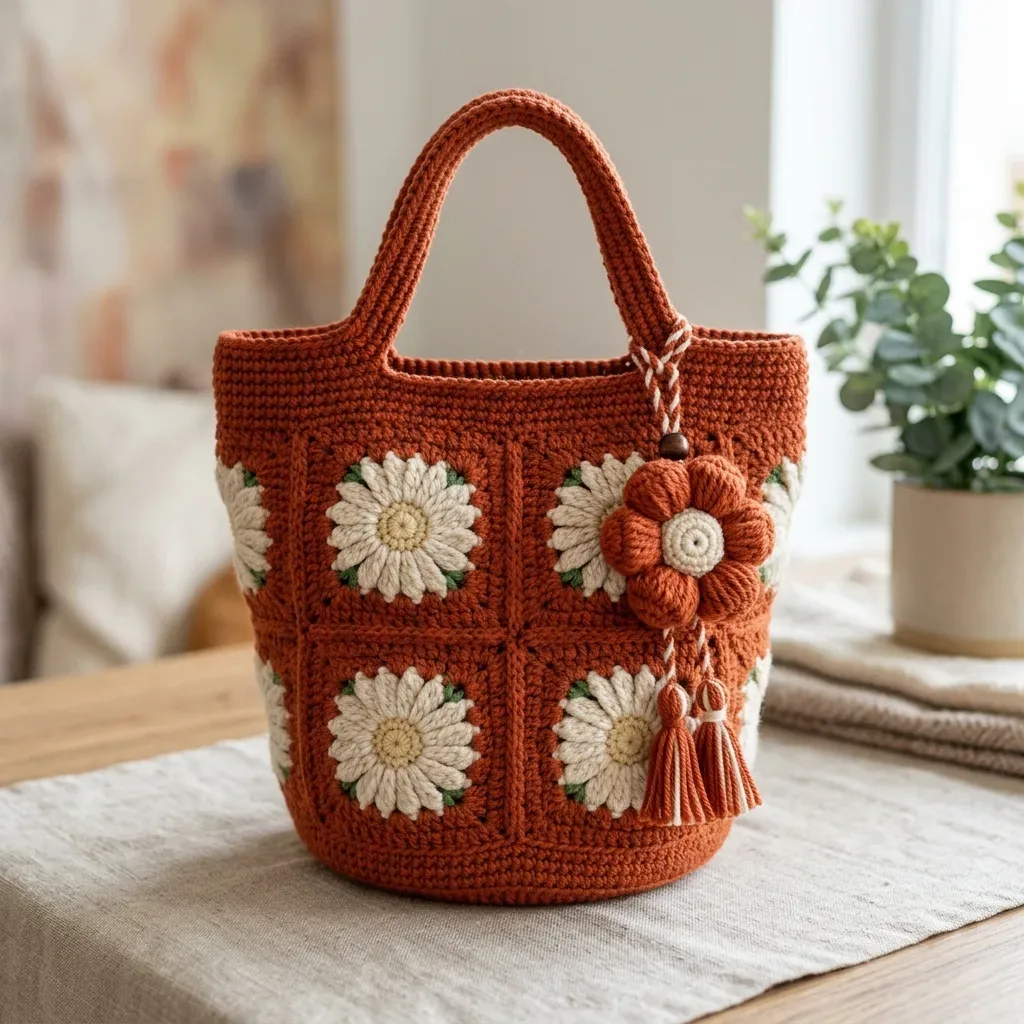
BagsTerracotta boho flower granny square bucket bag
A join-as-you-go granny square tote with daisy motifs and a structured oval base.
- Level
- Intermediate
- Time
- 14-17 hours
- Hook
- 5.0 mm
- Yarn
- Worsted
Pattern highlights
- Build six daisy squares from the center out, working the flower rounds first and the terracotta granny frame second.
- Use the join-as-you-go technique to connect squares into the bucket body as you finish each one, skipping a separate seaming step.
- Attach the base to the assembled square body to form the standing bucket shape.
- Add the top band in Color A to finish the upper edge cleanly.
- Make two handles as flat strips, then fold each lengthwise and slip stitch the long edge into a closed tube.
- Finish with the 3D flower charm and wooden bead embellishments once the main bag is assembled.
About This Pattern
I keep a shelf in my notebook for pieces that cross over from motif work into actual furniture for your life. This bag sits there. It starts as six separate granny squares, each with its own daisy, and ends up as a bucket you can carry groceries in. That jump from flat flower to load-bearing object is the part I find myself circling back to.
The techniques stack politely. Magic ring centers, a petal round worked in chained spokes, a terracotta granny frame, then join-as-you-go seaming instead of a separate sewing step. The base is a flat oval built from a foundation chain with corner increases, worked at a tighter gauge for firmness. Handles are strips folded and slip-stitched into tubes.
What comes out the other end is six daisy squares arranged into a standing bucket shape, two per side and one per end, seamed to an oval base and finished with a top band, folded handles, and a small 3D flower charm. It holds its shape without a lining, which is the whole point.
Worth knowing
I like projects that teach you a trick mid-stream, and the join-as-you-go here does that. Instead of making six squares and sewing them later, you connect them as you finish each one, so the seaming is baked into the making. The daisy itself is satisfying too: a magic ring center, then a petal spine round worked outward in chained spokes before the terracotta granny frame closes around it with sage leaf corners. Add a base worked at a tighter gauge for backbone, folded handles slip-stitched into tubes, and a 3D flower charm with wooden beads, and you get real variety in one project. Nothing here is just repeating the last round. Each section asks for a slightly different skill, which keeps my attention on it longer than a plain granny throw ever does.
Common mistakes
- Losing the first sc in the petal round Mark the join point before starting Round 2, since the chained spokes make it easy to lose track of the starting stitch.
- Joining squares in the wrong order Lay out all six squares before starting the join-as-you-go step so you know which edges meet before you connect them.
- Handle tube looks lopsided Fold the handle strip right side out and align both long edges carefully before slip stitching, so the tube doesn't twist.
- Using the wrong yarn for structure Stick with cotton or a cotton blend as noted; high stretch acrylic won't hold the bucket shape no matter how tightly you work the base.
Intermediate
Progress Tracker
0 of 0 rounds
Tap a round to tick it off — your place is saved on this device.
The kit
- Color A (Terracotta): approximately 420 yards / 384 meters, worsted weight, 100% cotton or cotton acrylic blend
- Color B (Cream/Ivory): approximately 210 yards / 192 meters, worsted weight, same fiber
- Color C (Sage Green): approximately 40 yards / 37 meters, worsted weight, same fiber
- Lion Brand 24/7 Cotton in Terracotta, Ecru, and Sage works beautifully. This 100% mercerized cotton gives excellent stitch definition for the raised daisy petals and holds the bag shape firmly without blocking. It is machine washable too.
- Paintbox Yarns Cotton DK is another solid choice. Look for Pillar Red (close to terracotta) and Paper White. If using DK weight, you may need to hold it double or adjust your gauge.
Important
- Avoid high stretch acrylic yarn for this project. It will not hold the bucket shape. Stick with cotton or cotton blends.
Primary hook
- US size H-8 / 5.0 mm
Optional
- US size G-6 / 4.0 mm for tighter tension on the base
- 6 stitch markers
- Yarn needle or tapestry needle
- Scissors
- 2 wooden beads, approximately 12 mm diameter, dark brown
- Bag base insert or heavy cardboard cut to approximately 12.5 by 5.5 inches (optional but recommended for extra structure)
Section 1: Daisy Granny Square (Make 6)
Each square builds outward from a center daisy motif. Rounds 1 through 3 create the flower. Rounds 4 through 5 create the terracotta granny frame with green leaf accents.
Round 1Center Ring, Color B Make a magic ring. Ch 3 (counts as first dc), work 11 dc into ring. Pull tail to close ring. Sl st to top of beg ch-3 to join.(12)
Round 2Petal Spine Round, Color B Ch 1 (does not count as st throughout). Work 1 sc into same st as join.[Ch 4, sk 1 dc, 1 sc into next dc] 5 times. Ch 4, sl st to first sc to join. Do not fasten off.(6 ch-4 loops)
Round 3Petal Round, Color B Sl st into first ch-4 loop. Into the same ch-4 loop: work [ch 1, 5 dc, ch 1, sl st to base sc of loop] to form one petal.Move to next ch-4 loop: sl st into loop.[Into loop: ch 1, 5 dc, ch 1, sl st to base sc] repeat for all remaining 5 loops.Fasten off Color B.(6 petals of 5 dc each = 30 dc petals total, plus 6 sl sts at base)
Your daisy center is complete. The cream flower has 6 petals radiating from center.
Round 4Background Ring, Color A Join Color A to any BLO sc between petals. Ch 3 (counts as dc).In the same st: 2 dc. (first cluster of 3 dc)Ch 2.[3 dc in next BLO sc between petals, ch 2] 5 times.Sl st to top of beg ch-3.(6 clusters, 6 ch-2 sps)
Round 5Square Formation, Color A Sl st into first ch-2 sp.
Note: You have 6 source spaces. You will distribute them as corners at spaces 1, 2, 4, 5 with side spaces at 3 and 6.
Anchor 1: Ch 4 (counts as dc + ch 1). Into same anchor: 2 dc. Ch 2. 3 dc into same anchor. Ch 1. (corner 1 complete)
Anchor 2: 3 dc into anchor 2. Ch 2. 3 dc into anchor 2. Ch 1. (corner 2 complete)
Anchor 3: 3 dc into anchor 3. Ch 1. (side cluster between corners 2 and 3)
Anchor 4: 3 dc into anchor 4. Ch 2. 3 dc into anchor 4. Ch 1. (corner 3 complete)
Anchor 5: 3 dc into anchor 5. Ch 2. 3 dc into anchor 5. Ch 1. (corner 4 complete)
Anchor 6: 3 dc into anchor 6. Ch 1. (side cluster between corners 4 and corner 1)
Sl st to 3rd ch of beg ch-4 to join.
(10 clusters of 3 dc, 4 ch-2 corner spaces, 4 ch-1 side spaces)
Color C Leaf Accents: After Round 5, fasten off Color A. Join Color C into any corner ch-2 sp. Work [sl st, ch 3, sl st] into each of the 4 corner ch-2 spaces. This creates a small leaf shaped accent at each corner. Fasten off Color C. Weave all ends.
Completed square: approximately 6 inches / 15 cm. Make 6 total.
Checkpoint: After completing all 6 squares, each should measure 6 inches / 15 cm when laid flat. If squares vary by more than 1/4 inch, wet block to uniform size before joining.
Section 2: Base (Color A)
The base is a flat oval worked in the round.
Foundation: Ch 19 with Color A.
Round 1Starting in 2nd ch from hook: sc across 18 ch sts (18 sc), then work 3 sc into the last ch (corner turn), continue along the underside of the foundation chain: sc in next 17 ch sts, then work 2 sc into the first ch st (to complete the oval). Sl st to first sc to join.(40)
Round 2Ch 1. 1 sc in each of next 18 sc. 3 sc in next sc (corner inc). 1 sc in each of next 18 sc. 3 sc in next sc (corner inc). Sl st to first sc.(44)
Round 3Ch 1. 1 sc in each of next 19 sc. 3 sc in next sc. 1 sc in each of next 20 sc. 3 sc in next sc. Sl st.(48)
Round 4Ch 1. 1 sc in each of next 20 sc. 3 sc in next sc. 1 sc in each of next 22 sc. 3 sc in next sc. Sl st.(52)
Round 5Ch 1. 1 sc in each of next 21 sc. 3 sc in next sc. 1 sc in each of next 24 sc. 3 sc in next sc. Sl st.(56)
Round 6Ch 1. 1 sc in each of next 22 sc. 3 sc in next sc. 1 sc in each of next 26 sc. 3 sc in next sc. Sl st.(60)
Round 7Ch 1. 1 sc in each of next 23 sc. 3 sc in next sc. 1 sc in each of next 28 sc. 3 sc in next sc. Sl st.(64)
Round 8Ch 1. 1 sc in each of next 24 sc. 3 sc in next sc. 1 sc in each of next 30 sc. 3 sc in next sc. Sl st.(68)
Round 9Ch 1. 1 sc in each of next 25 sc. 3 sc in next sc. 1 sc in each of next 32 sc. 3 sc in next sc. Sl st.(72)
Round 10Ch 1. 1 sc in each st around. Sl st to join. (72 sc) Fasten off, leaving a 24 inch / 60 cm tail for seaming.
Base measures approximately 13 by 6 inches / 33 by 15 cm.
Section 6: Handles (Color A, Make 2)
Foundation: Ch 61 with Color A.
Round 1Sc in 2nd ch from hook and in each ch across. Ch 1, turn. (60 sc)
Round 2through 6: Sc in each sc across. Ch 1, turn. (60 sc)
Round 7Sc in each sc across. Do not turn. Do not fasten off. Folding join: Fold the handle strip in half lengthwise (RS out), aligning the two long edges. Sl st through both layers along the entire long edge to create a closed strap tube.
Finished handle: approximately 15 inches / 38 cm long and 0.75 inch / 2 cm wide.
Attachment:
Position each handle symmetrically on the top rim. Each handle end sits approximately 3.5 inches / 9 cm from the center front (or back) seam. The handle ends overlap the inside of the top rim by approximately 2 inches / 5 cm.
Using Color A, sc firmly through the handle end and top band layers for 2 inches to secure each end. Use a tapestry needle to reinforce with whip stitches through all layers.
Section 7: 3D Flower Charm
3D Flower (Color A): Make a MR.
Round 1Ch 2, 10 hdc into ring, sl st to top of ch-2. Pull ring closed. (10 hdc)
Round 2Petal Round [Ch 3, 4 dc into same st, ch 3, sl st into same st (petal made), sl st into next st] 5 times. (5 petals)Fasten off, leaving a 12 inch tail for attachment.Braided Cord: Cut 6 strands of Color A and 3 strands of Color B, each 16 inches / 40 cm long.(5)
Divide into 3 groups and braid firmly to approximately 5 inches / 13 cm. Knot both ends. Thread one end through a dark wooden bead and secure with a large knot beneath the bead.
Tassels (make 2, one Color A and one Color B): Wrap yarn 20 times around a 3 inch / 7.5 cm piece of cardboard.
Slide off and tie firmly at top with a 6 inch tail.
Cut bottom loops.
Wrap a contrasting strand around the tassel approximately 0.5 inch / 1.2 cm from the top and tie off.
Trim evenly to approximately 2.5 inches / 6 cm below wrap.
Assembly: Tie both tassels to the bottom of the braided cord below the bead.
Attach the 3D flower to the top of the braided cord.
Stitch the entire charm unit to the upper right side seam of the bag at the top band level.
Section 5: Top Band (Color A)
Round 1 (pickup round): Join Color A at any top edge corner ch-2 sp of the assembled cylinder top.
Ch 1. Work sc evenly around the entire top opening.
Total pickup: 24 sts x 4 sides = 96 sc. Sl st to first sc.
(96 sc)
Round 2through 8: Ch 1. Sc in each st around. Sl st to first sc to join. (96 sc each round)Fasten off after Round 8.(96)
The top band adds approximately 2 inches / 5 cm of solid height above the square grid.
Section 3: Assembling the Square Body
The 6 squares assemble into a cylindrical body: Front panel: 2 squares joined vertically (6 by 12 inch rectangle)
Back panel: 2 squares joined vertically Left side panel: 1 square Right side panel: 1 square
Step 1: Join Front Panel. Hold two squares with RS facing outward and wrong sides together. Using Color A and the JAYG method, join along one shared edge.
Step 2: Join Back Panel. Repeat for back panel.
Step 3: Join Side Squares. Using JAYG, join the left side square to the left edge of the front panel. Then join the right side square to the right edge of the front panel.
Step 4: Close the Cylinder. Join the left edges of the left side square to the left edge of the back panel. Join the right edges of the right side square to the right edge of the back panel.
The assembled cylinder should measure approximately 38 inches / 97 cm in circumference and 12 inches / 30 cm tall.
Section 4: Attach Base
Position the oval base against the bottom opening of the cylinder, right sides both facing out.
With Color A, use a single crochet seam: hold pieces together and sc through both layers all the way around the oval perimeter, matching the 72 stitches of the base to the bottom edges of the four joined squares.
Sc evenly around. Join with sl st. Fasten off and weave in end.
Finishing
- Weave in all ends from the color changes in the daisy rounds and the granny frame before assembly, so joins don't tangle mid-seam.
- Attach the finished oval base to the joined square body once the bucket shape is fully seamed.
- Fold and slip stitch each handle strip into a closed tube, then attach both handles and the 3D flower charm with its wooden beads as the last step.
Why it works
The daisy's petal round is built on chained spokes between skipped stitches, which is what gives the raised, dimensional petal look before the granny frame closes around it.
The base is worked flat from a foundation chain with corner increases at both ends of the oval, which is why it lies flat rather than cupping like a round base would.
The join-as-you-go step replaces a separate seaming pass, so the six squares become the bucket's four sides and two ends as they are connected, not afterward.
What it becomes
- An everyday market tote that pairs well with a denim jacket and simple canvas sneakers.
- A beach or pool bag, since the cotton fiber and firm oval base handle a damp towel without collapsing.
- A project bag for carrying yarn and a small hook, roomy enough thanks to the bucket shape from the six squares.
FAQ
Can I skip the join-as-you-go technique and seam the squares later instead?
You can, but the pattern is written around joining as you go, so seaming later means working out your own stitch placement. The instructions walk through join-as-you-go step by step, which is the easier path if it's new to you.
Do I need the bag base insert or cardboard?
It's listed as optional but recommended for extra structure. The base and tighter-gauge hook already add firmness, but the insert gives the bottom extra rigidity if you're using it as a daily tote.
What happens if I use DK weight instead of worsted?
The materials note suggests holding DK yarn like Paintbox Cotton DK double, or adjusting your gauge, to match the worsted weight the pattern is written for. Otherwise your squares and base will come out smaller than intended.
Why does the base use a smaller hook than the rest of the bag?
The G-6 hook is called out specifically for tighter tension on the base, which helps it hold the bucket's weight without sagging. The squares, handles, and band all use the larger H-8 hook.