
Free Pattern
Step-by-Step
Crochet
AmigurumiTiny Hedgehog Free Crochet Pattern
Make an adorable tiny hedgehog amigurumi with this free crochet pattern using plush and fancy fur yarn for the softest textured spikes.
Level IntermediateTime 4-6 HoursHook 6 mmYarn Worsted
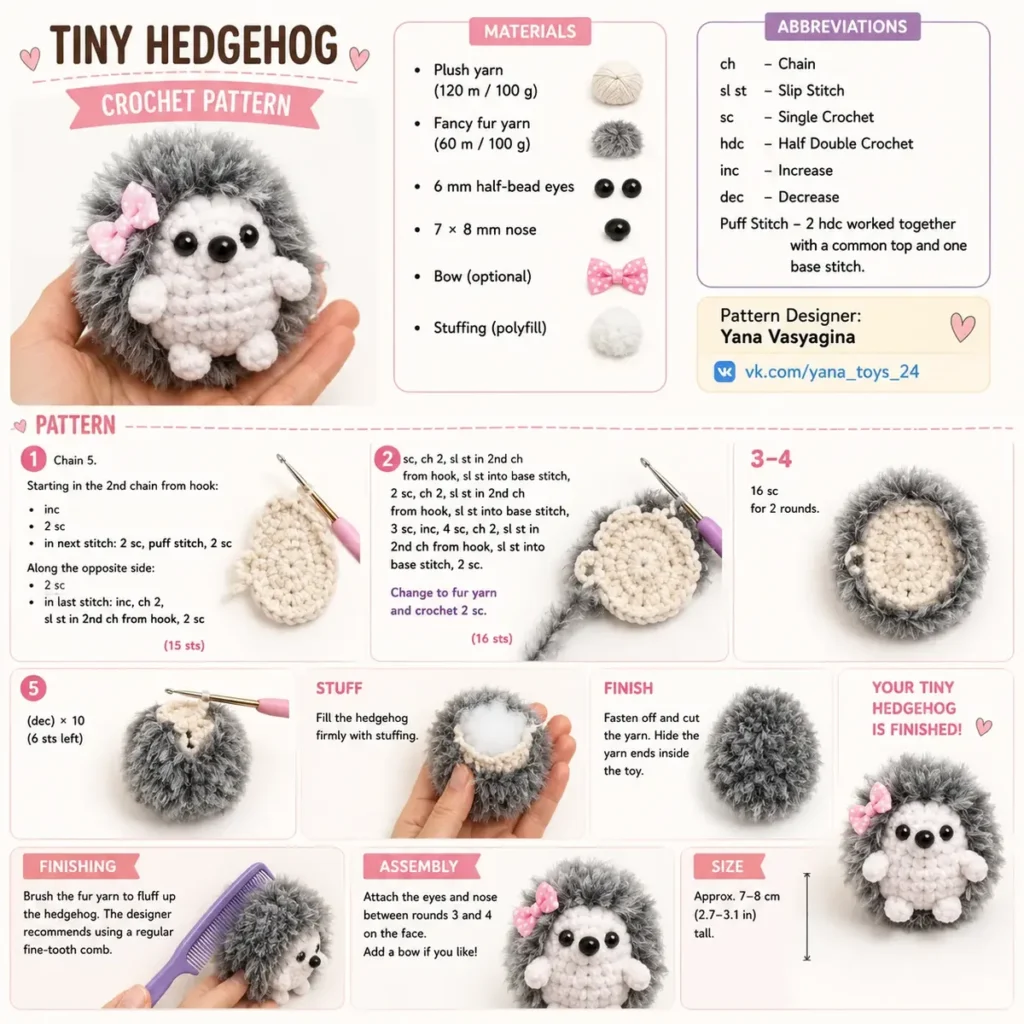
Pattern highlights
- Start by crocheting the rounded plush yarn body, working it up smoothly to form the hedgehog's base shape.
- Continue through all three rounds of the quill portion, letting the fur fibers puff outward as you stitch.
- Stuff the body firmly in small sections, paying extra attention to the head and nose for a rounded finish.
- Attach the half-bead eyes and tiny nose, adjusting placement until the hedgehog's expression feels just right.
- If desired, work the single-round optional bow and stitch it onto the head or body for extra charm.
- Complete the three assembly steps to join all pieces and secure any remaining seams neatly.
- Brush or fluff the fur yarn quills gently to reveal the finished textured coat before displaying your hedgehog.
About This Pattern
This Tiny Hedgehog pattern turns two simple yarn types into the coziest little woodland creature you'll ever hold. What makes this design so special is the clever pairing of soft plush yarn for the hedgehog's rounded body and face with fuzzy fancy fur yarn for those signature spiky quills. It's the perfect project for anyone who loves amigurumi with texture, and it makes an irresistible gift for kids, nature lovers, or anyone who needs a pocket-sized companion to squeeze.
You'll be working with two contrasting yarn weights, attaching half-bead eyes and a tiny nose for that unmistakable hedgehog charm, and shaping a compact body that comes together across a handful of focused sections. This project sits comfortably at an intermediate skill level, mostly because managing the fuzzy fur yarn takes a bit of patience compared to standard smooth yarn. Set aside a relaxed afternoon or evening, and you'll have a finished hedgehog in your hands within 4 to 6 hours.
The finished hedgehog is small enough to nestle in your palm, with a plush, huggable body offset by a delightfully textured coat of spiky fur along its back. It has that irresistible blend of softness and character that makes amigurumi so satisfying to display or gift. Add the optional bow for a touch of personality, and you've got a handmade keepsake that feels just as sweet on a nursery shelf as it does tucked into a gift box.
Variations
One of my favorite things about this hedgehog pattern is how easy it is to make it your own. Try swapping the fancy fur yarn colors for a whole hedgehog family: a caramel-brown fur paired with cream plush yarn for a classic look, or a soft lavender fur with white plush yarn for a pastel nursery version. If you want a more vibrant option, look for novelty fur yarns in variegated autumn tones (rust, gold, and brown) to mimic a hedgehog foraging through fallen leaves. For yarn substitutions, Fur or Fur-Like are great fancy fur alternatives if you can't find the exact plush and fur yarns called for, and any soft worsted-weight yarn like Bernat Baby Blanket or Hobbii Amigo Plush works beautifully for the smooth plush sections. Want to make a bigger cuddle-sized version? Simply size up your hook by 1-2mm and work with a bulkier yarn weight to naturally scale the whole project up without changing the stitch counts. For seasonal fun, add tiny felt leaves or a small acorn charm near the bow for an autumn-themed hedgehog, or swap the bow for a small knit scarf piece for a wintery look. You could also experiment with adding a second, smaller bead for a shinier nose look, or embroider tiny freckles onto the face using contrasting embroidery floss for extra character. If you're making these as gifts or for a craft fair, consider a rainbow set with fur yarn in bright primary colors paired with matching pastel plush bodies. However you customize it, this pattern is flexible enough to become a whole signature collection.
Common mistakes
- Losing stitch definition when working with the fancy fur yarn because the long fibers hide the stitches.
- Slow down and use your fingers to feel each stitch rather than relying on sight, and consider using a stitch marker at the start of each round to stay oriented.
- Mismatched tension between the plush yarn body and the fur yarn quill section, causing puckering.
- Practice a small swatch with both yarns before starting so you can match your hook size and grip pressure for a consistent gauge across sections.
- Placing the half-bead eyes and nose before the head is fully stuffed, leading to a lopsided or flat-looking face.
- Stuff the head firmly first, then hold the eyes and nose up to the face and move them around until the expression looks right before securing them permanently.
- Skipping stitch markers when working the opposite side section, resulting in miscounted rounds.
- Always mark the beginning of each round with a locking stitch marker and move it up as you go so you never lose your place in the 3-round section.
- Under-stuffing the body, leaving the hedgehog floppy instead of firm and huggable.
- Stuff in small pinches as you close each section rather than trying to stuff everything at the very end, packing firmly into the nose and rounded edges.
- Attaching the optional bow too early, making it hard to adjust its final position.
- Finish and stuff the entire hedgehog first, then pin the bow in a few spots to find the most flattering placement before stitching it down permanently.


Intermediate
Progress Tracker
0 of 0 rounds
Tap a round to tick it off — your place is saved on this device.
Materials
- Plush yarn (120 m / 100 g)
- Fancy fur yarn (60 m / 100 g)
- 6 mm half-bead eyes
- 7 × 8 mm nose
- Bow (optional)
- Stuffing (polyfill)
Bow (optional)
Stuffing (polyfill)
Abbreviations ch – Chain sl st – Slip Stitch sc – Single Crochet hdc – Half Double Crochet inc – Increase dec – Decrease
Puff Stitch – 2 hdc worked together with a common top and one base stitch.
Pattern
- Round 1Chain 5. Starting in the 2nd chain from the hook: inc, 2 sc, In the next stitch work: 2 sc, puff stitch, 2 sc
Along the opposite side
2 sc, In the last stitch work: inc, ch 2, sl st in the 2nd chain from hook, 2 sc Total: 15 stitches
- Round 2sc, ch 2, sl st in 2nd chain from hook, sl st into base stitch, 2 sc, ch 2, sl st in 2nd chain from hook, sl st into base stitch, 3 sc, inc, 4 sc, ch 2, sl st in 2nd chain from hook, sl st into base stitch, 2 sc.Change to fur yarn and crochet: 2 sc Total: 16 stitches
- Round 3-416 sc for 2 rounds. Stuff Fill the hedgehog firmly with stuffing.
- Round 5dec × 10 (finish with 6 stitches remaining) Fasten off and cut the yarn. Hide the yarn ends inside the toy.Attach the eyes, nose, and optional bow.
Finishing
Brush the fur yarn to fluff up the hedgehog. The designer recommends using a regular fine-tooth comb.
🦔 Your tiny hedgehog is finished!
Assembly
- Step 1Brush the fur yarn to fluff up the hedgehog. The designer recommends using a regular fine-tooth comb.
- Step 2Attach the eyes, nose, and optional bow.
- Step 3🦔 Your tiny hedgehog is finished!
Important notes
💡 Use a hook one size smaller than you normally would for amigurumi to keep your stitches tight enough that stuffing doesn't peek through the plush yarn body.
💡 When working with the fancy fur yarn, keep a small pair of scissors nearby to trim stray fibers that get caught in your hook so your stitches stay clean.
💡 Place a stitch marker at the start of every round, especially during the opposite side section, since fur yarn makes it hard to spot your starting point by eye.
💡 Stuff firmly but in small increments as you go rather than all at once at the end, especially in the nose and head area, for a rounder, sturdier shape.
💡 Test the placement of the 6mm half-bead eyes and 7x8mm nose with pins before sewing them on permanently, since even a few millimeters can change the hedgehog's expression.
💡 If your fancy fur yarn sheds while you work, brush the finished piece gently with a soft-bristle brush at the end to fluff up the quills and reveal the full texture.
Original pattern: https://onrecip.com/tiny-hedgehog-free-crochet-pattern/
FAQ
What's the difference between plush yarn and fancy fur yarn in this pattern?
Plush yarn is smooth and soft, used for the hedgehog's rounded body and face, while fancy fur yarn has long fuzzy fibers that create the textured, spiky quill effect on the back. Working with both in one project is what gives this hedgehog its realistic look.
Can I skip the fancy fur yarn and use only plush yarn?
You can, but you'll lose the signature spiky quill texture that makes this pattern look like a real hedgehog. If you don't have fur yarn on hand, a fuzzy eyelash yarn is a decent substitute for a similar effect.
How much yarn do I actually need to finish one hedgehog?
You'll need about 120 meters of plush yarn and roughly 60 meters of fancy fur yarn, both based on 100 gram skeins, which is generally more than enough with a little leftover for future projects.
Is the bow necessary, or can I leave it off?
The bow is completely optional and only takes one extra round to add, so it's a lovely finishing touch if you want extra personality but can easily be skipped for a more natural, unadorned hedgehog.
What size eyes and nose should I use for this hedgehog?
This pattern calls for 6mm half-bead eyes and a 7x8mm nose, which are perfectly proportioned for the tiny scale of this design. Using much larger pieces can throw off the hedgehog's cute, compact look.