
Free Pattern
Step-by-Step
Crochet
GarmentsTop-Down Crochet Raglan Top for Beginners
A top-down crochet raglan top with double crochet yoke and a lace-inspired hem.
- Level
- Intermediate
- Time
- 4-6 hours
- Hook
- 4.0 mm
- Yarn
- DK
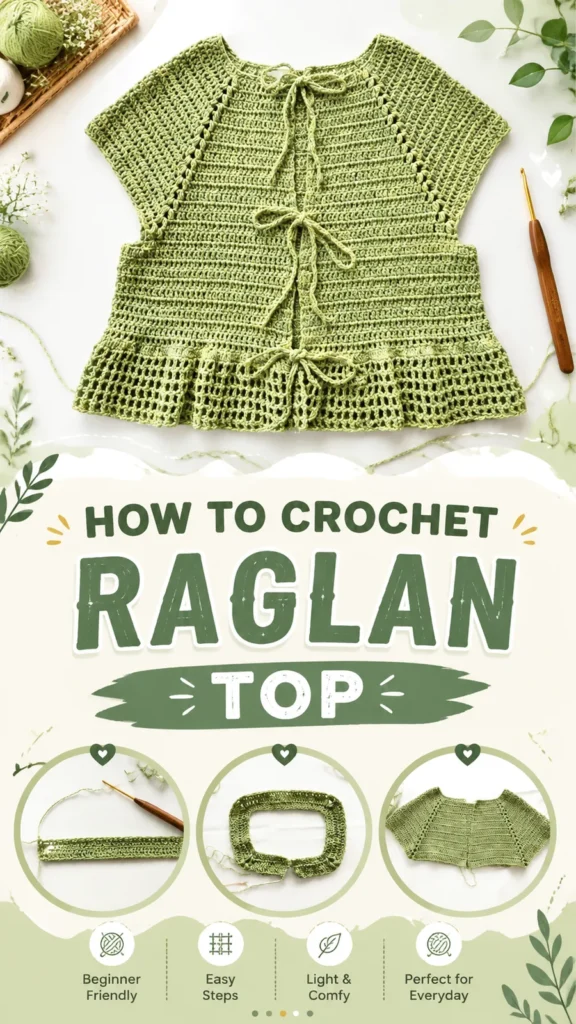
Pattern highlights
- Start with a joined chain at the neckline and work double crochet rounds outward from there.
- Place stitch markers at four raglan points to define the front, back, and two sleeves.
- Increase at each marker every round so the yoke widens evenly in all four directions.
- Separate the sleeves from the body, chaining underarm stitches to bridge the gap.
- Continue plain double crochet rounds on the body until it reaches the desired length.
- Finish the lower edge with a decorative mesh hem for movement and a handmade look.
About This Pattern
I keep a shelf for garments that behave, and this one earns its spot. No panels to sew, no shoulder seams to fudge. It goes here next to the other top-down pieces I trust when I want a project that grows in front of me instead of waiting to be assembled at the end.
The technique is the whole appeal: a neckline chain joined into a round, four raglan points marked and increased, and the yoke spreading outward on its own logic. Double crochet does the quiet work of building fabric while the raglan increases shape it into sleeves and body without a single seam.
What comes off the hook is a relaxed, short-sleeve top with a gathered lower edge and a decorative mesh hem. It reads as lightweight and a little airy, the kind of piece that looks more complicated than the construction actually was.
Worth knowing
There's a particular satisfaction in watching a flat chain become a garment shape without cutting or sewing anything. The raglan increases do their job round after round, and the four marked points turn into visible diagonal lines by the time the sleeves separate. I like that the decorative mesh hem shows up only at the end, a small reward after rounds of steady double crochet. It's a project that rewards patience with markers more than fancy stitchwork, which makes it a good one for building confidence in garment shaping. The moment the body splits from the sleeves feels like the whole thing clicking into place.
Common mistakes
- Losing track of the four markers Move each marker up into the new stitch every round so the raglan points stay lined up. Check all four before starting the next round.
- Twisting the starting chain Double-check the neckline chain lies flat before joining it into a round. A twist here carries through the entire yoke.
- Miscounting the raglan increases Confirm the stitch count after each increase round before moving on. Eight extra stitches per round is easy to lose track of without checking.
- Skipping the underarm chain length Chain the full underarm gap when separating sleeves from body, not a guessed shorter length. This chain is what gives the arm room to move.
- Rushing the mesh hem Work the decorative hem rounds at an even tension so the openwork lies flat. A tight hem pulls the lower edge in and fights the gathered shape.
- Incorrect gauge If your fabric is too loose, use a smaller hook. If it is too tight, move up a hook size. Gauge changes can affect the final fit significantly.
- Not checking yoke width Measure the yoke width before separating the sleeves. This is the best time to adjust the fit without needing to unravel the finished body.


Intermediate
Progress Tracker
0 of 0 rounds
Tap a round to tick it off — your place is saved on this device.
The kit
- DK weight cotton or cotton blend yarn in approximately 900 yards (823 meters)
- 4.0 mm (US G/6) crochet hook
- Stitch markers
- Yarn needle
- Scissors
- Measuring tape
Main Pattern
The turning chain does not count as a stitch, and the whole top is worked in joined rounds — join each round with a slip stitch to the first double crochet, and place stitch markers at the four raglan points, moving them upward as the yoke grows.
Round 1Ch 88. Join with sl st to first ch, making sure the chain is not twisted. Ch 2, dc in each ch around. Join. (88 dc)
Round 2Place markers after stitches 22, 44, 66, and 88. Ch 2, dc to first marker, work raglan increase, dc to next marker, work raglan increase, repeat around. Join. (96 dc)
Round 3Ch 2, dc in each stitch until reaching a marker. Work raglan increase in each marked stitch. Continue around. Join. (104 dc)
Rounds 4–12Repeat the raglan increase round. Each round increases by 8 stitches. After Round 12, you will have 176 dc.
Separating Sleeves and Body
Round 13Ch 2, dc across front section to first sleeve marker. Skip sleeve stitches and chain 8 underarm. Continue across back section. Skip second sleeve and chain 8 underarm. Join. (Approx. 120 dc)
Main Pattern
Rounds 14–30Ch 2, dc in each stitch around. Join after each round. Repeat until the body measures approximately 20 inches (51 cm) from neckline.
Decorative Hem
Round 31Ch 1, sc in each stitch around. Join.
Round 32Ch 3, sk 1 stitch, sc in next stitch around. Join. This creates small open spaces.
Round 33Ch 1, sc in each stitch and chain space around. Join. Fasten off.
Special Stitch
Raglan Increase: Work (dc, ch 1, dc) into the marked raglan stitch. This creates a small increase point while maintaining the four shaping lines.
Sleeve Edging
Attach yarn at the underarm opening. Work one round of sc evenly around each sleeve opening. Add one additional round of the same lace border used at the hem if desired. Fasten off and weave in ends.
Assembly
Step 1Blocking helps relax crochet stitches and improves the shape of handmade garments. Use gentle moisture and reshape the top carefully, especially around the neckline and sleeves.
Step 2For long-lasting wear, wash the crochet raglan top according to the yarn fiber recommendations. Cotton blends usually benefit from gentle washing and air drying to maintain shape.
Finishing
- Weave in the tail from the neckline chain and any joins along the raglan lines.
- Weave in ends left at the underarm chains where the sleeves were separated from the body.
- Block the finished top with gentle moisture, easing the neckline and sleeve edges into shape.
Why it works
The four raglan increase points sit at markers placed after specific stitch counts, so each increase round adds stitches in exactly four spots rather than scattering them.
The underarm sections use a short chain instead of stitches, which is what lets the sleeves separate cleanly from the body at that round.
Every round joins with a slip stitch to the first double crochet, which keeps the raglan lines aligned instead of spiraling as the yoke grows.
This top is worked to a gauge of 16 dc x 8 rows = 4 x 4 inches (10 x 10 cm), giving a finished size of approximately 36 inches (91 cm) bust and 22 inches (56 cm) length. Always check your gauge before starting the full garment so the neckline, sleeves, and body proportions fit correctly.
What it becomes
- A warm-weather top layered over a simple tank or worn on its own with high-waisted bottoms.
- A lightweight throw-on piece for studio days, paired with jeans and simple sandals.
- A handmade addition to a summer capsule, worn alongside woven skirts or straight-leg pants.
Original pattern: https://duniarecipe.com/easy-crochet-raglan-top-pattern-for-beginners-step-by-step-tutorial/
FAQ
Can I adjust the length of the body?
Yes, the body rounds are repeated until the piece measures about 20 inches from the neckline. Stop earlier or later depending on the fit you want.
Why does the pattern use stitch markers instead of counting?
The four raglan points need to stay in the same spot every round as the yoke expands. Markers make that far easier to track than counting stitches each time.
What happens at the underarms?
The sleeve stitches are skipped and a short chain bridges the gap, separating the sleeve from the body in one round. That chain becomes the underarm.
Is the mesh hem worked differently from the rest of the top?
Yes, the decorative hem is a separate section worked after the plain double crochet body. It adds the openwork texture and movement at the lower edge only.