
Free Pattern
Step-by-Step
Crochet
GarmentsHow to crochet a treble stitch jacket with panels
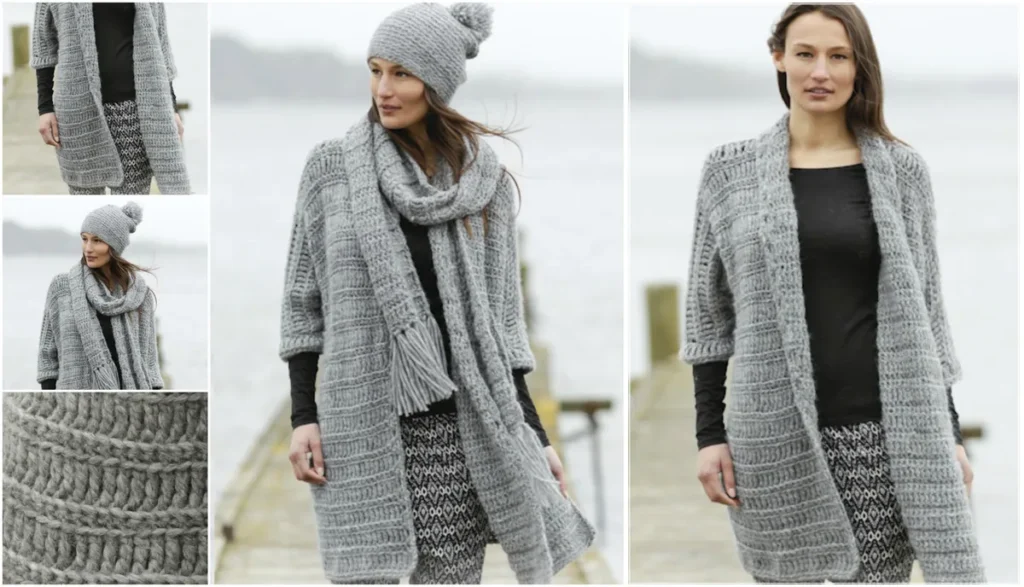
A treble stitch jacket built from two front panels, a back panel, and sleeves worked in the round.
- Level
- Intermediate
- Time
- 8-12 hours
- Yarn
- Worsted
Pattern highlights
- Chain and work the back panel in treble stitches until it reaches your intended body width.
- Chain a shorter foundation and work a front panel to half the back panel's width.
- Repeat the same front panel instructions a second time for the opposite side.
- Add a few extra stitches to each front panel so they overlap for a closure.
- Chain a sleeve foundation, join it into a round, and work continuous treble rounds.
- Increase every few rounds on the sleeve to follow the natural taper of an arm.
- Join yarn around the jacket opening and work two rows of single or half-double crochet as a border.
About This Pattern
This one belongs in the section of my notebook marked garments I actually finish. Most of my treble work has gone into shawls and blanket squares, so a full jacket felt like a step up. It's the kind of project that asks for patience across panels rather than any single tricky stitch.
What comes off the hook is a three-panel jacket body with set-in sleeves and a simple border. It's an open, airy piece thanks to the tall treble stitches, better suited to a light layer than a heavy winter coat.
Worth knowing
There's something satisfying about a garment that reveals its logic as you build it. The back panel sets the scale, then each front panel is worked to exactly half that width — no guessing, just division. I like that the pattern hands you a rule instead of a fixed number, so the jacket actually fits the body it's made for. The sleeves are the fun part: joined into a round and increased gradually, they grow their own shape without a single seam. And the treble stitch itself does real work here, not just decoration — its height and openness are what make the fabric feel like a jacket and not a slab. Finishing with a two-row border is a small step that makes the whole thing look deliberate.
Common mistakes
- Uneven treble height across rows Keep your chain-4 turning chain consistent every row so the row heights match. A stray taller or shorter row will show in a garment this open.
- Front panels not matching in width Check the front panel width against half the back panel measurement before starting the second one. Working from the same chain count keeps both sides symmetric.
- Skipping the closure allowance Forgetting the extra stitches for overlap means the front won't close over buttons or a zipper. Add them before you finish the panel, not after.
- Sleeve increases bunched together Spacing increases evenly across the sleeve rounds keeps the taper smooth. Clustering them in one round creates a visible flare instead of a gradual shape.
- Border rows worked too tightly Single crochet and half-double crochet borders can pull in an open treble fabric if worked too snugly. Keep tension relaxed so the edge lies flat against the panel.


Intermediate
Progress Tracker
0 of 0 rounds
Tap a round to tick it off — your place is saved on this device.
The kit
- Worsted weight yarn
- Crochet hook (size to suit your yarn)
- Tapestry needle (for sewing the panels and sleeves together)
Main Pattern
1. Start with the Back Panel
The back panel serves as the foundation of your jacket.
Step by step: Foundation Chain – begin with a foundation chain that matches the desired width of the back panel, making sure your chain count is a multiple of 4 for symmetry.
Row 1Start the first row by working 1 treble crochet (tr) in the 5th chain from the hook, then work trebles across the row.
Row 2Chain 4, turn, and continue working treble stitches across.Step by step: Back Panel Tip – measure as you go to ensure the panel matches your body width, and adjust chain length as needed.
2. Create the Front Panels
The front panels should be half the width of the back panel to accommodate a comfortable fit and front closure.
Step by step: Foundation Chain – chain a length that is half of the back panel width. Treble Rows – work in treble stitches, repeating rows until the panel reaches the same length as the back panel. Repeat for the Other Panel – create a second front panel using the same pattern and length as the first. Custom Fit Tip – add extra stitches to the front panels for an overlapping front closure, perfect for adding buttons or a zipper.
3. Shape the Sleeves
Creating sleeves in treble stitch is straightforward and adds an airy texture that pairs well with the jacket.
Step by step: Foundation Chain – chain a length that matches your desired sleeve circumference. Work in the Round – join the foundation chain and work in continuous rounds, using treble stitches. Increase as Needed – increase every few rounds to accommodate the natural shape of the arm. Finish Length – continue rounds until the sleeve reaches your desired length.
Border & Customization Ideas
5. Add a Finishing Border
A border adds polish to your jacket and can enhance the structure of the treble stitches.
Row 1Join yarn at the bottom edge of the jacket and work a row of single crochet evenly around the entire opening.
Row 2Add a second row of single or half-double crochet for a slightly thicker border.Customization Ideas for a Treble Stitch JacketExplore these ideas to personalize your treble stitch jacket:
1. Add Pockets
Crochet pockets separately and sew them onto the jacket for both style and functionality.
Step by step: Simple Rectangle – work up two small rectangles in treble stitches and attach them at hip level. Contrasting Color – choose a different color for the pockets for a fun, trendy look. Pocket Tip – sew pockets securely to prevent sagging, especially with open treble stitches.
2. Experiment with Color Blocking
Using different colors for each section of the jacket adds a unique, modern twist.
Step by step: Front Panels – try using one color for the back panel and different colors for each front panel. Sleeves – use a contrasting shade for the sleeves to create an eye-catching effect.
3. Add Buttons or a Zipper
Enhance your jacket's functionality by adding closures.
Step by step: Buttons – sew large buttons along the front and add button loops with chain stitches. Zipper – attach a zipper for a polished, fitted finish, especially helpful for cooler weather. Closure Tip – choose metallic buttons or a bold zipper color to make them stand out against the jacket's yarn.
4. Create a Shawl Collar
A shawl collar provides extra warmth and style.
Step by step: Collar Foundation – work a row of treble stitches along the neckline. Build Up the Collar – add rows, gradually increasing by 1 stitch on each end to create a gentle curve. Finishing Touches – add a few rows of single crochet to give the collar structure. Collar Idea – use a heavier yarn for the collar to give it more stability and visual contrast.
Styling Ideas for a Crochet Jacket with Treble Stitches
This crochet jacket can be styled in a variety of ways, making it perfect for multiple occasions. Here are some creative styling ideas:
1. Casual Weekend Look
Pair your crochet jacket with jeans and a basic T-shirt for a cozy, laid-back outfit.
Step by step: Layering Piece – the open texture of treble stitches makes it ideal for layering over lightweight tops. Add a Scarf – pair with a chunky scarf for added warmth and style.
2. Office Chic
Wear your crochet jacket over a blouse or dress for a stylish yet professional look.
Step by step: Neutral Colors – choose neutral yarns like cream, navy, or grey to keep it versatile and office-friendly. Minimalist Jewelry – opt for subtle accessories to keep the focus on the jacket's texture.
3. Evening Out
Dress up your jacket with a sleek outfit for a night out.
Step by step: Over a Dress – wear the jacket over a fitted dress for contrast. Add Statement Jewelry – accessorize with bold earrings or a necklace to elevate the outfit. Styling Tip – dark colors and metallic details make this jacket perfect for evening wear, bringing out its elegance.
4. Layered with Winter Wear
The breathable nature of treble stitches makes this jacket perfect for layering over sweaters in the winter.
Step by step: Under a Coat – wear your crochet jacket under a winter coat for extra insulation. Add Gloves and a Beanie – complete the look with coordinating crochet accessories.
Assembly
Step 1Once all the panels are complete, it's time to assemble the jacket.
Step 2Join Shoulder Seams: Use a tapestry needle to sew the top of the front panels to the top of the back panel.
Step 3Attach Sleeves: Sew each sleeve to the armholes, ensuring the fabric lays flat and there is enough room for easy movement.
Step 4Side Seams: Sew the sides of the jacket, leaving the armholes open.
Finishing
- Weave in all loose ends from the panels and sleeve rounds before seaming.
- Sew the front panels to the back panel, then set in the sleeves at the shoulder openings.
- Join yarn at the bottom edge and work the two-row border around the entire opening to finish.
Why it works
The two front panels are each worked to half the back panel's width, so the whole body is built from one governing measurement.
Panels are worked flat in turned rows, while sleeves are joined into a round — flat pieces need a straight seam, round pieces don't.
Sleeve increases are spaced every few rounds rather than all at once, letting the tube widen gradually instead of stepping outward.
What it becomes
- A light layering jacket for cool evenings, worn open over a plain top.
- A transitional piece for indoor wear in air-conditioned spaces where a full coat is too much.
- A statement layer over a simple dress, letting the treble texture do the visual work.
Original pattern: https://crochetblog.net/crochet-jacket-trebles-2/
FAQ
Do I need to block the panels before seaming?
The pattern doesn't specify blocking, so I'd treat it as optional. If your treble stitches look uneven, a light steam block on the panels before sewing can even things out.
Can I make the sleeves longer than a standard length?
Yes — the pattern has you continue rounds until the sleeve reaches your own desired length. Just keep the increase spacing consistent as you add rounds.
Why are the front panels only half the back panel's width?
Two half-width panels plus the closure overlap add up to roughly the same coverage as the back. It's what lets the jacket open down the center front.
What kind of closure works with the added front stitches?
The pattern mentions buttons or a zipper as options for the overlap. Either works since the extra stitches simply give you fabric to attach to.