
Free Pattern
Step-by-Step
Crochet
AmigurumiTriceratops crochet snuggler: a horned amigurumi pattern
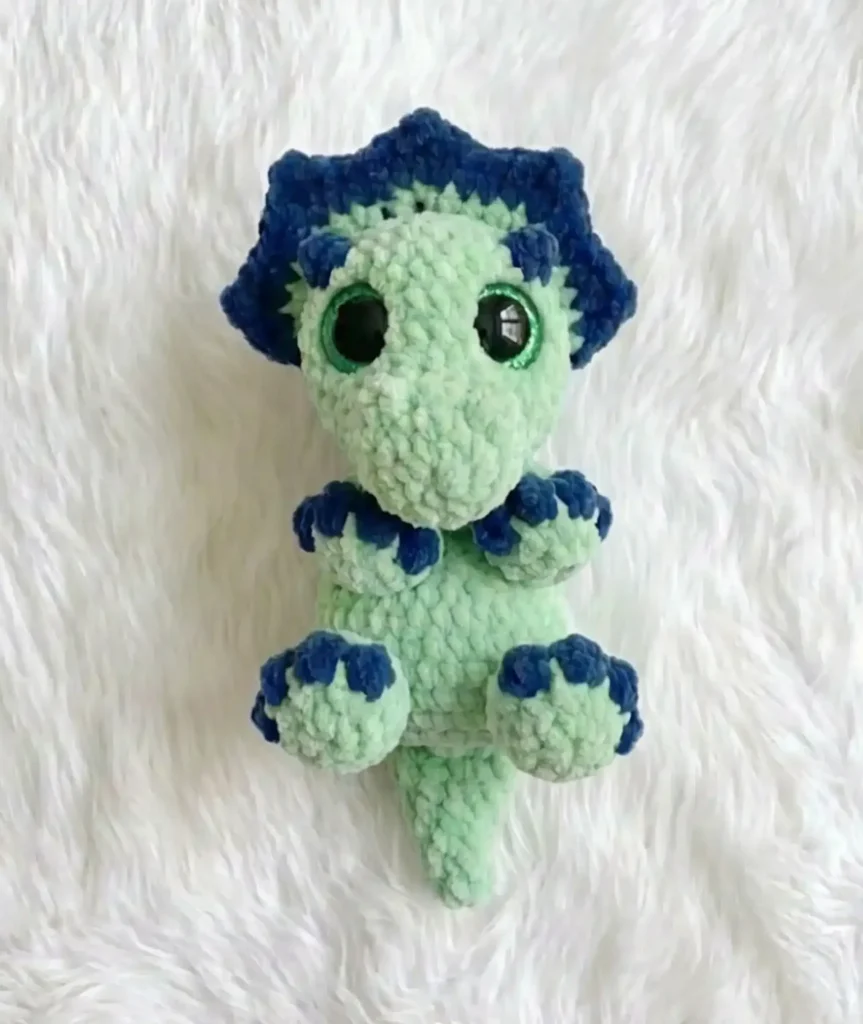
A crocheted triceratops snuggler with bobbled feet, a frilled head, and three horns.
- Level
- Intermediate
- Time
- 4-6 hours
- Hook
- 4.5 mm
- Yarn
- Worsted
Pattern highlights
- Start with the four legs, working each from the toe up with a bobbled color-change round for texture.
- Crochet the tail from a small starting ring, increasing gradually as the rounds build outward.
- Work the head in the main color, shaping the snout and building up toward the eye placement rounds.
- Crochet the body separately, leaving it ready to receive the legs and head once stuffed.
- Make the frill as its own flat piece using treble crochet and a picot edge, then set it aside.
- Crochet the horns, then hold off attaching anything until all the pieces are finished.
- Assemble by sewing the frill to the head first, then placing the horns, then joining legs to body.
About This Pattern
Every collection needs a dinosaur eventually. Mine had a gap where the horned ones should be, and Tuddles fills it neatly. This isn't a plain rounded amigurumi — it carries texture and structure most snugglers skip. It sits somewhere between a nursery toy and a study piece, which is exactly the kind of pattern I keep coming back to.
The techniques do the talking here. Bobble stitches show up on the feet, back-loop-only rounds carve toe lines into the legs, and the frill leans on treble crochet with picot edging for its scalloped rim. That's three distinct skills in one pattern, which keeps a familiar amigurumi shape from feeling routine.
Finished, Tuddles reads as soft but specific — a triceratops silhouette, not a generic dino blob. The frill and three horns do the identifying work. Stuffed and seated, it has enough weight in the body to sit upright, and enough give in the legs to be dragged around by a small child.
Worth knowing
The bobbles are the draw for me. Working them into the feet with a color change means each foot has a little jolt of contrast, and getting the tension even across a bobble round is a small satisfying puzzle. The frill is the other reward — treble crochet built up and finished with picot edging, so it actually looks carved rather than just crocheted flat. Three horns to make separately, then position by eye above the face, forces you to slow down and look at the head before committing. None of it is difficult exactly. It's textured, deliberate work, the kind where each round asks something slightly different of you instead of repeating the last one.
Common mistakes
- Uneven bobble tension on the feet Pull the working yarn snug after each bobble loop closes. Loose bobbles flatten out once stuffed and lose their definition.
- Frill sewn on before horns Attach the frill first, then place the horns — doing it in reverse makes it hard to judge spacing. The horns need the frill in place as a reference point.
- Horns placed too close together Space the horns evenly above the eyes rather than clustering them centrally. Step back and check symmetry before sewing them down permanently.
- Losing the back-loop-only row Watch for the BLO instruction on the leg round — working into both loops there erases the foot ridge. That ridge is what separates the foot visually from the leg.


Intermediate
Progress Tracker
0 of 0 rounds
Tap a round to tick it off — your place is saved on this device.
The kit
- Yarn of choice in medium weight (the designer used Yarnsmiths brand) — approximately 100-150g in your main color and 50g in a contrasting accent color
- Crochet hook (4.5mm recommended)
- Stitch markers
- Sewing needle
- Scissors
- 25mm safety eyes
- Polyester stuffing
- Pins (optional, but helpful for assembly)
Legs (Make 4)
Using Main Colour – Remember to CC to accent colour for the bobbles!
Round 18 Sc in Mr (8)
Round 2Inc x 8 (16)
Round 3BLO Sc 4, (BO, Sc) x 4, Sc 4 (16)
Round 4Sc 2, Dec x 6, Sc 2 (10)
Round 5Sc 2, Dec x 3, Sc 2 (7)
Round 6Sc 7 (7)
Lightly stuff, FO leaving a long tail for sewing.
Attach the top feet between rounds 13–15 with 3 visible stitches between them. Attach the bottom feet between rounds 3–5 with 5 visible stitches between them.
Tail
Round 14 Sc in Mr (4)
Round 2Sc 4 (4)
Round 3(Sc, Inc) x 2 (6)
Round 4Sc 6 (6)
Round 5(2 Sc, Inc) x 2 (8)
Round 6Sc 8 (8)
Round 7(3 Sc, Inc) x 2 (10)
Round 8(4 Sc, Inc) x 2 (12)
Round 9(5 Sc, Inc) x 2 (14)
Round 10(6 Sc, Inc) x 2 (16)Lightly Stuff. FO leaving a tail to sew to the base of the body. When attaching make sure the tail is in the center between the legs at the bottom of the body between rounds 1–3.
Head
Using Main Colour:
Round 18 Sc in Mr (8)
Round 2Inc x 8 (16)
Round 3Sc 3, Bo, 3 Sc, Bo, Sc 8 (16)
Round 4Sc 16 (16)
Round 5Sc 3, Inc 6, 7 Sc (22)
Round 6Sc 3, (Sc, Inc) x 6, 7 Sc (28)
Round 7Sc 3, (2 Sc, Inc) x 6, 7 Sc (34)
Rounds 8–12Sc 34 (34) (5 Rounds)(34)
Round 13(6 Sc, Dec) x 4, Sc 2 (30)
Round 14(3 Sc, Dec) x 6 (24)Place eyes between rounds 6–7. 3 Visible stitches apart either side of the nostrils. Stuff and continue to stuff as you go.
Round 15(2 Sc, Dec) x 6 (18)
Round 16(Sc, Dec) x 6 (12)
Round 17Dec x 6 (6)
FO leaving a tail to sew the hole closed.
Body
Using main colour:
Round 18 Sc in Mr (8)
Round 2Inc x 8 (16)
Round 3(Sc, Inc) x 8 (24)
Round 4(3 Sc, Inc) x 6 (30)
Round 5(4 Sc, Inc) x 6 (36)
Rounds 6–8Sc 36 (36) (3 Rounds)(36)
Round 9(4 Sc, Dec) x 6 (30)
Round 10Sc 30 (30)
Round 11(3 Sc, Dec) x 6 (24)
Rounds 12–13Sc 24 (24) (2 Rounds)(24)
Round 14(2 Sc, Dec) x 6 (18)
Rounds 15–16Sc 18 (18) (2 Rounds)Do not stuff. Fold flat and Sc 9 across to close. FO leaving a long tail. Sew to round 10 of the head.(18)
Frill
Using main colour: Leave a long tail when starting R1, we will use this to sew the frill to the head.
Round 1Ch 17, Turn, working in the 2nd loop from the hook, (3 Sc, Inc) x 4 (20)
CC to accent colour.
Round 2Ch 1, Turn. (Hdc, {Dc, Tr, Picot, {Tr, Dc}, Hdc) x 5 (30)FO and leave a tail for sewing. Sew to the head on round 10. The ends of the Frill should sit parallel to the eyes.
Horns
Using accent colour:
Insert your hook 1 round above the eye and attach your yarn, create a bobble stitch and Slst into the same stitch. Ch 1 and FO. When weaving in your ends make sure to thread down next to the bobble first to fix it into the correct placement. Horns are 5–6 visible stitches apart.
Assembly
Step 1Proper assembly is key to bringing Tuddles to life. The designer recommends sewing the frill onto the head before attaching the horns, as this helps with accurate placement. When positioning the horns, make sure they're evenly spaced above the eyes, approximately 5-6 visible stitches apart.
Step 2For the legs, pay careful attention to the attachment instructions. The top feet should be sewn between rounds 13-15 of the body with 3 visible stitches between them, while the bottom feet attach between rounds 3-5 with 5 visible stitches between them. This creates the proper snuggler posture.
Step 3The tail should be centered between the legs at the base of the body, attached between rounds 1-3. Make sure it's properly aligned before securing it permanently.
Finishing
- Weave in every color-change end from the bobble rounds before stuffing, since they're harder to reach once the piece is firm.
- Stuff the head, body, tail, and legs firmly enough to hold shape, keeping the frill unstuffed so it stays flat.
- Sew the frill to the head first, position and attach the horns above the eyes, then join the legs and tail to the body.
Why it works
The legs and head both start with 8 single crochet into a magic ring, then double on round two — a standard amigurumi base before any shaping begins.
The frill is worked flat over two rounds rather than in the round, which suits its scalloped, non-tubular shape.
Bobbles land on round three of the legs and head, placed just after the initial increase round, so they sit on the widest part of each piece before the next decrease or shaping starts.
In the leg pattern, round 3 starts with back-loop-only stitches worked before the bobbles in that same round, leaving a visible ridge that separates the foot from the leg above it.
Choose a main color for the body and a contrasting accent color for the bobbles, frill accents, and decorative details. Orange and white create a striking combination, but feel free to customize with your favorite color scheme.
What it becomes
- A bedside snuggler for a child who likes dinosaurs, sized to sit alongside other stuffed toys.
- A shelf piece in a handmade amigurumi collection, next to other textured or bobbled makes.
- A handmade gift for a dinosaur enthusiast, paired with a simple fabric gift bag rather than wrapping paper.
Original pattern: https://amigurumicorner.com/triceratops-crochet-pattern-free-tuddles-amigurumi-snuggler/
FAQ
What skill level is required for this triceratops pattern?
This pattern is best suited for intermediate crocheters who are comfortable with bobble stitches, picot edging, and amigurumi assembly techniques. Beginners with basic amigurumi experience can also tackle this project with patience.
How much yarn do I need to make Tuddles the Triceratops?
You'll need approximately 100-150 grams of your main color and 50 grams of accent color, depending on your yarn weight and tension. The pattern uses a 4.5mm hook with medium weight yarn.
Can I use different yarn weights for this pattern?
Yes, you can adapt this pattern to different yarn weights by adjusting your hook size accordingly. Keep in mind that using thinner or thicker yarn will change the final size of your triceratops snuggler.
Is this snuggler safe for young children?
If making this for young children under 3 years old, consider embroidering the eyes instead of using safety eyes, and ensure all parts are securely attached. Always supervise young children with handmade toys.